background image

Presione el botón de retorno / encendido       para salir de la interfaz de 
configuración del interruptor G-SENSOR, el interruptor G-SENSOR no 
se cambiará. 
 

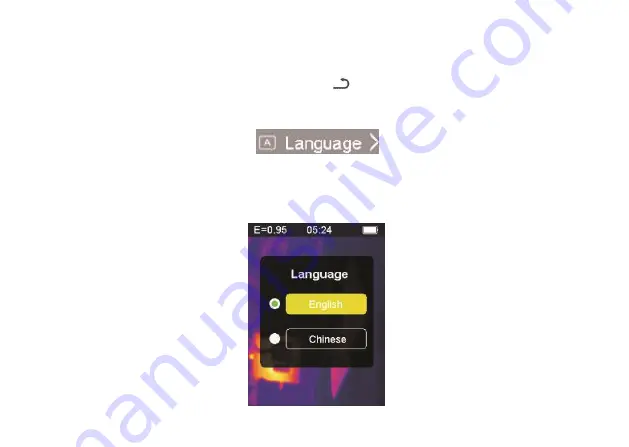
8-11. Selección de idioma 

 
Esta configuración puede configurar el instrumento para que se muestre 
en diferentes idiomas nacionales, ingrese la opción de selección de 
idioma y la interfaz es como se muestra en la siguiente figura: 


206

Summary of Contents for 017600710

Page 1: ...1760TMC 600 1...

Page 2: ...isplay di immagine termica a infrarossi 2 Estratto 3 Caratteristiche 4 Descrizione dello strumento 5 Specifiche tecniche 6 Alimentazione 7 Funzionamento dei pulsanti 7 1 Pulsante indietro accensione 7...

Page 3: ...t 8 3 Impostazioni estreme 8 4 Opzioni tabella colori 8 5 Data e ora 8 6 Memoria 8 7 Allarme 8 8 Regolazione retroilluminazione 8 9 Distanza di fusione 8 10 G SENSOR 8 11 Selezione lingua 8 12 Informa...

Page 4: ...erso il bersaglio l area o l oggetto da controllare La temperatura relativa viene visualizzata da calda a fredda attraverso la tabella dei colori corrispondente dalla luce al buio La lettura della tem...

Page 5: ...strumento sotto forma di immagine L immagine termica pu essere visualizzata tramite USB Premere il pulsante di ritorno per continuare a eseguire la scansione dell area target o dell oggetto 6 Nel proc...

Page 6: ...dere lo strumento Premere per 3 secondi il pulsante indietro accensione per spegnere lo strumento 1 3 Informazioni sul display di immagine termico a infrarossi 1 Emissivit 2 Ora 3 Capacit della batter...

Page 7: ...ci in grado di fornire un rapido semplice e accurato rilevamento della temperatura superficiale per una comprensione specifica e chiara della temperatura superficiale dell oggetto Allo stesso tempo lo...

Page 8: ...matica di punti caldi freddi 6 Fotocamera visibile e memorizzazione delle immagini BMP 7 La memoria interna memorizza le immagini possibile memorizzarne pi di 100 8 Impostazione data e ora e regolator...

Page 9: ...strumento 1 Schermo LCD 2 Pulsante Su 3 Pulsante conferma menu 4 Pulsante indietro accensione 5 Pulsante gi 6 Coperchio della batteria 7 Luce visibile 8 Sensore a infrarossi 9 Grilletto HOLD 10 Inter...

Page 10: ...mperatura 3 3 C 37 4 F come testato a 25 C 77 F Correzione della velocit di retinatura Si Prestazioni dell immagine Frequenza di acquisizione dell immagine 7Hz Tipo di sensore Sensore con tecnologia n...

Page 11: ...Tavola dei colori Metallo fuso ferro rosso colore rosso scala di grigi calore bianco scala di grigi calore nero Livello e span Automatico Informazioni sulla fusione Distanza di fusione visibile e infr...

Page 12: ...Formato dei documenti BMP Visione della memoria Visualizzare o eliminare le foto memorizzate dal menu Temperatura operativa 0 C a 50 C 32 F a 122 F Temperatura di stoccaggio 20 C a 60 C 4 F a 140 F U...

Page 13: ...o la carica della batteria diminuisce anche la parte bianca dell icona della batteria diminuisce Quando il simbolo della batteria visualizzato in rosso il livello della batteria basso necessario sosti...

Page 14: ...lletto con il dito indice 7 1 Pulsante indietro accensione Pressione prolungata accende o spegne il misuratore Pressione breve per uscire dall opzione del menu o rilasciare le foto di archiviazione 7...

Page 15: ...o il basso con i pulsanti di navigazione per vedere una miscela di immagini termiche visibili e infrarosse in proporzioni diverse Pressione prolungata nell opzione del menu impostazioni premere a lung...

Page 16: ...o si ripete 7 5 Scatto foto e salvataggio di immagini Questo strumento pu contenere almeno 100 foto nella memoria interna 1 Lo strumento rivolto all area o all oggetto target da misurare 2 Premere il...

Page 17: ...8 Menu Impostazioni Nella modalit di scansione della misurazione premere il pulsante di conferma menu OK per accedere alla panoramica del menu delle impostazioni come mostrato di seguito 17...

Page 18: ...la barra premere il pulsante conferma menu OK per inserire l opzione desiderata ciascuna opzione descritta in dettaglio come segue 8 1 Regolazione dell emissivit Per la definizione di emissivit fare...

Page 19: ...l emissivit la pressione prolungata diminuir in modo continuo l emissivit Premere il pulsante conferma menu OK per confermare l emissivit corrente e uscire dall interfaccia di regolazione dell emissiv...

Page 20: ...8 2 Impostazioni dell unit Le impostazioni dell unit possono essere impostate su diversi display dell unit Dopo aver inserito le opzioni dell unit l interfaccia come mostrato di seguito 20...

Page 21: ...re il pulsante di conferma menu OK per confermare la modifica dell unit di temperatura corrente e per uscire dall interfaccia di impostazione Premere il pulsante indietro accensione per uscire dall in...

Page 22: ...nu OK per confermare la modifica dell opzione estrema corrente per accendere la luce e uscire dall interfaccia di impostazione estrema Premere il pulsante indietro accensione per uscire dall interfacc...

Page 23: ...iata si sposta verso l alto Premere il pulsante gi la barra gialla evidenziata si sposta verso il basso Premere il pulsante conferma menu OK per confermare il colore corrente e uscire dalla schermata...

Page 24: ...di ritorno accensione per uscire dall interfaccia di impostazione della tabella dei colori il colore non verr modificato 8 5 Data e ora Dopo aver inserito l opzione data e ora l interfaccia come most...

Page 25: ...pulsante gi il numero corrispondente diminuir Premere il pulsante di conferma menu OK la barra gialla evidenziata salter le voci diverse in sequenza Premere il pulsante indietro accensione per uscire...

Page 26: ...alto Premere il pulsante gi la barra blu evidenziata si sposta verso il basso Premere il pulsante indietro accensione per uscire dall interfaccia di archiviazione Premere il pulsante di conferma menu...

Page 27: ...ante gi per visualizzare l immagine successiva Premere il pulsante indietro accensione per tornare all interfaccia di archiviazione Premere il pulsante di conferma menu OK per far apparire la finestra...

Page 28: ...hiusa automaticamente e viene visualizzata la prossima immagine salvata Premere il pulsante indietro accensione e selezionare No per annullare la cancellazione dell immagine Confermare la finestra si...

Page 29: ...Premere il tasto di indietro accensione per uscire dall interfaccia di impostazione dell allarme Premere il pulsante di conferma menu OK per accedere all interfaccia di allarme alto allarme basso cor...

Page 30: ...menu OK per aprire o chiudere il pulsante di avvio aprire questo pulsante per indicare che se l oggetto misurato superiore alla soglia massima di temperatura impostata lo strumento emetter un suono d...

Page 31: ...temperatura premere e tenere premuto per aumentare continuamente Premere il pulsante gi per diminuire la soglia per gli allarmi di bassa temperatura premere e tenere premuto per diminuire continuamen...

Page 32: ...superiore alla soglia minima di temperatura impostata lo strumento emetter un suono di allarme se chiuso non suoner nessun allarme 8 8 Regolazione retroilluminazione Dopo aver inserito l opzione di re...

Page 33: ...nfermare la modifica della luminosit corrente della retroilluminazione e uscire dalla schermata di regolazione della retroilluminazione Premere il pulsante indietro accensione per non modificare la lu...

Page 34: ...rarossi per visualizzare con precisione l area di destinazione e condividerla in modo pi efficace con gli altri Dopo aver inserito l opzione distanza di fusione l interfaccia come mostrato di seguito...

Page 35: ...nte alla barra dei colori corrente e uscire dall interfaccia della distanza di fusione Premere il tasto di ritorno accensione per uscire dall interfaccia di impostazione della distanza di fusione e la...

Page 36: ...Dopo aver inserito l opzione G SENSOR l interfaccia la seguente 36...

Page 37: ...per attivare la luce e uscire dall interfaccia di impostazione G SENSOR Premere il pulsante di ritorno accensione per uscire dall interfaccia di impostazione dell interruttore G SENSOR l interruttore...

Page 38: ...ta su un altra opzione Premere il pulsante gi la barra gialla evidenziata si sposta sull altra opzione Premere il pulsante di conferma menu OK quindi confermare per inserire la lingua evidenziata e pe...

Page 39: ...terfaccia della lingua La selezione della lingua non viene modificata 8 12 Informazioni Questa opzione mostra le informazioni di fabbrica il numero di versione ecc dello strumento Inserisci l opzione...

Page 40: ...Precauzioni 1 Prima di utilizzare questo prodotto assicurarsi che la batteria sia installata e che sia completamente carica 2 Utilizzare il prodotto solo dopo aver verificato che la temperatura idone...

Page 41: ...tenzione alla pulizia della superficie dello strumento Pulire la custodia con un panno umido se necessario Utilizzare un panno per lenti di alta qualit per rimuovere la polvere o le macchie dai crista...

Page 42: ...ettiva dell oggetto e sull emissivit della superficie Il prodotto percepisce l energia a infrarossi sulla superficie dell oggetto e utilizza questi dati per calcolare il valore di temperatura stimato...

Page 43: ...vit bassa sono necessarie correzioni dell emissivit Avvertenza difficile determinare la temperatura effettiva della superficie con un ampiezza inferiore a 0 60 in modo accurato e coerente Anche se l e...

Page 44: ...90 Carbone polvere 0 96 Suolo 0 92 a 0 96 Lacca 0 80 a 0 95 Acqua 0 92 a 0 96 Lacca opaca 0 97 Ghiaccio 0 96 a 0 98 Gomma nera 0 94 Neve 0 83 Plastica 0 85 a 0 95 Vetro 0 90 a 0 95 Legno 0 90 Ceramica...

Page 45: ...ation on the infrared thermal image display 2 Extract 3 Features 4 Description of the instrument 5 Technical specifications 6 Power supply 7 Button operation 7 1 Back ignition button 7 2 Confirm butto...

Page 46: ...ngs 8 3 Extreme settings 8 4 Color table options 8 5 Date and time 8 6 Memory 8 7 Alarm 8 8 Backlight adjustment 8 9 Melting distance 8 10 G SENSOR 8 11 Language selection 8 12 Information 9 Precautio...

Page 47: ...towards the target the area or object to be checked The relative temperature is displayed from hot to cold through the color table corresponding from light to dark The infrared temperature reading sho...

Page 48: ...is stored in the internal memory of the instrument in the form of images The thermal image can be viewed via USB Press the return button to continue scanning the target area or object 6 In the proces...

Page 49: ...to switch on the instrument Press the back on button for 3 seconds to switch off the instrument 1 3 Information on the infrared thermal image display 1 Emissivity 2 Time 3 Battery capacity 4 Central t...

Page 50: ...hy and temperature sensor and images of optical sensors of auxiliaries it is able to provide a rapid simple and accurate detection of surface temperature for a specific and clear understanding of the...

Page 51: ...omatic acquisition of hot cold points 6 Visible camera and image storage BMP 7 The internal memory stores images it is possible to store more than 100 images 8 Set date and time and emissivity regulat...

Page 52: ...ription of the instrument 1 LCD screen 2 Up button 3 Confirmation menu button 4 Back ignition button 5 Down button 6 Battery cover 7 Visible light 8 Infrared sensor 9 Trigger HOLD 10 Micro USB interfa...

Page 53: ...measurement accuracy 3 3 C 37 4 F as tested at 25 C 77 F Screen shot rate correction Yes Image performance Image capture frequency 7Hz Sensor type Sensor with n poly p poly Si technology Thermal sensi...

Page 54: ...cale white heat grayscale black heat Level and span Automatic Fusion information Visible and infrared fusion distance 0 5mt 1 0mt 2 0mt View options 50 step Hot spot and cold spot tracking Yes Image c...

Page 55: ...ored photos from the menu Operating temperature 0 C to 50 C 32 F to 122 F Storage temperature 20 C to 60 C 4 F to 140 F Relative umidity 10 to 90 non dewfall Display screen 2 0 240 x 320 TFT LCD Water...

Page 56: ...the symbol When the battery charge decreases the white part of the battery icon also decreases When the battery symbol is displayed in red the battery level is low the battery must be replaced immedia...

Page 57: ...tool to check the trigger with your index finger 7 1 Back ignition button Long press turns the meter on or off Short press to exit the menu option or release the archive photos 7 2 Confirm button OK m...

Page 58: ...oll up and down with the navigation buttons to see a mixture of visible and infrared thermal images in different proportions Long press in the settings menu option long press the up and down navigatio...

Page 59: ...scanning This cycle repeats itself 7 5 Taking pictures and saving images This tool can contain at least 100 photos in internal memory 1 The instrument is aimed at the target area or object to be measu...

Page 60: ...8 Settings Menu In the measurement scan mode press the OK button confirmation menu to access the settings menu overview as shown below 60...

Page 61: ...p and press down to scroll the bar press the OK button to enter the desired option each option is described in detail as follows 8 1 Emissivity adjustment For the definition of emissivity refer to App...

Page 62: ...the down button to decrease the emissivity the prolonged pressure will continuously decrease the emissivity Press the OK button to confirm the current emissivity and exit the emissivity adjustment in...

Page 63: ...8 2 Unit settings The unit settings can be set on different displays of the unit After entering the drive options the interface is as shown below 63...

Page 64: ...another option Press the OK confirmation menu button to confirm the modification of the current temperature unit and to exit the setting interface Press the back start button to exit the setting inter...

Page 65: ...ption Press the OK button to confirm the modification of the extreme current option to switch on the light and exit the extreme setting interface Press the back on button to exit the extreme settings...

Page 66: ...he up button the highlighted yellow bar moves upwards Press the down button the highlighted yellow bar moves down Press the OK button to confirm the current color and exit the color table settings scr...

Page 67: ...Press the return ignition button to exit the color table setting interface the color will not be changed 8 5 Date and time After entering the date and time option the interface is as shown below 67...

Page 68: ...ease Press the down button the corresponding number will decrease Press the OK confirmation menu button the highlighted yellow bar will jump to the different items in sequence Press the back on button...

Page 69: ...ghlighted blue bar will move upwards Press the down button the blue highlighted bar moves down Press the back power button to exit the storage interface Press the OK confirmation menu button to access...

Page 70: ...image press the down button to view the next image Press the back on button to return to the storage interface Press the OK confirmation menu button to display the confirmation window to delete the i...

Page 71: ...of the image the window is automatically closed and the next saved image is displayed Press the back on button and select No to cancel the image deletion Confirm the window closes automatically 8 7 A...

Page 72: ...low bar moves to another option Press the back on button to exit the alarm setting interface Press the OK confirmation menu button to access the corresponding high alarm low alarm interface according...

Page 73: ...the OK confirmation menu button to open or close the start button open this button to indicate that if the measured object is above the set maximum temperature threshold the instrument will sound an...

Page 74: ...for low temperature alarms press and hold to increase continuously Press the down button to decrease the threshold for low temperature alarms press and hold to decrease continuously Press the OK conf...

Page 75: ...if the measured object is higher than the minimum set temperature threshold the instrument will sound an alarm if it s closed no alarm will sound 8 8 Backlight adjustment After entering the backlight...

Page 76: ...ness and exit the backlight adjustment screen Press the back on button to not change the brightness of the backlight and exit the backlight adjustment interface 8 9 Melting distance By using aligned v...

Page 77: ...moves upwards Press the button down the highlighted yellow bar moves downwards Press the OK confirmation menu button to confirm the modification of the melting distance corresponding to the current co...

Page 78: ...itched from gravity to switch between menus and to change image at the time of image preview The portable instrument is facing towards itself shaking it to the left moving the menu upwards or switchin...

Page 79: ...es to another option Press the down button the highlighted yellow bar moves to the other option Press the OK confirmation menu button to confirm the modification of the current G SENSOR to activate th...

Page 80: ...tch setting interface the G SENSOR switch will not be changed 8 11 Language selection This setting can set the instrument to display in different national languages enter the language selection option...

Page 81: ...nfirmation menu button then confirm to enter the highlighted language and exit the language setting interface Press the back on button to exit the language interface The language selection is not chan...

Page 82: ...Model Model of the instrument SN Serial number of the instrument Version Version number Release date Date of manufacture Press the back power button to exit the information display interface 82...

Page 83: ...saved in the tool If you use a rechargeable battery the micro USB will not charge the battery 4 The instrument was calibrated at the factory before shipment If it is necessary to recalibrate contact y...

Page 84: ...ared energy on the surface of the object and uses this data to calculate the estimated temperature value Many common objects and materials such as painted metal wood water leather fabrics etc can actu...

Page 85: ...estimate Warning It is difficult to determine the actual surface temperature with an amplitude less than 0 60 accurately and consistently Even if the emissivity and the background of the reflection a...

Page 86: ...al powder 0 96 Soil 0 92 to 0 96 Laquerware 0 80 to 0 95 Water 0 92 to 0 96 Laquerware matte 0 97 Ice 0 96 to 0 98 Rubber black 0 94 Snow 0 83 Plastic 0 85 to 0 95 Glass 0 90 to 0 95 Wood 0 90 Ceramic...

Page 87: ...ffichage d image thermique infrarouge 2 Extraire 3 Caract ristiques 4 Description de l instrument 5 Sp cifications techniques 6 Alimentation 7 Fonctionnement des boutons 7 1 Bouton retour allumage 7 2...

Page 88: ...R glages extr mes 8 4 Options de la table des couleurs 8 5 Date et l heure 8 6 M moire 8 7 Alarme 8 8 R glage du r tro clairage 8 9 Distance de fusion 8 10 G CAPTEUR 8 11 S lection de la langue 8 12...

Page 89: ...ra vers la cible la zone ou l objet v rifier La temp rature relative est affich e du chaud au froid travers le tableau des couleurs correspondant du clair au fonc La lecture de temp rature infrarouge...

Page 90: ...erne de l instrument sous forme d images L image thermique peut tre visualis e via USB Appuyez sur le bouton Retour pour continuer num riser la zone ou l objet cible 6 Lors du balayage de la zone ou d...

Page 91: ...lumer l instrument Appuyez sur le bouton retour marche pendant 3 secondes pour teindre l instrument 1 3 Informations sur l affichage d image thermique infrarouge 1 Emissivit 2 Fois 3 Capacit de la bat...

Page 92: ...capteur de temp rature et d images de capteurs optiques d auxiliaires il est capable de fournir une d tection rapide simple et pr cise de la temp rature de surface pour une compr hension pr cise et cl...

Page 93: ...omatique des points chauds froids 6 Cam ra visible et stockage d images BMP 7 La m moire interne stocke des images il est possible de stocker plus de 100 images 8 R glez la date l heure et le r gulate...

Page 94: ...l instrument 1 Ecran LCD 2 Bouton haut 3 Bouton de confirmation menu 4 Bouton Retour Allumage 5 Bouton bas 6 Couvercle de la batterie 7 Lumi re visible 8 Capteur infrarouge 9 D clencheur HOLD 10 Inter...

Page 95: ...rature 3 3 C 37 4 F comme test 25 C 77 F Correction du taux de capture d cran Oui La performance de l image Fr quence de capture d image 7Hz Type de capteur Capteur avec technologie n poly p poly Si...

Page 96: ...hite heat grayscale black heat Niveau et dur e Automatique Information de fusion Distance de fusion visible et infrarouge 0 5mt 1 0mt 2 0mt Options de vue 50 tape Suivi des points chauds et froids Oui...

Page 97: ...imer des photos stock es dans le menu Temp rature de fonctionnement 0 C 50 C 32 F 122 F Temp rature de stockage 20 C 60 C 4 F 140 F Umidit relative 10 90 non goutte goutte cran d affichage 2 0 240 x 3...

Page 98: ...le Lorsque la charge de la batterie diminue la partie blanche de l ic ne de la batterie diminue galement Lorsque le symbole de la batterie est affich en rouge le niveau de la batterie est faible la ba...

Page 99: ...la g chette avec votre index 7 1 Bouton retour allumage Appui long allume ou teint le lecteur Appui court pour quitter l option de menu ou lib rer les photos d archives 7 2 Bouton de confirmation men...

Page 100: ...utons de navigation pour voir un m lange d images thermiques visibles et infrarouges dans des proportions diff rentes Appui long dans l option du menu des param tres appuyez longuement sur les boutons...

Page 101: ...p te 7 5 Prendre des photos et enregistrer des images Cet outil peut contenir au moins 100 photos dans la m moire interne 1 L instrument vise la zone ou l objet mesurer 2 Appuyez sur la g chette bout...

Page 102: ...8 Menu Param tres En mode de balayage des mesures appuyez sur le bouton OK menu de confirmation pour acc der la vue d ensemble du menu des param tres comme indiqu ci dessous 102...

Page 103: ...sur bas pour faire d filer la barre appuyez sur le bouton OK pour entrer l option d sir e chaque option est d crite en d tail comme suit 8 1 Ajustement de l missivit Pour la d finition de l missivit...

Page 104: ...ton bas pour diminuer l missivit la pression prolong e diminuera continuellement l missivit Appuyez sur le bouton OK pour confirmer l missivit actuelle et quitter l interface de r glage de l missivit...

Page 105: ...8 2 Param tres de l unit Les param tres de l appareil peuvent tre d finis sur diff rents affichages de l appareil Apr s avoir entr les options du lecteur l interface est la suivante 105...

Page 106: ...option Appuyez sur le bouton de confirmation menu OK pour confirmer la modification de l unit de temp rature actuelle et quitter l interface de r glage Appuyez sur le bouton retour marche pour quitter...

Page 107: ...z sur le bouton OK pour confirmer la modification de l option de courant extr me pour allumer la lumi re et quitter l interface de r glage extr me Appuyez sur le bouton retour marche pour quitter l in...

Page 108: ...en surbrillance se d place vers le haut Appuyez sur le bouton bas pour faire descendre la barre jaune en surbrillance Appuyez sur le bouton OK pour confirmer la couleur actuelle et quitter l cran des...

Page 109: ...le bouton retour allumage pour quitter l interface de r glage de la table des couleurs La couleur ne sera pas modifi e 8 5 Date et l heure Apr s avoir entr l option date et heure l interface est la s...

Page 110: ...outon bas le nombre correspondant diminuera Appuyez sur le bouton de confimation menu OK la barre jaune en surbrillance passera aux diff rents l ments en s quence Appuyez sur le bouton retour marche p...

Page 111: ...vers le haut Appuyez sur le bouton bas la barre bleue en surbrillance se d place vers le bas Appuyez sur le bouton retour marche pour quitter l interface de stockage Appuyez sur le bouton de confirmat...

Page 112: ...bouton bas pour afficher l image suivante Appuyez sur le bouton retour marche pour revenir l interface de stockage Appuyez sur le bouton de confirmation menu OK pour afficher la fen tre de confirmatio...

Page 113: ...ge La fen tre se ferme automatiquement et la prochaine image enregistr e s affiche Appuyez sur le bouton retour marche et s lectionnez Non pour annuler la suppression de l image Confirmez la fen tre s...

Page 114: ...option Appuyez sur le bouton retour marche pour quitter l interface de r glage de l alarme Appuyez sur le bouton de confirmation menu OK pour acc der l interface d alarme haute alarme correspondante...

Page 115: ...e confirmation menu OK pour ouvrir ou fermer le bouton de d marrage Ouvrez ce bouton pour indiquer que si l objet mesur est au dessus du seuil de temp rature maximum d fini l instrument d clenchera un...

Page 116: ...asse temp rature appuyez et maintenez pour augmenter en continu Appuyez sur le bouton bas pour diminuer le seuil des alarmes de basse temp rature appuyez et maintenez pour diminuer en continu Appuyez...

Page 117: ...l objet mesur est sup rieur au seuil de temp rature minimum d fini l instrument mettra une alarme si elle est ferm e aucune alarme ne sonne 8 8 R glage du r tro clairage Apr s avoir entr l option de r...

Page 118: ...luminosit du r tro clairage actuel et quitter l cran de r glage du r tro clairage Appuyez sur le bouton retour marche pour ne pas modifier la luminosit du r tro clairage et quitter l interface de r gl...

Page 119: ...option de distance de fusion l interface est la suivante Appuyez sur le bouton haut de la barre jaune en surbrillance pour vous d placer vers le haut Appuyez sur le bouton bas la barre jaune en surbr...

Page 120: ...8 10 G SENSOR G SENSOR est un capteur d acc l ration de gravit trois axes qui peut tre bascul de la gravit pour basculer entre les menus et pour changer d image au moment de la pr visualisation de l i...

Page 121: ...autre option Appuyez sur le bouton bas la barre jaune en surbrillance passe l autre option Appuyez sur le bouton de confirmation menu OK pour confirmer la modification du capteur G SENSOR actuel pour...

Page 122: ...ateur G SENSOR le commutateur G SENSOR ne sera pas modifi 8 11 S lection de la langue Ce param tre peut configurer l instrument pour qu il s affiche dans diff rentes langues nationales saisir l option...

Page 123: ...n menu OK puis confirmez pour saisir la langue en surbrillance et quitter l interface de r glage de la langue Appuyez sur le bouton retour marche pour quitter l interface de langue La s lection de la...

Page 124: ...le de l instrument SN num ro de s rie de l instrument Version Num ro de version Date de sortie Date de fabrication Appuyez sur le bouton retour marche pour quitter l interface d affichage des informa...

Page 125: ...Si vous utilisez une batterie rechargeable le micro USB ne chargera pas la batterie 4 L instrument a t talonn en usine avant exp dition S il est n cessaire de recalibrer contactez votre revendeur loca...

Page 126: ...surface Le produit d tecte l nergie infrarouge la surface de l objet et utilise ces donn es pour calculer la valeur de temp rature estim e De nombreux objets et mat riaux courants tels que le m tal pe...

Page 127: ...ent au produit de calculer plus pr cis ment l estimation de la temp rature r elle Attention Il est difficile de d terminer la temp rature de surface r elle avec une amplitude inf rieure 0 60 avec pr c...

Page 128: ...90 Charbon de bois poudre 0 96 Sol 0 92 0 96 Laque 0 80 0 95 Eau 0 92 0 96 Laque mat 0 97 Glace 0 96 0 98 Caoutchouc noir 0 94 Neige 0 83 Plastique 0 85 0 95 Verre 0 90 0 95 Bois 0 90 C ramique 0 90 0...

Page 129: ...ionen zur Infrarot W rmebildanzeige 2 Extrahieren 3 Eigenschaften 4 Beschreibung des Instruments 5 Technische Daten 6 Stromversorgung 7 Tastenbedienung 7 1 Zur ck Z ndungstaste 7 2 Taste Men best tige...

Page 130: ...Einstellungen 8 4 Farbtabelle Optionen 8 5 Datum und Uhrzeit 8 6 Erinnerung 8 7 Alarm 8 8 Einstellung der Hintergrundbeleuchtung 8 9 Schmelzstrecke 8 10 G SENSOR 8 11 Sprachauswahl 8 12 Information 9...

Page 131: ...auf das Ziel den zu pr fenden Bereich oder das zu pr fende Objekt Die relative Temperatur wird in der Farbtabelle von hei nach kalt angezeigt entsprechend von hell nach dunkel Der Infrarot Temperatur...

Page 132: ...icher des Instruments gespeichert Das W rmebild kann ber USB angezeigt werden Dr cken Sie die Eingabetaste um den Zielbereich oder das Objekt weiter abzutasten 6 Dr cken Sie beim Scannen des Bereichs...

Page 133: ...m das Instrument einzuschalten Dr cken Sie die Back On Taste 3 Sekunden lang um das Instrument auszuschalten 1 3 Informationen zur Infrarot W rmebildanzeige 1 Emissionsverm gen 2 Mal 3 Batteriekapazit...

Page 134: ...e Bildern von optischen Sensoren von Hilfsmitteln ist es in der Lage eine schnelle einfache und genaue Erfassung der Oberfl chentemperatur f r ein spezifisches und klares Verst ndnis der Oberfl chente...

Page 135: ...von Hot Cold Punkten 6 Sichtbare Kamera und Bildspeicher BMP 7 Der interne Speicher speichert Bilder Es ist m glich mehr als 100 Bilder zu speichern 8 Stellen Sie Datum und Uhrzeit sowie den Emissions...

Page 136: ...g des Instruments 1 LCD Bildschirm 2 Auf Taste 3 Best tigungs Men taste 4 Zur ck Z ndungstaste 5 Abw rtstaste 6 Batteriefachdeckel 7 Sichtbares Licht 8 Infrarotsensor 9 Trigger HOLD 10 Micro USB Schni...

Page 137: ...essung 3 3 C 37 4 F wie getestet bei 25 C 77 F Korrektur der Bildschirmschu rate Ja Bildleistung Bildaufnahmefrequenz 7Hz Sensorart Sensor mit n Poly p Poly Si Technologie W rmeempfindlich NETD 347mK...

Page 138: ...veau und Spanne Automatisch Fusionsinformationen Sichtbare und infrarote Fusionsentfernung 0 5mt 1 0mt 2 0mt Optionen anzeigen 50 schritt Hot Spot und Cold Spot Tracking Ja Bilderfassung und speicheru...

Page 139: ...rter Fotos aus dem Men Betriebstemperatur 0 C zu 50 C 32 F zu 122 F Lagertemperatur 20 C zu 60 C 4 F zu 140 F Relative Umidit t 10 zu 90 Nicht Taufall Anzeigebildschirm 2 0 240 x 320 TFT LCD Impr gnie...

Page 140: ...e Batterieladung abnimmt nimmt auch der wei e Teil des Batteriesymbols ab Wenn das Batteriesymbol rot angezeigt wird und der Batteriestand niedrig ist muss die Batterie sofort ausgetauscht werden Wenn...

Page 141: ...t dem Zeigefinger zu berpr fen 7 1 Zur ck Z ndungstaste Lang dr cken Schaltet das Messger t ein oder aus Kurz dr cken um den Men punkt zu verlassen oder die Archivfotos freizugeben 7 2 Best tigungstas...

Page 142: ...unten um eine Mischung aus sichtbaren und infraroten W rmebildern in verschiedenen Proportionen anzuzeigen Lang dr cken Halten Sie in der Men option Einstellungen die Aufw rts und Abw rts Navigationst...

Page 143: ...gezeigt den bzw das das Infrarot derzeit scannt Dieser Zyklus wiederholt sich 7 5 Bilder aufnehmen und Bilder speichern Dieses Tool kann mindestens 100 Fotos im internen Speicher enthalten 1 Das Instr...

Page 144: ...das Speichern des Fotos abzubrechen und das Scannen des Objekts fortzusetzen 8 Einstellungsmen Dr cken Sie im Messungsscan Modus die OK Taste das Best tigungsmen um auf die bersicht des Einstellungsme...

Page 145: ...e Leiste zu scrollen Dr cken Sie die OK Taste um die gew nschte Option einzugeben Jede Option wird im Detail wie folgt beschrieben 8 1 Emissionsgradeinstellung Einzelheiten zur Definition des Emission...

Page 146: ...um den Emissionsgrad zu verringern Der l ngere Druck verringert das Emissionsverm gen kontinuierlich Dr cken Sie die OK Taste um den aktuellen Emissionsgrad zu best tigen und die Emissionsgrad Einste...

Page 147: ...8 2 Ger teeinstellungen Die Ger teeinstellungen k nnen auf verschiedenen Displays des Ger ts vorgenommen werden Nach Eingabe der Laufwerksoptionen sieht die Benutzeroberfl che wie folgt aus 147...

Page 148: ...r anderen Option Dr cken Sie die OK Best tigungs Men taste um die nderung der aktuellen Temperatureinheit zu best tigen und die Einstellungsoberfl che zu verlassen Dr cken Sie die Zur ck Start Taste u...

Page 149: ...en Sie die OK Taste um die nderung der Option f r extreme Str me zu best tigen um das Licht einzuschalten und die Schnittstelle f r extreme Einstellungen zu verlassen Dr cken Sie die Taste Zur ck Ein...

Page 150: ...n Balken nach oben zu verschieben Dr cken Sie die Abw rts Taste um den hervorgehobenen gelben Balken nach unten zu verschieben Dr cken Sie die OK Taste um die aktuelle Farbe zu best tigen und den Bild...

Page 151: ...Return Z ndungstaste um die Farbtabellen Einstelloberfl che zu verlassen Die Farbe wird nicht ge ndert 8 5 Datum und Uhrzeit Nach Eingabe der Datums und Uhrzeitoption sieht die Benutzeroberfl che wie...

Page 152: ...chende Zahl zu verringern Dr cken Sie die OK Best tigungs Men taste Der hervorgehobene gelbe Balken springt nacheinander zu den verschiedenen Elementen Dr cken Sie die Taste Zur ck Ein um die Benutzer...

Page 153: ...oben zu springen Dr cken Sie die Abw rtstaste Der blau hervorgehobene Balken bewegt sich nach unten Dr cken Sie die Taste Zur ck Ein Aus um die Speicherschnittstelle zu verlassen Dr cken Sie die OK Be...

Page 154: ...e Abw rts Taste um das n chste Bild anzuzeigen Dr cken Sie die Zur ck Ein Taste um zur Speicheroberfl che zur ckzukehren Dr cken Sie die OK Best tigungs Men taste um das Best tigungsfenster zum L sche...

Page 155: ...wird automatisch geschlossen und das n chste gespeicherte Bild wird angezeigt Dr cken Sie die Zur ck Ein Taste und w hlen Sie Nein um das L schen des Bildes abzubrechen Best tigen Sie das Fenster wir...

Page 156: ...selt zu einer anderen Option Dr cken Sie die Zur ck Ein Taste um die Alarmeinstellungsoberfl che zu verlassen Dr cken Sie die OK Best tigungs Men taste um auf die entsprechende Hochalarm Niedrigalarm...

Page 157: ...Men taste um die Starttaste zu ffnen oder zu schlie en ffnen Sie diese Taste um anzuzeigen dass das Ger t einen Alarm ausgibt wenn das gemessene Objekt ber dem eingestellten maximalen Temperaturschwel...

Page 158: ...n zu erh hen gedr ckt halten um kontinuierlich zu erh hen Dr cken Sie die Abw rtstaste um den Schwellenwert f r Alarme bei niedrigen Temperaturen zu verringern gedr ckt halten um kontinuierlich zu ver...

Page 159: ...enn das gemessene Objekt ber dem eingestellten Mindesttemperaturschwellenwert liegt Wenn es geschlossen ist ert nt kein Alarm 8 8 Einstellung der Hintergrundbeleuchtung Nach dem Aufrufen der Option zu...

Page 160: ...die OK Taste um die nderung der aktuellen Helligkeit der Hintergrundbeleuchtung zu best tigen und den Bildschirm zur Einstellung der Hintergrundbeleuchtung zu verlassen Dr cken Sie die Taste Back On u...

Page 161: ...eren zu teilen Nach Eingabe der Option f r die Schmelzdistanz sieht die Benutzeroberfl che wie folgt aus Dr cken Sie die Aufw rtstaste auf dem hervorgehobenen gelben Balken um nach oben zu springen Dr...

Page 162: ...ein dreiachsiger Schwerkraftbeschleunigungssensor der von der Schwerkraft umgeschaltet werden kann um zwischen Men s zu wechseln und das Bild zu wechseln zum Zeitpunkt der Bildvorschau Das tragbare In...

Page 163: ...nderen Option Dr cken Sie die Abw rtstaste Der hervorgehobene gelbe Balken wechselt zur anderen Option Dr cken Sie die OK Best tigungs Men taste um die nderung des aktuellen G SENSOR zu best tigen um...

Page 164: ...Der G SENSOR Schalter wird nicht ver ndert 8 11 Sprachauswahl Mit dieser Einstellung kann das Instrument so eingestellt werden dass es in verschiedenen Landessprachen angezeigt wird Geben Sie die Spr...

Page 165: ...t tigungs Men taste und best tigen Sie um die markierte Sprache einzugeben und die Spracheinstellungsoberfl che zu verlassen Dr cken Sie die Zur ck Ein Taste um die Sprachoberfl che zu verlassen Die S...

Page 166: ...odell Modell des Instruments SN Seriennummer des Instruments Version Versionsnummer Erscheinungsdatum Herstellungsdatum Dr cken Sie die Taste Zur ck Ein Aus um die Informationsanzeige zu verlassen 166...

Page 167: ...speicherten Fotos anzeigen Wenn Sie einen Akku verwenden l dt der Micro USB den Akku nicht auf 4 Das Ger t wurde vor dem Versand im Werk kalibriert Wenn eine Neukalibrierung erforderlich ist wenden Si...

Page 168: ...berfl che Das Produkt erfasst die Infrarotenergie auf der Oberfl che des Objekts und berechnet anhand dieser Daten den gesch tzten Temperaturwert Viele g ngige Gegenst nde und Materialien wie lackiert...

Page 169: ...ie tats chliche Temperatursch tzung genauer berechnen Warnung Es ist schwierig die tats chliche Oberfl chentemperatur mit einer Amplitude von weniger als 0 60 genau und konsistent zu bestimmen Selbst...

Page 170: ...90 Holzkohle Pulver 0 96 Boden 0 92 zu 0 96 Lackwaren 0 80 zu 0 95 Wasser 0 92 zu 0 96 Lackwaren matt 0 97 Eis 0 96 zu 0 98 Gummi schwarz 0 94 Schnee 0 83 Kunststoff 0 85 zu 0 95 Glas 0 90 zu 0 95 Hol...

Page 171: ...obre la pantalla de imagen t rmica infrarroja 2 Extracto 3 Caracter sticas 4 Descripci n del instrumento 5 Especificaciones t cnicas 6 fuente de alimentaci n 7 Operaci n del bot n 7 1 Bot n de retroce...

Page 172: ...dad 8 3 Ajustes extremos 8 4 Opciones de tabla de colores 8 5 Fecha y hora 8 6 Memoria 8 7 Alarma 8 8 Ajuste de luz de fondo 8 9 Distancia de fusi n 8 10 G SENSOR 8 11 Selecci n de idioma 8 12 Informa...

Page 173: ...cia el objetivo el rea u objeto a comprobar La temperatura relativa se muestra de caliente a fr o a trav s de la tabla de colores correspondiente de claro a oscuro La lectura de temperatura infrarroja...

Page 174: ...ria interna del instrumento en forma de im genes La imagen t rmica se puede ver a trav s de USB Presione el bot n de retorno para continuar escaneando el rea u objeto objetivo 6 En el proceso de escan...

Page 175: ...er el instrumento Presione el bot n de retroceso encendido durante 3 segundos para apagar el instrumento 1 3 Informaci n sobre la pantalla de imagen t rmica infrarroja 1 Emisividad 2 Tiempo 3 capacida...

Page 176: ...eratura e im genes de sensores pticos de auxiliares es capaz de proporcionar una detecci n r pida simple y precisa de la temperatura de la superficie para una comprensi n espec fica y clara de la temp...

Page 177: ...i n autom tica de puntos calientes fr os 6 C mara visible y almacenamiento de im genes BMP 7 La memoria interna almacena im genes es posible almacenar m s de 100 im genes 8 Ajuste la fecha y hora y el...

Page 178: ...instrumento 1 Pantalla LCD 2 Bot n arriba 3 Bot n de confirmaci n men 4 Bot n de retroceso encendido 5 Bot n abajo 6 Tapa de la bater a 7 Luz visible 8 Sensor infrarrojo 9 Disparador MANTENER 10 Inter...

Page 179: ...i n de temperatura 3 3 C 37 4 F as tested at 25 C 77 F Correcci n de velocidad de captura de pantalla S Rendimiento de la imagen Frecuencia de captura de imagen 7Hz Tipo de sensor Sensor con tecnolog...

Page 180: ...ido rojo hierro color rojo escala de grises calor blanco escala de grises calor negro Nivel y lapso Autom tica Informaci n de fusi n Distancia de fusi n visible e infrarroja 0 5mt 1 0mt 2 0mt Ver opci...

Page 181: ...alizaci n de la memoria Ver o eliminar fotos almacenadas del men Temperatura de funcionamiento 0 C a 50 C 32 F a 122 F Temperatura de almacenamiento 20 C a 60 C 4 F a 140 F Umidez relativa 10 a 90 sin...

Page 182: ...estra el s mbolo Cuando la carga de la bater a disminuye la parte blanca del icono de la bater a tambi n disminuye Cuando el s mbolo de la bater a se muestra en rojo el nivel de la bater a es bajo la...

Page 183: ...l gatillo con su dedo ndice 7 1 Bot n de retroceso encendido Pulsaci n larga enciende o apaga el medidor Pulsaci n breve para salir de la opci n del men o liberar las fotos de archivo 7 2 Bot n de con...

Page 184: ...jo con los botones de navegaci n para ver una mezcla de im genes t rmicas visibles e infrarrojas en diferentes proporciones Pulsaci n larga en la opci n del men de configuraci n presione prolongadamen...

Page 185: ...objeto que el infrarrojo est escaneando actualmente Este ciclo se repite 7 5 Tomar fotos y guardar im genes Esta herramienta puede contener al menos 100 fotos en la memoria interna 1 El instrumento e...

Page 186: ...guardado de la foto y continuar escaneando el objeto 8 Men de configuraci n En el modo de exploraci n de medici n presione el bot n OK men de confirmaci n para acceder a la descripci n general del men...

Page 187: ...para desplazarse por la barra presione el bot n OK para ingresar la opci n deseada cada opci n se describe en detalle de la siguiente manera 8 1 Ajuste de emisividad Para la definici n de emisividad c...

Page 188: ...acia abajo para disminuir la emisividad La presi n prolongada disminuir continuamente la emisividad Presione el bot n OK para confirmar la emisividad actual y salir de la interfaz de ajuste de emisivi...

Page 189: ...Configuraciones de la unidad La configuraci n de la unidad se puede configurar en diferentes pantallas de la unidad Despu s de ingresar las opciones de la unidad la interfaz se muestra a continuaci n...

Page 190: ...ne el bot n de confirmaci n men OK para confirmar la modificaci n de la unidad de temperatura actual y salir de la interfaz de configuraci n Presione el bot n atr s inicio para salir de la interfaz de...

Page 191: ...irmar la modificaci n de la opci n de corriente extrema para encender la luz y salir de la interfaz de configuraci n extrema Presione el bot n de retroceso encendido para salir de la interfaz de confi...

Page 192: ...rilla resaltada se mueve hacia arriba Presione el bot n hacia abajo y la barra amarilla resaltada se mueve hacia abajo Presione el bot n OK para confirmar el color actual y salir de la pantalla de con...

Page 193: ...n de retorno encendido para salir de la interfaz de configuraci n de la tabla de colores el color no cambiar 8 5 Fecha y hora Despu s de ingresar la opci n de fecha y hora la interfaz se muestra a co...

Page 194: ...jo para disminuir el n mero correspondiente Presione el bot n OK de confirmaci n men la barra amarilla resaltada saltar a los diferentes elementos en secuencia Presione el bot n atr s encendido para s...

Page 195: ...iba Presione el bot n hacia abajo la barra azul resaltada se mueve hacia abajo Presione el bot n de retroceso encendido para salir de la interfaz de almacenamiento Presione el bot n OK de confirmaci n...

Page 196: ...ot n abajo para ver la siguiente imagen Presione el bot n atr s encendido para volver a la interfaz de almacenamiento Presione el bot n de confirmaci n men OK para mostrar la ventana de confirmaci n p...

Page 197: ...ana se cierra autom ticamente y se muestra la siguiente imagen guardada Presione el bot n atr s encendido y seleccione No para cancelar la eliminaci n de la imagen Confirme la ventana se cierra autom...

Page 198: ...n Presione el bot n atr s encendido para salir de la interfaz de configuraci n de alarma Presione el bot n de confirmaci n men OK para acceder a la interfaz de alarma alta alarma baja correspondiente...

Page 199: ...nfirmaci n men OK para abrir o cerrar el bot n de inicio abra este bot n para indicar que si el objeto medido est por encima del umbral de temperatura m xima establecido el instrumento har sonar una a...

Page 200: ...stenga para aumentar continuamente Presione el bot n hacia abajo para disminuir el umbral de las alarmas de baja temperatura presione y sostenga para disminuir continuamente Presione el bot n de confi...

Page 201: ...bral de temperatura m nimo establecido el instrumento har sonar una alarma Si est cerrado no sonar ninguna alarma 8 8 Ajuste de luz de fondo Despu s de ingresar a la opci n de ajuste de luz de fondo l...

Page 202: ...el brillo de la retroiluminaci n actual y salir de la pantalla de ajuste de la retroiluminaci n Presione el bot n atr s encendido para no cambiar el brillo de la luz de fondo y salir de la interfaz de...

Page 203: ...de distancia de fusi n la interfaz se muestra a continuaci n Presione el bot n arriba en la barra amarilla resaltada que se mueve hacia arriba Presione el bot n hacia abajo la barra amarilla resaltad...

Page 204: ...nsor de aceleraci n de gravedad de tres ejes que se puede cambiar de gravedad para cambiar entre men s y cambiar de imagen en el momento de la vista previa de la imagen El instrumento port til est ori...

Page 205: ...otra opci n Presione el bot n hacia abajo la barra amarilla resaltada se mueve a la otra opci n Presione el bot n de confirmaci n men OK para confirmar la modificaci n del G SENSOR actual para activar...

Page 206: ...nterruptor G SENSOR el interruptor G SENSOR no se cambiar 8 11 Selecci n de idioma Esta configuraci n puede configurar el instrumento para que se muestre en diferentes idiomas nacionales ingrese la op...

Page 207: ...rmaci n men luego confirme para ingresar el idioma resaltado y salir de la interfaz de configuraci n de idioma Presione el bot n atr s encendido para salir de la interfaz de idioma La selecci n del id...

Page 208: ...instrumento SN n mero de serie del instrumento Versi n n mero de versi n Fecha de lanzamiento fecha de fabricaci n Presione el bot n de retroceso encendido para salir de la interfaz de visualizaci n d...

Page 209: ...en la herramienta Si usa una bater a recargable el micro USB no cargar la bater a 4 El instrumento fue calibrado en la f brica antes del env o Si es necesario recalibrar comun quese con su distribuid...

Page 210: ...emisividad de la superficie El producto detecta la energ a infrarroja en la superficie del objeto y utiliza estos datos para calcular el valor de temperatura estimado Muchos objetos y materiales comu...

Page 211: ...roducto calcule con mayor precisi n la estimaci n de temperatura real Advertencia Es dif cil determinar la temperatura real de la superficie con una amplitud inferior a 0 60 con precisi n y coherencia...

Page 212: ...a 0 90 Carb n polvo 0 96 Suelo 0 92 a 0 96 Laca 0 80 a 0 95 Agua 0 92 a 0 96 Laca mate 0 97 Hielo 0 96 a 0 98 Caucho negro 0 94 Nieve 0 83 Plastico 0 85 a 0 95 Vaso 0 90 a 0 95 Madera 0 90 Cer mica 0...

Page 213: ...es no visor de imagens t rmicas por infravermelho 2 Extrair 3 Recursos 4 Descri o do instrumento 5 Especifica es t cnicas 6 Fonte de alimenta o 7 Opera o com bot o 7 1 Bot o Voltar igni o 7 2 Bot o me...

Page 214: ...3 Configura es extremas 8 4 Op es da tabela de cores 8 5 Data e hora 8 6 Mem ria 8 7 Alarme 8 8 Ajuste da luz de fundo 8 9 Dist ncia de derretimento 8 10 G SENSOR 8 11 Sele o de idioma 8 12 Em forma...

Page 215: ...era para o alvo a rea ou o objeto a ser verificado A temperatura relativa exibida do quente ao frio atrav s da tabela de cores correspondente do claro ao escuro A leitura da temperatura infravermelha...

Page 216: ...o instrumento na forma de imagens A imagem t rmica pode ser visualizada via USB Pressione o bot o de retorno para continuar a digitaliza o da rea ou objeto de destino 6 No processo de digitaliza o da...

Page 217: ...a ligar o instrumento Pressione o bot o voltar ligar por 3 segundos para desligar o instrumento 1 3 Informa es no visor de imagens t rmicas por infravermelho 1 Emissividade 2 Tempo 3 Capacidade da bat...

Page 218: ...ensor de temperatura e imagens de sensores pticos de auxiliares capaz de fornecer uma detec o r pida simples e precisa da temperatura da superf cie para uma compreens o espec fica e clara da temperatu...

Page 219: ...o autom tica de pontos quentes frios 6 C mera vis vel e armazenamento de imagens BMP 7 A mem ria interna armazena imagens poss vel armazenar mais de 100 imagens 8 Defina o regulador de data e hora e...

Page 220: ...do instrumento 1 Tela LCD 2 Bot o para cima 3 Bot o de confirma o menu 4 Bot o Voltar igni o 5 Bot o para baixo 6 Tampa da bateria 7 Luz vis vel 8 Sensor infravermelho 9 Gatilho HOLD 10 Interface Mic...

Page 221: ...ratura 3 3 C 37 4 F como testado em 25 C 77 F Corre o da taxa de captura de tela Sim Desempenho de imagem Frequ ncia de captura de imagem 7Hz Tipo de sensor Sensor com tecnologia n poli p poli Si Sens...

Page 222: ...melho cor vermelha escala de cinza calor branco escala de cinza calor preto N vel e extens o Autom tico Informa es de fus o Dist ncia de fus o vis vel e infravermelha 0 5mt 1 0mt 2 0mt Ver op es 50 de...

Page 223: ...sualiza o de mem ria Ver ou excluir fotos armazenadas no menu Temperatura de opera o 0 C para 50 C 32 F para 122 F Temperatura de armazenamento 20 C para 60 C 4 F para 140 F Umidade relativa 10 to 90...

Page 224: ...mostra o s mbolo Quando a carga da bateria diminui a parte branca do cone da bateria tamb m diminui Quando o s mbolo da bateria exibido em vermelho o n vel da bateria est baixo a bateria deve ser subs...

Page 225: ...erificar o gatilho com o dedo indicador 7 1 Bot o Voltar igni o Press o longa liga ou desliga o medidor Toque r pido para sair da op o de menu ou liberar as fotos do arquivo 7 2 Bot o Confirmar menu O...

Page 226: ...t es de navega o para ver uma mistura de imagens t rmicas vis veis e infravermelhas em diferentes propor es Press o longa na op o do menu de configura es pressione e segure os bot es de navega o para...

Page 227: ...ento Este ciclo se repete 7 5 Tirando fotos e salvando imagens Esta ferramenta pode conter pelo menos 100 fotos na mem ria interna 1 O instrumento direcionado para a rea ou objeto alvo a ser medido 2...

Page 228: ...8 Menu Configura es No modo de varredura de medi o pressione o bot o OK menu de confirma o para acessar a vis o geral do menu de configura es como mostrado abaixo 228...

Page 229: ...ne para baixo para rolar a barra pressione o bot o OK para inserir a op o desejada cada op o descrita em detalhes da seguinte maneira 8 1 Ajuste de emissividade Para a defini o de emissividade consult...

Page 230: ...o para baixo para diminuir a emissividade a press o prolongada diminuir continuamente a emissividade Pressione o bot o OK para confirmar a emissividade atual e sair da interface de ajuste de emissivid...

Page 231: ...8 2 Configura es da unidade As configura es da unidade podem ser definidas em diferentes telas da unidade Depois de inserir as op es do inversor a interface mostrada abaixo 231...

Page 232: ...a op o Pressione o bot o OK de confirma o menu para confirmar a modifica o da unidade de temperatura atual e para sair da interface de configura o Pressione o bot o voltar iniciar para sair da interfa...

Page 233: ...essione o bot o OK para confirmar a modifica o da op o de corrente extrema para ligar a luz e sair da interface de configura o extrema Pressione o bot o voltar ligar para sair da interface de configur...

Page 234: ...ima a barra amarela destacada se move para cima Pressione o bot o para baixo a barra amarela destacada se move para baixo Pressione o bot o OK para confirmar a cor atual e sair da tela de configura es...

Page 235: ...essione o bot o de retorno igni o para sair da interface de configura o da tabela de cores a cor n o ser alterada 8 5 Data e hora Depois de inserir a op o de data e hora a interface mostrada abaixo 23...

Page 236: ...bot o para baixo o n mero correspondente diminuir Pressione o bot o OK de confirma o menu a barra amarela destacada saltar para os diferentes itens em sequ ncia Pressione o bot o voltar ligar para sai...

Page 237: ...ver para cima Pressione o bot o para baixo a barra destacada azul se move para baixo Pressione o bot o voltar ligar desligar para sair da interface de armazenamento Pressione o bot o de confirma o men...

Page 238: ...ione o bot o para baixo para ver a pr xima imagem Pressione o bot o voltar ligar para retornar interface de armazenamento Pressione o bot o OK de confirma o menu para exibir a janela de confirma o par...

Page 239: ...o da imagem a janela fechada automaticamente e a pr xima imagem salva exibida Pressione o bot o voltar ligar e selecione N o para cancelar a exclus o da imagem Confirme a janela fecha automaticamente...

Page 240: ...para outra op o Pressione o bot o voltar ligar para sair da interface de configura o de alarme Pressione o bot o OK de confirma o menu para acessar a interface de alarme alto alarme baixo corresponde...

Page 241: ...e o bot o OK de confirma o menu para abrir ou fechar o bot o Iniciar Abra esse bot o para indicar que se o objeto medido estiver acima do limite m ximo de temperatura definido o instrumento emitir um...

Page 242: ...armes de baixa temperatura pressione e segure para aumentar Pressione o bot o para diminuir o limite para alarmes de baixa temperatura pressione e segure para diminuir continuamente Pressione o bot o...

Page 243: ...e se o objeto medido for superior ao limite m nimo de temperatura definido o instrumento emitir um alarme se estiver fechado nenhum alarme soar 8 8 Ajuste da luz de fundo Depois de inserir a op o de a...

Page 244: ...ajuste da luz de fundo Pressione o bot o voltar ligar para n o alterar o brilho da luz de fundo e sair da interface de ajuste da luz de fundo 8 9 Dist ncia de derretimento Ao usar imagens vis veis ali...

Page 245: ...ove para cima Pressione o bot o para baixo a barra amarela destacada se move para baixo Pressione o bot o OK de confirma o menu para confirmar a modifica o da dist ncia de fus o correspondente barra d...

Page 246: ...lternado da gravidade para alternar entre menus e alterar a imagem no momento da visualiza o da imagem O instrumento port til est voltado para si agitando o para a esquerda movendo o menu para cima ou...

Page 247: ...ove para outra op o Pressione o bot o para baixo a barra amarela destacada ser movida para a outra op o Pressione o bot o OK de confirma o menu para confirmar a modifica o do G SENSOR atual para ativa...

Page 248: ...nfigura o do interruptor G SENSOR o interruptor G SENSOR n o ser alterado 8 11 Sele o de idioma Essa configura o pode definir o instrumento para exibi o em diferentes idiomas nacionais digite a op o d...

Page 249: ...ot o OK de confirma o menu e confirme para entrar no idioma destacado e sair da interface de configura o de idioma Pressione o bot o voltar ligar para sair da interface do idioma A sele o de idioma n...

Page 250: ...odelo do instrumento SN n mero de s rie do instrumento Vers o N mero da vers o Data de lan amento Data de fabrica o Pressione o bot o voltar ligar desligar para sair da interface de exibi o de informa...

Page 251: ...na ferramenta Se voc usar uma bateria recarreg vel o micro USB n o carregar a bateria 4 O instrumento foi calibrado na f brica antes do envio Se for necess rio recalibrar entre em contato com o reven...

Page 252: ...e na emissividade da superf cie O produto detecta a energia infravermelha na superf cie do objeto e usa esses dados para calcular o valor estimado da temperatura Muitos objetos e materiais comuns com...

Page 253: ...iss o geralmente permite que o produto calcule com mais precis o a estimativa real de temperatura Aten o dif cil determinar a temperatura real da superf cie com uma amplitude menor que 0 60 com precis...

Page 254: ...p 0 96 Solo 0 92 para 0 96 Lacquerware 0 80 para 0 95 Agua 0 92 para 0 96 Lacquerware fosca 0 97 Gelo 0 96 para 0 98 Borracha preta 0 94 Neve 0 83 Pl stica 0 85 para 0 95 Vidro 0 90 para 0 95 Madeira...

Page 255: ...atie over de infrarood warmtebeeldweergave 2 Uitpakken 3 Functies 4 Beschrijving van het instrument 5 Technische specificaties 6 Voeding 7 Knopbediening 7 1 Terug ontstekingsknop 7 2 Bevestig knop men...

Page 256: ...3 Extreme instellingen 8 4 Kleurentabel opties 8 5 Datum en tijd 8 6 Geheugen 8 7 Alarm 8 8 Achtergrondverlichting aanpassing 8 9 Smeltafstand 8 10 G SENSOR 8 11 Taal selectie 8 12 Informatie 9 Voorz...

Page 257: ...el het gebied of het object dat moet worden gecontroleerd De relatieve temperatuur wordt weergegeven van warm naar koud via de kleurentabel corresponderend van licht naar donker De infraroodtemperatuu...

Page 258: ...agen in het interne geheugen van het instrument in de vorm van afbeeldingen Het warmtebeeld kan via USB worden bekeken Druk op de retourknop om door te gaan met het scannen van het doelgebied of objec...

Page 259: ...instrument in te schakelen Druk 3 seconden op de back on knop om het instrument uit te schakelen 1 3 Informatie over de infrarood warmtebeeldweergave 1 Emissiviteit 2 Tijd 3 Batterijcapaciteit 4 Cent...

Page 260: ...rsensor en afbeeldingen van optische sensoren van hulpmiddelen kan het een snelle eenvoudige en nauwkeurige detectie van de oppervlaktetemperatuur bieden voor een specifiek en duidelijk begrip van de...

Page 261: ...me koude punten 6 Zichtbare camera en beeldopslag BMP 7 Het interne geheugen slaat afbeeldingen op het is mogelijk om meer dan 100 afbeeldingen op te slaan 8 Stel de datum en tijd en de emissiviteitsr...

Page 262: ...jving van het instrument 1 LCD scherm 2 Omhoog knop 3 Bevestiging menuknop 4 Terug ontstekingsknop 5 Omlaag knop 6 Batterijdeksel 7 Zichtbaar licht 8 Infrarood sensor 9 Trekker HOLD 10 Micro USB inter...

Page 263: ...urigheid temperatuurmeting 3 3 C 37 4 F zoals getest op 25 C 77 F Screenshot snelheidscorrectie Ja Beeldprestaties Opnamefrequentie van afbeeldingen 7Hz Type sensor Sensor met n poly p poly Si technol...

Page 264: ...olten metaal ijzerrood kleur rood grijswaarden witte hitte grijswaarden zwarte hitte Niveau en spanwijdte Automatisch Fusion informatie Zichtbare en infrarood fusieafstand 0 5mt 1 0mt 2 0mt Bekijk opt...

Page 265: ...bekijken Bekijk of verwijder opgeslagen foto s uit het menu Bedrijfstemperatuur 0 C naar 50 C 32 F naar 122 F Bewaar temperatuur 20 C naar 60 C 4 F naar 140 F Relatieve umiditeit 10 naar 90 niet dauw...

Page 266: ...er de batterijlading afneemt neemt ook het witte gedeelte van het batterijpictogram af Als het batterijsymbool rood wordt weergegeven is het batterijniveau laag en moet de batterij onmiddellijk worden...

Page 267: ...uw wijsvinger te controleren 7 1 Terug ontstekingsknop Lang indrukken schakelt de meter in of uit Kort indrukken om de menuoptie te verlaten of de archieffoto s vrij te geven 7 2 Bevestig knop OK menu...

Page 268: ...de navigatieknoppen omhoog en omlaag om een combinatie van zichtbare en infrarood warmtebeelden in verschillende verhoudingen te zien Lang indrukken druk in de menu optie lang op de navigatieknoppen...

Page 269: ...t dat momenteel door infrarood wordt gescand Deze cyclus herhaalt zich 7 5 Foto s maken en afbeeldingen opslaan Deze tool kan minstens 100 foto s in het interne geheugen bevatten 1 Het instrument is g...

Page 270: ...n de foto te annuleren en door te gaan met het scannen van het object 8 Instellingenmenu Druk in de meetscanmodus op de OK knop het bevestigingsmenu om toegang te krijgen tot het overzicht van het ins...

Page 271: ...m door de balk te bladeren druk op de knop OK om de gewenste optie in te voeren elke optie wordt als volgt gedetailleerd beschreven 8 1 Emissiviteit aanpassing Raadpleeg Bijlage 11 voor meer informati...

Page 272: ...viteit te verminderen de langdurige druk zal de emissiviteit continu verminderen Druk op de knop OK om de huidige emissiviteit te bevestigen en de interface voor het aanpassen van de emissiviteit te v...

Page 273: ...8 2 Eenheidsinstellingen De apparaatinstellingen kunnen worden ingesteld op verschillende displays van het apparaat Na het invoeren van de schijfopties ziet de interface eruit zoals hieronder 273...

Page 274: ...verplaatsen Druk op de OK bevestiging menuknop om de wijziging van de huidige temperatuureenheid te bevestigen en de instellingsinterface te verlaten Druk op de terug startknop om de instellingsinter...

Page 275: ...e OK knop om de wijziging van de optie voor extreme stroom te bevestigen om het licht in te schakelen en de interface voor extreme instellingen te verlaten Druk op de knop Terug Aan om de interface vo...

Page 276: ...g De gemarkeerde gele balk gaat omhoog Druk op de knop Omlaag de gemarkeerde gele balk gaat naar beneden Druk op de knop OK om de huidige kleur te bevestigen en het instellingenscherm voor de kleurent...

Page 277: ...ur ontstekingsknop om de interface voor het instellen van de kleurentabel te verlaten De kleur wordt niet gewijzigd 8 5 Datum en tijd Na het invoeren van de datum en tijdoptie ziet de interface er als...

Page 278: ...knop omlaag om het bijbehorende nummer te verlagen Druk op de OK bevestiging menuknop de gemarkeerde gele balk springt in volgorde naar de verschillende items Druk op de knop Terug Aan om de interface...

Page 279: ...balk om omhoog te gaan Druk op de knop omlaag de blauw gemarkeerde balk gaat naar beneden Druk op de knop Back Power om de opslaginterface te verlaten Druk op de OK bevestiging menuknop om de interfa...

Page 280: ...op omlaag om de volgende afbeelding te bekijken Druk op de knop Terug Aan om terug te keren naar de opslaginterface Druk op de OK bevestiging menuknop om het bevestigingsvenster weer te geven om de af...

Page 281: ...enster wordt automatisch gesloten en de volgende opgeslagen afbeelding wordt weergegeven Druk op de knop Terug Aan en selecteer Nee om het verwijderen van de afbeelding te annuleren Bevestig het venst...

Page 282: ...re optie Druk op de knop Terug Aan om de interface voor alarminstellingen te verlaten Druk op de knop OK bevestiging menu om toegang te krijgen tot de bijbehorende interface voor hoog alarm laag alarm...

Page 283: ...p om de startknop te openen of te sluiten Open deze knop om aan te geven dat als het gemeten object zich boven de ingestelde maximale temperatuurdrempel bevindt het instrument een alarm laat horen als...

Page 284: ...temperatuur te verhogen ingedrukt houden om continu te verhogen Druk op de knop omlaag om de drempel voor alarmen bij lage temperatuur te verlagen ingedrukt houden om continu te verlagen Druk op de O...

Page 285: ...aan als het gemeten object hoger is dan de minimum ingestelde temperatuurdrempel als het gesloten is klinkt er geen alarm 8 8 Achtergrondverlichting aanpassing Na het invoeren van de optie voor het aa...

Page 286: ...grondverlichting te bevestigen en het scherm voor aanpassing van de achtergrondverlichting te verlaten Druk op de knop Terug Aan om de helderheid van de achtergrondverlichting niet te wijzigen en de i...

Page 287: ...t invoeren van de optie fusieafstand ziet de interface er als volgt uit Druk op de omhoog knop op de gemarkeerde gele balk om omhoog te gaan Druk op de knop omlaag naar beneden De gemarkeerde gele bal...

Page 288: ...rsnellingssensor met drie assen die kan worden geschakeld van zwaartekracht om te schakelen tussen menu s en om het beeld te wijzigen op het moment van de voorbeeldweergave Het draagbare instrument is...

Page 289: ...andere optie Druk op de knop omlaag de gemarkeerde gele balk gaat naar de andere optie Druk op de OK bevestiging menuknop om de wijziging van de huidige G SENSOR te bevestigen om het licht te activere...

Page 290: ...stelling te verlaten De G SENSOR schakelaar wordt niet gewijzigd 8 11 Taal selectie Met deze instelling kan het instrument worden weergegeven in verschillende nationale talen de optie voor taalselecti...

Page 291: ...vestiging menu en bevestig vervolgens om de gemarkeerde taal in te voeren en de interface voor taalinstellingen te verlaten Druk op de knop Terug Aan om de taalinterface te verlaten De taalkeuze is ni...

Page 292: ...Model Model van het instrument SN serienummer van het instrument Versie versienummer Releasedatum fabricagedatum Druk op de knop Terug Aan om de interface voor informatieweergave te verlaten 292...

Page 293: ...de tool Als u een oplaadbare batterij gebruikt laadt de micro USB de batterij niet op 4 Het instrument werd v r verzending in de fabriek gekalibreerd Neem contact op met uw plaatselijke dealer als he...

Page 294: ...lak Het product detecteert de infraroodenergie op het oppervlak van het object en gebruikt deze gegevens om de geschatte temperatuurwaarde te berekenen Veel voorkomende objecten en materialen zoals ge...

Page 295: ...stal de werkelijke temperatuurschatting nauwkeuriger berekenen Waarschuwing Het is moeilijk om de werkelijke oppervlaktetemperatuur met een amplitude van minder dan 0 60 nauwkeurig en consistent te be...

Page 296: ...Bodem 0 92 naar 0 96 Lakwerk 0 80 naar 0 95 Water 0 92 naar 0 96 Lakwerk matte 0 97 Ijs 0 96 naar 0 98 Rubber zwart 0 94 Sneeuw 0 83 Plastic 0 85 naar 0 95 Glas 0 90 naar 0 95 Hout 0 90 Keramiek 0 90...

Page 297: ...macje na temat termicznego wy wietlania obrazu w podczerwieni 2 Ekstrakt 3 Funkcje 4 Opis przyrz du 5 Dane techniczne 6 Zasilacz 7 Dzia anie przycisku 7 1 Przycisk powrotu zap onu 7 2 Potwierd przycis...

Page 298: ...i 8 3 Ekstremalne ustawienia 8 4 Opcje tabeli kolor w 8 5 Data i godzina 8 6 Pami 8 7 Alarm 8 8 Regulacja pod wietlenia 8 9 Odleg o topnienia 8 10 CZUJNIK G 8 11 Wyb r j zyka 8 12 Informacja 9 rodki o...

Page 299: ...lu obszaru lub obiektu kt ry chcesz sprawdzi Temperatura wzgl dna jest wy wietlana od gor cej do zimnej poprzez tabel kolor w odpowiadaj c jasno ci do ciemno ci Odczyt temperatury w podczerwieni pokaz...

Page 300: ...howywany w wewn trznej pami ci instrumentu w postaci obraz w Obraz termiczny mo na ogl da przez USB Naci nij przycisk powrotu aby kontynuowa skanowanie obszaru docelowego lub obiektu 6 Podczas skanowa...

Page 301: ...by w czy przyrz d Naci nij przycisk Wstecz W Przez 3 sekundy aby wy czy przyrz d 1 3 Informacje na temat termicznego wy wietlania obrazu w podczerwieni 1 Emisyjno 2 Razy 3 Pojemno baterii 4 Temperatur...

Page 302: ...dczerwie i czujnik temperatury oraz obrazy czujnik w optycznych urz dze pomocniczych jest w stanie zapewni szybkie proste i dok adne wykrywanie temperatury powierzchni w celu dok adnego i jasnego zroz...

Page 303: ...ne pozyskiwanie punkt w gor cych zimnych 6 Widoczna pami aparatu i zdj BMP 7 Pami wewn trzna przechowuje obrazy mo liwe jest przechowywanie ponad 100 obraz w 8 Ustaw regulator daty i godziny oraz emis...

Page 304: ...zyrz du 1 Ekran LCD 2 Przycisk w g r 3 Przycisk potwierdzenia menu 4 Przycisk powrotu zap onu 5 Przycisk w d 6 Pokrywa baterii 7 Widoczne wiat o 8 Czujnik podczerwieni 9 Trigger HOLD 10 Interfejs Micr...

Page 305: ...u temperatury 3 3 C 37 4 F jak przetestowano w 25 C 77 F Korekta szybko ci zrzut w ekranu Tak Wydajno obrazu Cz stotliwo przechwytywania obrazu 7Hz Rodzaj czujnika Czujnik z technologi n poli p poli S...

Page 306: ...Stopiony metal elazna czerwie kolor czerwony skala szaro ci bia e ciep o skala szaro ci czarne ciep o Poziom i zakres Automatyczny Informacje o fuzji Widoczna i podczerwona odleg o zespolenia 0 5mt 1...

Page 307: ...k Format dokumentu BMP Przegl danie pami ci Wy wietl lub usu zapisane zdj cia z menu Temperatura robocza 0 C do 50 C 32 F do 122 F Temperatura przechowywania 20 C do 60 C 4 F do 140 F Wzgl dna stabiln...

Page 308: ...ol Gdy poziom na adowania baterii spada bia a cz ikony baterii r wnie maleje Gdy symbol baterii jest wy wietlany na czerwono poziom na adowania baterii jest niski nale y natychmiast wymieni bateri Je...

Page 309: ...y sprawdzi spust palcem wskazuj cym 7 1 Przycisk powrotu zap onu D ugie naci ni cie w cza lub wy cza miernik Kr tkie naci ni cie aby wyj z opcji menu lub zwolni zdj cia archiwalne 7 2 Przycisk potwier...

Page 310: ...zycisk w nawigacyjnych aby zobaczy mieszank obraz w termicznych w podczerwieni w r nych proporcjach D ugie naci ni cie w opcji menu ustawie d ugie naci ni cie przycisk w nawigacyjnych w g r i w d powo...

Page 311: ...e obszar lub obiekt kt ry skanuje podczerwie Ten cykl si powtarza 7 5 Robienie zdj i zapisywanie zdj To narz dzie mo e zawiera co najmniej 100 zdj w pami ci wewn trznej 1 Instrument jest skierowany na...

Page 312: ...ecz W aby anulowa zapisywanie zdj cia i kontynuowa skanowanie obiektu 8 Menu ustawie W trybie skanowania pomiar w naci nij przycisk OK menu potwierdzenia aby uzyska dost p do przegl du menu ustawie ja...

Page 313: ...by przewin pasek naci nij przycisk OK aby wprowadzi dan opcj ka da opcja jest szczeg owo opisana w nast puj cy spos b 8 1 Regulacja emisyjno ci Definicja emisyjno ci znajduje si w za czniku 11 aby uzy...

Page 314: ...ci nij przycisk w d aby zmniejszy emisyjno przed u one ci nienie b dzie stale zmniejsza emisyjno Naci nij przycisk OK aby potwierdzi bie c emisyjno i wyj z interfejsu regulacji emisyjno ci Naci nij pr...

Page 315: ...8 2 Ustawienia jednostki Ustawienia urz dzenia mo na ustawi na r nych wy wietlaczach urz dzenia Po wprowadzeniu opcji nap du interfejs wygl da nast puj co 315...

Page 316: ...do innej opcji Naci nij przycisk OK potwierdzenie menu aby potwierdzi zmian bie cej jednostki temperatury i wyj z interfejsu ustawie Naci nij przycisk Wstecz W aby wyj z interfejsu ustawie jednostka...

Page 317: ...ji Naci nij przycisk OK aby potwierdzi modyfikacj opcji pr du ekstremalnego aby w czy wiat o i wyj z interfejsu ustawie ekstremalnych Naci nij przycisk Wstecz W Aby wyj z interfejsu ustawie ekstremaln...

Page 318: ...j przycisk w g r pod wietlony ty pasek przesuwa si w g r Naci nij przycisk w d pod wietlony ty pasek przesuwa si w d Naci nij przycisk OK aby potwierdzi bie cy kolor i wyj z ekranu ustawie tabeli kolo...

Page 319: ...Naci nij przycisk powrotu zap onu aby wyj z interfejsu ustawie tabeli kolor w kolor nie zostanie zmieniony 8 5 Data i godzina Po wprowadzeniu opcji daty i godziny interfejs wygl da nast puj co 319...

Page 320: ...i kszy Naci nij przycisk w d odpowiedni numer zmniejszy si Naci nij przycisk potwierdzenia menu OK pod wietlony ty pasek przejdzie kolejno do r nych pozycji Naci nij przycisk Wstecz W aby wyj z interf...

Page 321: ...asku aby przej w g r Naci nij przycisk w d niebieski pod wietlony pasek przesunie si w d Naci nij przycisk Wstecz Zasilanie aby wyj z interfejsu pami ci Naci nij przycisk potwierdzenia menu OK aby uzy...

Page 322: ...zdj cie naci nij przycisk w d aby wy wietli nast pne zdj cie Naci nij przycisk Wstecz W aby powr ci do interfejsu pami ci Naci nij przycisk OK potwierdzenie menu aby wy wietli okno potwierdzenia usuni...

Page 323: ...uni cie obrazu okno zostanie automatycznie zamkni te i wy wietli si nast pny zapisany obraz Naci nij przycisk Wstecz W i wybierz Nie aby anulowa usuni cie obrazu Potwierd okno zamyka si automatycznie...

Page 324: ...do innej opcji Naci nij przycisk Wstecz W Aby wyj z interfejsu ustawie alarmu Naci nij przycisk potwierdzenia menu OK aby uzyska dost p do odpowiedniego interfejsu alarmu wysokiego niskiego alarmu zg...

Page 325: ...potwierdzenia menu OK aby otworzy lub zamkn przycisk Start otw rz ten przycisk aby wskaza e je li mierzony obiekt znajduje si powy ej ustawionego progu temperatury maksymalnej przyrz d uruchomi alarm...

Page 326: ...rm w niskiej temperatury naci nij i przytrzymaj aby stale zwi ksza Naci nij przycisk w d aby zmniejszy pr g dla alarm w niskiej temperatury naci nij i przytrzymaj aby stale zmniejsza Naci nij przycisk...

Page 327: ...znacza to e je li mierzony obiekt jest wy szy ni minimalny ustawiony pr g temperatury przyrz d uruchomi alarm je li jest zamkni ty nie zabrzmi alarm 8 8 Regulacja pod wietlenia Po wej ciu w opcj regul...

Page 328: ...gulacji pod wietlenia Naci nij przycisk Wstecz W Aby nie zmienia jasno ci pod wietlenia i wyjd z interfejsu regulacji pod wietlenia 8 9 Odleg o topnienia Dzi ki zastosowaniu wyr wnanych obraz w widocz...

Page 329: ...u przesuwa si w g r Naci nij przycisk w d pod wietlony ty pasek przesuwa si w d Naci nij przycisk OK potwierdzenie menu aby potwierdzi modyfikacj odleg o ci topnienia odpowiadaj cej bie cemu kolorowi...

Page 330: ...o na prze cza z grawitacji aby prze cza si mi dzy menu i zmienia obraz w czasie podgl du obrazu Przeno ny instrument jest skierowany w swoj stron potrz saj c nim w lewo przesuwaj c menu w g r lub prze...

Page 331: ...asek przechodzi do innej opcji Naci nij przycisk w d pod wietlony ty pasek przechodzi do innej opcji Naci nij przycisk potwierdzenia menu OK aby potwierdzi modyfikacj bie cego G SENSOR aby w czy wiat...

Page 332: ...jsu ustawie prze cznika G SENSOR prze cznik G SENSOR nie zostanie zmieniony 8 11 Wyb r j zyka To ustawienie mo e ustawi wy wietlanie przyrz du w r nych j zykach narodowych wprowadzi opcj wyboru j zyka...

Page 333: ...ij przycisk OK potwierdzenie menu a nast pnie potwierd aby wprowadzi pod wietlony j zyk i wyj z interfejsu ustawie j zyka Naci nij przycisk Wstecz W aby wyj z interfejsu j zykowego Wyb r j zyka nie ul...

Page 334: ...Model model instrumentu SN Numer seryjny instrumentu Wersja numer wersji Data wydania Data produkcji Naci nij przycisk Wstecz Zasilanie aby wyj z interfejsu wy wietlania informacji 334...

Page 335: ...j cia zapisane w narz dziu Je li u ywasz akumulatora micro USB nie aduje akumulatora 4 Przyrz d zosta skalibrowany w fabryce przed wysy k Je li konieczna jest ponowna kalibracja skontaktuj si z lokaln...

Page 336: ...owierzchni obiektu i emisyjno ci powierzchni Produkt wykrywa energi podczerwieni na powierzchni obiektu i wykorzystuje te dane do obliczenia szacunkowej warto ci temperatury Wiele popularnych przedmio...

Page 337: ...jno ci Dostosowanie warto ci emisji zwykle pozwala produktowi dok adniej obliczy rzeczywist szacunkow temperatur Ostrze enie Trudno jest dok adnie i konsekwentnie ustali rzeczywist temperatur powierzc...

Page 338: ...drzewny proszek 0 96 Gleba 0 92 do 0 96 Lakier 0 80 do 0 95 Woda 0 92 do 0 96 Lakier matowy 0 97 l d 0 96 do 0 98 Guma czarny 0 94 nieg 0 83 Plastikowy 0 85 do 0 95 Szk o 0 90 do 0 95 Drewno 0 90 Cera...

Page 339: ...gys g 1 3 Inform ci az infrav r s h k perny n 2 Kivonat 3 Jellemz k 4 A m szer le r sa 5 M szaki adatok 6 T pegys g 7 Gomb m k d se 7 1 Vissza gy jt s gomb 7 2 Er s tse meg a gombot men t 7 3 Fel s le...

Page 340: ...i 8 3 Extr m be ll t sok 8 4 Sz nes t bl zat lehet s gei 8 5 D tum s id 8 6 mem ria 8 7 Riaszt s 8 8 H tt rvil g t s be ll t sa 8 9 Olvad si t vols g 8 10 G szenzor 8 11 Nyelvv laszt s 8 12 Inform ci...

Page 341: ...y tsa a kamer t a megc lozand ter let ter let vagy t rgy fel A relat v h m rs kletet melegt l hidegen kereszt l a sz nt bl zatban jelen tj k meg a vil gos s s t t sz nnek felel meg Az infrav r s h m r...

Page 342: ...r bels mem ri j ban A termikus k p USB n kereszt l tekinthet meg A c lter let vagy az objektum szkennel s nek folytat s hoz nyomja meg a visszat r gombot 6 Annak a ter letnek vagy objektumnak a beolva...

Page 343: ...r bekapcsol s hoz Nyomja meg a vissza be gombot 3 m sodpercig a k sz l k kikapcsol s hoz 1 3 Inform ci az infrav r s h k perny n 1 Kibocs t s 2 Id 3 Az akkumul tor kapacit sa 4 K zponti h m rs klet 5...

Page 344: ...el s h m rs klet rz kel vel valamint a kieg sz t k optikai rz kel inek k peivel ell tva k pes a fel let h m rs klet nek gyors egyszer s pontos szlel s re az objektum fel leti h m rs klet nek pontos s...

Page 345: ...forr hideg pontok automatikus beolvas sa 6 L that kamera s k pt rol BMP 7 A bels mem ria k peket t rol t bb mint 100 k pet t rolhat 8 ll tsa be a d tumot s az id t valamint a emisszi szab lyoz t 9 3...

Page 346: ...4 A m szer le r sa 1 LCD k perny 2 Fel gomb 3 Meger s t s men gomb 4 Vissza gy jt s gomb 5 Le gomb 6 Az akkumul tor fedele 7 L that f ny 8 Infrav r s rz kel 9 Trigger HOLD 10 Mikro USB interf sz 346...

Page 347: ...m r si pontoss g 3 3 C 37 4 F ahogyan tesztelt k 25 C 77 F A k perny k pess g jav t sa Igen K pteljes tm ny K p r gz t si gyakoris ga 7Hz rz kel t pusa rz kel n poly p poly Si technol gi val H rz ken...

Page 348: ...eh r h sz rke rnyalatos fekete h Szint s span Automatikus F zi s inform ci k L that s infrav r s f zi s t vols g 0 5mt 1 0mt 2 0mt Be ll t sok megtekint se 50 l p s Forr s hideg helyek k vet se Igen K...

Page 349: ...ek megtekint se vagy t rl se a men b l zemi h m rs klet 0 C s 50 C 32 F s 122 F T rol si h m rs klet 20 C s 60 C 4 F s 140 F Relat v p ratartalom 10 s 90 nem harmat Kijelz k perny 2 0 240 x 320 TFT LC...

Page 350: ...lumot Ha az akkumul tor t lt se cs kken akkor az akkumul tor ikon feh r r sze szint n cs kken Ha az akkumul tor szimb luma pirosan jelenik meg az akkumul tor t lt tts gi szintje alacsony az akkumul t...

Page 351: ...ombot mutat ujj val 7 1 Vissza gy jt s gomb Hossz nyom s a m r be vagy kikapcsol sa R viden nyomja meg a men pontb l val kil p shez vagy az arch v fot k kiad s hoz 7 2 Meger s t s gomb OK men R vid le...

Page 352: ...felfel s lefel a navig ci s gombokkal hogy a l that s infrav r s h k peket k l nb z ar nyban keverje meg Hossz lenyom s a be ll t sok men ben tartsa lenyomva a fel s le navig ci s gombokat az rt kek f...

Page 353: ...us megism tl dik 7 5 K pek k sz t se s k pek ment se Ez az eszk z legal bb 100 f nyk pet tartalmazhat a bels mem ri ban 1 A m szer a m rni k v nt c lter letre vagy t rgyra ir nyul 2 Nyomja meg a kiold...

Page 354: ...8 Be ll t sok men M r si szkennel s m dban nyomja meg az OK gombot meger s t men t a be ll t sok men ttekint s hez az al bb l that m don 354...

Page 355: ...l s a le gombokat a s v g rget s hez nyomja meg az OK gombot a k v nt opci be r s hoz az egyes lehet s geket az al bbiakban r szletezz k 8 1 Emisszi k pess g be ll t sa Az emisszi k pess g meghat roz...

Page 356: ...le gombot a kibocs t s cs kkent s hez a hosszan tart nyom s folyamatosan cs kkenti a kibocs t st Az OK gomb megnyom s val er s tse meg az aktu lis emisszi k pess get s l pjen ki a emisszi s be ll t f...

Page 357: ...8 2 Az egys g be ll t sai Az egys g be ll t sait az egys g k l nf le kijelz in lehet be ll tani A meghajt be ll t sok megad sa ut n a fel let az al bb l that 357...

Page 358: ...Nyomja meg az OK meger s t s men gombot az aktu lis h m rs kleti egys g m dos t s nak meger s t s hez s a be ll t interf szb l val kil p shez A be ll t interf szb l val kil p shez nyomja meg a Vissza...

Page 359: ...mbot a sz ls s ges ram opci m dos t s nak meger s t s hez hogy bekapcsolja a l mp t s kil pjen a sz ls s ges be ll t si fel letr l Nyomja meg a Vissza Be gombot a sz ls s ges be ll t sok fel let r l v...

Page 360: ...el gombot a kiemelt s rga s v felfel mozog Nyomja meg a le gombot a kiemelt s rga s v lefel mozog Nyomja meg az OK gombot az aktu lis sz n meger s t s hez s a sz nt bl zat be ll t sok k perny j nek ki...

Page 361: ...Nyomja meg a visszat r s gy jt s gombot a sz nt bl zat be ll t si fel let b l val kil p shez a sz n nem v ltozik 8 5 D tum s id A d tum s az id megad sa ut n a fel let az al bb l that 361...

Page 362: ...kszik Nyomja meg a le gombot a megfelel sz m cs kken Nyomja meg az OK meger s t s men gombot a kiemelt s rga s v az egyes elemekre ugrik egym s ut n Nyomja meg a Vissza Be gombot a d tum s id be ll t...

Page 363: ...mozoghat Nyomja meg a le gombot a k k kiemelt s v lefel mozog Nyomja meg a Vissza Bekapcsol gombot a t rol interf szb l val kil p shez Nyomja meg az OK meger s t s men gombot az el n zeti fel let el...

Page 364: ...ombot a k vetkez k p megtekint s hez nyomja meg a le gombot A visszat r shez a t rol fel lethez nyomja meg a Vissza Be gombot Nyomja meg az OK meger s t s men gombot a meger s t s ablak megjelen t s h...

Page 365: ...s t s re Az ablak automatikusan bez r dik s megjelenik a k vetkez mentett k p A k p t rl s nek megszak t s hoz nyomja meg a Vissza Be gombot s v lassza a Nem lehet s get Meger s t s az ablak automati...

Page 366: ...i ra l p A riaszt sbe ll t si fel letr l val kil p shez nyomja meg a Vissza Be gombot Nyomja meg az OK meger s t s men gombot a megfelel riaszt si alacsony riaszt si interf sz el r s hez a kiemelt v l...

Page 367: ...s t s men gombot a Start gomb megnyit s hoz vagy bez r s hoz A gomb megnyit s hoz jelezze hogy ha a m rt objektum meghaladja a be ll tott maxim lis h m rs kleti k sz b t akkor a m szer riaszt st fog...

Page 368: ...t k nek n vel s hez tartsa lenyomva a folyamatos n veked shez Nyomja meg a le gombot az alacsony h m rs klet riaszt sok k sz b nek cs kkent s hez tartsa lenyomva hogy folyamatosan cs kkenjen A megnyit...

Page 369: ...rt objektum magasabb mint a be ll tott minim lis h m rs kleti k sz b akkor a m szer riaszt st ad ha z rva van nem fog riaszt s sz lni 8 8 H tt rvil g t s be ll t sa Miut n bel pett a h tt rvil g t s b...

Page 370: ...tt rvil g t s be ll t si k perny j b l val kil p shez Nyomja meg a Vissza Be gombot hogy ne v ltoztasson meg a h tt rvil g t s f nyereje s kil pjen a h tt rvil g t s be ll t fel let r l 8 9 Olvad si t...

Page 371: ...lfel mozog A gomb lenyom s val a kiemelt s rga s v lefel mozog Nyomja meg az OK meger s t s men gombot az aktu lis sz ns vnak megfelel olvad si t vols g m dos t s nak meger s t s hez s az olvad si t v...

Page 372: ...l s rz kel amely v lthat a gravit ci t l a men k k z tti v lt shoz s a k p megv ltoztat s hoz a k p el n zetekor A hordozhat eszk z maga fel n z balra r zva a men t felfel mozgatva vagy az el z k pre...

Page 373: ...sik opci ra l p Nyomja meg a le gombot a kiemelt s rga s v a m sik opci ra l p Nyomja meg az OK meger s t s men gombot az aktu lis G SENSOR m dos t s nak meger s t s hez a f ny aktiv l s hoz s a G SE...

Page 374: ...csol be ll t fel let nek kil p s hez a G SENSOR kapcsol nem v ltozik 8 11 Nyelvv laszt s Ez a be ll t s be ll thatja hogy a m szer k l nf le nemzeti nyelveken jelenjen meg be rhatja a nyelvv laszt si...

Page 375: ...OK meger s t s men gombot majd er s tse meg a kiemelt nyelv be r s hoz s a nyelvi be ll t fel letr l val kil p shez A nyelvi fel letr l val kil p shez nyomja meg a Vissza Be gombot A nyelvv laszt s ne...

Page 376: ...Modell A m szer modellje SN A m szer sorsz ma Verzi Verzi sz m Kiad s d tuma A gy rt s d tuma Az inform ci s kijelz interf szb l val kil p shez nyomja meg a Vissza Bekapcsol gombot 376...

Page 377: ...az eszk zben mentett f nyk peket Ha jrat lthet akkumul tort haszn l a mikro USB nem t lti az akkumul tort 4 A m szert a gy rban kisz ll t s el tt kalibr lt k Ha jrakalibr lni kell vegye fel a kapcsola...

Page 378: ...ess g n alapszik A term k rz keli az infrav r s energi t a t rgy fel let n s ezeket az adatokat haszn lja a becs lt h m rs kleti rt k kisz m t s hoz Sok ltal nos t rgy s anyag p ld ul festett f m fa v...

Page 379: ...t k be ll t sa ltal ban lehet v teszi a term k sz m ra hogy pontosabban kisz m tsa a t nyleges h m rs kleti becsl st Figyelem Neh z pontosan s k vetkezetesen meghat rozni a t nyleges fel leti h m rs k...

Page 380: ...Homok 0 90 Fasz n por 0 96 Talaj 0 92 s 0 96 Lakkk szlet 0 80 s 0 95 V z 0 92 s 0 96 Lakkk szlet matt 0 97 J g 0 96 s 0 98 Gumi fekete 0 94 H 0 83 M anyag 0 85 s 0 95 veg 0 90 s 0 95 Faipari 0 90 Ker...

Page 381: ...I INFORMATION FOR THE USERS INFORMATIONS POUR LES UTILIZATEURS INFORMATIONEN FUR DIE BENUTZER INFORMACION DEL USUARIO A INFORMACAO DOS UTILIZADORES INFORMATIE VOOR DE GEBRUIKERS INFORMACJE DLA U YTKOW...

Page 382: ...a di tipo equivalente Lo smaltimento abusivo del prodotto da parte dell utente comporta l applicazione delle sanzioni amministrative di cui al Decreto Legislativo N 49 del 14 Marzo 2014 EN At the end...

Page 383: ...E Al final de su vida util el dispositivo debe separarse de los otros residuos El usuario debe remitir el dispositivo y todos sus componentes a un centro adecuado de centro de reciclaje electrot cnic...

Page 384: ...iec okresu eksploatacji urz dzenie nale y oddzieli od pozosta ych odpad w Umie urz dzenie wraz ze wszystkimi jego cz ciami w centrum centrum przetwarzania odpad w elektronicznych i elektrotechnicznych...

Page 385: ...3 56 EU and that can not be disposed of with normal household waste Please inform yourself about the local rules on separate collection of batteries because correct disposal helps to prevent negative...

Page 386: ...biertas por la Directiva Europea 2013 56 UE y que no pueden desecharse con la basura dom stica normal Inf rmese sobre las normas locales sobre la recogida selectiva de bater as porque la eliminaci n c...

Page 387: ...kt rych nie mo na wyrzuca wraz ze zwyk ymi odpadami domowymi Prosz zapozna si z lokalnymi przepisami dotycz cymi selektywnej zbi rki baterii poniewa prawid owa utylizacja pomaga zapobiega negatywnym k...

Page 388: ...388...

Reviews: