2
Note
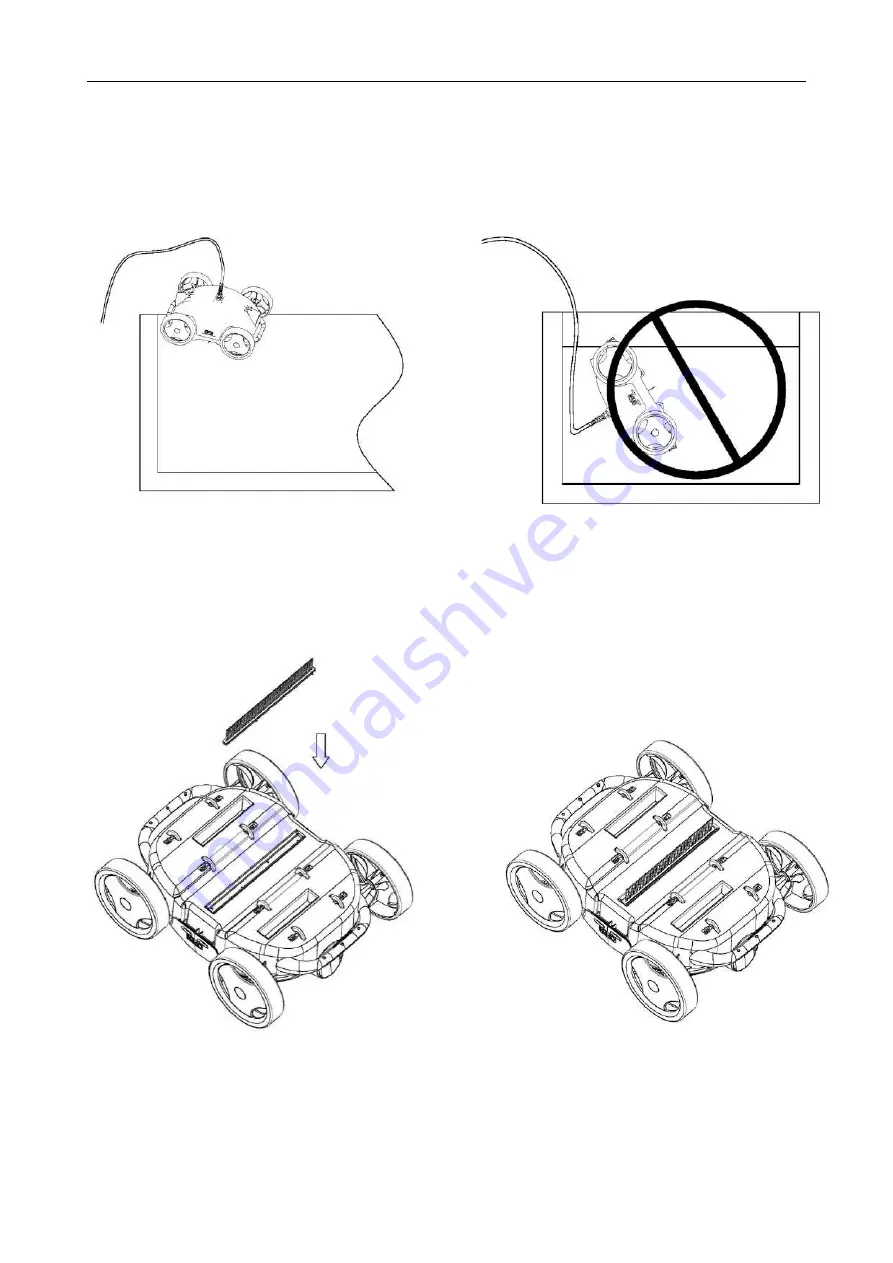
1.
Putting into or lifting out from pool with the cleaner bottom toward the wall to avoid any possible scratch
to the pool surface.
2.
Install the brush before use to avoid possible dirt leaks.
Page 1: ...ly warranty dose not cover the risk of using unauthorized adapter to charge the battery 10 Never charge the battery when cleaner in water charge the battery indoor and make sure at least 3 5m away fro...
Page 2: ...2 Note 1 Putting into or lifting out from pool with the cleaner bottom toward the wall to avoid any possible scratch to the pool surface 2 Install the brush before use to avoid possible dirt leaks...
Page 3: ...3 Contents Introduction P 4 Safety P 4 Specifications P 4 Cleaner Structure P 5 Operation Instructions P 5 Trouble Shooting P 17 Packing List P 17...
Page 4: ...the battery pack within environment temperature of 10 45 If the batt ery pack and cleaner need to be stored over 3 months please put it in an environment with temperature of 23 5 humidity of 65 20 RH...
Page 5: ...5 Cleaner Structure Assemble the cleaner according to above structure Operation Instruction 5 1 Panel Top cover Chassis Filter tray 3 5 6 4 1 2...
Page 6: ...e Function Instruction 1 ON Power on 2 OFF Power off 3 Program Pool size selection Chose the proper program based on pool size S Moving direction reverses every 18 seconds ideal for pool size M Moving...
Page 7: ...is deleting cleaner moves in single direction till it touches wall indicator of S M L flashes in sequence while the indicator S L flashes in sequence once the cleaner touches the wall When operated b...
Page 8: ...light 5 3 Battery charging 5 3 1 Lift out the cleaner out of pool before charge the battery 5 3 2 Connect to adapter 5 3 3 Connect to home power 5 3 4 Indicator of adapter Indicator light color Statu...
Page 9: ...he nozzle by rotating it to control the moving path 5 4 1 Settings of nozzle Nozzle angle from 0 to 60 Cleaner moves in approximately straight line when nozzles in position 0 Cleaner moves in a more c...
Page 10: ...10 Moving path Setting 2 0 45 When the cleaner move in too much curved line to cover the pool Nozzle Moving path...
Page 11: ...ng 3 0 30 When the cleaner still moves in too much curved line to cover the pool by above settings Nozzle Moving path Setting 4 15 60 when the cleaner need to move in more curved line to cover the poo...
Page 12: ...12 Moving path Setting 5 30 60 Cleaner moves in more curved line than setting 4 Nozzle Moving path...
Page 13: ...13 Setting 6 30 30 For round pool Nozzle Moving path Setting 7 45 45 When the cleaner does not have full coverage of pool by setting 6 and need to move in more curved line Nozzle...
Page 14: ...thod of putting the cleaner into pool Hold the battery pack by one hand and hold Hold the cable till the cleaner immerse into the handle of the cleaner by the other hand to pool floor putting it into...
Page 15: ...Clean the filter tray Open the cleaner from both side of themachine Take off the filter trayClean the filter tray Wash the filter tray and chassis then Push both side of the clips on reassemble the c...
Page 16: ...lter them by main filter system of the pool 5 8 Helpful tips i Power off and take out batterypack immediately after use ii The cleaner should not touch pool walls while lifting out to avoid scratching...
Page 17: ...of pool Nozzle in improper direction Adjust nozzle into proper direction so as to move in more curved path Cleaner always move along pool edge Adjust nozzle or use sweeping mode Customized pool shape...