Page 11
Cleaning
WARNING! Do not operate the unit unless the
following are properly installed: DBI CELL,
REAR FILTER ASSEMBLY (with all three
pieces in place), and the REAR COVER.
CAUTION! The unit should be powered off and the
POWER CORD should be disconnected whenever
cleaning/disassembling/reassembling/servicing.
Unit Exterior
Wipe down the exterior with a damp cloth or use
compressed air or a vacuum cleaner to remove
dust. A non-abrasive cleaner may be used on
the surfaces of the exterior, but do not let non-
alcohol based cleaners come in contact with the
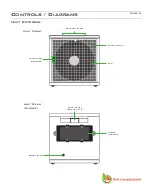
IONIZATION NEEDLE at the left center of the
FRONT GRILLE.
Filter Assembly
Clean water or compressed air may be passed
through the filter assemblies or through the
individual parts of the filters when they are
disassembled. To disassemble the FILTER
ASSEMBLIES grasp the assemblies by the sides
of the rim around the filter and carefully separate
the rim from the FILTER ASSEMBLY. The three
filters (mesh, foam, and honeycomb) can then
be removed and cleaned separately. If using
water you must allow the filters to dry separately
before reassembly. When reassembling, the
HONEYCOMB FILTER goes in first, then the
FOAM FILTER, and finally the thin MESH
FILTER. Then simply reattach the rim to the
FILTER ASSEMBLY.
Ionization Needle
Using a cotton applicator (Q-Tip), apply a small
amount of clear alcohol based cleaner (or rubbing
alcohol) to the IONIZATION NEEDLE. You may
also use compressed air to blow off any dust that
may accumulate near the IONIZATION NEEDLE.
Unit Interior
Using a damp cloth, a clear alcohol based cleaner,
or compressed air/vacuum cleaner carefully clean
the walls and components inside of the unit, after
completing the DISASSEMBLY procedures.
PCO Cell
Using compressed air or a vacuum blow/suck the
dust out of the PCO Cell. Do not use any liquid to
clean the PCO CELL.
DBI Cell
Using compressed air or a vacuum blow/suck the
dust out of the DBI Cell. Do not use any liquid to
clean the DBI CELL.


