background image

Installation Instructions for 45HM IDH Max® 1300 Mortise Locks

BEST ACCESS SYSTEMS

a Division of Stanley Security Solutions, Inc.

5

Installation Instructions for 45HM IDH Max® 1300 Mortise Locks

Configuring & installing the mortise case

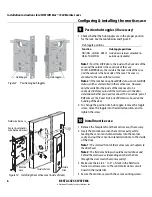
5  Run the sensor wiring from the location of the access 

control panel to the location for the wire transfer hinge.
To match the sensor wire colors, refer to the table below.

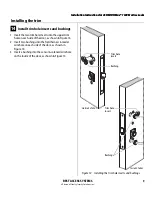
7  Pull the field wiring down the wall and through the 

access hole in the frame.

7

Optional: Install door status switch


(for deadbolt function locks with door 
sensing only)

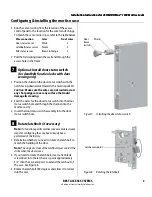
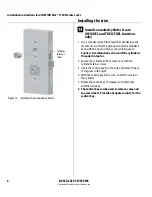
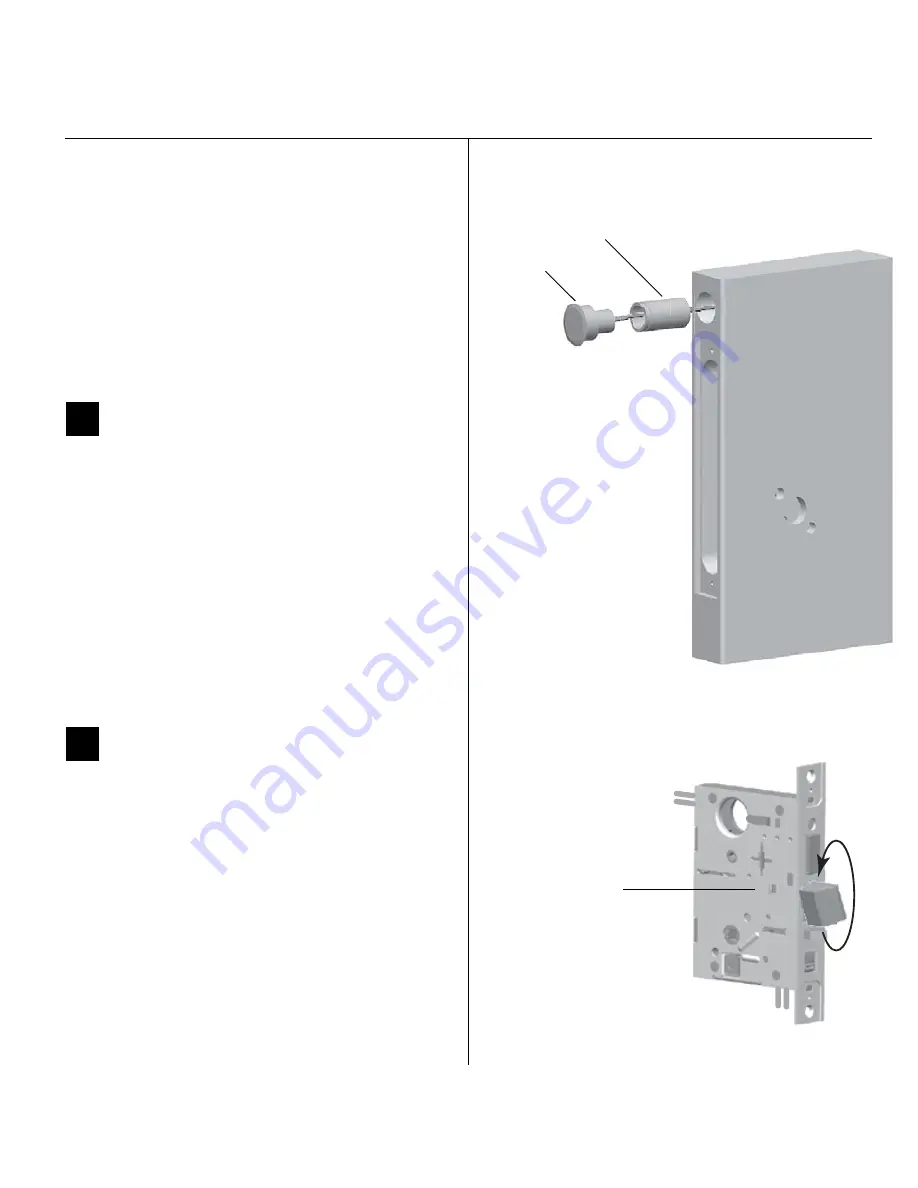
1  Position the shield on the door status switch with the 

notch facing downwards (towards the mortise pocket).

Caution:  

Make sure the wires are not routed across 

any sharp edges or over any surface that could 
damage its sleeving.

2  Feed the wires for the door status switch into the door 

status switch hole and through the channel into the 
mortise cavity.

3  Insert the door status switch assembly into the door 

status switch hole.

8

Rotate latchbolt 

(if necessary)

Note: 

If a function specific mortise case was ordered, some 

steps for configuring the case have already been 
performed at the factory.

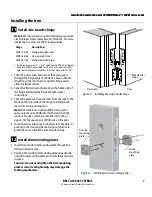
1  Determine whether you need to rotate the latchbolt to 

match the handing of the door.

Note: 

The angled surface of the latchbolt must contact the 

strike when the door closes.

2  If you need to rotate the latchbolt, insert a flat blade 

screwdriver into the latch access point approximately 
1/2

 into the case and press to extend the latch out of 

the case. See Figure 8.

3  Rotate the latchbolt 180 degrees and allow it to retract 

into the case.

Wire connection

Color

No. of wires

Door status sensor

White

2

Latchbolt status sensor

Purple

2

RQE status sensor

Brown & Orange

2

 Figure 7

Installing the door status switch

Door 
status
switch

Shield

 Figure 8

Rotating the latchbolt

Latch access point

Summary of Contents for 45HM IDH Max 1300

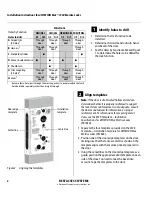
Page 1: ...grated trim door status detection ability to exit without triggering an alarm RQE The figure below shows the relationship between the components in the IDH Max System Installation Instructions for 45HM IDH Max 1300 Mortise Locks Power supply Lock Wire transfer hinge Field wire harness Power 2 RS 485 Communication 2 B A S I S or Lenel Access Control Panel B B A A C F H D G G For hole sizes see the ...

Page 2: ... a guide position the appropriate door template on each side of the door You need to take the bevel into account Tape the templates to the door Figure 2 Aligning the templates Installation template Door edge template Centerline Centerline 1 Identify holes to drill 1 Determine the lock function to be installed 2 Determine the inside and outside hand and bevel of the door 3 See the HolesbyFunction t...

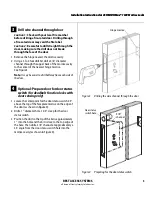
Page 3: ...avity to the center of the nearest hinge mortise See Figure 3 Note It may be easier to drill halfway from each side of the door 4 Optional Prepare door for door status switch for deadbolt function locks with door sensing only 1 Locate the centerpoint for the door status switch 2 5 above the top of the faceplate mortise on the edge of the door as shown in Figure 4 2 Drill a 1 diameter hole 1 3 4 de...

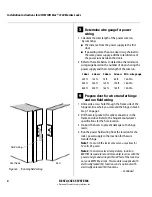
Page 4: ...in Task 3 Step 1 on page 3 2 Drill holes or pockets for splice connectors in the frame and door Refer to the hinge manufacturer s specifications for the hole location 3 De burr the holes to prevent damage to the hinge leads 4 Run the power field wiring from the location for the lock s power supply to the location for the wire transfer hinge Note 1 To match the lock s wire color use yellow for 12 v...

Page 5: ...r the door status switch into the door status switch hole and through the channel into the mortise cavity 3 Insert the door status switch assembly into the door status switch hole 8 Rotate latchbolt if necessary Note Ifafunctionspecificmortisecasewasordered some steps for configuring the case have already been performed at the factory 1 Determine whether you need to rotate the latchbolt to match t...

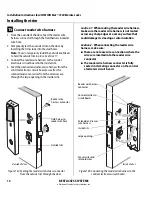
Page 6: ...ange the position of a hub toggle remove the toggle screw move the toggle into the desired position and re tighten the screw 10 Install mortise case 1 Remove the faceplate from the mortise case if necessary 2 Insert the mortise case into the mortise cavity while feeding the sensor and solenoid wires into the mortise cavity and out the sensor solenoid wire hole to the inside of the door Note 1 The ...

Page 7: ... of RQE wires for the switch on the inside of the door which you identified in Task 9 on page 6 Put the unused pair of RQE wires in the door 4 Insert the wires and splice connectors into the holes or pockets in the door and frame being careful not to pinch the wires Install the wire transfer hinge 12 Install trim mounting plates 1 Insert the outside trim mounting plate through the door and mortise...

Page 8: ...shown in Figure 13 Caution A malfunction can occur if the cylinder is threaded in too far 2 Secure the cylinder in the mortise case with the cylinder retainer screw 3 Insert the control key into the core and rotate the key 15 degrees to the right 4 With the control key in the core insert the core into the cylinder 5 Rotate the control key 15 degrees to the left and withdraw the key 6 The control k...

Page 9: ...1 Insert the two trim hole inserts into the upper trim hole on each side of the door as shown in Figure 14 2 Insert two bushings into the field harness reader wire hole on each side of the door as shown in Figure 14 3 Insert a bushing into the sensor solenoid wire hole on the inside of the door as shown in Figure 14 Figure 14 Installing the trim hole inserts and bushings Outside of door Trim hole ...

Page 10: ...ugh the large opening in the inside trim Figure 15a Feeding the reader wire harness connector from the outside trim through the door Reader wire harness connector Field harness reader wire hole Outside trim Outside of door Figure 15b Connecting the reader wire harness to the control electronics circuit board Reader wire harness connector Sensor wires and solenoid wires Solenoid and sensor wire har...

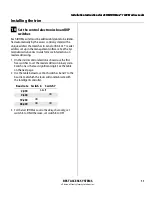
Page 11: ...eader address set up in the management software See the Sys tem Administration User Guide for more information on reader addressing 1 On the inside control electronics board use the first five switches to set the reader address in binary code Switch one is the least significant digit See the table on the next page 2 Use the table below to set both switches 6 and 7 to the baud rate at which the loc...

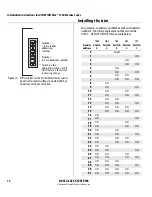
Page 12: ... ON ON ON 8 ON 9 ON ON 10 ON ON 11 ON ON ON 12 ON ON 13 ON ON ON 14 ON ON ON 15 ON ON ON ON 16 ON 17 ON ON 18 ON ON 19 ON ON ON 20 ON ON 21 ON ON ON 22 ON ON ON 23 ON ON ON ON 24 ON ON 25 ON ON ON 26 ON ON ON 27 ON ON ON ON 28 ON ON ON 29 ON ON ON ON 30 ON ON ON ON 31 ON ON ON ON ON 1 2 3 4 5 6 7 8 ON Figure 16 DIP switches on the Control Electronics circuit board set to reader address 5 and 38 40...

Page 13: ...nsor wire harness the sensor wires and the solenoid wires make sure the wires are not routed across any sharp edges or over any surface that could damage their sleeving or wire insulation 3 Make the solenoid connection and three sensor connections and place the wires into the inside trim Caution When making the sensor connections and solenoid connection make sure there are no loose wire connection...

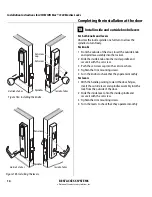
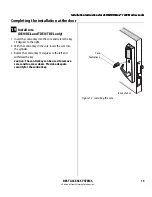
Page 14: ...and secure it with the set screw 3 Push the set screw cap into the set screw hole 4 Tighten the trim mounting screws 5 Turn the knobs to check that they operate smoothly For levers 1 With the handle pointing toward the door hinges insert the outside lever and spindles assembly into the lock from the outside of the door 2 Slide the inside lever onto the inside spindle and secure it with the set scr...

Page 15: ...nstall core DEU DEL and TDEU TDEL only 1 Insert the control key into the core and rotate the key 15 degrees to the right 2 With the control key in the core insert the core into the cylinder 3 Rotate the control key 15 degrees to the left and withdraw the key Caution The control key can be used to remove cores and to access doors Provide adequate security for the control key Figure 19 Installing th...

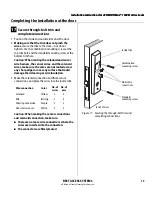
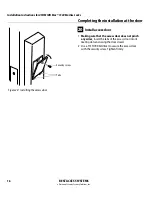
Page 16: ...installation at the door 16 20 Install access door 1 Making sure that the access door does not pinch any wires insert the tabs of the access door into its mating slots and swing the door closed 2 Use a T15 TORX bit driver to secure the access door with the security screw Tighten firmly Figure 20 Installing the access door Security screw Tabs ...

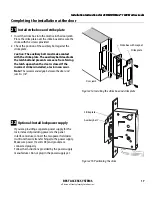
Page 17: ...ocks the latchbolt and prevents someone from forcing the latch open when the door is closed If the incorrect strike is installed a lock in can occur Note The recommended gap between the door and jamb is 1 8 22 Optional Install lock power supply If you are providing a separate power supply for the lock instead of providing power via the panel interface module connect the two power field wires run f...

Page 18: ...9 1 Check the control electronics red status LED Both LEDs should be blinking red indicating that the communication connection between the access con trol panel and the lock s control electronics circuit board is OK 2 After performing any necessary programming for the lock and putting the door in a locked mode use a valid token to access the lock Confirm that the red reader LED green readerLED and...

Page 19: ... refer to the IDH Max Lock Service Manual T60775 and to the documentation pro vided by the manufacturer of the access control panel reader interface You notice Possible causes include You should Control electronics red status LED and access control panel s red status LED are on only 20 of the time Communication between the lock s control electronics circuit board and the access control panel has b...

Page 20: ...BEST ACCESS SYSTEMS a Division of Stanley Security Solutions Inc 2006 Stanley Security Solutions Inc and Stanley Logistics Inc T81626 Rev 1929247 ER 7991 12 Feb 2007 ...

Reviews: