background image

4.2.6

Audio Description

button  to  enter.

button  to  enter  and

  press 

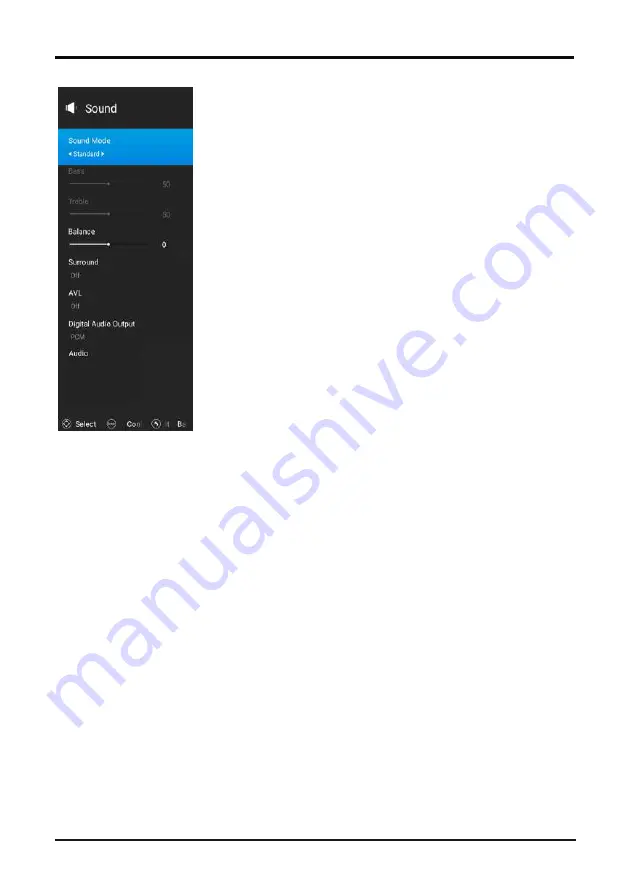
Digital Audio Output

Audio Description

press ◄/► button to select. 

4.2.5

4.2.4 AVL

4.2.3 

4.2.2 Balance

4.2.1 Sound mode 

4.2 Sound Menu

LED COLOR TV

9

Press ▲/▼ button to select 

Sound mode

, and then press 

ENTER 

button to enter. And then 

Press  ▲/▼  button  to  select  Balance,  then  press 

ENTER

button  to  enter  and  press  ◄/► 

button to adjust. Then press 

MENU

button to return back the previous menu directly.

Surround

Press  ▲/▼  button  to  select  surround,  then  press 

ENTER

button  to  enter  and  press  ◄/► 

button to adjust. Then press 

MENU

button to return back the previous menu directly.

Press ▲/▼ button to select 

AVL, 

then press 

ENTER

button to enter and

press ◄/► button 

to adjust. It can only be adjusted under user mode Then press 

MENU

button to return back 

the previous menu directly.

Digital Audio output

Press  ▲/▼  button  to  select 

,  then  press 

ENTER

◄/► button

to select.

Description

Press  ▲/▼  button  to  select 

,  then  press 

ENTER

Summary of Contents for BS-75UK721UHD

Page 1: ...Please read these instructions before operating your set and retain them for future reference Model BS 75UK721UHD RWZ400 H544 LED COLOR TV Operating Instruction...

Page 2: ...PRECAUTION Note If the manual is inconsistent with the product please refer to the actual product...

Page 3: ...hildren can be avoided by taking simple precautions such as If your existing television set is being retained and relocated the same considerations as above should be applied IMPORTANT INFORMATION Usi...

Page 4: ...ight cause permanent destruction to the display Be sure not to display motionless picture on the LED TV for more than 2 hours because it would cause picture remnants to appear which is called screen b...

Page 5: ...to the wall or cabinet Ensure the TV is positioned close to the wall to avoid it falling when pushed 10cm 30cm 10cm 10cm When you turning the TV set do not hold the top side of the TV set you should h...

Page 6: ...reparation of TV 1 1 Accessories 1 2 Installation of Stand 1 3 Keys and Interfaces 1 4 Remote Control 1 5 Installation of Batteries 2 Basic Operation 2 1 Power ON OFF Optional 2 2 2 3 4 6 6 6 6 2 2 Se...

Page 7: ...assembled Optional 1 2 Installation of Stand 1 Place the TV with the front panel facing downwards on the soft cloth or soft pads on a desk 2 Insert the stand into the bottom socket of the TV 3 Insert...

Page 8: ...Remote sensor window 2 Power indicator 3 Speaker 10 Standby key 11 Power plug input VOL VOL CH CH INPUT MENU 8 Menu key 7 CH key 6 CH key 5 Volume key 4 Volume key 9 INPUT key COAXIAL RJ45 HDMI1 RF I...

Page 9: ...ration 21 22 ENTER Confirm or enter 9 Entering the website 7 10 TXT Enter or exit teletext 23 TIMESHIFT DTV mode time shift MEDIA mode Press one time to pause press again to playback 13 SUBTITLE DTV m...

Page 10: ...LED COLOR TV 5 Here is only the sketch please in kind prevail...

Page 11: ...no special fluorescent light or neon light around LED COLOR TV Here is only the sketch please in kind prevail 2 Basic Operation 2 1 Power ON OFF Optional Connect the power cord to the AC input Insert...

Page 12: ...N OSD MENU Press button to select the MENU you want Press ENTER button or button to enter the sub menu and press button to return back to the previous menu Press button to select the option and then p...

Page 13: ...cture Mode then press ENTER button to enter and press Press button to select Aspect Ratio then press ENTER button to enter and press button to adjust Then press MENU button to return back the previous...

Page 14: ...tton to adjust Then press MENU button to return back the previous menu directly Surround Press button to select surround then press ENTER button to enter and press button to adjust Then press MENU but...

Page 15: ...1 OSD Timer LED COLOR TV 10 Power Down Press ENTER button to enter and select tton to select OSD Timer Press bu imer Press button to select Sleep T Press ENTER button to enter and select imer Press b...

Page 16: ...ation button to enter and then press to select 4 5 1 Menu Language LED COLOR TV 11 4 5 Setting Menu Press button to select Menu Language Press button to select Location and then press to select Press...

Page 17: ...button to select HDMI CEC Setup Device Auto Power Off TV Auto Power on 4 6 CEC Menu LED COLOR TV 12 return the previous menu Press Press EXIT button to button on the remote control 4 7 Channel Menu 4...

Page 18: ...t Auto Search and then press ENTER button to play the channel 4 7 5 Manual Tuning Press button to select Manual Tuning and then press ENTER button to play the 4 7 6 Record menu Press button to select...

Page 19: ...Home Page The picture is for a reference only the actual item is the standard Press button to select APPS in the Source Menu and then press ENTER or to enter Press button to select Setting in the Sour...

Page 20: ...5 2 2 Time Setting 5 2 1 Network Setting LED COLOR TV 15 Press button to select the Network that you can open the Wi Fi...

Page 21: ...then press SOURCE button to set the Source to Media Press button to select MEDIA in the Source Menu and then press ENTER or to enter You can also enter the Media by pressing MEDIA button on the remot...

Page 22: ...then press ENTER button to enter Press EXIT button to return back to the previous menu You can see the information of the current playing photo after press INFO button then press button to play or pa...

Page 23: ...5 3 4 App 5 3 3 Video Applicatitons LED COLOR TV 18 lications Press button to select in the main menu then press ENTER button to enter Press EXIT button to return back to the previous menu...

Page 24: ...na Input Antenna Input USB Input USB Input HDMI Input HDMI Input VGA Input VGA Input PC AUDIO Input PC AUDIO Input Audio Input L R Audio Input L R Video Input Video Input YPbPr Input YPbPr Input RJ45...

Page 25: ...i 576p 720x576 720p 1280x720 1080i 1080p 1920x1080 59 94 59 94 50 00 50 00 50 00 60 00 50 00 60 00 60 00 50 00 15 734 31 468 15 625 31 25 37 50 45 00 28 13 33 75 67 50 56 25 Horizontal Frequency Khz V...

Page 26: ...the input signal Check the batteries are not drained Use new batteries Check that the remote control is within the operating range Check that the remote control is pointed to the remote control window...

Reviews: