Bernina Overlocker Plus Workbook Download Page 16

 16 

7/01/16 

BERNINA


Overlocker Workbook 2 

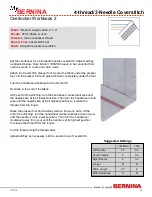
4-thread/3-Needle Coverstitch 

Fabric:


Medium weight cotton, 4” x 8”


Needle:


80/12 Sharp or JLx2


Thread: 

4 cones overlocker thread


Presser Foot: 

Coverstitch Foot 

Stitch:


4-thread/3-needle coverstitch   

Set the overlocker for a 4-thread/3-needle coverstitch. Adjust settings 
as directed below. 

Note: Model 1300MDC needs to be converted from 

overlock mode to cover and chain mode.  
 

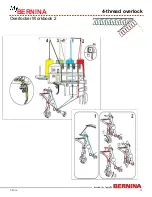
Attach the Coverstitch presser foot. Center the fabric under the presser 
foot. Lift the presser foot and place the fabric completely under the foot. 
 
Turn the handwheel clockwise for the first stitch. 
 
Overlock to the end of the fabric. 
 
At the end of the stitching, turn the handwheel counterclockwise until 
the needles are at their lowest position. Then turn the handwheel clock-
wise until the needles are at their highest position to release the 
threads from the looper. 
 
Raise the presser foot and carefully remove the work. 

Note: At the        

end of the stitching, turn the handwheel counterclockwise (toward you)   
until the needle is at its lowest position. Then turn the handwheel   
clockwise (away from you) until the needle is at its highest position     
to release the thread from the looper.  

 
Cut the thread using the thread cutter. 
 
Adjust settings as necessary; stitch a second row of coverstitch.


Suggested Settings


1300MDC 

L 220 

Left Needle


3.2 

3-5 

Center Needle


3-5 

Right Needle


3-5 

Looper


Stitch Length


3.5 

Differential Feed


Summary of Contents for Overlocker Plus

Page 1: ...ica Permission granted to copy and distribute in original form only Content may not be altered or used in any other form or under any other branding Overlocker Plus For current BERNINA models Overlock...

Page 2: ...ot Decorative Tucks 12 Blindstitch Foot Joining Lace to Lace 13 Cording Foot Shaped Edges 14 Cording Foot Wired Edges 15 The remainder of the exercises are for models 1300MDC and L 220 only 3 Needle C...

Page 3: ...attachments are included with the purchase of the overlocker and others are optional depending on the model Each presser foot snaps onto the shank of the overlocker easy to change without the use of...

Page 4: ...ighten the elastic along the right edge of the slot Turn the hand wheel to lower the needles Lower the roller guide Using the small screwdriver loosen the set screw on the front of the elasticator and...

Page 5: ...This also lowers the feed dog Insert the fabric under the Gathering Foot up against the needles The fabric should be on the stitch plate Lower the presser foot and overlock to the first mark Adjust t...

Page 6: ...fabric right side up under the Gathering Foot with the fabric on the stitch plate Lower presser foot Sew several stitches until the fabric is under the needles Turn the handwheel to lower the needles...

Page 7: ...ommo date the Guide Insert the filler cord into the guide from front to back Raise the Multi Purpose Foot and insert the filler cord into the guide on the left side of the foot Feed the filler cord un...

Page 8: ...h Guide Note 700D and 800DL need the Attachment Base to accommodate the Guide Place one of the 3 x 8 pieces of fabric under the foot right side up Wrap the bias strip around the cord and place the wra...

Page 9: ...and metal post directly behind the fixing screw Hint Place the horseshoe shaped slot over the screw then rotate the attachment to lock over the metal post Tighten fixing screw Note 700D and 800DL also...

Page 10: ...the Multi Purpose Foot with Guide Lay the pre strung beads in the channel on the right side of the foot threading them under the rear guide see instruction leaflet for the Multi Purpose Foot with Guid...

Page 11: ...low Attach the Blindstitch Foot Fold the fabric under for a 1 blind hem and then turn the body of the project back so that extends beyond the fold as in a conventional blind hem Place the fabric under...

Page 12: ...ges at lower position Move the fabric guide just to the left of the knife line on the stitch plate Mark three lines 1 apart across the fabric Fold the fabric wrong sides together along one marked line...

Page 13: ...toward you Raise the upper knife and lock it in the up position You will not cut fabric with this technique Move the fabric guide just to the left of the knife line on the stitch plate Stiffen the lac...

Page 14: ...irected be low Pull the Stitch Selection Lever towards you Attach the Cording Foot Following the directions in the instruction leaflet for the Cording Foot insert the nylon fishing line through the gu...

Page 15: ...the guides Place the fabric under the presser foot and overlock along one 18 edge feeding the wire through the foot as you overlock Use wire cutters to cut the wire Do not use the overlocker knives R...

Page 16: ...o the end of the fabric At the end of the stitching turn the handwheel counterclockwise until the needles are at their lowest position Then turn the handwheel clock wise until the needles are at their...

Page 17: ...ed from overlock mode to cover and chain mode Attach the Coverstitch presser foot Fold up a 2 hem along the 8 edge of the fabric Glue stick or pin in place The coverstitch hem attachment may be used o...

Page 18: ...he fabric At the end of the stitching turn the handwheel counterclockwise until the needles are at their lowest position Then turn the hand wheel Clockwise until the needles are at their highest posit...

Page 19: ...nation presser foot for overlock and chain stitch model L 220 has an optional chain stitch foot or the Standard presser foot may be used With right sides together place the fabric under the needles Al...

Page 20: ...presser foot for overlock and chain stitch model L 220 has an optional chain stitch foot or the Stan dard presser foot may be used Place the stabilizer against the wrong side of the denim Place the de...

Page 21: ...21 7 01 16 BERNINA Overlocker Workbook 2 4 thread overlock...

Page 22: ...22 7 01 16 BERNINA Overlocker Workbook 2 3 thread flatlock...

Page 23: ...23 7 01 16 BERNINA Overlocker Workbook 2 3 thread rolled hem...

Page 24: ...24 7 01 16 BERNINA Overlocker Workbook 2 4 thread 3 needle coverstitch...

Page 25: ...25 7 01 16 BERNINA Overlocker Workbook 2 3 thread 2 needle coverstitch...

Page 26: ...26 7 01 16 BERNINA Overlocker Workbook 2 2 thread 1 needle chainstitch...

Reviews: