


My
BERNINA
15
B E R N I N A O V E R L O C K E R W O R K B O O K
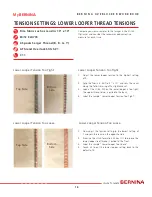
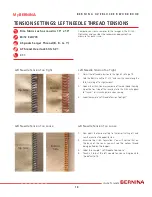
TENSION SETTINGS: UPPER LOOPER THREAD TENSIONS
Create some imperfect stitch formations by adjusting
the thread tension settings for each stitch to extremes as
follows below. Label each sample as it is sewn to identify
the thread tension as: too loose or too tight. This will serve
as a physical reference, much like the stitch optimizer, to
help you identify the tension that needs correcting with
future stitch issues.
Compare your sewn samples to the images in the Stitch
Optimizer and consider the recommended corrective
measure for each issue.
1.
Adjust the upper looper tension to the highest setting
of 9.
2.
Fold the fabric in half to 5" x 10” and sew the seam
along the fold, trimming off a slight amount.
3.
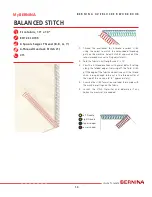
Look at the stitch. You can see that when the tension
is too tight the upper looper pulls the lower looper (red
thread) over to the right side.
4.
Label the sample "Upper Looper Tension Too Tight".
1.
Now adjust the tension setting to the lowest setting of
1, and sew the seam on the opposite side.
2.
Examine the stitch formation. When the upper looper is
too loose, the blue thread is pulled to the back side of
the fabric.
3.
Label the sample "Upper Looper Too Loose".
4.
Touch clr to put the upper looper setting back to the
default of 4.
Firm fabric such as muslin, 10" x 10"
80/12 ELX705
4 Spools Serger Thread (B, R, G, Y)
4-Thread Overlock Stitch #1)
C 11
Upper Looper Tension Too Tight
Upper Looper Tension Too Tight
Upper Looper Tension Too Loose
Upper Looper Tension Too Loose
Top Side
Bottom
Side
Bottom
Side
Top Side


