Bernina Happy Voyager Resource Manual Download Page 57


                               Happy Voyager


                              Installing the Cap Device/Machine Set Up                            22


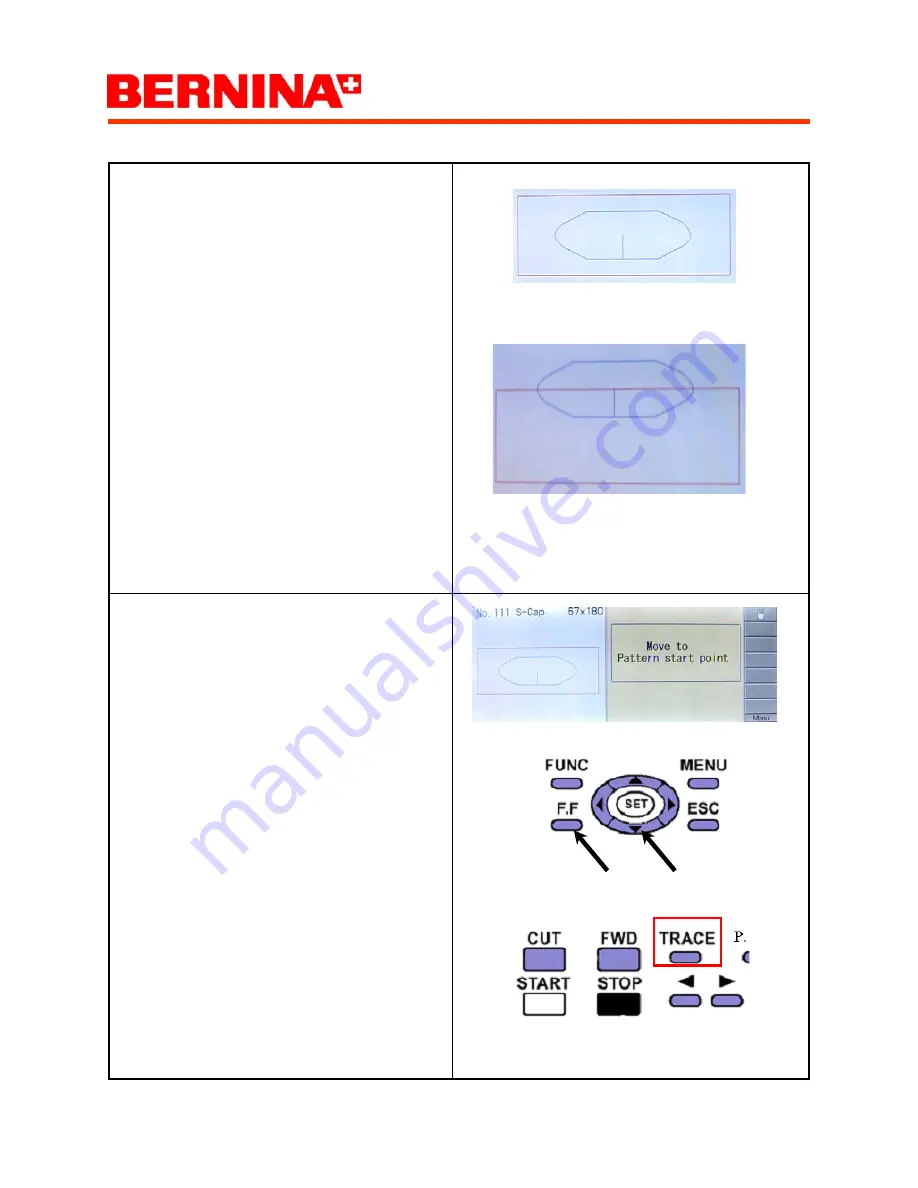
Explanation: The outer outline (red) represents 
the safe embroidery area of the hoop. The pattern 
is represented in the inside the frame (blue). 


Only place the pattern within the red boundary 
area.  


Note: Always perform a TRACE prior to em-
broidering. 


Use the arrow keys with the 

FF 

(Fast Forward) 

key to move the pattern to position the design and 
select 

SET


Select 

ESC 

to exit the frame menu, and 

ESC 

again to return to the drive menu.  


Always perform a 

TRACE  

before starting to em-

broider  to make sure the presser foot stays within 
the inside parameter of the hoop.  


Summary of Contents for Happy Voyager

Page 1: ...Happy Voyager Resource Manual...

Page 2: ...intended to be complete or to replace the original Happy Voyager User Operation Manual Its purpose is solely to educate the Bernina Happy Voyager Machine Operators This Manual is copy right protected...

Page 3: ...0 3 Using the Trace Function 15 6 4 Forward and Backward Tracking 16 3 8 3 9 Design Mulipulations Scaling the Size of the Pattern 17 12 2 Rotating Mirroring Design 18 9 5 Adjusting the Satin Stitch Wi...

Page 4: ...Forward In conjunction with the arrow keys increases frame movement speed for faster tracking buttons Plus minus buttons increases and decreases the machine embroidery speed ARROR button Left Right Mo...

Page 5: ...ks the frame moves backwards by 1 stitch at a time continuously Stop button must be pressed to stop Keep pressing longer still The button function locks the frame goes back in multiples of 10 stitches...

Page 6: ...he desire function and SET to execute Explanation of Functions TOP Returns frame to the top of the pattern CENTER Moves the frame to the center ORIGIN Moves the frame to the start point POSTITION Move...

Page 7: ...sign and its position is dis played in the large left hand display area The display shows the amounts of stitches per pattern And the current stitch count during the embroidery process In the upper ri...

Page 8: ...s the maximum speed setting The right hand display shows the actual embroidery speed Currently selected needle The left hand dis play represents the machine embroidery head The right hand display show...

Page 9: ...Icon appears when a cap frame is mounted to the machine Automatic sen sor activation Wide cap frame Icon appears when the wide cap frame is selected The frame type is selected in the OPTION 17 Top The...

Page 10: ...n millimeters Note If the numbers are equal i e 37 4 37 4 and 29 2 29 2 the design is digitized center center X distance moved from start point Y distance moved from start point Size of Pattern info H...

Page 11: ...gns back to a memory card SETTING Menu Design manipulations such as resizing rotating and repeating Addition features such as satin stitch width frame out and design offset NEEDLE Menu Color selection...

Page 12: ...individual stitches within a design FRAME Menu Frame selection and design placement within a selected hoop LETTER Menu Lettering program for basic letter ing CONTRAST Menu Display screen manipulation...

Page 13: ...ftware Version 5 Each square represents 1cm and is compatible with the metric Happy Voyager machine grid Before starting Bernina Embroidery Software Version 5 the computer has to be set to metric dime...

Page 14: ...used with the Happy Voyager ma chine Note The computer must be set to metric dimensions prior Start the Bernina Embroidery Software Version 5 program Right mouse click on the HOOP ICON se lect HOOP an...

Page 15: ...20mm 150mm and 180mm For Format select Oval Change the Rectangle height to 10 00 Change the Width to 180 00 Change the Total height to 180 00 After changing the dimensions select Save Hoop As to save...

Page 16: ...angle Cap hoop select the rectan gle and adjust the setting for the following sizes Happy Standard Cap 67X 180mm Happy Wide Cap 67 X 290mm Note The actual sewing area is smaller to account for the pre...

Page 17: ...rive mode Perform all creations and manipulation in the pow erful Bernina Embroidery Software Version 5 When satisfied save design both in art format and dst format Only dst and tap formatted designs...

Page 18: ...N to search for a design When searching for a design make sure the disk format is set to dst Once pattern is selected use the TRANSFER Icon to send the design to the machine Note The machine must be i...

Page 19: ...memory cards with adaptors for dst data transfer to the machine Perform all creations and manipulation in the pow erful Bernina Embroidery Software Version 5 When satisfied save design both in art fo...

Page 20: ...ard 07 Using a PCMCIA card adaptor greater than 16Mb Recommended 256Mb copy the saved dst de sign to the card Note Machines updated to firmware version 1 05 accept 1Meg memory cards Note Card format i...

Page 21: ...and SET keys The machine displays the names of the designs on the card Using the arrow and SET keys select the design to be copied to the machine Addition designs can be copied by selecting READ When...

Page 22: ...the machine to a PCMCIA card All design specific settings are transferred Note When sending a file to the machine it can be in several formats Such as DST Designs Saved back to a card from the machin...

Page 23: ...Pattern to a Card 08 Use a PCMCIA card adaptor greater than 16Mb Recommended 256Mb Note Machines updated to firmware version 1 05 accept 1Meg memory cards Note Card format is FAT Carefully insert mem...

Page 24: ...move down pass the last submenu icon for the TRANS FER function icon press SET Message Make a HP1 File Select YES and press SET Checks for free space on the card and then dis play Select OK and press...

Page 25: ...extension Note Only the TAP extension is a valid file exten sion Open Happy link Select FILE PATTERN OPEN to search for a design Saved machine design on the card can only be displayed and retrieved a...

Page 26: ...ption prevents accidental changes or deletions Select PATTERN menu press SET Using the arrow keys select a design and select SET Select MENU again use the down arrow key to move to the LOCK function B...

Page 27: ...ress SET Select the ERASE function by pressing SET the following screen appears Use the arrow keys to mark the design for dele tion select SET Select ESC to execute select OK and press SET to delete d...

Page 28: ...menu Up to 99 patterns or 250 000 stitches Select PATTERN and press SET Select a PATTERN by using the arrow keys to move to the pattern desired Press SET to select that pattern Select ESC to exit bac...

Page 29: ...on the front right hand side The far back position is for the bobbin thread Place threads on thread stand Generally place most common color threads Primary colors right next to each other for example...

Page 30: ...er color change area The first spool Icon represent the color currently selected the second spool Icon represents the changed color By using the arrow keys move among the palette to locate a color tha...

Page 31: ...ppy Voyager Programming Thread Colors for the Designs 13 Description of function In the needle menu select the color and the se quence for the color in the displayed design Select NEEDLE menu press SE...

Page 32: ...5 colors for additional allocations Note Needle number 0 means no needle has been chosen The machine will stop waiting for a selection When selecting SET a will appear next to the needle number This...

Page 33: ...to create customized round and square hoops Select FRAME menu and press SET to enter If Message Check the top of pattern data select OK Select the appropriate hoop type Round or Square press SET Selec...

Page 34: ...he pattern to the desired embroidery loca tion select SET to accept Only place the pattern within the red boundary area Select ESC to exit the frame menu and ESC again to return to the drive menu Alwa...

Page 35: ...ility to custom create 5 additional hoops to use for positioning a design Select one of the 5 hoops using the up down blue arrow keys Select Menu to get to the sub menu area Select the HAND icon by pr...

Page 36: ...press SET Press SET to enter the Size Y area Change the numbers to represent the height size you wish for the hoop Press SET to accept Press SET to enter the Size X area Change the numbers to represen...

Page 37: ...before sewing out a pattern Perform a trace by pressing the TRACE button The frame Hoop begins tracing the pattern Design within the hoop Visually observe the hoop and the front back of presser foot...

Page 38: ...urred use the STOP button to back track a few stitches past where the breakage occurred Note The STOP and FWD buttons have several modes Press once moves by one stitch Press continuously beep indicate...

Page 39: ...down to the X scaling option Select SET to choose Use arrow keys up down to change value Select SET to ac cept the change Using the arrow keys arrow down to the Y scaling option Select SET to choose...

Page 40: ...rees Using the arrow keys ar row down to the angle option Select SET to choose Use arrow keys up down to change value Select SET to accept change To rotate by 90 degrees or to mirror Using the arrow k...

Page 41: ...decrease satin stitch from 1 0mm to 1 0 mm in size Min 1 0mm Max 1 0mm Select MENU then using the arrow keys move to SETTING press SET to enter setting menu Us ing the arrow keys arrow down to the wi...

Page 42: ...he cut at jump data option in the EDIT menu Explanation Cut at jump data setting eliminates for example the jumps stitches between two words Example the jump stitch setting is at 7 If the ma chine cou...

Page 43: ...d cuts between the different color changes is not effected Note While jumping between to be the needle bar is disengage and causes a loud clank ing noise Explanation of Issue If cut at jump data is se...

Page 44: ...is set to 1 All stitches with more then 1 jump will be cut the only threads left are those that do not have an actual jump stitch in them Explanation of Issue Use the features in the EDIT mode to remo...

Page 45: ...p data option and using the EDIT menu unwanted jump stitches can be eliminate Select MENU then using the arrow keys move to OPTION press SET After selecting OPTION two Icons appear the one on the righ...

Page 46: ...mp Stitches 20 Select 6 Cut at jump data by using the arrow keys and pressing SET Using the arrow keys change value to 1 and select SET Now all actual jump stitches will be cut Select the ESC key two...

Page 47: ...Jump Stitches 20 Description of function In the EDIT mode by changing the setting of the cut at jump data option unwanted jump stitches can be eliminate Select MENU then using the arrow keys move to E...

Page 48: ...he submenus Use up or down arrow keys to select Zooming rate Select SET to change Suggest change to 200 or 400 magnification Select MENU for the submenus use up or down arrow keys to select Zoom in fo...

Page 49: ...jump jump speed cut stop and end Use the right arrow key to move forward in the pattern and the left arrow key to move back in the pattern Move to the stitch just before the thread to be trimmed press...

Page 50: ...next stitch is market with an blue X The one before the un wanted thread trail Continue process until all unwanted thread trails are removed When finished Select ESC Finish editing mode Use the arrow...

Page 51: ...a number of times Note This allows for multiple copies of the same design embroidered in one hoop Select the pattern be aware of the size of the pat tern in respect to the hoop size and whether the mu...

Page 52: ...tern repeat in the X direction Number of pattern repeat in the Y direction Distance between start point of each pattern in the X direction Patterns spread out in X direction Priority of embroidery dir...

Page 53: ...ttings select SET to activate the setting Use the up and down arrow keys to change the value Select SET to accept that setting To view the multiple patterns select MENU and select the Magnifying glass...

Page 54: ...me device Warning When installing the cab frame be care ful not to damage the actuating lever underneath the right hand side of the X carrier see arrow Note Important prior to turning on the machine m...

Page 55: ...Normal or Wide frame Select OPTION press SET After selecting OPTION two Icons appear the one on the right is for machine options and the one on the left is for pattern options Select the Machine Icon...

Page 56: ...chine Set Up 22 To position pattern inside the cap frame select FRAME press SET Press SET to accept cap Use the up down arrows to chose between the 111S Cap Standard and the 112W Cap Wide Press SET to...

Page 57: ...e the pattern within the red boundary area Note Always perform a TRACE prior to em broidering Use the arrow keys with the FF Fast Forward key to move the pattern to position the design and select SET...

Page 58: ...stem installed Only install the ITCS after the machine has cali brated its X Y position Do not performing power fail recovery with ITCS installed Only move the X Y position or TRACE with the Clamping...

Page 59: ...eight fabrics the other yellow upper window is for bulkier projects Install the lower window into the clamping system by first loosening the thumb screw in the center of the clamping system and slide...

Page 60: ...vot pin on the right hand side and gently pulling the left arm outwards to engage the hole on the opposite side of the upper clamping win dow Install the brackets on the clamping system Note Screws fo...

Page 61: ...menu is displayed Move the pentagram using the FF and arrow func tion all the way to the rear most position Slide the clamping system in from behind 1 and then clamp into frame holders 2 See picture...

Page 62: ...center center Check in window marked 3 if the Y distances from center and the X distances from center are matching pairs If not adjust the center using the digitizing editing software or ignore the in...

Page 63: ...s the di rection of movement when positioning the design in the frame menu Select Menu then using the arrow keys move to OPTION menu press SET After selecting options two Icons will appear the one on...

Page 64: ...row key to move to 18 Re verse frame move Press SET to activated Use the up down keys to change to yes Press SET to accept change Select ESC to exit the FRAME menu The FRAME menu and positioning the p...

Page 65: ...n Change the needle number and allocate different colors needles Note In case the thread ran out with this feature quickly a new thread needle can be assigned to the design rather than changing the th...

Page 66: ...submenus Use the arrow keys to move to the TWO NEEDLES select SET Select the up down arrow keys to chose the nee dle select SET Select the up down arrow keys to select the re placement needle color S...

Page 67: ...fer 26 Description of function With the color change data options saved color data can be transferred to another pattern with similar colors and sequences Select MENU then using the arrow keys move to...

Page 68: ...rans ferred The WRITE function writes the data back to a se lected design Example of practical uses The color change data application is useful pat terns with similar colors and sequences If a pattern...

Page 69: ...select MENU again for the submenus Use the arrow keys to move to the data READ Setting Select SET to start the data read Open the new pattern to apply the color data After entering the NEEDLE menu sel...

Page 70: ...arrow keys move to PO SITION press SET Using the arrow keys move to the STITCH ICON TAB press SET to activate Use the up down arrows to count up down among the stitches Left right moves the bar from t...

Page 71: ...ng the arrow keys move to POSITION press SET to enter position menu Using the arrow keys move to the COLOR ICON TAB press SET to activate Use the up down arrows to count up down among the colors Left...

Page 72: ...eedle bars 1 12 In an steep angle look from left to the right hand side and locate the needle bars through the take up lever slot in the front cover Each needle bar receives one drop of oil Remember t...

Page 73: ...dle plate using the offset screwdriver 2 In the back of the machine remove the rubber cap With the blue handled 3mm hexagonal T driver and turn the main shaft clockwise to the C point 275 degrees 3 Fr...

Page 74: ...rn the main shaft clockwise back to the C point 275 de grees Note When the machine is under power and if the C point is not reached manually an error mes sage 050 is displayed Manually move to the dis...

Page 75: ...TION press SET After selecting options two Icons appear the one on the right is for machine options and the one on the left is for pattern options Select the Machine Icon and press Set Use the up down...

Page 76: ...escription of function Checking the firmware version Select OTHER press SET Use the down arrow key to move to VERSION and press SET to select The Firmware Version of the machine is the num ber indicat...

Page 77: ...t effected Select OTHER menu press SET Use the down arrow key to move to SYSTEM and press SET to select Use the arrow keys to move to OK and select SET to begin Machine displays a Happy logo Initializ...

Page 78: ...elect Note Secure the needle thread in the horizontal spring of the needle that is over the presser foot to prevent unthreading Use the arrow keys to move to OK and select SET to begin The machine beg...

Reviews: