


EN
0
10 12 15
Embroidery hoop available as optional accessory.
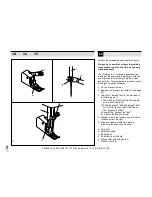
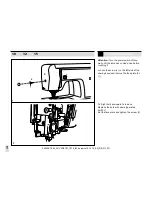
- Set the machine as illustrated.
- Pattern selector on " " or " " .
- Remove the presser foot and the presser foot
holder.
- Install the darning plate. (1) (model 10/12)
- Move the drop feed control to right side to lower
the feed dogs. (2) (model 15)
- Lower presser foot lever before starting to sew.
- Turn the stitch length dial to "0".
- Adjust the stitch width according to the size of
lettering or design.
Preparation for Monogramming and
Embroidering
- Draw the desired lettering or design on the right
side of the fabric.
- Stretch the fabric between embroidery hoop as
firmly as possible.
- Place the fabric under the needle. Make sure
the presser foot bar is down in its lowest
position.
- Turn the balance wheel towards you to bring up
the lower thread through the fabric. Sew a few
securing stitches at the starting point.
- Hold the hoop with both hands and guide it.
- Remove darning plate for normal use. (model
10/12)
- Move drop feed control to the left side for
normal use. (model 15)
Please note:
No "S" marking is shown on the stitch length dial
by model 10.
Monogramming and embroi-
dering with embroidery hoop
502020.75.24_021V4D0101_1010_IM_bernette 10 12 15_EN_DE_NL_FR


