


My
BERNINA
16
B E R N I N A S E W I N G M A C H I N E W O R K B O O K
1.
Attach Open Embroidery Sole #20.
2.
Place the stabilizer behind the fabric.
3.
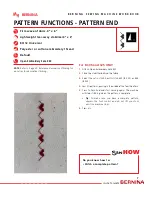
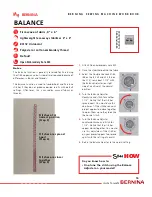
Select the Double Overlock Stitch
(#8 on the B 335 and 325, #6 on
the 215); sew about 1 1/2” with
the Balance Adjuster (on right
side of machine) at the normal
position.
4.
Turn the Balance Adjuster
clockwise and stitch for another
1 1/2". Notice that the stitches
spread apart. You would use this
adjustment if the stitches on your
project appear too close together
to open them up so they look like
the normal stitch.
5.
Turn the Balance Adjuster
counterclockwise and stitch for
1 1/2". Notice that the stitches
appear closer together. You would
use this adjustment if the stitches
on your project appear too spread
apart with the setting at normal.
6.
Return the Balance Adjuster to the normal setting.
BALANCE
Firm woven fabric, 4” x 6”
Lightweight tear-away stabilizer 4” x 6”
80/12 Universal
Polyester or cotton embroidery thread
Default
Open Embroidery Sole #20
Notes:
The Balance function is generally reserved for fine tuning
the stitch appearance, but is sometimes required because of
differences in fabrics and threads.
The Balance Function is used to troubleshoot and fine tune
stitches if they do not produce desired results with default
settings. Oftentimes, this is caused by unusual fabrics or
threads.
HOW
Do you know how to:
• Fine-tune the stitch using the Balance
Adjuster on your model?
Stitches are closer
together
(Step 5)
Stitches are spread
apart
(Step 4)
Stitches at at
normal position
(Step 3)


