background image

1015002x00

61

Driving Unit

en

WARNING

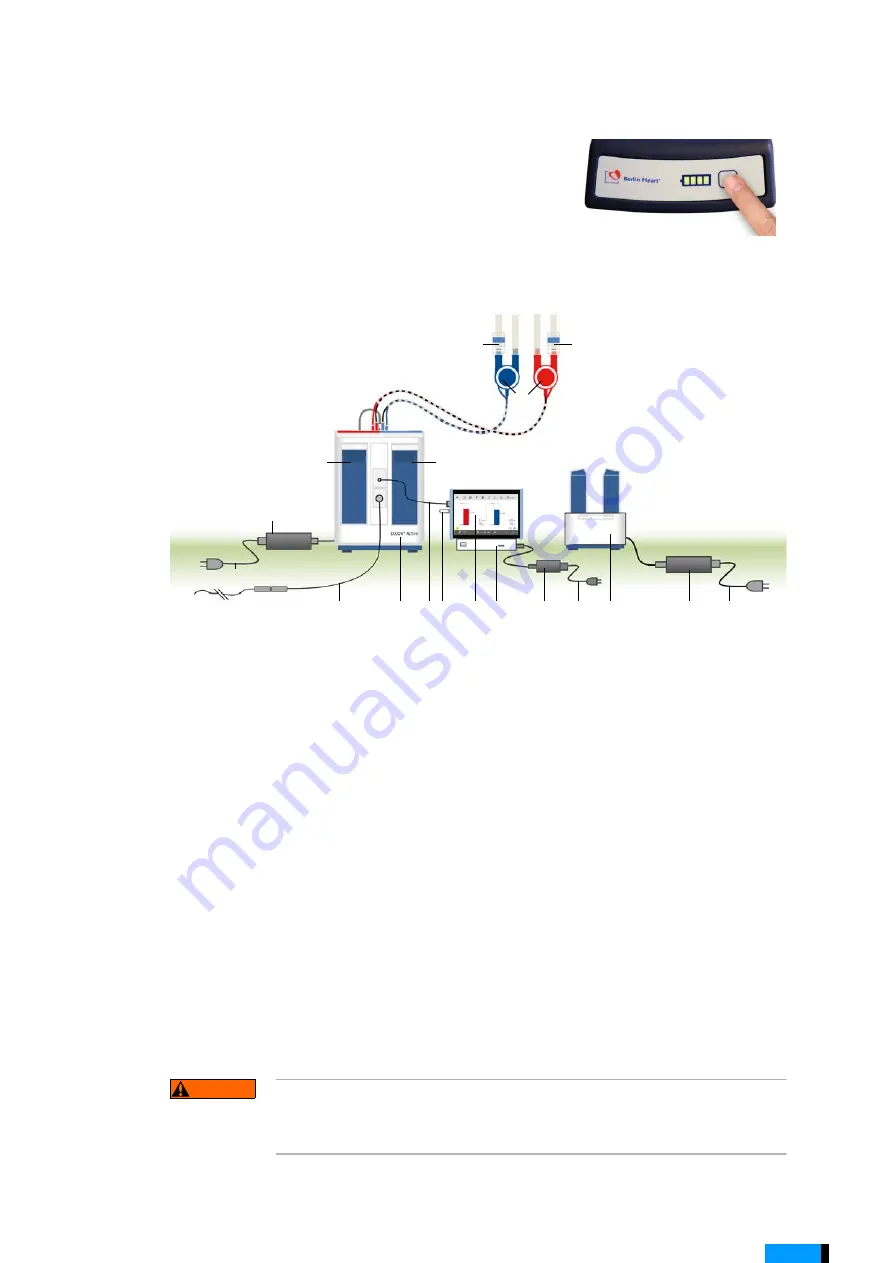
5.9

Connecting Electrical Components

Fig. 5-34  

Connection of electrical components

5.10 Replacing a Driving Unit

The driving unit must be replaced:

to conduct driving unit maintenance

in the event of an error that cannot be immediately rectified

A replacement driving unit is required in order to conduct such a replacement. A re-
placement driving unit is a driving unit that has been configured with the current set-
tings for the patient.

It is not possible to switch directly to an unconfigured driving unit. The driving unit must 
always be configured beforehand.

5.10.1 Replacing a Driving Unit - BVAD


BVAD: After replacing the driving unit, check the settings. Adjust the 
settings if necessary. Make sure that pulmonary circulation is not being 
overloaded.

5.

Check the charge level on the battery. Press 
the 

<charge level button>

 on the battery 

and check whether the battery is fully 
charged.

1

Power supply unit

2

Adapter for external alarm

3

Batteries

4

Driving unit

5

USB cable

6

USB stick

7

Panel PC

8

Docking Station

9

Panel PC power supply unit

10

Battery charging unit

11

Flow sensor right

12

Flow sensor left

13

Power cable (country-specific)

14

Applied parts: blood pumps (defibrillation-
protected)

1

3

4

10

7

11

12

8

5

1

2

3

9

6

5

13

13

13

14

Summary of Contents for EXCOR Adult

Page 1: ...EXCOR Adult EXCOR Pediatric EXCOR VAD Ventricular Assist Device EXCOR Active Driving System Instructions for Clinical Use Edition 1 0 ...

Page 2: ...2 1015002x00 en ...

Page 3: ...ns for use have been prepared and checked to the best of our knowl edge Only the German edition of these instructions for use is considered to be legally binding however Component Software 2 Driving unit 1 for model dependent scope of functionality see Tab 3 2 page 20 Driving unit 1502200 Driving unit 1502210 from version 01 09 00 onward from version 01 09 00 onward Panel PC including docking stat...

Page 4: ... names mentioned in these instructions for use are subject to the rights of their respective owners These rights are expressly recognized and respected when referring to these names in the pres ent publication Use of the trademark will be dispensed with in the further text Berlin Heart GmbH will be hereinafter referred to as Berlin Heart Berlin Heart GmbH All rights reserved ...

Page 5: ...uctions for Use 23 3 9 Disposal of Components 23 3 10 Product Life 24 4 Safety Information 25 4 1 General 25 4 2 Configuration 25 4 3 Caregivers 26 4 4 Ambient Conditions 26 4 5 Diagnostic Procedures EMC 27 4 6 Connections and Operation Elements 27 4 7 Power Supply 28 4 8 Operation 28 5 Driving Unit 29 5 1 Structure and Function 29 5 1 1 Primary Function 29 5 1 2 Setup 30 5 2 Connections and Opera...

Page 6: ...ermining the Charge Level 55 5 7 1 9 Driving Unit Operating Time in Battery Operation 56 5 7 1 10 Notes on Replacing the Batteries 57 5 7 2 Power Supply Unit 57 5 7 3 Emergency Battery 58 5 7 3 1 General 58 5 7 3 2 Charging the Emergency Battery 58 5 8 Battery Charging Unit 59 5 8 1 Setup 59 5 8 2 Function 60 5 9 Connecting Electrical Components 61 5 10 Replacing a Driving Unit 61 5 10 1 Replacing...

Page 7: ...g On the System 95 8 3 Checking Functions 95 8 3 1 Checking Functionality of an Unconfigured Driving Unit 95 8 3 2 Checking Functionality of a Configured Replacement Driving Unit 96 8 4 Parameters and Configuration 96 8 4 1 Default Parameter Settings 96 8 4 2 Blood Pumps Cannulae Maximum Rate 97 8 4 3 Selecting Blood Pumps and Cannulae 97 8 5 Configuring the System 98 8 5 1 Configuration Options O...

Page 8: ...D Right 117 8 11 Configuring and Updating the Replacement Driving Unit 117 8 11 1 Configuring the Replacement Driving Unit 117 8 11 2 Replacement Driving Unit Updating Configuration 118 8 12 Types of Data 119 8 12 1 Configurations 119 8 12 2 Logs 119 8 13 Managing Data 119 9 Replacing the Driving System 123 9 1 General 123 9 2 From Ikus to EXCOR Active 123 9 2 1 Prerequisites for a Replacement 123...

Page 9: ... 4 2 Overview Assembly 145 15 4 3 Mounting the Stroller Board 146 15 4 4 Adjusting the Suspension 146 15 4 5 Combination with the Stroller 146 15 4 5 1 Set 1 Frame 147 15 4 5 2 Set 2 Child Seat Fixture with Accessories 147 15 4 5 3 Set 3 Baby Seat Fixture 147 15 4 5 4 Using the Child Seat and the Baby Seat 147 15 4 6 Attaching the Stroller Board to the Stroller 148 15 4 7 Releasing the Stroller Bo...

Page 10: ... 18 2 3 1 Intervals 172 18 2 3 2 Panel PC 172 18 2 3 3 Power Supply Units 172 18 2 3 4 Docking Station 173 18 2 3 5 Battery Charging Unit 173 18 3 Cleaning and Disinfection 173 18 3 1 General Rules 173 18 3 2 Cleaning Agents and Disinfectants Resources 174 18 3 3 Cleaning Intervals 174 18 3 4 Notes on Cleaning and Disinfecting Components 176 18 4 Performing Functional Tests 177 18 5 Overview of Re...

Page 11: ...d Cannulae 196 21 4 Patient and Driving Unit 196 22 Using the External Alarm Nurse Call 199 22 1 Assembling the External Alarm Nurse Call Adapter 199 23 EMC 201 23 1 Safety Information 201 23 2 Major Performance Characteristics 201 23 3 Electromagnetic Emissions 202 23 4 Electromagnetic Immunity Part 1 203 23 5 Electromagnetic Immunity Part 2 204 24 Patient ID Labels 207 Abbrevations 209 ...

Page 12: ...12 1015002x00 Table of Contents en ...

Page 13: ...ufacturer Berlin Heart GmbH Wiesenweg 10 12247 Berlin Germany www berlinheart de Tel 49 0 30 8187 2600 Mon Fri 8 00 am 6 00 pm Fax 49 0 30 8187 2601 info berlinheart de Sales Orders deliveries Prices quotes Claims service berlinheart de Clinical Affairs Support with technical and medical issues Training courses service berlinheart de Distributor ...

Page 14: ...14 1015002x00 Contact en ...

Page 15: ... not avoided may result in se rious injury or death Indicates a hazardous situation which if not avoided may result in minor or moderate injury The device may suffer damage Indicates practices that will not result in personal injury The device may suffer damage Indicates corrective actions and work techniques that are recommend ed by Berlin Heart Heed the instructions for use on EXCOR sterile comp...

Page 16: ...unit EXCOR Active driving unit configured with the current settings for the patient Inflow cannula Cannula attached to the inflow side of the blood pump The inflow cannula transports blood to the blood pump Outflow cannula Cannula attached to the outflow side of the blood pump The outflow cannula transports blood to the patient Baby buggy Transport system for EXCOR Active comprised of stroller and...

Page 17: ...ser interface Button Button labels Placeholder Denotes variable text in error messages unit of measure ment Unit of measurement e g mmHg Describes a part or a function in a diagram Denotes an action shown in a diagram Tab 2 2 Explanation of highlights emphases in text and images Instructions for use must be observed Note instructions for use Do not use the device in con junction with magnetic reso...

Page 18: ...tation with display of the upper tempera ture threshold Air pressure limitation Temperature limitation with display of the upper and lower temperature thresholds Protection class II device Medical device For indoor use only Protection type IP Ingress Protection see also chapter 20 Technical Specifi cations page 187 The transport systems are labeled with the weights of the connected components baby...

Page 19: ...entricular assist device The components that are continuously active on the patient are the blood pump s the cannulae the driving unit with one flow sensor per blood pump one driving tube for each blood pump Fig 3 1 EXCOR VAD cannulae and blood pumps on the EXCOR Active driving system BVAD 1 Cannulae 2 Flow sensors 3 Blood pumps 4 Driving tubes and sensor cable connected to the cable wrap 5 EXCOR ...

Page 20: ...e for indoor use Driving unit Flow sensor with cable wrap Battery Caddy Baby buggy Accessory Bag Manual pump Battery charging unit Power Supply Unit for Driving Unit and Battery Charging Unit Panel PC Docking Station Panel PC power supply unit Adapter for external alarm nurse call USB cable USB stick Tab 3 1 Components of the EXCOR Active system Driving unit 1502200 1502210 Operating mode BVAD BVA...

Page 21: ...cardiac output is based on patient size weight and body surface area This information is used in order to select a combination of blood pumps and cannulae that will meet the patient s medical needs The intended patient population may be restricted depending on country specific ap provals Professional users EXCOR VAD and EXCOR Active may only be implanted and configured by medical personnel Medical...

Page 22: ...lations Insufficiently shielded electrical devices Security check devices such as security scanners Magnetic resonance imaging scanners Magnetic levitation trains See chapter 23 EMC page 201 for more detailed information on electromagnetic compatibility Possible consequences could include Modified filling and emptying of the blood pump View on the display of the driving unit and the panel PC is mo...

Page 23: ... available at the hospital for replacement purposes for LVAD and RVAD patients driving unit EXCOR Active or Ikus for BVAD patients EXCOR Active configured with patient s current settings flow sensor including cable wrap red marked and or blue marked driving tube blood pump T00L 002 connector set cannula extension set if required for therapy 3 8 Information Regarding the Instructions for Use The in...

Page 24: ...ds on proper use and ad herence to the specified inspection and maintenance intervals See chapter 18 Main tenance Cleaning and Disinfection page 171 for more information Component Product life in years Driving unit 6 Battery 1 Power Supply Unit for Driving Unit and Battery Charging Unit 3 Panel PC including docking station and power supply unit 6 Flow sensor 6 Manual pump 6 Battery charging unit 6...

Page 25: ...vice the components of the EXCOR Active system appropriately as described in the instructions for use Install and configure the components of the EXCOR Active system in accordance with the instructions for use Do not continue to use components after they have reached the end of their product life If these warnings are not heeded safe and proper op eration is not guaranteed Information on product l...

Page 26: ...t be guaranteed Follow the instructions in section 20 9 3 Transport Conditions and Long Term Storage Conditions page 193 Observe the minimum and maximum ambient temperatures for the components of the EXCOR Active system If these warnings are not heeded safe and proper operation is not guaranteed Possible conse quences could be the failure of components due to overheating or loss of functionality d...

Page 27: ...scribed in these instructions for use see chapter 3 5 EMC Electromagnetic Compatibility page 22 Do not conduct magnetic resonance therapy in patients with EXCOR Active Do not operate the driving unit in the immediate vicinity of other electri cal devices If such circumstances cannot be avoided e g in a hospital environment monitor the driving unit closely When using the driving unit observe the EM...

Page 28: ... not available the driving unit will stop When using the system in mobile operation always ensure that an al ternative source of power can be reached within the battery operating time Keep in mind that batteries can also fail Alternative sources of power could include Replacement batteries extra power supply unit with means of connecting to mains power 4 8 Operation Ensure that driving unit audibl...

Page 29: ... under uni ventricular operation the other pneumatic unit automatically assumes control of the blood pump Pump output and parameters remain the same The switching unit auto matically switches to the other pneumatic unit so the driving tube connections do not need to be changed If one pneumatic unit fails under biventricular operation the other pneumatic unit will drive both blood pumps The switchi...

Page 30: ...panel 1 Control panel 2 Handle 3 Batteries 4 USB port cover connection to Panel PC 5 External alarm nurse call cover 6 Air vents Fig 5 3 Driving unit rear side and underside 1 Mounting bracket 2 Air vent 3 Speaker 4 Identification plate 5 Maintenance label 6 Additional information including dis tributor information if applicable 7 Tray for patient specific label Patient ID 1 2 3 4 6 6 5 1 4 6 7 5 ...

Page 31: ...t LED 5 Button 6 Connection driving tube seal plug 7 Connection flow sensor 8 Connection power supply unit cap 2 3 4 5 6 7 8 1 There are maintenance battery and driving unit LEDs underneath each display The LEDs indicate notification messages or errors Each set of LEDs refers to its corresponding drive side The LEDs light up or flash depending on message priority see section 17 3 6 Visual Alarms o...

Page 32: ...y for around five sec onds The SHUTDOWN view is displayed The driving unit can be switched off by disconnecting the mains or removing both batteries For shut down information see also section 5 6 Switching Off the Driv ing Unit page 50 Charging the emer gency battery Press and hold one button while connecting the device to mains power The driving unit can be connected to the mains without starting...

Page 33: ... displayed in the ERROR view In the example Alarm 1 2 total alarms In all other views the number of active alarms is displayed CHILD PROTECTION ON Displays that child protection is active When child protection is active audible alarms will be emitted for around 15 seconds after PAUSE AUDIO is pressed This gives caregiv ers and medical personnel a chance to hear the audible alarm even after the chi...

Page 34: ...ation view After start up and when in error free operation the display appears as shown in Fig 5 7 If an error condition occurs the error code message and number of errors are displayed Fig 5 7 Display of view Error free operation Depicted in the example Child protection is active The driving unit is connected to mains power The battery is fully charged The Activity view is shown No alarm con diti...

Page 35: ... view Displays the current flow for the left and or right blood pump Info view Display showing the current driving parameters The values apply to the correspond ing driving unit side S Driving pressure in systole mmHg D Driving pressure in diastole mmHg R Rate bpm Duration systole Fig 5 8 Display of view Error 1 Alarm paused 2 Display of current errors error 1 of 2 is currently being displayed 3 D...

Page 36: ...e date The expected date of next maintenance is calculated based on rate settings and displayed see also section 7 6 3 System Information page 89 Error History view The ERROR HISTORY view shows the last five rectified errors Fig 5 10 Display of view Info Fig 5 11 Display of view Maintenance 1 Driving unit software version 2 Expected date of next mainte nance 3 Pump cycles pump cycles conducted num...

Page 37: ...g Off the Driving Unit page 50 Charging the emergency battery The emergency battery is charged when one of the buttons is pressed when connect ing to the mains The battery symbol appears in the display The charge level is dis played See also section 5 7 3 2 Charging the Emergency Battery page 58 When one driving unit is active the emergency battery charges automatically when the unit is running on...

Page 38: ...riving unit through open connection sockets Dirt and liquids could damage the driving unit itself as well as any connected compo nents Only properly inserted connector plugs can guarantee the system s op eration Loose plug connections can interrupt patient care or disrupt the flow of information Pay attention to the markings Never use excessive force when plug ging in Always push the connector plu...

Page 39: ...ll 1 2 3 4 5 1 2 1 Pull out the seal plugs and put them in the holder 2 Grasp the connector plug by its ribbed body 3 Insert the connector plug into the appropriate connector driving tube marked in red red connection driving tube marked in blue blue connection Fig 5 18 Plugging and checking 4 In the end position the connector plug will snap into place The plug is locked and cannot disengage itself...

Page 40: ...the cap 2 Grasp the connector plug by its ribbed body 1 3 Align the markings on the con nector plug and the connector 4 Insert the connector plug into the connector 5 The connector plug will snap audibly into place When the device is connected to mains power a brief signal tone will be emitted 1 Connector plug 2 Marking 2 1 1 To pull the connector plug out grasp the ribbed area and pull upwards 2 ...

Page 41: ...ensors are connected to the driving unit and the cannulae Flow alarms are only emitted if a flow alarm threshold has been set If no flow sensors are connected or no flow alarm threshold has been set make sure to monitor the blood pumps to ensure that they are filling and emptying completely The flow sensors are not sterile Do not connect the flow sensors to the cannulae until the patient s thorax ...

Page 42: ...nula The measured values are displayed on the driving unit and the panel PC An alarm is emitted in the event of in sufficient support The Flow alarm threshold the value below which an alarm is emit ted can be set manually Always set the flow alarm threshold to a level that will ensure that an H2 FLOW TOO LOW alarm will be emitted in the event of insufficient support The flow sensor can be connecte...

Page 43: ...sensor is designed Fig 5 20 FS06 06 P flow sensor on a 6 mm cannula 1 Cannula 2 Flow sensor 3 Sensor locking clip 4 Protective cap 5 Mirror 6 Sensor quick connect 7 Stop 8 Sensor cable Fig 5 21 FS06 06 P FS09 09 P FS12 12 P Fig 5 22 Model label 1 Cannula diameter 2 Connector diameter 3 Blood pump type pursuant to information on flow sensor and blood pump P10P 001 or P50C 001 1 2 3 4 5 6 8 7 FS06 0...

Page 44: ...gree of accuracy must be tak en into account The flow is shown rounded to one decimal place Cannula diameter Blood pump connector diameter For blood pumps with FS06 06 P 6 mm and 5 6 mm 6 mm Tri leaflet polyure thane valve FS09 09 P 9 mm 9 mm Tri leaflet polyure thane valve FS09 12 P 9 mm 12 mm using stage 12 mm Tri leaflet polyure thane valve FS12 12 P 12 mm 12 mm Tri leaflet polyure thane valve ...

Page 45: ... and then connect the flow sensor to the driving unit FS12 12 P 15 within the range of 3 0 l min to 8 0 l min FS12 12 C Measurement accuracy within the measurement range Tab 5 2 Flow measurement accuracy 1 Attach the flow sensor to the cannula The cable always points toward the blood pump 2 Positioning Flow sensors for blood pumps with PU valves have a defined stop position The stop must be positi...

Page 46: ...3 Close 3 4 To change the closure side rotate the sensor quick connect 4 or attach it to the other side Fig 5 26 Closing the sensor quick connect Replace worn or lost sensor quick connects Corresponding sensor quick connects are available for all sizes of flow sensors Fig 5 27 Sensor quick connect for flow sen sors FS06 FS09 FS12 1 2 3 4 06 09 12 1 Grasp the connector plug under neath by the ring ...

Page 47: ...h the cable wrap to the wrapping tool 5 Slowly guide the wrapping tool along the cable wrap with one hand while grasping the cable wrap with the other Avoid creat ing tensile force on the blood pump or the cannulae 6 At the end guide the driving tube and sensor cable out of the wrapping tool The sensor cable will need to form a small loop by the driving unit The loop makes plug insertions easier 7...

Page 48: ...ion to the driving tube and flow sensor cable Any parts interfering with the locking sys tem may disable the locking mechanism After positioning the driving unit on the intended system components e g the caddy check the locking mechanism Check whether the han dle is completely pushed in The driving unit could come loose if not properly locked This could cause damage to the driving unit It could re...

Page 49: ...i tion the driving unit on the mobile components The locking mechanisms are found inside the depressions 5 2 4 2 Setup of Mobile Components 5 3 Switching On the Driving Unit The driving unit will switch on as soon as it is connected to a power supply Its power supply sources include connection to the mains via a power supply unit one or two charged batteries A previously configured driving unit wi...

Page 50: ...once a day and lasts approximately 30 seconds The sys tem may make different operating sounds during the self test Blood pump operation is not affected The self test time can be configured Schedule the self test for a time when the patient will be awake That way the user will be able to react more effectively to messages like S1 MAINTENANCE DUE because messages will not disturb the patient while h...

Page 51: ...eep in mind that mains power batteries or the power supply unit could potentially fail Arrange all EXCOR Active components with mains connections such that they are easy to disconnect from mains power To disconnect components from the mains pull the mains plug on the power supply unit If mains power fails an alternative source of power must be made avail able within the battery operating time This...

Page 52: ... may also prevent the batteries from maintaining their guaranteed properties Store and transport batteries so as to protect them against short cir cuits Potential hazards could include metallic objects such as keys or liquids A short circuit will cause the battery to discharge 5 7 1 1 Inserting the Batteries The driving unit has two identical battery mounts Each of them holds one battery Grasp the...

Page 53: ...nt batteries 5 7 1 6 Charging Time Batteries charge most quickly at room temperature Cold batteries will not charge Bat teries may be cold as a result of having been transported at temperatures below 0 C or brought along during mobile operation Allow the batteries to acclimatize Charging is possible at a battery temperature of at least 5 C Charging time is not affected by whether one battery or tw...

Page 54: ...he button in order to display the charge level If the battery is in the driving unit the charge level is displayed on the corresponding display If the battery is being charged the charging process is displayed Charge level and capacity Charge level refers to the available battery capacity in percent This capacity is re duced with increasing duration of use and number of charge cycles The charge le...

Page 55: ...ating time Charge level is displayed on components as follows Relative state of charge Driving unit and panel PC Battery dischar ging Battery char ging Emer gency battery Battery charging unit 75 Battery fully charged 50 to 75 The chaser light shows the charging process 25 to 50 15 to 25 10 to 15 0 to 10 Battery dis charged denotes a flashing LED ...

Page 56: ...00 mmHg 0 C min 8 h at least 30 min 25 C min 9 h 40 C min 8 30 h Operating times are based on new 100 charged batteries The operating time of the emergency battery is measured from the P7 Emergency battery dis charged notification Tab 5 4 Driving unit operating time in battery operation or emergency battery operation 10 mL BVAD 80 mL 60 mL Blood pumps Ambient temperature Battery oper ating time Op...

Page 57: ... driving unit in battery operation BVAD LVAD or RVAD operating mode In BVAD operating mode both pneumatic units are operated whereas only one is operated in LVAD or RVAD mode As such system operating time is comparatively longer in LVAD and RVAD modes Size of the blood pump The higher the blood flow the larger the output that the driving unit must provide Operating time decreases with larger blood...

Page 58: ...arged every four weeks 5 7 3 2 Charging the Emergency Battery Charge the emergency battery on an inactive driving unit every four weeks This ap plies to any driving units that are not currently being used with patients replacement driving units driving units in storage Fig 5 32 Power supply unit 1 Power cable connection 2 Power supply unit 3 Mains operation indicator 4 Power cable country specific...

Page 59: ...ot conscious or unable to move 5 8 1 Setup The battery charging unit can charge two batteries at once independently of one an other Fig 5 33 Charging unit view from the front side and back Each battery mount is monitored separately The current condition of the battery and battery mount are displayed 5 The emergency battery is charging Pay attention to the symbol The charging process is complete wh...

Page 60: ...attery is defective and may not be used further orange flashing The battery mount is defective The battery charging unit must not be used again orange steadily illu minated The battery mount is too warm Place the battery charging unit in a cooler location 1 Connect the power supply unit to the battery charging unit 2 Check the readiness for operation The sta tus indicator must be illuminated green...

Page 61: ...ing unit The driving unit must always be configured beforehand 5 10 1 Replacing a Driving Unit BVAD BVAD After replacing the driving unit check the settings Adjust the settings if necessary Make sure that pulmonary circulation is not being overloaded 5 Check the charge level on the battery Press the charge level button on the battery and check whether the battery is fully charged 1 Power supply un...

Page 62: ... connected to 8 Note H1 H2 and S6 alarms will be emitted during the replace ment process These alarms can be ignored initially Finish replac ing the driving unit first After that if the alarms are not automati cally canceled see section 17 7 Alarms H1 and H2 page 165 and section 17 5 Driving Unit Alarms page 160 9 Reconnect both driving tubes Be mindful of the color markings driving tube marked in...

Page 63: ...y as user EXPERT 7 Check the following items on the driving unit Did the start test run without errors Are the displays active Can an audible alarm be heard when the buttons are pressed 8 Check the following items on the panel PC Is a driving unit panel PC connection in place Does the user interface respond when the buttons are pressed Is the user interface bright and easy to read 9 If errors occu...

Page 64: ... ignored initially Finish replacing the driving unit first After that if the alarms are not automatically canceled see section 17 7 Alarms H1 and H2 page 165 and section 17 5 Driving Unit Alarms page 160 1 Have the patient sit or lie down 2 Remove the driving unit to which the patient is connected from the transport system 3 Place the two driving units close together Align the driving units connec...

Page 65: ... in emergency operation switch to the replacement driving unit as soon as pos sible In BVAD emergency operation the blood pumps must be monitored continuously to ensure complete filling and emptying Monitor patient status If necessary support the patient using the manual pump In emergency operation the driving unit will not be able to detect insuffi cient patient support Pneumatic leaks cannot be ...

Page 66: ...66 1015002x00 Driving Unit en ...

Page 67: ...tteries check the connection and disconnect if needed 6 2 Setup Overview This section only describes the connections and operation elements utilized Any con nections functions or operation elements that are not described have been deactivat ed Front view and rear view Fig 6 1 Panel PC 1 Cover for connections 2 USB 3 0 3 USB 2 0 4 Cover closed 5 Locking mechanism 6 Charge level display 7 HDD displa...

Page 68: ...ctive Off Hard disk not active Touchscreen The panel PC offers a touch screen It recognizes entries made wearing surgical gloves Rear side Fig 6 2 Panel PC battery Tapping Tap an element to activate a button Sliding Tap and slide an element to select a value Swiping Swipe across the screen using one or more fingers to move to the next view Zooming Zoom in or out by making a spreading or pinching m...

Page 69: ...ure that the panel PC is not connected to a driving unit that is currently supporting a patient Fig 6 3 Panel PC power supply unit 1 Panel PC power supply unit 2 Plug for panel PC 3 Panel PC power supply unit On Off display 4 Mains power connector 2 1 3 4 1 Open the panel PC cap 2 Connect the plug to the panel PC 3 Connect the mains power con nector to the power supply unit 4 Connect the plug to t...

Page 70: ...he locking mechanism To do so slide the lock toward the right 1 Bolt right open 2 Inserting the battery 2 Place the battery in the mount 3 Close the locking mechanism To do so slide the lock toward the left 1 2 1 Open the locking mechanism To do so slide the lock toward the right 1 Removing the battery 2 Remove the battery 1 1 Mount for panel PC 2 Mount for battery 3 Lock release 4 USB 5 Connectio...

Page 71: ... pressing and holding Power on off only in an emer gency This method does not allow the software and the operating system to be shut down safely 3 Charge level display for the battery in the docking station Green Battery charged 95 Orange Battery is charging 4 Display for the panel PC docking station connection Blue connected Off not connected 3 4 1 Insert the panel PC from above into the mount In...

Page 72: ...Use for any other purpose may result in an unintended transfer of software to the USB stick USB in panel PC USB on the docking station The docking station has two USB ports one on the front panel and one on the back Both can be used 1 Open the USB port covers 1 USB 3 0 connection blue slot 2 USB cable 2 Insert a USB cable into one of the USB ports It is preferable to use the USB 3 0 port when con ...

Page 73: ...iguration of the panel PC for display of system information for switching off the panel PC and for resetting the driving unit 2 Work area Display and change of parameters as well as display of error messages 3 Menu bar Selection of different work areas for the configuration and monitoring of driving unit and blood pumps 4 Alarm Display of a current alarm 5 Status bar Display of information on the ...

Page 74: ...isible at a time MONITORING Patient monitoring display of parameters and graphic illustration of the current flow rate and flow alarm threshold BLOOD PUMP SETTINGS PARAMETER view Display and setting of the parameters with which the blood pumps are operated Starting and stopping of blood pumps PRESSURE CURVES view Display and selection of the pressure curves displayed DRIVING UNIT SETTINGS PATIENT ...

Page 75: ...signaled and no high or medium priority alarms are active at the same time AUDIO PAUSED Temporarily mutes audible acoustic alarms The duration of the muting depends on the priority level of the alarm Symbol Significance AUDIO PAUSED No audible acoustic alarms will be emitted for a period of time Once the alarm condition has been rectified the symbol disap pears If the alarm condition is still vali...

Page 76: ...t RELATIVE STATE OF CHARGE AND CHARGING DISPLAY FOR PANEL PC Display of the relative state of charge as well as charge display for the batteries on the panel PC If the battery is charging the shown symbol will be animated If the battery is not charging the charge level will be displayed MAINS OPERATION The driving unit is connected to the mains If there is no mains the symbol will not appear PATIE...

Page 77: ... The active value is in the middle and is displayed in bold letters Selec tions can also be made by tapping or swiping Activity view If data or commands are being transmitted to the driving unit the activity view will be shown for the duration of the transmission if the pro cess takes longer than one second Different users can log into the panel PC To log in the user must be selected and the corre...

Page 78: ...cal data EXPERT EXPERT has access to all driving unit and panel PC functions Characteristics EXPERT is automatically logged off if after configuration is finished or the user logs in no settings are changed for 4 hours The 4 hour countdown until automatic log off always begins with the last setting changed on the panel PC Audible alarms are only active when the blood pumps are operating in automat...

Page 79: ...ht side of the heart are displayed on the right If only one blood pump is connected one of the images is omitted User Password EXCOR Active LOCAL xxxxxx MEDICAL xxxxxx EXPERT xxxxxx To log off the panel PC press the LOG OFF button Disconnecting the USB connection between the panel PC and the driving unit will also result in the user being logged off Reconnecting the USB cable will not auto matical...

Page 80: ... 4 1 Parameter BLOOD PUMP SETTINGS contains the PARAMETER settings window The parameters set there are used to operate the blood pumps Another window shows the PRESSURE CURVES 1 Bar flow Graphical illustration of the current blood flow 2 Bell Alarm threshold set for the flow alarm in l min 3 Flow Display of the current blood flow in l min 4 Rate Display of the rate in bpm 5 Alarm Displays a curren...

Page 81: ...driving pressure cannot be set directly It can only be set in combination with the piston stroke using the PLUS and MINUS buttons Piston stroke The piston stroke indicates what percentage of the possible distance the piston covers within the pneu matic unit The piston stroke determines the air vol ume that is driven into or suctioned out of the blood pump The piston stroke cannot be set directly I...

Page 82: ...m threshold an alarm will be emitted Flow The flow sensor measures the current flow in the cannula The measured value is displayed in the MONITORING window The flow cannot be set directly The flow is automat ically calculated based on the rate and on the selected combination of blood pump and cannulae Parameter Description Synchronization Synchronization of the blood pumps can only be selected in ...

Page 83: ...volume displacement Separate mode Both blood pumps work independently from one another Separate mode allows for selection of lower rates for the right side of the heart Separate mode is recommended for patients who are supplied with same sized blood pumps on the right and left sides Parameter Default settings left right Synchronization Synchronous mode Rate 20 1 min 20 1 min Duration systole 50 50...

Page 84: ...currently set parameters is shown on the right hand side 2 Auto Pause Starts or stops the continuous operation of the left blood pump 3 Step right With each press of this button the right blood pump is filled or emptied Pressing 2x equals one pump cycle 4 Auto Pause Starts or stops the continuous operation of the right blood pump 5 Auto Pause both Starts or stops the continuous operation of both b...

Page 85: ... optional The recommendations for the blood pump and cannula sizes are based on the weight entered The recommen dations are visually highlighted Without entering a weight a recommendation cannot be shown and an indication can also not be made for recommended Ber lin Heart pump cannula combinations The weight parameter can be changed at a later time Implantation date Date of implantation The curren...

Page 86: ...ity to hear them Time of self test Setting for the time at which the driving unit conducts a daily self test The self test is a routine to check the function of the components of the driving unit Schedule the self test for a time outside of sleeping hours so that the patient can confirm messages if required Parameter Default settings Operating mode BVAD Language for driving unit English Child prot...

Page 87: ...e the driving unit is commissioned the user must re check the selections made APPLY transmits the data to the driving unit When configuring a driving unit as a re placement driving unit the current blood pump settings are also displayed Parameter Description Operating mode BVAD circulatory support biventricular LVAD circulatory support left sided RVAD circulatory support right sided Blood pumps Si...

Page 88: ...log and configuration files can be deleted from the panel PC configuration files can be exported from the panel PC to a USB stick the automatic loading of driving unit logs can be activated or deactivated 7 6 2 Options LANGUAGE FOR PANEL PC DATE AND TIME can also be changed by users who are not logged in Fig 7 5 Options menu OPTIONS opens a menu in which language date and time of the panel PC can ...

Page 89: ...hed Around five days before the maintenance date an active alarm is emitted For more information on maintenance dates see also section 18 2 2 Maintenance by the Manufacturer Distributor page 171 7 6 4 Resetting the Driving Unit RESET DRIVING UNIT reverts driving parameters to their default values All logs and con figuration files are preserved The time is set using two rotary knobs hours and min u...

Page 90: ...be amended Patient ID Implantation date Operating mode Cannula size The driving unit settings can only be reset when the blood pumps are stopped 7 6 5 Switching Off the Panel PC Fig 7 6 Switch off panel PC menu The SWITCH OFF PANEL PC button shuts down the user interface and switches off the panel PC ...

Page 91: ...corresponding categories If the panel PC is connected to a driving unit the alarms for the connected driving unit are displayed The messages for the current day are shown Scroll within the table by swiping 7 7 2 Trend Info Patient ID Users logged in as LOCAL can view all patient infor mation found on the panel PC Tapping on the PATIENT ID button will call up a selection of available data records D...

Page 92: ...f the image Use one finger to move the displayed area Tapping the screen again will hide the arrows After that you can change the complete view Curve selection Selection window to show or hide parameters for the right and left drive sides The following can be selected systolic pressure driving unit diastolic pressure driving unit flow Patient ID Users logged in as LOCAL can view all data records o...

Page 93: ...formation appearing in the MESSAGES window concerns the panel PC or com munication between the panel PC and the driving unit Messages that concern the safety of the patient are not shown in the MESSAGES window When a message arrives it is briefly shown on the bottom right An exclamation point indicates that current messages are available 7 10 2 Help HELP opens a window providing assistance for ope...

Page 94: ...94 1015002x00 User Interface en Fig 7 7 Help window 1 Help display 2 Help button 1 2 ...

Page 95: ...ies fully including the emergency battery Do this by operating the driving unit on mains power for a sufficient length of time For charging times see section 5 7 1 6 Charging Time page 53 Without charged batter ies transportation is not possible 8 3 1 Checking Functionality of an Unconfigured Driving Unit 1 Connect the driving unit to the power supply Insert charged batteries If nec essary connect...

Page 96: ... and easy to read 1 Have the panel PC and driving unit ready 2 Connect the panel PC to the mains and switch it on 3 Remove the seal plugs 4 Connect the driving unit to the mains and insert batteries 5 The driving unit will start 6 Connect the driving unit and panel PC with the USB cable 7 Log into the user interface as EXPERT or MEDICAL 8 Check the following items on the driving unit Are the displ...

Page 97: ...eshold No preset value Parameter Default value Tab 8 1 Default driving unit settings Cannulation1 Blood pump Diameterof apex atrial cannula Diameterof arterial cannula 10 mL 15 mL 25 mL 30 mL 50 mL 60 mL 80 mL 5 mm 5 mm 110 6 mm 5 mm 130 100 6 mm 6 mm 130 120 80 9 mm 6 mm 130 90 90 9 mm 9 mm 130 120 120 100 12 mm 9 mm 100 80 12 mm 12 mm 110 100 95 1 With cannulae having multiple diameters the smal...

Page 98: ...ep mode or when one or both blood pumps are stopped The driving unit must thus be monitored in such cases Otherwise alarms could be noticed too late or not at all Check the blood pumps and cannulae for full de airing before AUTO op eration Perform individual steps to de air and check the system 8 5 1 Configuration Options Overview After switching on the system the driving unit can be configured Th...

Page 99: ...ND DRIVING UNIT SETTINGS view will appear Continue with chapter 8 5 2 2 Entering Patient Information page 99 1 Press PATIENT ID 2 Enter a patient ID The patient ID can be selected freely and can contain all characters 3 Accept entry 4 Press PATIENT WEIGHT 5 Select the patient weight Blood pump and cannula size recommendations will be shown later in the configuration process based on the patient we...

Page 100: ... only symbols will be used on the driving unit 3 Accept entry 4 Select CHILD PROTECTION 5 Select ON or OFF ON delays pausing of audible alarms by around 15 sec onds 6 Select the TIME OF SELF TEST button 7 Select the correct time in the window 8 Accept entry 9 Continue with chapter 8 5 2 4 Selecting Blood Pumps and Cannulae page 100 1 Press the OPERATING MODE button 2 Select BVAD LVAD or RVAD mode ...

Page 101: ...ress APPLY The settings are copied to the driving unit 5 Continue with chapter 8 6 De Airing Starting and Setting the Blood Pumps page 102 1 Initial state Driving unit and panel PC connected both devices are on A suitable configuration file can be found on the panel PC or on a USB stick 2 If the configuration file is found on the USB stick then insert the USB stick into the USB port on the panel P...

Page 102: ...mponents explain how to prime blood pumps connect blood pumps to cannulae and use the T00L 002 de airing set Heed the instructions for use on EXCOR sterile components 8 6 2 LVAD and RVAD 1 Status before de airing Blood pump filled with sterile saline solution Blood pump connected to cannulae De airing cannula placed Driving tube connected to the blood pump 2 Connect the driving tube to the connect...

Page 103: ...d with STEP or AUTO 5 The start of the pump is thus concluded The parameters must be adjusted subsequently Make sure that the blood pump is filling and emptying completely 6 Continue with chapter 8 6 4 Setting Rate and Synchroniza tion page 104 1 1 Press the START STOP button 2 Every start of a blood pump begins with a step The first step is always a diastole If the membrane of the blood pump is i...

Page 104: ...20 bpm The blood pump starts with this rate For regular operation a value greater than 60 bpm must be selected To change the rate press the RATE button 2 Adjust the rate value Accept the value 3 BVAD In Synchronous mode and Asynchronous mode the left and right blood pumps always operate with the same rate If the rate for a blood pump is adjusted the rate for the other blood pump will be automatica...

Page 105: ...e settings in this order 1 Rate 2 Filling Emptying 3 Duration systole Monitoring Monitor and evaluate the filling and emptying of the blood pump over sev eral cycles after each parameter change 1 Adjust the Rate to generate sufficient blood flow 2 Adjust Filling and Emptying The goal is to completely fill and empty the blood pump A crease free membrane in the end position indicates complete fillin...

Page 106: ...emains constant After settings have been selected wait until the system has adjusted then check whether the settings allow the blood pumps to fill and empty completely In its default setting and after a reset the driving unit is configured so that the blood pump fills and empties almost completely at rates between 20 and 60 bpm and an af terload of 70 mmHg Minor corrections might be necessary At h...

Page 107: ...After every tap the system requires a short period of adjust ment No additional settings can be changed during that period Buttons can not be selected until the system has finished self regulation A counter 1 shows how much longer the system will need to finish adjusting The counter will remain visible even if the window is closed 2 7 Repeat the setting process until the membrane is crease free in...

Page 108: ... positioning on the outer cannulae is preferred Any orientation is possible For information on connecting flow sensors see chapter 5 2 3 6 Connecting Discon necting the Flow Sensor to from the Driving Unit page 46 and section 5 2 3 3 Attach ing the Flow Sensors to the Cannulae and the Blood Pumps page 45 Check the flow alarm threshold regularly i e at least once per day Select a flow alarm thresho...

Page 109: ...iggering alarms Do not set the flow alarm threshold to a value that will make the alarm unusable 1 The flow alarm needs to signal insufficient support reliably while avoiding unnecessary alarms for minor flow fluctuations The flow alarm must be set immediately after connection of the flow sensor Each time after the rate is adjusted check the flow alarm threshold and adjust it if necessary 2 Call u...

Page 110: ...sers can change the driving unit parameters Several pa rameters can only be changed after the blood pumps have been paused or the driving unit has been reset Parameters can only be set within a defined range of values These value ranges de pend on the specific components implanted 1 Lower threshold for the flow alarm 2 Currently selected value 3 Upper threshold for the flow alarm 3 Set the flow al...

Page 111: ...tate Driving unit and panel PC connected both devices are on 2 Log in EXPERT OR Medical 3 Select BLOOD PUMP settings or DRIVING UNIT settings Duration systole Rate Flow alarm threshold Filling Emptying Synchronization Patient weight Language for driving unit Child protection Time of self test 4 Choose and set parameters that are to be changed 5 When changing blood pump parameters pay attention to ...

Page 112: ...just the parameters 1 Monitor filling emptying behavior again after one hour 2 Adjust the parameters if necessary 1 Initial state Driving unit and panel PC connected both devices are on 2 Log in as user EXPERT or MEDICAL 3 Select the BLOOD PUMP SETTINGS view 4 Open the START STOP BLOOD PUMPS window and stop the blood pump s 5 Select the DRIVING UNIT SETTINGS view and then open the BLOOD PUMPS AND ...

Page 113: ...g in as user EXPERT or MEDICAL 3 Select the BLOOD PUMP SETTINGS view 4 Open the START STOP BLOOD PUMPS window and stop the blood pump s 5 Select FILE RESET DRIVING UNIT 6 Select CONFIGURE DRIVING UNIT FROM FILE 7 Select the configuration file for the current patient 8 Select the DRIVING UNIT SETTINGS view and then open the BLOOD PUMPS AND CANNULAE window 9 Adjust the settings for Operating mode Bl...

Page 114: ...nitial state The system is in AUTO operation The panel PC is connected to the driving unit A sterile environment has been prepared The blood pump has been prepared The necessary materials are ready for use 2 Log in with the EXPERT user profile 3 Remove the cable wrap 4 Remove the flow sensor from the cannula If alarms are emitted with regard to flow or a flow sensor not being connected press AUDIO...

Page 115: ...m is in AUTO operation The panel PC is connected to the driving unit A sterile environment has been prepared The blood pump has been prepared The necessary materials are ready for use 2 Log in with the EXPERT user profile 3 Remove the cable wrap 4 Remove the flow sensor from the cannula If alarms are emitted with regard to flow or a flow sensor not being connected press AUDIO PAUSED 5 Reduce the r...

Page 116: ... blood pumps Audible alarms are off while the blood pumps are paused 8 10 1 Replacing Driving Tubes BVAD Left LVAD RVAD 13 Mount the flow sensors and cable protectors 14 Log off 1 Initial state System in AUTO operation The panel PC is connected to the driving unit The driving tube with corresponding color coding is ready 2 Log in with the EXPERT user profile 3 Remove the cable wrap 4 Remove the fl...

Page 117: ...panel PC is connected to the driving unit Driving tube with blue color coding is ready 2 Log in with the EXPERT user profile 3 Remove the cable wrap 4 Remove the flow sensor from the cannula If alarms are emitted with regard to flow or a flow sensor not being connected press AUDIO PAUSED 5 Reduce the rate on the left blood pump if necessary 6 Call up the START STOP BLOOD PUMPS view 7 Stop the righ...

Page 118: ...or the correct patient and that the parameters are suitable Press APPLY to confirm the set tings The replacement driving unit is now configured 7 Switch off the replacement driving unit 8 Label the replacement driving unit There is a tray for the label on the back of the driving unit Mark the label in a suitably unique manner such as with the patient ID Select a label that will make it clear which...

Page 119: ...ewed on the panel PC In order to make data available on the panel PC such data must be loaded from the driving unit Importing logs This function copies selected logs from the driving unit to the panel PC 4 Connect the panel PC to the driving unit If necessary plug the USB stick into the panel PC Wait until the panel PC has connected to the replacement driv ing unit 5 Log in with the EXPERT user pr...

Page 120: ...onfiguration of the selected patients from the panel PC 1 Connect the driving unit to the panel PC 2 Log in 3 Open the DATA menu and select FILES AUTOMATIC LOG 4 Select AUTOMATIC ON and accept 5 Now every time that a driving unit is connected the logs will be automatically copied to the panel PC 1 Log in 2 Connect the USB stick to the panel PC Only one USB stick may be inserted into the panel PC 3...

Page 121: ...tick The se lected configuration is always one that is saved on the panel PC 1 Log in 2 Connect the USB stick to the panel PC Only one USB stick may be inserted into the panel PC Otherwise the user will be prompted to remove one USB stick 3 Select the DATA menu 4 Select FILES EXPORT CONFIGURATION 5 The selected configuration file is copied onto the USB stick ...

Page 122: ...122 1015002x00 Configuring and Operating the Driving Unit en ...

Page 123: ...be Otherwise operating errors are possible when using EXCOR Active 9 2 1 Prerequisites for a Replacement 1 EXCOR Active can achieve the required flow rate using the combination of pumps and cannulae see section 8 4 2 Blood Pumps Cannulae Maximum Rate page 97 2 If the patient has received staged cannulae the length of the stages must permit attachment of a flow sensor If necessary the stage will ne...

Page 124: ...c tion of the driving tube 1 Lay the patient on his or her back Perform the following steps for each sup ported side in BVAD mode 2 Connect the flow sensor to the cannula 3 Connect the flow sensor to EXCOR Active 4 Remove the seal plugs from the EXCOR Active driving unit 5 Switch the driving tube connection from Ikus to EXCOR Active 6 Check filling and emptying of the blood pump and adjust as need...

Page 125: ...driving unit on the Ikus so as to allow fast and secure reconnec tion of the driving tube s 1 Lay the patient on his or her back Perform the following steps for each sup ported side in BVAD mode 2 Remove the cable wrap from the driving tube 3 Disconnect the flow sensor from the cannula and the driving unit Press AUDIO PAUSED 4 Disconnect the tank unit from Ikus 5 Switch the driving tube from EXCOR...

Page 126: ...126 1015002x00 Replacing the Driving System en ...

Page 127: ...ause the blood pump for a lengthy period Heed the instructions for use on EXCOR sterile components 10 3 Performing an Explantation 1 Initial state The driving unit is connected to the panel PC Both components are in mains operation 2 Log into the EXPERT user profile 3 Vary the rate as described in the Instructions for Use of Sterile Components 1 Initial state The driving unit is connected to the p...

Page 128: ...128 1015002x00 Weaning and Explantation en ...

Page 129: ...1 2 Safety Information Train patient and caregivers on handling of EXCOR The contents and operations taught must be well understood and mastered Conduct training programs in their entirety Refresh training program contents regularly Without training the safe and smooth operation of EXCOR is not guar anteed Use the training checklists The checklists ensure that all relevant top ics have been covere...

Page 130: ...views and knowing what they mean Connecting the driving unit to mobile components Positioning cannulae blood pumps and driving tubes Attaching driving tubes and sensor cables to the mobile compo nents Power supply Charging batteries in the driving unit Charging batteries in the battery charging unit Recognizing charge level Connecting and disconnecting to mains power Charging and using the emergen...

Page 131: ...t and caregivers Check Safety Check Children Children and people who are physically and or mentally incapable of operating the system as patients Children and people who are physically and or mentally incapable of operating the system outside the hospital setting Care Identifying insufficient support Monitoring fluid intake Notifying a contact person of any sign of changes in the patient s clinica...

Page 132: ...angers Stairs Bathroom Kitchen Mobility Maneuvering in public areas and recognizing dangers Safety Check Training Check section 11 3 1 Using Components page 130 section 11 3 2 Behavior and Safety page 131 Contents and instructions as described in the Instructions for patient and caregiver use Physician name Signature Date Patient caregiver name Signature Date ...

Page 133: ... Active 12 1 Help with Mobilization The following components are available for use when mobilizing the patient Caddy chapter 13 Caddy page 135 Baby Buggy chapter 15 Baby Buggy Stroller Board page 143 Fig 12 1 Mobilization in the baby buggy stroller with stroller board ...

Page 134: ...134 1015002x00 Mobile Use of EXCOR Active en ...

Page 135: ...the caddy The stand can be folded back for transportation or storage purposes Fig 13 1 Caddy 1 Handle 2 Hand strap 3 Clip for driving tubes 4 Mounting hook 5 Mounting bracket for accessory bag 6 Brake 7 Stand 8 Locking bolt to release the locking mecha nism 9 Mount 10 Wheel locking mechanism 11 Wheel 1 2 3 4 5 6 11 10 8 7 9 5 1 Pull the locking bolt ...

Page 136: ... 2 Unfold the stand to the stop posi tion and allow the locking handle to snap into place 1 In order to mount the wheels the stand must be folded open 2 Mounting Press the wheel lock ing mechanism inwards and attach the wheel in the process Release the locking mechanism Check that the wheels are firmly seated 3 Dismounting Press the wheel s locking mechanism inwards while removing the wheel 2 Type...

Page 137: ... left hand side 13 2 6 Adjusting the Handle Height The handle height can be adjusted in steps 1 Grip the accessory bag by the handle such that the fasteners are open 2 Hang the accessory bag from the hook below and the fasteners from the crossbar above 3 Release the handle Make sure that the accessory bag is seated firmly 1 Mounting Affix the hand strap with the carabiner to the right or left grom...

Page 138: ... on both sides 3 Press and hold the lock release and slide the handle to the desired height Let go of the lock release 4 Push the handle gently until you feel it snap into place Secure the driving tubes again 1 1 2 1 Attach the driving unit to the hook At the same time position the driving unit in such a way that it slides onto the mount 2 The mount serves to position the bottom of the driving uni...

Page 139: ...lding the Caddy into Transport Position The caddy can be collapsed for transportation purposes 1 Lay the driving tubes such that they will not tangle on the wheels or drag on the ground when in motion 2 Press the driving tubes into the clips 3 To release the driving tubes pull them out of the clips 1 Locking Press the level down with your foot If you feel signifi cant resistance when pressing down...

Page 140: ...140 1015002x00 Caddy en 1 Remove the driving unit Fig 13 2 Caddy in transport position 2 Remove the wheels 3 Fold and lock the stand 4 Slide the handle downwards ...

Page 141: ...he patient Attach the accessory bag to the transport system during mobile use Keep the following components available in the accessory bag 1 Valves with magnetic closure 2 Battery compartment 3 Pump compartment 4 Closure 5 Handle and opening contact for the locking mechanism 6 Grommets for mounting bracket 1 2 3 4 5 4 6 Battery compartment Pump compartment Two charged batteries Manual pump Tire pu...

Page 142: ...142 1015002x00 Accessory Bag en 1 Two charged batteries 2 Manual pump 3 Short instructions 4 Tire pump for caddy 1 2 3 4 ...

Page 143: ...em is not in motion The brake prevents the caddy from rolling away accidentally 15 2 General The driving unit can be connected to a stroller using the stroller board The driving unit and accessory bag are transported on the stroller board 15 3 Setup Fig 15 1 Stroller Board 15 4 Mounting the Stroller Board 15 4 1 Checking the Scope of Delivery After unpacking check the scope of delivery and lay out...

Page 144: ...144 1015002x00 Baby Buggy Stroller Board en Body 1 Carrier 1 Wheel 2 Cap 2 Countersunk screw 2 Hook for bag 2 Hexagon screw 2 Sleeve 2 Spacer set 2 Stroller clip 3 Allen wrench 3 mm 1 ...

Page 145: ...5002x00 145 Baby Buggy Stroller Board en 15 4 2 Overview Assembly Fig 15 2 Stroller board assembly 1 Hexagon screw 2 Hook for bag 3 Sleeve 4 Carrier 5 Countersunk screw 6 Cap 7 Body 8 Wheel 1 2 3 4 5 6 7 8 ...

Page 146: ... into the body The safety hook must point in the direction of the mount 2 Connect the hexagon screw with the hook Insert both into the body and use to affix the carrier Insert the sleeve on the opposite side Tighten the sleeve using the Allen wrench Repeat the proce dure with the second hook 3 Insert the wheel into the bearing 4 Slide on the cap to affix the wheel Tighten cap with the coun tersunk...

Page 147: ...y seat in the direction of motion Make sure the child s feet are facing forward Do not place the child seat or the baby seat in a fully horizontal position Make sure the baby seat or the child seat is not on top of the con nections or the driving unit while in motion 1 Base frame 2 Set of wheels 3 Sunshade 1 2 3 1 Child seat 2 Frame 3 Cover 4 Rain protection 5 Brackets 1 2 3 4 5 1 Rain protection ...

Page 148: ...dling any components the brake on the stroller must be set 1 Mount the spacers onto the rear axle To do so place two spacers around each axle and press them tight Position as shown in the diagram 2 Press the snap in connectors of the stroller board over the rear axle 3 Check that the components are firmly seated 4 Mount the stroller clips onto the stroller 1 Spacer 2 Snap in connector 3 Stroller c...

Page 149: ...patient s neck There may also not be any large loops extending outward that could become en tangled Avoid tension and kinks The driving tubes must not run too tightly between the stroller and stroller board Make sure there is no tension on the driving tubes Position the driving tubes in large radii The driving tubes must not kink 1 Activate the brake on the stroller 2 Hang the bag on the stroller ...

Page 150: ...150 1015002x00 Baby Buggy Stroller Board en Fig 15 3 Guiding of the driving tubes ...

Page 151: ...te patient support may not be ensured in case of emergency First ensure the patient is receiving support At the right time call on one or more persons for assistance Otherwise the supply to the pa tient is not guaranteed Note the color coding on the driving tubes and on the connectors on the manual pump Connect the red marked driving tube to the red connection Connect the blue marked driving tube ...

Page 152: ...for blue driving tube 3 Valves one negative pressure valve and one overpressure valve per side 4 Base plate 5 Connection for red driving tube 6 Plug Fig 16 3 Driving tube in socket 1 Color marking red to red 2 Area above the release sleeve fixed 3 Release sleeve movable 4 Valve 1 2 3 4 6 5 3 3 3 1 2 3 4 ...

Page 153: ...5 Connect the driving tube s to the manual pump Note Connect the red marked driving tube to the red connection Connect the blue marked driving tube to the blue connection 6 Pump smoothly and rhythmically at a rate of around 60 to 80 strokes per minute Move the piston as far as is necessary to fill all blood pumps completely and ensure that the membrane is crease free in the end position 7 Make sur...

Page 154: ...154 1015002x00 Manual Pump en ...

Page 155: ...oo late Replace the driving unit if its audible signals are inaudible or incorrect Otherwise the user or caregiver might not react to an error or might react incorrectly This could impair the safety of the patient Alarms signaled on the driving unit take priority over alarms signaled by other components panel PC alarm via external alarm nurse call If several alarms are being signaled at once take ...

Page 156: ...on the left Responding to alarms by priority Identifying alarm priority Driving unit Panel PC External alarm Message Message and instructions on the display Detailed mes sage and instructions on the user inter face Forwarding of high and medium priority alarms Alarms are emitted in accordance with the system used at the hospital Visual alarm Battery system and mainte nance LEDs Bell on the user in...

Page 157: ...h group If an alarm condition occurs the corresponding LED illuminates medium yellow flashing system LED or battery LED slow tone sequence every 7 5 seconds yellow flashing bell alarm code on yellow back ground low continuously illuminated yellow system LED bat tery LED or maintenance LED slow tone sequence every 20 seconds continuously illuminated yellow bell alarm code on white background Priori...

Page 158: ... PAUSED Alarms gradually get louder over time Volume is increased twice each time following two alarm signal sequences When AUDIO PAUSED is pressed the volume is reset Display and meaning FLASHING RED High priority alarm twice every second FLASHING YELLOW Medium priority alarm every two seconds ILLUMINATED YELLOW Low priority alarm continuous Tab 17 3 Visual displays on the driving unit Priority A...

Page 159: ...ower supply is interrupt ed for a longer period of time When less than 20 of disk space is available config urations and logs will be deleted from the panel PC 17 3 10 Canceling an Alarm Once the alarm condition is no longer in place the driving unit will cancel the alarm Canceling an alarm may take a few seconds Example Alarm H2 FLOW TOO LOW Cause Once the cause of the error has been rec tified t...

Page 160: ...nstructions for action starting with the highest priority alarm If alarms have the same priority level it may be a judgment call in some cases as to which message needs to be addressed first 6 Once the alarm condition is no longer in place the driving unit will cancel the alarm This may take several seconds 3 2 1 If the driving unit is connected to a panel PC users can also complete the trouble sh...

Page 161: ...ct person section 5 7 1 1 page 52 Emergency hotline P3 Battery not connected Connect battery section 5 7 1 1 page 52 P5 Battery old Replace battery and notify contact person section 5 7 1 1 page 52 Emergency hotline P6 Emergency battery in use Replace batteries or con nect power supply unit section 5 7 1 1 page 52 section 5 2 2 3 page 40 P7 Emergency battery dis charged Connect power supply unit s...

Page 162: ... sensor section 5 2 3 6 page 46 S7 Flow sensor defective Immediately disconnect the flow sensor notify contact person section 5 2 3 6 page 46 Emergency hotline S8 Driving unit in emergency operation Replace driving unit immediately and notify contact person section 5 10 page 61 Emergency hotline S9 Flow monitor ing not ready Set threshold value for the flow alarm section 8 7 2 page 109 T2 Driving ...

Page 163: ...se Replace the batteries or connect a power supply unit P7 Emergency battery discharged Connect a power supply unit P8 Emergency battery discharged Leave the power supply unit connected S1 Maintenance due Notify your contact person S4 Driving unit defective Replace the driving unit and notify your contact person S5 Pressure build up left right not possi ble Test run for the left right drive failed...

Page 164: ...om the drive notify your contact per son Code and priority Message Instructions Error message Solution It was not possible to accept the entry Please repeat the process If this occurs again contact the manufacturer Proceed in the following order when rectifying the error Repeat the process If the problem per sists disconnect and reconnect the USB cable If the problem persists switch the panel PC o...

Page 165: ...intact 5 Is the blood pump undamaged and free of mechanical strain pressure torsion 6 Are the connections between the blood pumps and the cannulae intact 7 Are the cannulae undamaged and free of mechanical strain kinks torsion ten sion pressure For more information on alarms see also section 5 2 3 2 Measurement Accuracy and Alarms page 44 17 8 Battery Battery errors are displayed on the driving un...

Page 166: ... minated The charging unit is not connected or not properly connected Connect power supply unit Check the mains power connectors for cor rect positioning Power supply unit defective Check the status display on the power supply unit Replace the defective power supply unit Battery charging unit defective Replace the battery charging unit Error display is perma nently illumi nated The temperature in ...

Page 167: ...38 C or a feverish patient Covering the flow sensor e g with clothing or a blanket is an additional factor Pediatric patients skin is particularly sensitive Avoid exposing patients skin to contact temperatures above 41 C for more than 10 min If a flow sensor temperature alarm is emitted protect the patient s skin Follow the recommendations given in the warnings This will prevent injury to the pa t...

Page 168: ...mp Monitor patient vital parameters 17 14 Driving Tube Repair A defective driving tube must be replaced immediately If a new driving tube is not im mediately available the defective driving tube can be temporarily repaired The goal is to seal leakages in order to maintain the flow to prevent the penetration of foreign bodies into the blood pump and driving unit Missing or illegible inscriptions or...

Page 169: ... Find the defect This may require removal of the cable wrap 2 Wipe away any contamination Do not introduce any contamination or fluids into the damaged area 3 Wrap the damaged area with air tight adhesive tape 4 Check the flow Improve on the repair if required ...

Page 170: ...170 1015002x00 Identifying Errors and Troubleshooting en ...

Page 171: ... 2 2 Maintenance by the Manufacturer Distributor 18 2 2 1 Intervals The maintenance label shows the latest possible date of next maintenance Active driving units may require maintenance before that date depending on the number of pump cycles performed 18 2 2 2 Shipment Place the components inside their intended packaging and send them to the manufac turer or distributor If the original packaging i...

Page 172: ... inspections Check of external integrity Component Packaging Driving unit and batteries Driving unit case Replacement driving unit Manual pump Flow sensor Packaging for flow sensor Caddy Components case Tab 18 2 Intended packaging Component Interval Panel PC Annually Power supply units Every two years Docking Station Every two years Battery charging unit Every two years Tab 18 3 Intervals maintena...

Page 173: ...med by trained users 18 3 1 General Rules 1 First clean then disinfect 2 Before cleaning components check for damage that could allow liquids to pene trate into them 3 Do not spray directly onto the components or apply liquids to them directly Apply cleaning agents and disinfectants to a cloth Only moisten the cloth do not wet it Liquids must not seep into the components 4 Do not immerse component...

Page 174: ...ient such as the enclosure the s or the frame of the caddy These areas must be cleaned and disinfected in the event of visible contamination or whenever they are moved to a different patient 1 Moisten a cloth with water and wipe down all exterior surfaces If necessary use a mild pH neutral cleaning agent Larger particles can first be removed using a soft brush 2 If using cleaning agents Wipe down ...

Page 175: ... contamina tion is visible Component When Cleaning disinfection Flow sensor including protective cap sensor quick connect and sensor locking clip At each dressing change Driving unit Battery Power supply unit Sensor cable Cable wrap Battery charging unit Caddy with accessory bag Child caddy Stroller Board Panel PC including power supply unit and docking station Manual pump Short instructions Tab 1...

Page 176: ...manufacturer specifications recommendation 3 Mediclean If the sensor locking clip sensor quick connect and protective cap cannot be cleaned thoroughly replace those components Replace the sensor locking clip sensor quick con nect and protective cap for each new patient Dry the flow sensor and the cannula After cleaning and disinfection re attach the flow sen sor to the cannula Check the correct po...

Page 177: ...t immerse the power supply unit Cable wrap Remove the cable wrap If cleaning and disinfection are not possible replace the cable wrap USB cable adapter for external alarm nurse call power supply cable Disconnect the cable from the connected device and from mains power Cover electrical contacts Panel PC Disconnect from mains power and the docking station Switch off the panel PC Close the USB port c...

Page 178: ...and release the left button 2 Press and release the right button Result The functional test is passed if when both the left and right buttons are pressed an audible tone is emitted The absence of an audible tone indicates an error The driving unit is incapable of emitting audible alarms correctly The driving unit must be replaced Tab 18 7 Functional tests Fig 18 1 Overview of regular actions ...

Page 179: ...gs Intervals vary see EXCOR Sterile Compo nents instructions for use Transcutaneous exit site Cleaning and disinfection Dressing change Cannulae under neath dressing Cleaning and disinfection Check for deposits and defects Flow sensor Cleaning and disinfection Weekly Contact and func tional areas on all EXCOR Active components Cleaning and disinfection Check for defects Every four weeks Emergency ...

Page 180: ...180 1015002x00 Maintenance Cleaning and Disinfection en ...

Page 181: ...ssory Bag 1 1501560 3 Battery charging unit 1 1540060 4 Docking Station 1 1501510 5 Caddy castors 2 see caddy 6 Power supply unit 2 1501200 7 Panel PC power supply unit 1 1501520 8 Panel PC 1 1501500 9 Power cable 3 country specific 10 Tire pump for caddy 1 1501410 11 USB stick 1 1501530 12 USB cable 1 1501540 13 Adapter for external alarm 1 1501550 14 Instructions for clinical use for hospitals a...

Page 182: ...tteries and the manual pump The specific driving unit model varies by approval region Driving unit cases that are labeled as Driving unit back up set only contain a driving unit 1 2 3 4 5 5 6 6 7 8 9 9 9 10 11 12 13 14 15 Pos Component Quantity 1 Manual pump 1 1502400 2 Driving unit or 1 1502200 Driving unit 1502210 3 Battery 4 1503200 4 Driving unit case case without con tents 1 1502100 Tab 19 2 ...

Page 183: ...s and manual pump into the driving unit case as shown in the figure 1 Manual pump 2 Driving unit 3 Battery Fig 19 2 Driving unit case 1 Pull out handle 2 Grommet for sealing the box 3 Lock 1 2 3 3 3 3 1 2 3 3 2 Flow sensor set Quantity Flow sensor set 1 FS06 06 P 1505000 Flow sensor 1 FS06 06 P Replacement parts set FS06 consist ing of 1 1505110 Sensor quick connect FS06 3 Sensor locking clip FS06...

Page 184: ...ool 2 1505100 Accompanying documentation 1 Flow sensor set 3 FS09 12 P 1505020 Flow sensor 1 FS09 12 P Replacement parts set FS09 12 con sisting of 1 1505140 Sensor quick connect FS12 3 Sensor locking clip FS09 2 Protective cap 1 Cable wrap including wrapping tool 2 1505100 Accompanying documentation 1 Flow sensor set 4 FS12 12 P 1505030 Flow sensor 1 FS12 12 P Replacement parts set FS12 consist i...

Page 185: ... Protective cap 1 Cable wrap including wrapping tool 2 1505100 Accompanying documentation 1 Flow sensor set 6 FS12 12 C 1505050 Flow sensor 1 FS12 12 C Replacement parts set FS12 consist ing of 1 1505130 Sensor quick connect FS12 3 Sensor locking clip FS12 2 Protective cap 1 Cable wrap including wrapping tool 2 1505130 Accompanying documentation 1 1505260 Flow sensor set Quantity Tab 19 3 Flow sen...

Page 186: ...186 1015002x00 Scope of Delivery and Transport Cases en 3 Child seat fixture with accesso ries 1 1550202 4 Baby seat fixture 1 1550203 Pos Component Quantity Tab 19 4 Optional components ...

Page 187: ...on 110 VA Protection type ingress protection IP 53 dust protected protected against spray ing water Sound pressure 45 3 dB A Alarm acoustic pressure level max 76 3 dB A Operating time on battery power 4 to 10h see also section 5 7 1 9 page 56 et seq Emergency battery charging time max 7h Maintenance interval 12 months or 34 million pump cycles whichever comes first Tab 20 1 Driving unit Parameter ...

Page 188: ... spray ing water Tab 20 2 Battery Parameter Value Weight approx 80 g Dimensions without cable L x W x H 57 mm x 36 mm x 35 mm Sensor cable approx 2000 mm Protection type ingress protection IP 67 dust resistant pro tected against the effects of temporary immersion in water Tab 20 3 Battery Parameter Value Weight approx 0 85 kg Dimensions L x W x H 200 mm x 80 mm x 41 mm Input voltage 100 V to 240 V...

Page 189: ...m x 199 mm x 23 mm Input voltage 18 V DC Input current max 3 5 A Protection class I I O ports USB 3 0 USB 2 0 Battery Li Ion 11 1 V 2860 mAh Operating time on battery power min 1 h Display size 10 1 multi touch Display resolution 1280 x 800 Docking station Input voltage 100 V to 240 V AC 50 Hz to 60 Hz Input current max 1 62 A Output voltage 18 V DC Output current max 3 5 A Protection class I Tab ...

Page 190: ...g Dimensions L x W x H 207 mm x 166 mm x 126 mm Input voltage 19 V DC Input current max 9 47 A Output voltage for each battery mount 16 4 V DC Charging current for each battery mount 4 0 A max Protection class II Protection type ingress protection IP 31 protected against ingress of solid foreign bodies 2 5 mm in diame ter or larger protected against water ingress vertical drips Tab 20 6 Battery ch...

Page 191: ...ght 3 6 kg Dimensions 559 mm x 542 mm x 652 mm mounted Tab 20 7 Caddy Stroller Board Parameter Value Components case Weight 18 3 kg empty 36 3 kg with contents Dimensions L x W x H 933 mm x 573 mm x 588 mm Driving unit case Weight 7 9 kg empty 25 4 kg with contents Dimensions L x W x H 618 mm x 459 mm x 365 mm Tab 20 8 Components case and driving unit case ...

Page 192: ...Baby buggy All components can be used at elevations ranging from 0m to 2000m above sea level Flow sensor Stationary Power supply unit Docking Station Charging unit USB memory stick Adapter for exter nal alarm nurse call Panel PC 1 The driving unit and replacement driving unit may only be switched on in tem peratures ranging from 5 to 40 C Replacement driving units for BVAD patients must be kept at...

Page 193: ... The following transport and long term storage conditions apply to EXCOR Active Transport refers to shipment of components between the hospital and the manufac turer or distributor After storage or transport allow EXCOR Active to acclimatize at 20 C for one hour Remove the components from the transport boxes if necessary Temperature Air humidity Pressure Tab 20 10 Conditions for storage of EXCOR A...

Page 194: ...194 1015002x00 Technical Specifications en ...

Page 195: ...eters Blood Pumps and Cannulae 21 2 Permitted BVAD Combinations Parameter Possible values Operating mode BVAD LVAD RVAD Blood pump 10 mL 15 mL 25 mL 30 mL 50 mL 60 mL 80 mL Cannula 5 mm 6 mm 9 mm 12 mm Duration systole 30 to 60 Rate 5 bpm to 130 bpm Synchronization synchronous mode asynchronous mode separate mode Flow alarm threshold 0 l min to 10 l min Tab 21 1 Parameters for blood pumps and cann...

Page 196: ...ecting set 9 25 6 with connecting set 9 9 6 with connecting set 6 with connecting set 9 30 9 9 6 with connecting set 9 50 9 12 12 9 9 12 60 12 12 9 12 80 12 12 Tab 21 3 Permitted combinations of blood pumps and cannulae Parameter Value Patient ID 1 to 32 characters freely selectable Patient weight 2 kg to 255 kg Implantation date Freely selectable up to the current date Language for driving unit B...

Page 197: ...1015002x00 197 Overview Parameters en Child protection on off Time of self test Freely selectable down to the minute Parameter Value Tab 21 4 Patient and driving unit parameters ...

Page 198: ...198 1015002x00 Overview Parameters en ...

Page 199: ...as opening or closing contacts Before using the external alarm nurse call with a patient check its functionality and ensure that it is properly connected Type 2 pole conductor to be used Opening contact Closing contact Connector Connector on the driving unit side Connector plug The connector assembled by the hospital must include a strain relief enclosure Driving unit connection to the hospital s ...

Page 200: ...200 1015002x00 Using the External Alarm Nurse Call en Electrical data The contacts are de energized Rated voltage maximum 60 V Rated current maximum 3 A ...

Page 201: ...se of doubt please contact Berlin Heart 23 2 Major Performance Characteristics The following essential performance characteristics have been tested and are valid even under the influence of electromagnetic disturbances Automatic start of a configured driving unit when connected to a power supply Blood pump operation using the set parameters Continuous monitoring of driving unit pressures and blood...

Page 202: ...ailure to maintain the recommended minimum safety distances to the electromagnet ic disturbances can lead to impairment or loss of essential performance see section 23 2 Major Performance Characteristics page 201 Guidance and manufacturer s declaration electromagnetic interference emission measure ment EXCOR Active is intended for use in an electromagnetic environment as described below The custom...

Page 203: ...wer quality should be that of a professional health care establishment as well as that of a home healthcare environment Voltage dips short interrup tions and volt age variations on power supply input lines as per IEC 61000 4 11 0 UT 100 dip in UT for cycle at 0 45 90 135 180 225 270 and 315 degrees 0 UT 100 dip in UT for 1 cycle 70 UT 30 dip in UT for 0 5 sec onds 0 UT 100 dip in UT for 5 seconds ...

Page 204: ...r amateur radio band widthsa 3 V d 2 P 6 V 150 kHz to 80 MHz within ISM or ama teur radio band widthsa 6 V d 1 P Radiated HF interfer ence according to IEC 61000 4 3 10 V m 80 MHz to 6 GHz 9V m or 28V m from 385MHz to 6GHz at selected frequen cies 10 V m 80 MHz to 6 GHz 9V m or 28V m from 385MHz to 6GHz at selected frequencies d 0 6 P Where P is the maximum nominal output power rating of the trans...

Page 205: ...n these fre quency ranges c The field strengths of fixed transmitters such as base stations for mobile phones and land mobile radio devices amateur radios AM and FM radio and television broadcasters cannot be theoretically predicted with accuracy To assess the electromagnetic environment due to fixed transmitters a site survey should be considered If the measured field strength of the location exc...

Page 206: ...206 1015002x00 EMC en ...

Page 207: ...it If the original label is already filled in feel free to copy and use this label template Replacement driving unit configured for Patient ID Replacement driving unit configured for Patient ID Replacement driving unit configured for Patient ID Replacement driving unit configured for Patient ID Replacement driving unit configured for Patient ID Replacement driving unit configured for Patient ID Re...

Page 208: ...208 1015002x00 Patient ID Labels en ...

Page 209: ...nterference comité international spécial des perturbations ra dioélectriques CPB Cardiopulmonary bypass E EMC Electromagnetic compatibility ESD Electrostatic discharge H HDD Hard Disk Drive HF High frequency I IEC International Eletrotechnical Commission L LVAD Left Ventricular Assist Device R RVAD Right Ventricular Assist Device ...

Page 210: ...Abbrevations 210 1015002x00 en ...

Page 211: ...1015002x00 211 en Print Control A B C D E F G H I J K L M N O P Q R S T U V W X Y Z a b c d e f g h i j k l m n o p q r s t u v w x y z _ µ 1 2 3 4 5 6 7 8 9 0 1 2 3 ...

Page 212: ...212 1015002x00 en ...

Reviews: