background image

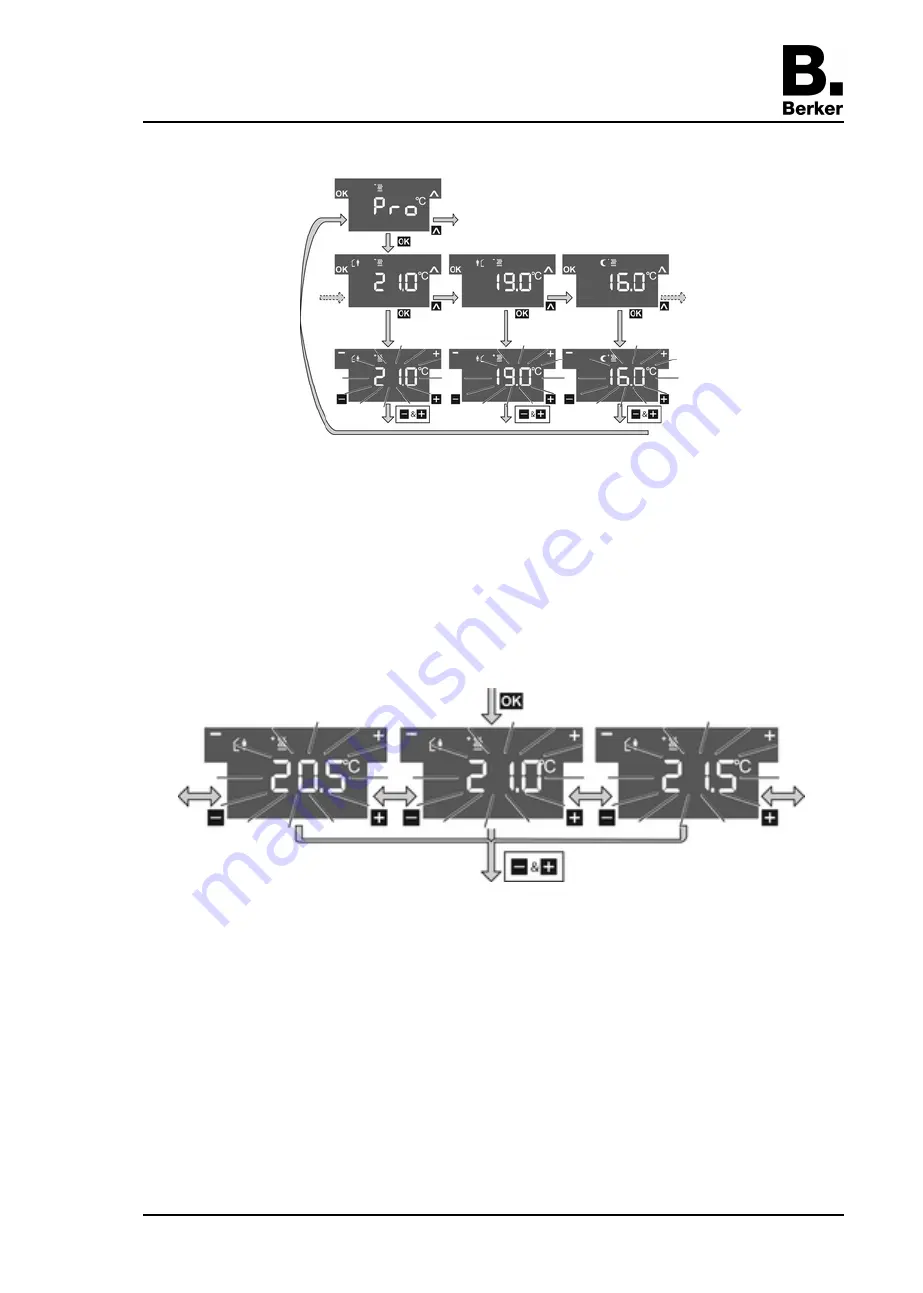
Figure 7 

Press the sensor button 

¨

 to select the menu item 

Pro

 for Heating mode 

ĉ

 or Cooling 

mode 

Ċ

 and press the sensor button 

OK

(Figure 7). 

Press the sensor button 

¨

 to select the required operating mode and press the 

OK

 sensor 

button. 
The setpoint temperature flashes. 

Reduce setpoint temperature: press the left sensor button 

- or - 

Increase setpoint temperature: press the right sensor button 

+

Figure 8 

Apply changes: press the 

+

 and 

 sensor buttons simultaneously. 

The set setpoint temperature for the set operating mode is saved. 
The display returns to the main menu. 
- or - 

Do not apply change: press another sensor button. 
The device returns to the basic display. 

If the setpoint temperature should be changed for other operating modes, repeat the 
described operating levels. 

Cleaning the device 

The device can be blocked for 60 s to prevent unintentional actions from being executed when 
the glass is being cleaned.  
The main menu is displayed.  

Seite 6/13 

15.02.2013 

32586901 
97-09635-000 

KNX 
Touch/Glass sensor 2gang / 3gang with room thermostat 

Summary of Contents for KNX Touch Glass sensor 2gang

Page 1: ...omponents Figure 1 1 Sensor buttons OK 2 Sensor buttons for operating functions 3 Status LED 4 Operation LED 3 Function System information This device is a product of the KNX system and complies with...

Page 2: ...modes are used Single button operation Switching on or off or dimming brighter darker e g of lighting takes place alternately when the same sensor button is pressed repeatedly Two button operation Tw...

Page 3: ...l display Heating mode Cooling mode Icon blocked buttons locked Interior temperature Outdoor temperature 1 7 Weekdays Mon Sun and Active when values are changed OK and Active when the menu is active T...

Page 4: ...adjusted in steps of 0 5 C The adjusted value is applied immediately The icon in the display shows that the setpoint temperature was adjusted The system returns to the basic display automatically afte...

Page 5: ...by an external timer it is nevertheless possible to retain the comfort mode for some time This is made possible by the comfort extension Die Komfortverl ngerung ist zeitlich begrenzt The device is in...

Page 6: ...ess the and sensor buttons simultaneously The set setpoint temperature for the set operating mode is saved The display returns to the main menu or o Do not apply change press another sensor button The...

Page 7: ...lock is removed and normal operation possible i Cleaning with a lightly moistened lint free cloth possibly with a mild glass cleaner Do not use sharp objects or abrasive cleaning agents e g scouring...

Page 8: ...ellow and white wire pair of the KNX bus line can be used to provide an additional power supply o Align the mounting frame 10 and screw it to the appliance box or the wall Figure 11 Observe marking TO...

Page 9: ...oints for the adhesive dots on the rear side of the glass sensor 12 from impurities o Remove the adhesive dots from the carrier film and stick them to the four adhesion points o Free the substrate of...

Page 10: ...nsation is 20 mm x from the socket for the threaded pins Figure 13 10 Mounting frame 14 Retaining peg 15 Threaded pin 16 Friction spring 17 Double installation socket accessory o Connect power supply...

Page 11: ...e a Pozi Drive screwdriver size 0 Figure 14 18 Friction spring seat Dismantling the Glass sensor o If available slacken the retaining screw on the bottom edge Use a Pozi Drive screwdriver size 0 o Pre...

Page 12: ...provides insufficient hold Use the adhesive dots supplied for mounting Touch Glass sensor cannot be removed The device was mounted with increased dismantling protection Slacken the screw on the botto...

Page 13: ...Wall box 2gang Order No 1871 Floor temperature sensor remote sensor Order No 161 6 4 Warranty We reserve the right to make technical and formal changes to the product in the interest of technical pro...

Reviews: