background image

21

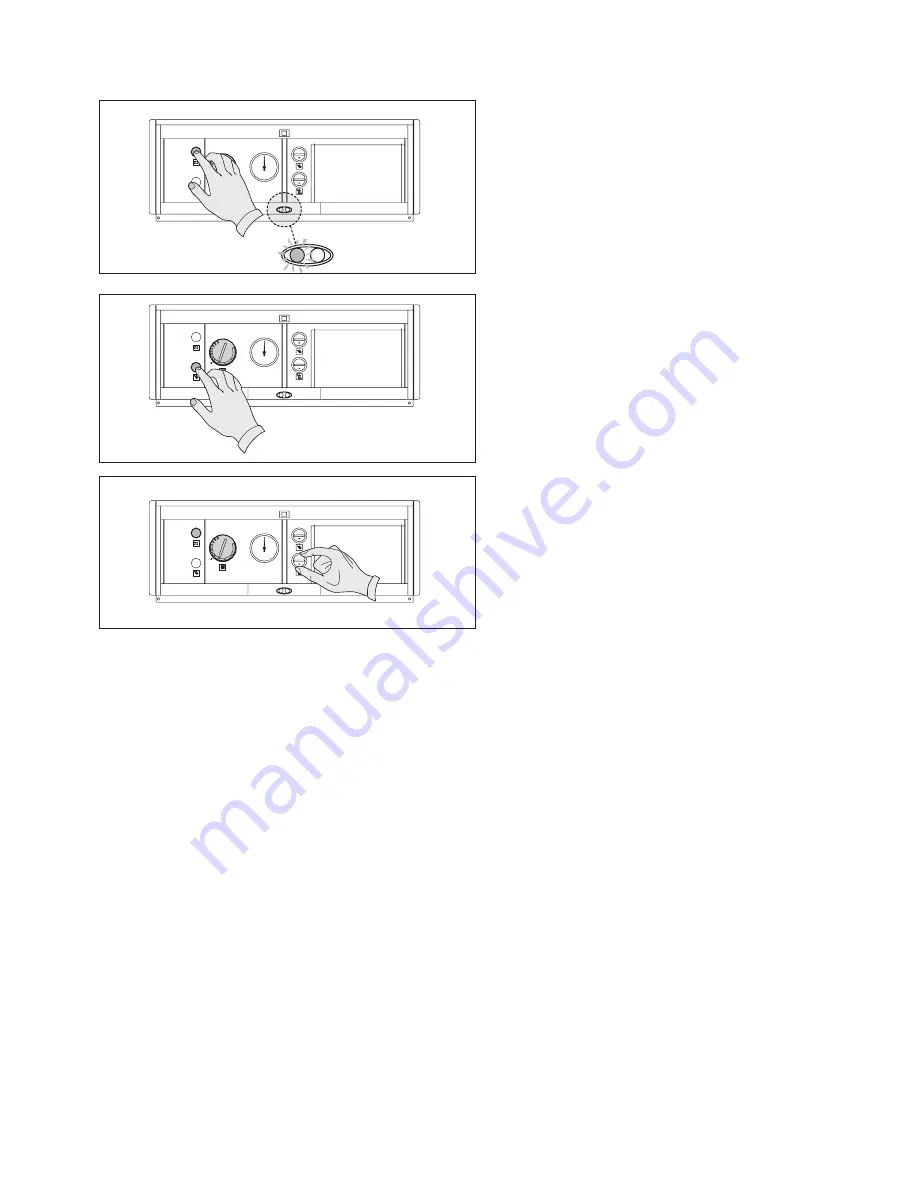
Fig. 4.5

Fig. 4.6

Fig. 4.7

The boiler will now start up and the burner will 

remain lit until the set temperature is reached.

If any ignition or functioning errors occur, the 

boiler enters “LOCK-OUT” and the red LED 

on the control panel comes on to indicate this 

(fig. 4.5).

Proceed as follows to reset the safety ther-

mostat:

 - wait for about 1 minute, then press the 

"burner reset" button(fig. 4.6)

 - wait for the burner to complete the entire 

start-up cycle again, up to the ignition of 

the flame.

The boiler will also shut down if the flue gas 

thermostat trips. To reset the boiler in this 

case, remove the hood and reset the flue gas 

thermostat (fig. 4.7).

If the flue gas thermostat trips repeated-
ly, make sure that the flue gas pipes are 
not blocked and that the flue is properly 
constructed.

Summary of Contents for NOVELLA 45 RAI

Page 1: ...Installation Manual NOVELLA 31 45 RAI Boilers Cast Iron Base EN Installation Manual...

Page 2: ...INSTALLATION MANUAL 2 The following symbols are used in this manual b CAUTION Indicates actions that require caution and adequate preparation a STOP Identifies actions that you MUST NOT do...

Page 3: ...Multi line wiring diagram 12 3 INSTALLATION 13 3 1 Installation standards 13 3 2 Place of installation 13 3 3 Installation in existing systems 13 3 4 Water connections 14 3 5 Electrical connections 1...

Page 4: ...ice to have at least the following operations performed switch the boiler OFF at the control panel and at the mains power switch close the boiler s fuel cock central heating circuit shut off cock and...

Page 5: ...logic and do not waste energy because they only start up when heat is actually needed by the central heating system i e when the room thermostat trips Novella boilers can be connected to a stor age c...

Page 6: ...light 17 Power on LED indicator 18 Quick reference guide 19 Burner reset button Key 1 Control panel 2 Temperature sensor socket 3 Boiler body 4 Electronic ignition and flame detection unit 5 Ignition...

Page 7: ...th G20 gas CO below p p m 21 19 CO2 5 7 5 5 NOx according to EN 297 class 1 Flue gas t C 96 113 Boiler dimensions Height mm 850 Width mm 450 600 Depth mm 675 720 Weight of boiler kg 118 154 2 5 Techni...

Page 8: ...aced removed or lost proper installation and servicing may be ren dered difficult Fig 2 4 2 7 Material supplied The boiler is delivered in a wooden cage Proceed as follows to remove this remove the st...

Page 9: ...rom the casing fig 2 5 lift the boiler using two 3 4 pipes 1 pushed through the lifting points 2 fig 2 6 bWear suitable personal protective equipment and use suitable safety devices aDo not dispose of...

Page 10: ...N MODEL 31 RAI 45 RAI A 450 154 mm B 675 720 mm 2 10 Water circuit MI GAS RI A B C D A Water circuit drain cock B Water circuit temperature control sensor C Safety thermostat temperature sen sor D Wat...

Page 11: ...ump A pump must therefore be provided as part of the installation In order to choose a pump of the right size bear in mind the boiler s water side pressure drop as shown in the following graph bOn ini...

Page 12: ...e LV Green power on LED indicator LR Red burner lockout LED warning light RS Burner reset button TR Central heating temperature control TS Safety thermostat manual reset TF Flue gas thermostat manual...

Page 13: ...with the type of gas supplied The type of gas is specified on the packaging label and on the boiler s own name plate Make sure that the flue is able to withstand the temperature of the flue gases and...

Page 14: ...a contact gap of at least 3 mm to connect the appliance to the mains electricity supply The appliance functions on an alternating current supply of 230 V 50 Hz Consumption is 150 W The appliance conf...

Page 15: ...h fig 3 2 connect up the optional room thermostat and or timer as shown in the electrical wir ing diagrams in this manual connect up the electrical power supply fig 3 3 connect up the room thermostat...

Page 16: ...pplicable legisla tion and standards bOn completion of the installation check that all joints are sealed in conformity to the relevant installation standards 3 7 Gas supply conversion The boiler comes...

Page 17: ...boiler as instructed on page 20 NOZZLE PRESSURE Adjust the pressure regulator on the LPG supply until the pressure gauge reads out the value specified in the table below fig 3 9 31 RAI 45 RAI G30 G31...

Page 18: ...ostat shuts down the boiler immediately in the event of flue gas blowback bUninsulated flue pipes are potentially dangerous and can cause burns Fig 3 11 DESCRIPTION MODEL 31 RAI 45 RAI B 77 97 mm I 14...

Page 19: ...e boiler s mains power switch and control panel switch OFF before starting to empty the boiler fig 3 15 make sure that the water circuit shut off cocks are closed connect a rubber hose to the hose uni...

Page 20: ...t up the boil er for the first time Turn the boiler s mains power switch ON fig 4 1 Set the room thermostat to the required temperature 20 C or if the system has a timer or timer thermostat make sure...

Page 21: ...o reset the safety ther mostat wait for about 1 minute then press the burner reset button fig 4 6 wait for the burner to complete the entire start up cycle again up to the ignition of the flame The bo...

Page 22: ...boiler s temperature control is turned down fig 4 8 the control panel switch is switched OFF fig 4 8 the temperature setting on the room thermo stat or timer is reduced fig 4 9 make sure that the pum...

Page 23: ...ing operations switch the boiler on at the control panel switch and check that the green power indi cator lights fig 5 1 turn the mains power switch OFF fig 5 2 close the boiler s fuel cock and water...

Page 24: ...tenance normally consists of the following operations Remove encrustations from the burner Remove encrustations from the heat exchangers Check and clean the flue pipes Check the efficiency of the exte...

Page 25: ...1 cod 1100279 Pump or valve controlled multizone central heating kit with total shut down function fig 7 2 cod 696439 RO120 storage cylinder fig 7 3 cod 696339 Pump manifold fig 7 4 cod 694769 High h...

Page 26: ...INSTALLATION MANUAL 26...

Page 27: ......

Page 28: ...23 A 23900 Lecco www berettaboilers com The manufacturer strives to continuously improve all products Appearance dimensions technical specifications standard equipment and accessories are therefore l...

Reviews: