background image

25

Cleaning

6005044_0 – 04.12.2019

EN

5. 

Cleaning

5.1 

Safety information for cleaning


D

WARNING!

Hazard through a disregard of the cleaning instructions!

This chapter contains important information for the safe 
cleaning of the device.


Read through this chapter carefully before cleaning the 
device. 


Follow the safety instructions.


y

Cleaning only by authorised users.


D

“1.2 Authorised target groups” (page 4).


y

No cleaning permitted by children under 8 years old and 
persons who would not be able to properly assess the 
hazards associated with handling the device.


y

After use, the hob and other parts that could be touched 
may still be hot. There is a risk of burning.


y

Grease residues should be removed. Grease residues pose 
a fire hazard.

The device should be cleaned regularly:


y

Control panel, surface, upper section, bulging edge and 
lower section after each cooking process.


y

With daily use, the Capillar Trap after three weeks at the 
latest.

5.2 

Cleaning procedures

The device draws in dirt particles (e.g. grease and oil particles) 
with the air from the room. The dirt particles are separated 
and collected in the upper section, on the bulging edge, 
in the lower section and in the Capillar Trap.

Before every cleaning:


Turn off the device.


Make sure that the hob and other parts that could be 
touched have cooled down.


D

ATTENTION!

Danger of damage through improper cleaning!

Sharp-edged objects, abrasive or unsuitable cleaning agents 
can damage the device.
The following cleaning agents are unsuitable and must not 
be used:


y

Acetone


y

Trichloroethylene


y

Solutions on a cellulose basis (e.g. cellulose thinner)


y

Artificial resin thinner


y

Abrasive media


y

Polishes containing silicone


y

Polishes containing oil


y

Wax


y

Water vapour


y

On painted surfaces: Microfibre cloth


Keep objects that could scratch the device away from it 
(e.g. rings).


Use mild household cleaner (e.g. alkali-free, pH-neutral 
multipurpose cleaner).


Use a soft, damp cloth.


Clean without exercising excessive pressure.


The instructions and information on the cleaning agent 
should be observed.

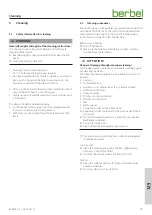
Control panel


Clean the control panel with a lint-free, slightly damp 
cloth (e.g. a microfibre cloth).


Dry the control panel with a lint-free, soft cloth.

Surfaces


Clean the surfaces with a soft, damp cloth and a mild 
household cleaner.


Dry the surfaces with a soft cloth.

Summary of Contents for BKH 120 FO

Page 1: ...EN Headroom hood Formline EN Operating and installation instructions for the models BKH 60 FO BKH 70 FO BKH 80 FO BKH 90 FO BKH 120 FO 6005044_0 ...

Page 2: ... that results in serious injuries or death D WARNING Notes with the word WARNING warn of a hazardous situation that could result in serious injuries or death D CAUTION Notes with the word CAUTION warn of a situation that could result in minor injuries D ATTENTION Notes with the word ATTENTION warn of a situation that could result in damage to property or to the environment Symbol clarification tex...

Page 3: ...ce 12 3 5 5 Connect accessories 14 3 5 6 Fit the BackFlow port 14 3 5 7 Install filter with recirculating and hybrid operation 15 3 5 8 Connect exhaust air ducting with exhausted air and hybrid operation 16 3 5 9 Establish electrical power supply 17 3 5 10 Mounting the chimney 17 3 5 11 Insert the Capillar Trap bulging edge and lower section 18 3 5 12 Check and carry out commissioning 19 4 Operati...

Page 4: ...ructed with regard to safe use of the device y Users understand the hazards involved with the device y Children may not play with the device 1 3 General safety instructions D WARNING Hazard through a disregard of the operating and installation instructions This manual contains important information for the safe handling of the device Separate reference is made to possible hazards Read through this...

Page 5: ...into the room The humidity in the room can be reduced with the fresh air feed In recirculated air mode it is necessary to use the run on function so that the device can remove the remaining odours Using the run on function increases the life of the filter filling The filter filling must be replaced at regular intervals 2 2 2 Extracted air mode The cleaned room air can be routed to the outside via ...

Page 6: ...section B A C D A Upper section with bulging edge removable B Lower section removable C Capillar Trap removable behind the lower section D Ratings plate in the air induction shaft of the Capillar Trap A B C D E A Sockets for accessories B BackFlow port with use of the BackFlow technology C Control box D Adjusting screws for alignment E Connector for the mains cable ...

Page 7: ...02 Connection voltage 230V 50 Hz 230V 50 Hz 230V 50 Hz 230V 50 Hz 230V 50 Hz Total power 180W 180W 185W 185W 189W Fan power consumption 170W 170W 170W 170W 170W Lighting hob lighting LED 10W 263 lx LED 10W 210 lx LED 14 6W 300 lx LED 14 6W 315 lx LED 18 3W 379 lx Colour temperature hob lighting setting 2700 6500 K 2700 6500 K 2700 6500 K 2700 6500 K 2700 6500 K Width 599 mm 699 mm 799 mm 899 mm 11...

Page 8: ...nditions can lead to hazardous situations e g in the handling of electrical power or gas Make sure that the requirements for the installation location are complied with y Do not install in potentially explosive atmospheres y With simultaneous use of a heating point which uses air from the room as its oxygen supply e g chimneys y A safety device is absolutely essential y The safety device must prev...

Page 9: ... due to improper installation When using the exhaust air ducting with other devices or when connecting an active exhaust air channel e g chimney gases or smoke can be drawn into the room Make sure that the requirements for the exhaust air ducting are complied with y The exhaust air ducting is used exclusively by this device y The exhaust air ducting is made of non combustible material in accordanc...

Page 10: ...hat could be damaged Make sure that the hob and other parts that could be touched have cooled down Protect the hob and other surfaces in the installation area e g with thick cardboard Ensure that the power supply is switched off and remains so Connect the power supply only when instructed to do so in the installation instructions If accessories e g wall box window contact switch are required for t...

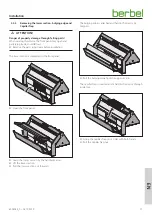
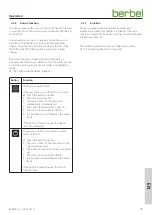
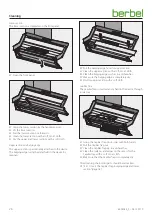
Page 11: ...ng inside before installation The lower section is integrated in the front panel Open the front panel Grasp the lower section by the handle recesses Lift the lower section Pull the lower section out forwards The bulging edge is attached and held in the device by magnets Pull the bulging edge from the upper section The Capillar Trap is inserted and is held in the device through a side lock Grasp th...

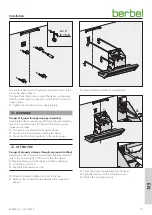
Page 12: ...0 mm y With gas hobs at least 650 mm y With electric hobs at least 500 mm Determine the hanging position Ensure that the chimney mount is correctly positioned y The chimney cannot be mounted if it falls below the required measurement 30 mm y Any irregularities e g in the ceiling can be compensated with slotted holes Make sure that the safety distance is complied with D WARNING Risk of death due to...

Page 13: ...ble Two persons are required to hang the device Ensure stable footing when hanging the device Ensure that no other people are in the working area D ATTENTION Danger of property damage through improper handling Hanging the device requires a great deal of physical exertion due to its size and weight If the device falls the device kitchen furnishings and other objects could be damaged Cover the coole...

Page 14: ...nection with special accessories of the manufacturer Connection with a PC or other devices is not permitted Wall box y The wall box is closed when the control contacts are open y The wall box is open when the control contacts are closed Window contact switch y The hood s fan is only operational when the window is open Safety device y The hood s fan is only operational when no critical under pressu...

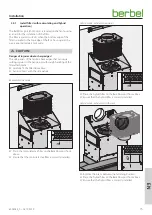
Page 15: ... can cause cutting injuries to the hands e g with rough handling of the filter attachment Carefully fit the filter from above Avoid contact with the side panels Recirculated air mode 3 Place the recirculated air filter on the BackFlow port from above Ensure that the recirculated air filter is correctly installed Hybrid mode exhaust air upwards 3 Place the hybrid filter on the BackFlow port from ab...

Page 16: ...xhaust air ducting Fit the exhaust air ducting directly onto the outlet in the fan housing from above Extracted air mode with BackFlow technology The BackFlow port is used D 3 5 6 Fit the BackFlow port page 14 1 2 Fit the exhaust air ducting onto the BackFlow port from above Seal the transition between the exhaust air ducting and the BackFlow port with sealing tape accessory Hybrid mode Fit the ex...

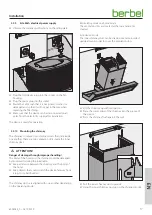
Page 17: ...inner chimney duct D ATTENTION Danger of damage through improper handling The body of the hood and the chimney could be damaged by movements during the installation Keep a distance between the chimney and the body of the hood Keep objects that could scratch the device far away from it e g tools belt buckles The chimney ducts are aligned with one another depending on the operating mode Recirculatin...

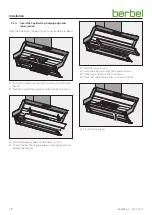
Page 18: ...the mounting slot with both hands Push the Capillar Trap upwards until it latches into place Place the bulging edge onto the upper section Check whether the bulging edge is correctly placed and held by the magnets Align the lower section Grasp the lower section by the handle recesses Fit the lower section in the front panel Check that the lower section is inserted correctly Close the front panel ...

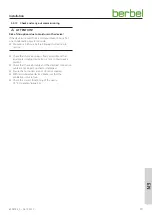
Page 19: ...hours before bringing the device into service Check that the mains plug is freely accessible or that an all pole isolating device min 3 mm contact gap is present Check that the mains cable and the electrical connection cable are not kinked crushed or damaged Ensure that air outlets are not closed or covered With recirculated air devices Make sure that the ventilation slots are free Check the corre...

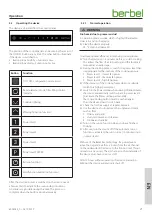
Page 20: ...t impede the air flow y Do not impede the air channel on the underside of the device y Use only when the capillary trap is used and the lower section closed y In recirculated air mode Do not cover the air outlets e g glasses plates on or in front of the ventilation slots Out flowing air must be able to escape through the ventilation slots without impediment Otherwise backpressure may form If the c...

Page 21: ...w of air to build up and the fumes are removed at an early stage During the cooking process switch to a power level that is appropriate for the intensity of the cooking vapours y Power level 1 lowest fan power y Power level 2 medium fan power y Power level 3 high fan power If the intensity of the cooking fumes does not subside switch to a higher power level Switch to the Power setting when searing...

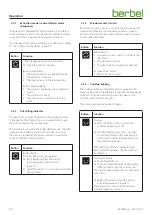
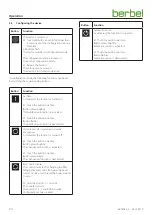
Page 22: ...ling with recirculating and hybrid mode page 27 Hold the button 1 second to restart the hours counter 4 2 4 Window contact switch If a window contact switch is connected to the device this monitors whether the corresponding window is open or closed Extraction only takes place with an open window or in recirculated air mode Button Function Button flashes y A window contact switch is connected to th...

Page 23: ...uch the button one time y The device switches off y The run on time 10 minutes starts automatically in power level 1 y The button for power level 1 goes on y The run on function button flashes y It is possible to switch between the power levels If the button is touched again the device shuts off completely The device is switched on and any power level is selected Touch the button one time y The ru...

Page 24: ...ed Touch the button one time Button flashes The AutoRun automation is deactivated Extraction mode recirculated air mode changeover As delivered the function is turned off Touch the button one time Button glows brightly The changeover function is activated Touch the button one time Button glows dimly The changeover function is deactivated Reset hours counter The control indicator for changing the f...

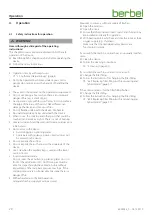
Page 25: ...he dirt particles are separated and collected in the upper section on the bulging edge in the lower section and in the Capillar Trap Before every cleaning Turn off the device Make sure that the hob and other parts that could be touched have cooled down D ATTENTION Danger of damage through improper cleaning Sharp edged objects abrasive or unsuitable cleaning agents can damage the device The followi...

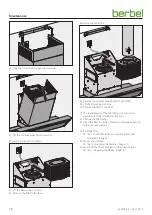
Page 26: ...g edge from the upper section Clean the upper section with a soft moist cloth Clean the bulging edge such as in a dishwasher Make sure the bulging edge is completely dry Dry the upper section with a soft cloth Capillar Trap The Capillar Trap is inserted and is held in the device through a side lock Grasp the Capillar Trap on its sides with both hands Pull the Capillar Trap out Clean the Capillar T...

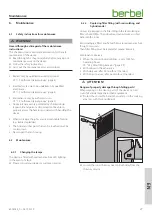
Page 27: ...ed must be cooled down y Never open the fan housing 6 2 Maintenance 6 2 1 Changing the lamps The device is fitted with maintenance free LED lighting In the event of a fault Please consult your dealer or customer services 6 2 2 Replacing filter filling with recirculating and hybrid mode Odours are trapped in the filter filling in the recirculating air filter or hybrid filter The odour free cleaned ...

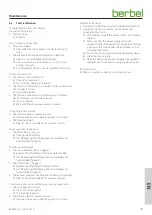
Page 28: ...t the filter at least 30 mm Remove the filter to the front The replacement of the filter filling is carried out as described in the associated instructions Change the filter filling Clean the filter from the outside e g through extraction with a vacuum cleaner Re fit the filter D 3 5 7 Install filter with recirculating and hybrid operation page 15 Mount the chimney D 3 5 10 Mounting the chimney pa...

Page 29: ...irculating and hybrid mode page 27 Poor device performance y The recirculated air filter is clogged Replace the filter filling of the recirculated air filter D 6 2 2 Replacing filter filling with recirculating and hybrid mode page 27 y The hybrid filter is clogged Replace the filter filling of the hybrid filter D 6 2 2 Replacing filter filling with recirculating and hybrid mode page 27 y The exhau...

Page 30: ...r duct For recirculating air and hybrid operation Remove the filter Loosen the mounting screws by approx one turn Lift the device with two persons Lift the device off forwards Set the device down on a firm and protective surface 8 Disposal 8 1 Dispose of packaging D ATTENTION Risk of environmental damage due to improper disposal of the packaging Do not put the packaging into the normal household w...

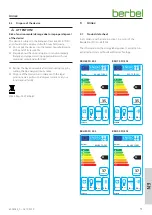
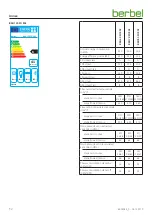
Page 31: ...ins cable Dispose of the device in accordance with the legal provisions via a professional disposal centre or at your local disposal facility WEEE Reg Nr 59614689 9 Annex 9 1 Product data sheet In accordance with article 3 section 1 b point ii of the Regulation EU No 65 2014 The information on the energy label applies to extraction in extracted air mode without BackFlow technology BKH 60 FO E02 BK...

Page 32: ...ass B B B Flow rate in extracted air mode in m h Stage min to max 260 310 360 270 310 380 280 330 390 Stage Power Intense 450 470 480 Flow rate in recirculated air mode in m h Stage min to max 210 260 320 220 270 320 230 280 320 Stage Power Intense 400 400 410 Noise power level in extracted air mode in db A Stage min to max 50 54 58 50 54 58 51 55 59 Stage Power Intense 64 64 64 Noise power level ...

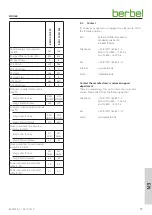
Page 33: ... 67 Noise power level in recirculated air mode in db A Stage min to max 54 58 61 55 58 63 Stage Power Intense 66 69 Power consumption stand by in Watt W 0 3 0 3 Power consumption stand off in Watt W 0 2 0 2 9 2 Contact If you have any questions or suggestions please select from the following options Post berbel Ablufttechnik GmbH Sandkampstraße 100 D 48432 Rheine Telephone 49 0 5971 80 80 9 0 Mon ...

Page 34: ...34 6005044_0 04 12 2019 ...

Page 35: ...35 6005044_0 04 12 2019 ...

Page 36: ...6005044_0 04 12 2019 ...

Reviews: