background image

41

Base-2 

Security Panel

ENGLISH

The required status will become active when the Digital key is extracted.

A Zone can be bypassed at a Key Reader during Armed or Disarmed status.

To bypass Zone 1 or Zone 2 at a Proximity Reader—hold a Card/Key near the
sensitive area of a Proximity Reader [

42

] the LEDs will change at 2 second

intervals. Remove the Card/Key when the required configuration is shown (refer
to the 

LED CONFIGURATIONS 

table).

If a Zone is Bypassed from the Panel (Priority Bypass via the Bypass button
[

42

]), it will be impossible to Unbypass it from aReader.

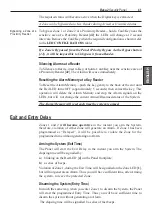
Silencing Alarms at a Reader

To Silence an Alarm—insert a Key, or hold a Card/Key near the  sensitive area of
a Proximity Reader [

42

]. The Alarm will cease immediately.

Resetting the Alarm Memory at a Key Reader

To Reset the Alarm Memory—push the key gently to the back of the slot until
the Red LED turns OFF (approximately 5 seconds) then extract the key. This
operation will delete the Alarm Memory and stop the Alarm signals on the
LEDs, but will  not change the current Armed/Disarmed status of the System.

The Alarm Memory will reset each time the system is armed.

Zones 1 and 2 

will become operative 

in the instant you arm the System,

therefore, violation of either Zone will generate an Alarm. If Zone 1 has been
programmed as “Delayed”, it will be possible to violate the Zone for the
programmed time without generating an Alarm.

Arming the System (Exit Time)

The Panel will start the Exit Delay in the instant you arm the System. The
elapsing time will be signalled by:

a

) blinking on the Red LED [

4

] on the Panel frontplate;

b

) a series of beeps.

Violation of Zone 1, during the Exit Time, will be signalled on the Zone LED [

1

],

but will not generate an Alarm. Thus you will have sufficient time, after Arming
the system, to leave the protected Zone.

Disarming the System (Entry Time)

In much the same way, when you enter Zone 1 to disarm the System, the Panel
will start the programmed Entry Time. Thus you will have sufficient time to
disarm the system without generating an Alarm.

The elapsing time will be signalled b a series of fast beeps.

Exit and Entry Delay

Bypassing a Zone at a
Proximity Reader

Summary of Contents for Base-2

Page 1: ...MADE IN ITALY...

Page 2: ...sicurezza le procedure da seguire Il Costruttore declina ogni responsabilit nel caso in cui la Centrale venga manomessa da personale non autorizzato The Base 2 Base 2 Base 2 Base 2 Base 2 complies wit...

Page 3: ...eritorieLettoridiProssimit 12 Sensori 13 Sirena di Allarme 13 Sirena Interna 13 Avvisatore Telefonico 14 LineadiAntisabotaggio 14 AltriDispositivi 14 Programmazione 15 Programmazione della Centrale 15...

Page 4: ...tema Occupato 22 Riepilogo segnalazioni su Inseritori o Lettori 22 Note 43 C A R ATTER IS TIC H E TEC N IC H E N ome P rodotto Base 2 Tensione di alimentazione 220V 50 H z 10 A ssorbimento massimo 0 1...

Page 5: ...sione di segnalazione guasto 1 Uscita in tensione di segnalazione preallarme tempo di ingresso zona Ritardata 9 LEDs per segnalazioni ottiche Buzzer interno per segnalazioni acustiche 2 Pulsanti di es...

Page 6: ...e inserita Spenta Centrale disinserita Lampeggiante Solo durante il tempo di Uscita se Linea 1 Ritardata 5 Spia di segnalazione Allarme rossa Accesa Almeno una delle due zone ha memorizzato un allarme...

Page 7: ...di collaudo NON TOCCARE 15 Microprocessore 16 Buzzer segnala le seguenti azioni a pressione dei pulsanti 3 o 10 b tempo di Ingresso e tempo di Uscita sulla Zona Ritardata mediante serie di beep c avv...

Page 8: ...9 30 25 Vista Interna 25 Fori 4 per il fissaggio della centrale 5 mm 26 Trasformatore di alimentazione 27 Apertura per il passaggio dei cavi 28 Spazio per batteria interna 12V 7Ah max 29 Fusibile di p...

Page 9: ...hiavi 41 Chiave Elettronica 42 Fori preformati per il fissaggio del fondo 43 Buzzer 44 Antiapertura 45 Cavetto di collegamento alla centrale Rosso Al morsetto Positivo di Alimentazione Bianco Al morse...

Page 10: ...ione di rete nell impianto dell edificio in accordo alle norme vigenti legge46 90 come adesempio uninterruttoremagnetotermicobipolare Inseritori Gli Inseritori sono dotati di contenitori compa tibili...

Page 11: ...Avvisatori ecc Morsetti di collegamento per Inseritori e o Lettori di Prossimit Morsetti per l alimentazione del dispositivo C Morsetto di Comando R Morsetto di Risposta Morsetti per il collegamento d...

Page 12: ...di 4 Dispositivi Inseritori e o Lettori di Prossimit Terminati i collegamenti degli Inseritori o dei Lettori di Prossimit va effettuata la Codifica degli stessi questa procedura utile per assegnare a...

Page 13: ...atti liberi del Rel 1 facenti capo ai morsetti NC1 NA1 e COM1 La figura successiva illustra un tipico esempio di collegamento di una sirena autoalimentata Nello schema si presuppone che la Sirena veng...

Page 14: ...vo il Combinatore Telefonico viene attivato Linea di Antisabotaggio La Centrale dotata di una linea 24h di Antisabotaggio Bilanciata 10K che fa capo ai morsetti AS e M M M M M Su questi morsetti vanno...

Page 15: ...fino a quando la linea non torna nello stato di riposo Zona 1 Ritardata Mediante il microinterruttore n 8 possibile programmare la Zona 1 in modalit Ritardata anzich Immediata cos come visibile nella...

Page 16: ...TERRUTTORE N 9 Attivabile per ogni allarme di fabbrica OFF Non attivabile in caso di inserimento Parziale ON Bilanciamento Zone Mediante il microinterruttore n 4 possibile programmare la modalit di fu...

Page 17: ...Chiave considerata terminata Acquisizione Configurazione Inseritori e Lettori di Prossimit Una volta collegati all impianto tutti gli Inseritori e i Lettori di Prossimit che come gi detto non possono...

Page 18: ...n cui verrebbe rimosso il ponticello TEST Se l impianto dotato di almeno un Inseritore per bloccare tutti gli allarmi sufficente lasciare inserita una Chiave in uno di essi cos facendo la Centrale si...

Page 19: ...e o 6 e dal lampeggio delle spie 38 su eventuali Inseritori o Lettori Per spegnere queste spie sufficente mantenere girata la chiave 9 per almeno 5 secondi fino a quando non si avr lo spegnimento del...

Page 20: ...impianto introdurreunaChiaveinunInseritoreoppuresfiorarecon laChiaveoconunaTesseralapartesensibiledelLettorediProssimit qualsiasispia accesa sull Inseritore o sul Lettore si spegne e l impianto si di...

Page 21: ...tive spie 1 e o 6 e dal lampeggio delle spie 38 su Inseritori o Lettori Per spegnere queste spie sufficente tenere premuta a fondo la Chiave in un Inseritore per almeno 5 secondi All estrazione della...

Page 22: ...ma Occupato Disinserimento Analogamente per disinserire l impianto si ha a disposizione il tempo di In gresso programmabile che la Centrale attiva non appena viene violata la Linea 1 Questo tempo scan...

Page 23: ...ecting Key and Proximity Readers 32 ConnectingSensors 33 ConnectingOutdoorSirens 33 Connecting Indoors Sirens 33 Connecting a Telephone Dialler 34 Connecting the Tamper Line 34 Connecting Other Device...

Page 24: ...K eypads or Readers 30 mA _ C omplies w ith EN S tandard EN 50081 1 1992 EN 50130 4 1995 A 1 1999 EN 60950 2000 C EI 79 2 2 a Ed 1993 User Guide 39 Using the Panel 39 Arming Disarming 39 Bypass zone 3...

Page 25: ...y 1 Output Alarm Relay for Indoor Siren 1 Open collector Output for Trouble signalling 1 Open collector Output for Alarm delay signal Delayed zone entry time 9 LEDs for visual signals Built in Buzzer...

Page 26: ...tus LED Red On Panel Armed Off Panel Disarmed Blinking Line 1 Exit time running 5 Alarm LED Red On At least one of the zones has generated an Alarm event Blinking Alarm cycle running 6 Tamper LED Red...

Page 27: ...r 16 Buzzer signals the following operations a Button 3 or 10 has been pressed b Entry and Exit times on the Delayed zone fast beeps c Enrolling Done refer to PROGRAMMING d Memory Reset 17 Terminal bo...

Page 28: ...Campione Freccia 25 26 27 28 25 25 29 30 25 Internal View 25 Backplate anchor screw holes 4 x 5 mm 26 Power Transformer 27 Cable entry 28 Battery housing 12 V 7Ah max 29 Mains protection fuse 220 V 2...

Page 29: ...h 40 Key slot 41 Digital key 42 Backplate anchor screw holes 43 Buzzer 44 Snatch switch 45 Cable to be connected to the Panel Red to Terminal Positive White to Terminal C Call Blue to Terminal R Answe...

Page 30: ...ce with the Safety Regulations in force this device must be earthed and the Mains must be fitted with an automatic isolating switch Mounting Key Readers Key Readers can be flush mounted to mod 503 out...

Page 31: ...e terminal Alarm Lines Normally Closed the Line Inputs must be closed to Negative during standby status 10K Balanced the Line Inputs must be closed to Negative during standby status via a 10K W resist...

Page 32: ...the Panel Negative as per the following wiring diagram Using the on board DIP Switches 32 assign a different Address to each of the connected Readers Refer to the following table for the 4 available...

Page 33: ...will not be necessary Connecting Outdoor Sirens Connect the Alarm Siren to the free voltage changeover terminals NC1 NA1 and COM1 The following wiring diagram illustrates the connection of a Self powe...

Page 34: ...Tamper Line Connect the tamper wires of peripheral device in series to terminals AS and M M M M M of the 24h Balanced 10K Tamper Line as per the following wiring diagram If the 24h Line is not utiliz...

Page 35: ...ctory or Repetitive Alarm Cycles i e until Standby status is restored as follows Zone 1 Delayed Using DIP Switch no 8 program the Zone 1 as either Delayed or Instant as follows Entry and Exit Times If...

Page 36: ...UZZER DIP SWITCH 10 Enable at Factory OFF Disable ON INDOOR SIREN OUTPUT DIP SWITCH 9 UnBypassed and Bypassed Mode at Factory OFF Bypassed Mode only ON Zone Balance Using DIP switch no 4 program the o...

Page 37: ...l be denied Enrolling Key Readers and Card Readers The connected Readers maximum 4 must be enrolled on the System The configuration of the enrolled Readers the number of Readers and their Addresses wi...

Page 38: ...removed Alternatively if the system is equipped with Key Readers insert and leave a key in one of the Key Readers this will have the same effect as inhibiting Alarms by means of the TEST jumper 20 2 E...

Page 39: ...stop an Alarm in course Disarm the Panel ResetAlarmMemory Alarm and Tamper events will be signalled on the Panel Alarm LED 5 Line Status LED 1 and or on the Tamper LED 6 If the system is equipped wit...

Page 40: ...turn ON refer to the LED CONFIGURATIONS table The system will arm when the Key Card is removed from the Reader Disarming the System at a Reader To disarm the system insert a Digital key 41 into a Key...

Page 41: ...Alarm signals on the LEDs but will not change the current Armed Disarmed status of the System The Alarm Memory will reset each time the system is armed Zones 1 and 2 will become operative in the inst...

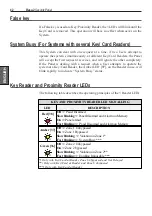
Page 42: ...blink rapidly to indicate System Busy status System Busy For Systems with several Key Card Readers Key Reader and Proximity Reader LEDs The following table describes the operating principles of the 3...

Page 43: ...43 Centrale per Sistemi di Sicurezza Base 2 Security Panel ITALIANO ENGLISH NOTE NOTES...

Page 44: ...ISTISNE1BASE2 0 0 081002 P70...

Reviews: