background image

  11

  How to assemble your monitor hardware

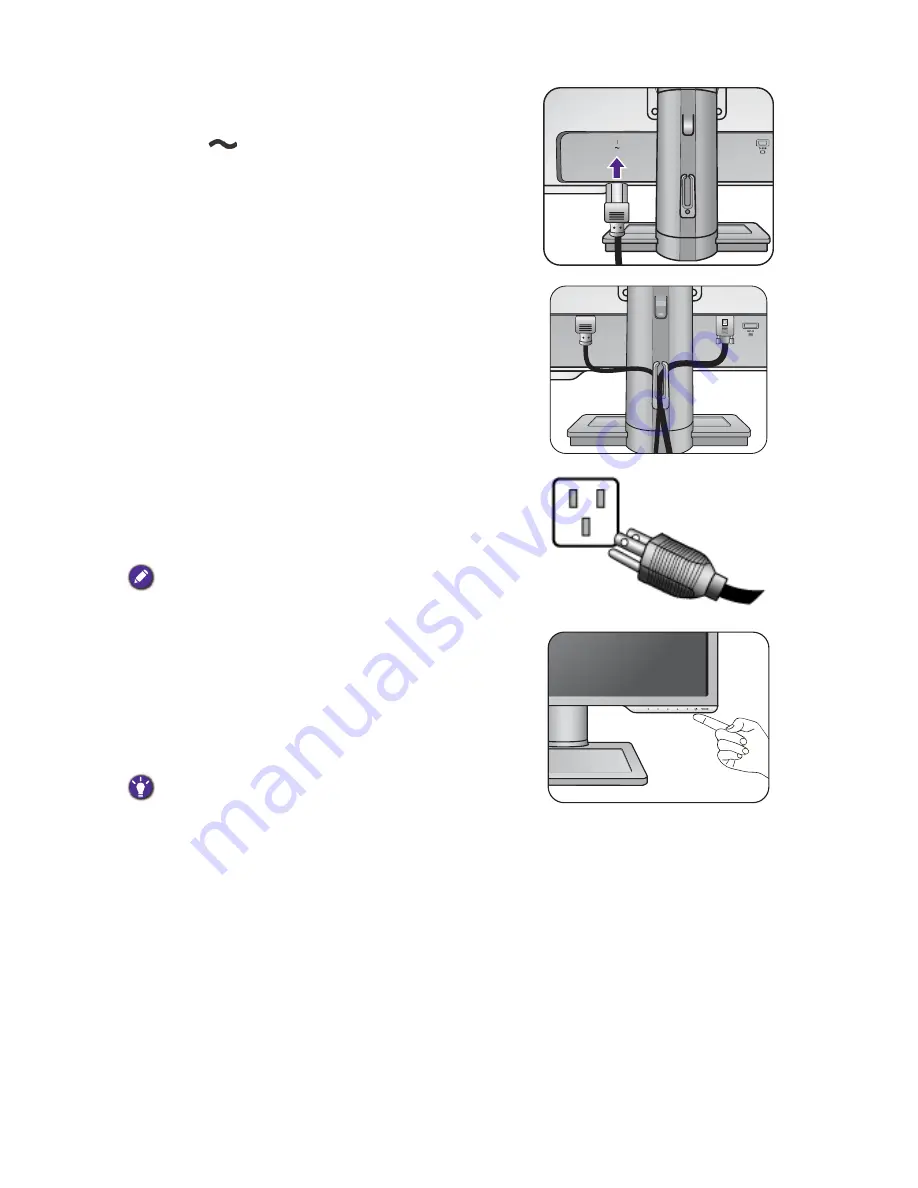
4. Connect the power cable to the monitor.

Plug one end of the power cord into the socket 
labelled 

 on the rear of the monitor. Do not 

connect the other end to a power outlet just yet. 

5. Route the cables via the cable clip.

6. Connect-to and turn-on the power.

Plug the other end of the power cord into a power 
outlet and turn it on.

Picture may differ from product supplied for your region.

Turn on the monitor by pressing the power button 
on the monitor. 

Turn on the computer too, and follow the 
instructions in 

Getting the most from your BenQ 

monitor on page 18

 to install the monitor 

software.

To extend the service life of the product, we recommend 

that you use your computer's power management function.

Summary of Contents for XL2411T

Page 1: ...XL2411T User Manual ...

Page 2: ...ar the equipment and be easily accessible This product should be operated from the type of power indicated on the marked label If you are not sure of the type of power available consult your dealer or local power company An approved power cord greater or equal to H03VV F or H05VV F 2G or 3G 0 75mm2 must be used Care And Cleaning Cleaning Always unplug your monitor from the wall outlet before clean...

Page 3: ...rds pertaining to environmental management BenQ has spared no efforts in pushing our initiatives further to incorporate life cycle design in the aspects of material selection manufacturing packaging transportation using and disposal of the products BenQ ecoFACTS label lists key eco friendly design highlights of each product hoping to ensure that consumers make informed green choices at purchase Ch...

Page 4: ... the monitor on an existing computer 20 How to install on Windows 7 system 21 How to install on Windows Vista systems 22 How to watch 3D content on your monitor 23 How to adjust your monitor 24 The control panel 24 Basic menu operation 25 Initial setup for playing games 27 Picture optimization 29 Customizing the hot keys 29 Setting up your own game mode 29 Adjusting display mode 30 Using Smart Sca...

Page 5: ...the following items If any are missing or damaged please contact the place of purchase for a replacement BenQ LCD Monitor Monitor Base Quick Start Guide CD ROM Power Cord Picture may differ from product supplied for your region Video Cable D Sub Video Cable DVI D Dual Link ...

Page 6: ...sider keeping the box and packaging in storage for use in the future when you may need to transport the monitor The fitted foam packing is ideal for protecting the monitor during transport Always keep the product and accessories out of reach of small children ...

Page 7: ...trol buttons 2 Power button 1 2 3 AC Power Input jack 4 Height release 5 Cable clip 6 D Sub socket 7 DVI D socket 8 HDMI socket 9 Kensington lock slot 10 Headphone jack Above diagram may vary depending on the model Picture may differ from product supplied for your region 3 4 5 6 7 8 9 10 ...

Page 8: ...the monitor around on your desk will scratch or damage the monitor surround and controls Protect the monitor and screen by clearing a flat open area on your desk and placing a soft item like the monitor packaging bag on the desk for padding Gently lay the screen face down on a flat clean padded surface While holding the monitor firmly against the desk pull the monitor stand arm upwards clear of th...

Page 9: ...d the stand to the maximum extended position And rotate the monitor 90 degrees counterclockwise as illustrated You might want to adjust the monitor stand height See Adjusting the monitor height on page 13 for more information You should position the monitor and angle the screen to minimize unwanted reflections from other light sources 5O 20O ...

Page 10: ...r video socket Connect the other end of the cable at the end with the ferrite filter to the computer video socket Tighten all finger screws to prevent the plugs from accidently falling out during use To Connect the HDMI Cable Connect the plug of the HDMI cable to the HDMI port on the monitor Connect the other end of the cable to the HDMI port of a digital output device If there is more than one vi...

Page 11: ...t to and turn on the power Plug the other end of the power cord into a power outlet and turn it on Picture may differ from product supplied for your region Turn on the monitor by pressing the power button on the monitor Turn on the computer too and follow the instructions in Getting the most from your BenQ monitor on page 18 to install the monitor software To extend the service life of the product...

Page 12: ...g a soft item like a towel on the desk for padding before laying the screen face down on a flat clean padded surface Please be careful to prevent damage to the monitor Placing the screen surface on an object like a stapler or a mouse will crack the glass or damage the LCD substrate voiding your warranty Sliding or scraping the monitor around on your desk will scratch or damage the monitor surround...

Page 13: ... of the monitor at the same time And pull the stand and the monitor upward together to the desired height If the height release in the proceeding operation cannot be pressed down press the top of the monitor once as illustrated on the right before you proceed If you prefer to lower the monitor stand height push the stand downward while holding both left and right sides of the monitor Height releas...

Page 14: ...f the monitor as ascending or descending monitor might cause personal injuries Keep children out of reach of the monitor while performing this operation If the monitor has been rotated to portrait mode and height adjustment is desired you should be noted that the wide screen will keep the monitor from being lowered to its minimum height ...

Page 15: ...he help document of your operating system for details 2 Fully extend the monitor and tilt it Gently lift the display up and extend the stand to the maximum extended position Then tilt the monitor The monitor should be vertically extended to allow to rotate from landscape to portrait mode 3 Rotate the monitor 90 degrees clockwise as illustrated To avoid the edge of the LCD display hitting the monit...

Page 16: ...iewing angle adjustment You may position the screen to the desired angle with 5 to 20 monitor tilt 90 left and right total monitor swivel and 130 mm monitor height 4 Adjust the monitor to the desired viewing angle 5O 20O 45O 45O 45O 45O 130 mm ...

Page 17: ...cables from the LCD monitor 1 Remove the monitor stand Lay the screen face down on a clean and well padded surface Detach the monitor base as instructed in How to detach the stand base on page 12 2 Remove the monitor stand Use a a cross pointed screwdriver to release the screws that fixing the monitor stand to the monitor The use of a magnetic head screwdriver is recommended to avoid of losing the...

Page 18: ...r connecting the monitor to your computer Windows will automatically recognize the new or different hardware and will launch its Found New Hardware wizard Follow the wizard instructions until it asks you to select a monitor model At that point click the Have Disk button insert the BenQ LCD Monitor CD ROM and select the appropriate monitor model Further details and step by step instructions for eit...

Page 19: ...nd launch the Found New Hardware Wizard Follow the prompts until it displays the option to Install Hardware Device Drivers 2 Insert the BenQ LCD Monitor CD ROM into a CD drive on the computer 3 Check Search for a suitable driver for my device option and click Next 4 Check the option for CD ROM drives uncheck all others and click Next 5 Look to confirm that the wizard has selected the correct name ...

Page 20: ...articular model monitor you have connected and letting Windows install the corresponding driver files from the CD You need only steer it in the right direction Windows has an Upgrade Device Driver Wizard to automate the task and guide you through the file selection and installation process See How to install on Windows 7 system on page 21 How to install on Windows Vista systems on page 22 The BenQ...

Page 21: ...nd the Update Driver button 6 Insert the BenQ LCD Monitor CD ROM into a CD drive on the computer 7 In the Update Driver Software window select the option Browse my computer for driver software 8 Click Browse and navigate to the following directory d BenQ_LCD Driver where d is the drive letter designator for the CD ROM drive 9 Select the correct folder name of your monitor from provided driver list...

Page 22: ... and the Update Driver button 6 Insert the BenQ LCD Monitor CD ROM into a CD drive on the computer 7 In the Update Driver Software window select the option Browse my computer for driver software 8 Click Browse and navigate to the following directory d BenQ_LCD Driver where d is the drive letter designator for the CD ROM drive 9 Select the correct folder name of your monitor from provided driver li...

Page 23: ... If you want to adjust the brightness when watching 3D content go to Picture and NVIDIA 3D LightBoost See Brightness during 2D playback NVIDIA 3D LightBoost during 3D playback on page 35 for more information Safety information for watching 3D content You may experience eye strain after watching 3D content for certain period of time Take off the 3D glasses and take a rest to relieve the eye strain ...

Page 24: ...nitor The control panel All OSD On Screen Display menus can be accessed by the control keys No Name Description 1 Control keys Accesses the functions or menu items displayed on the screen right next to each key 2 Power key Turns the power on or off 1 2 ...

Page 25: ...articular functions 3 Select Menu to access the main menu 4 In the main menu follow the icons next to the control keys to make adjustments or selection See Navigating the main menu on page 32 for details on the menu options 1 2 3 4 No OSD in hot key menu OSD icon in main menu Function Custom Key 1 By default the key is the hot key for Picture Mode To change the default settings see Customizing the...

Page 26: ...ange the default settings see Customizing the hot keys on page 29 Enters sub menus Selects menu items Menu Activates the main menu Returns to the previous menu Exit Exits OSD menu No OSD in hot key menu OSD icon in main menu Function OSD On Screen Display The hot keys only operate while the main menu is not currently displaying Hot key displays will disappear after a few seconds of no key activity...

Page 27: ...rate to 120 Hertz 120 Hz a Right click the desktop and select Screen resolution Click Advanced settings Under the Monitor tab change the screen refresh rate to 120 Hertz And then click Apply and Yes to confirm the change Depending on the operating system on your PC different procedures should be followed to adjust the screen refresh rate Refer to the Help document of your operating system for deta...

Page 28: ...Resize your display by Smart Scaling See Using Smart Scaling on page 30 4 Select an appropriate game mode for your game FPS is for FPS games while RTS is for RTS games 5 Adjust the brightness of your display See Brightness during 2D playback NVIDIA 3D LightBoost during 3D playback on page 35 6 Adjust the brightness of the black shades by Black eQualizer See Black eQualizer on page 36 7 Adjust the ...

Page 29: ...op 3 control keys also called custom keys perform as hot keys to provide direct access to pre defined functions You can change the default setting and designate different functions for these keys 1 Press any of the control keys to bring up the hot key menu 2 Select Menu to access the main menu 3 Go to System 4 Select the custom key you want to change 5 In the sub menu select a function that can be...

Page 30: ...d select the game mode you saved in Step 2 Your preferred display settings will be applied all at once Adjusting display mode To display images of aspect ratios other than your monitor aspect ratio and sizes other than your display size you can adjust the display mode on the monitor For the aspect ratio and display size of your monitor see the specifications on the CD 1 Press any of the control ke...

Page 31: ...ure and Instant Mode 2 Select On If one of the custom keys is preset for Smart Scaling you can press the custom key and adjust the value directly Your display may become unstable temporarily when being resized This is a normal phenomenon and should not be considered as manufacturing defect For more information on Smart Scaling go to Smart Scaling on page 39 ...

Page 32: ...nctions and settings Menu options that are not available will become grayed out And keys that are not available will be disabled and the corresponding OSD icons will disappear For more information on each menu please refer to the following pages Display menu on page 33 Picture menu on page 35 Picture Advanced menu on page 37 Save Settings menu on page 41 Audio menu on page 42 System menu on page 4...

Page 33: ...u and then use or to select a menu item 4 Use or to make adjustments or use to make selection 5 To return to the previous menu select 6 To exit the menu select 50 Mode Standard Auto Adjustment H Position V Postion Pixel Clock Phase Display Picture Picture Advanced Save Settings Audio System Item Function Range Auto Adjustment Optimizes and adjusts the screen settings automatically for you Not appl...

Page 34: ... input video signal See also Picture optimization on page 29 Not applicable to a digital input signal 0 to 100 Phase Adjusts the pixel clock phase timing to synchronize with the analog input video signal See also Picture optimization on page 29 Not applicable to a digital input signal 0 to 63 Item Function Range ...

Page 35: ...ious menu select 6 To exit the menu select Display Picture Picture Advanced Save Settings Audio System Normal Bluish Reddish User Mode Brightness Contrast Sharpness Black eQualizer Gamma Color Temperature Hue Saturation Mode Standard 100 100 R G B 100 Item Function Range Brightness during 2D playback NVIDIA 3D LightBoost during 3D playback Adjusts the balance between light and dark shades during 2...

Page 36: ... Blue primary colors can be altered to change the color tint of the image Go to the succeeding R red G green and B blue menus to change the settings Decreasing one or more of the colors will reduce their respective influence on the color tint of the image e g if you reduce the Blue level the image will gradually take on a yellowish tint If you reduce Green the image will become a magenta tint R 0 ...

Page 37: ...e selection 5 To return to the previous menu select 6 To exit the menu select Mode Standard Display Picture Picture Advanced Save Settings Audio System Standard Movie Photo sRGB Eco FPS1 FPS2 RTS Picture Mode Senseye Demo Dynamic Contrast Over scan Display Mode Smart Scaling Color Format HDMI RGB PC Range Item Function Range Picture Mode Select a picture mode that best suits the type of images sho...

Page 38: ...ew of screen images under the selected mode from Picture Mode The screen will be divided into two windows the left window demonstrates images of Standard mode while the right window presents the images under the specified mode ON OFF Dynamic Contrast The function is to automatically detect the distribution of an input visual signal and then to create the optimal contrast 0 to 5 Overscan Slightly e...

Page 39: ...monitor of 4 3 aspect ratio 19 4 3 Displays the input image as if on a 19 monitor of 4 3 aspect ratio 19 W 16 10 Displays the input image as if on a 19 W monitor of 16 10 aspect ratio 21 5 16 9 Displays the input image as if on a 21 5 monitor of 16 9 aspect ratio 22 W 16 10 Displays the input image as if on a 22 W monitor of 16 10 aspect ratio 23 W 16 9 Displays the input image as if on a 23 W mon...

Page 40: ...rce YUV For D Sub Component converted from VGA input source from a video device HDMI RGB PC Range Determines the range of color scales Select an option that matches the RGB range setting on the connected HDMI device RGB 0 255 RGB 16 235 Smart Focus This feature provides a highlight area to focus on certain content e g a YouTube video or a game in windowed mode Size Determines the size of the highl...

Page 41: ...ct Menu from the hot key menu 2 Use or to select Save Settings 3 Select to go to a sub menu and then use or to select a menu item 4 Use to make selection 5 To return to the previous menu select 6 To exit the menu select Item Function Range Gamer 1 Saves a new set of customized display settings See Setting up your own game mode on page 29 for information on applying the game mode Gamer 2 Gamer 3 Mo...

Page 42: ...g OSD icons will disappear 1 Select Menu from the hot key menu 2 Use or to select Audio 3 Select to go to a sub menu and then use or to select a menu item 4 Use or to make adjustments or use to make selection 5 To return to the previous menu select 6 To exit the menu select Item Function Range Volume Adjusts the audio volume 0 100 Mute Mutes the audio input ON OFF Mode Standard 50 Display Picture ...

Page 43: ...or to select System 3 Select to go to a sub menu and then use or to select a menu item 4 Use or to make adjustments or use to make selection 5 To return to the previous menu select 6 To exit the menu select Mode Standard Display Picture Picture Advanced Save Settings Audio System D Sub DVI DL HDMI Input OSD Settings Custom Key 1 Custom Key 2 Custom Key 3 Auto Power Off DDC CI HDMI Auto Switch Item...

Page 44: ...o Español Polski Česky Magyar Serbo croatia Română Nederlands Русский Svenska Português 日本語 繁體中文 简体中文 Display Time Adjusts the display time of the OSD menu 5 Sec 10 Sec 15 Sec 20 Sec 25 Sec 30 Sec OSD Lock Prevents all the monitor settings from being accidentally changed When this function is activated the OSD controls and hotkey operations will be disabled To unlock the OSD controls press and hol...

Page 45: ...ommand Interface which was developed by Video Electronics Standards Association VESA DDC CI capability allows monitor controls to be sent via the software for remote diagnostics ON OFF HDMI Auto Switch When this function is activated HDMI port will be in the input auto select loop Otherwise HDMI can only be selected by input select or by hot key ON OFF Resolution Notice Sets whether to display the...

Page 46: ...refresh rate and make adjustments based on these instructions How do you use a VGA extension cable Remove the extension cable for the test Is the image now in focus If not optimize the image by working through the instructions in the Adjusting the refresh rate section on the link Adjusting the Screen Resolution It is normal for blurring to occur due to conduction losses in extension cables You can...

Page 47: ...ct your dealer to get necessary support Is the prompt on the display not illuminated at all Check the power supply mains socket the external power supply and the mains switch The image is distorted flashes or flickers Read the instructions on the link Adjusting the Screen Resolution on the CD and then select the correct resolution refresh rate and make adjustments based on these instructions You a...

Page 48: ...t BenQ com No sound can be heard from the connected external speakers Remove your headphone if the headphone is connected to the monitor Check whether the headphone jack is properly connected If the external speakers are USB powered check whether the USB connection is OK Increase the volume volume may be muted or too low on the external speakers ...

Reviews: