background image

33

English

Using On-Screen Display

Using the Menus

The projector has an On-Screen Display (OSD) that lets you make image adjustments and change 

various settings. 

Navigating the OSD

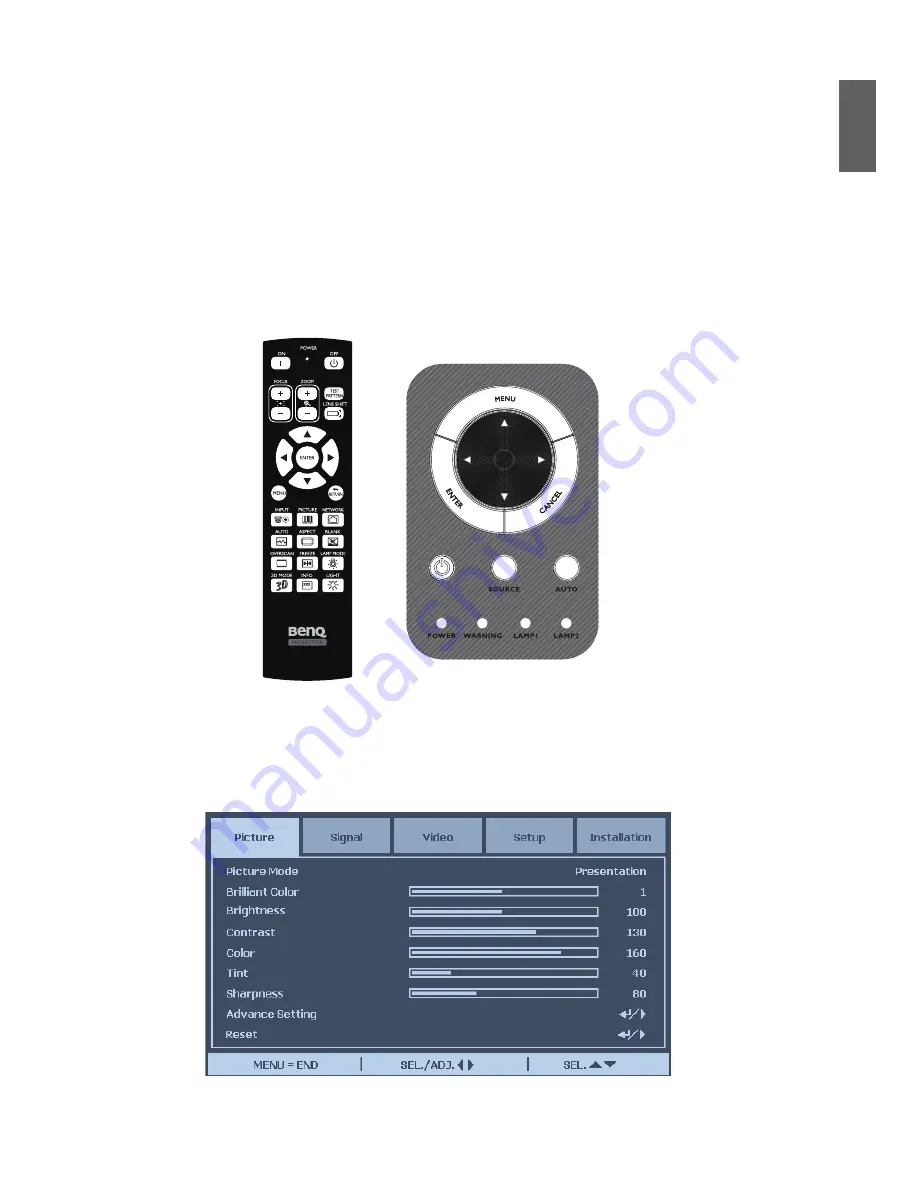
You can use the remote control or the buttons on the top of the projector to navigate and make 

changes to the OSD. The following illustration shows the corresponding buttons on the remote 

control and on the projector.

1.  To open the OSD, press the 

Menu button on the OSD control panel or remote control. There 

are five folders on the menu. Press the cursor 

 or 

 buttons to move through secondary 

menus.

2.  Press 

▲ 

or 

 to select menu items and 

 or 

 to change values for settings. Press to 

confirm the new setting.

3.  Press 

CANCEL/RETURN to leave a submenu or MENU  to close menu.

Summary of Contents for PW9500

Page 1: ...PX9600 PW9500 Digital Projector BenQ User Manual...

Page 2: ...m the Projector 15 Choosing a location 16 Throw distance and screen size 17 Lens Shift Adjustable Range 19 Making Connections 20 Preparations 20 Connecting DVI D devices 21 Connecting component video...

Page 3: ...eaning the lens 58 Cleaning the projector case 58 Storing the projector 58 Transporting the projector 58 Installing the Optional Color Wheel 62 Cleaning the Filters 64 Troubleshooting 66 Indicator Mes...

Page 4: ...and be damaged Do not place inflammables near the projector Do not use if tilted at an angle of more than 10 degrees left to right nor at angle of more than 15 degrees front to back 4 Do not place the...

Page 5: ...he projector Liquids spilled into the projector will void your warranty If the projector does become wet disconnect it from the power point and call BenQ to have the projector repaired UPS 9 Do not lo...

Page 6: ...Do not attempt to disassemble this projector There are dangerous high voltages inside which may cause death if you should come into contact with live parts The only user serviceable part is the lamp...

Page 7: ...with your place of purchase Some of the accessories may vary from region to region The warranty card is only supplied in some specific regions Please consult your dealer for detailed information Proje...

Page 8: ...9 Air Inlet 10 Air Filter 11 Rear IR sensor 5 2 6 1 4 3 10 11 9 8 7 12 24 19 25 22 26 20 23 21 13 14 18 16 17 15 12 AC Power Cable Inlet 13 AC Power Switch 14 Screen Trigger output 15 RS 232 control...

Page 9: ...9 English Upper Right sideView UnderView 29 28 27 Handle 28 Ceiling support holes Mounting Screw M4 12mm 29 Air Filter 27...

Page 10: ...Select or change settings in the OSD CANCEL Exit the On Screen Display OSD POWER Turn the projector on or off main power switch must be turned on first Press to place the projector in standby mode Sou...

Page 11: ...submenu ENTER Select or change setting in the OSD MENU Display OSD main menu RETURN Return to last OSD page or exit menu INPUT Select image to display PICTURE Display picture menu NETWORK LAN input c...

Page 12: ...sensors on the projector that might obstruct the IR beam from the remote control reaching the projector The effective range of the remote control is up to 7 meters and at an angle within 30 degrees o...

Page 13: ...into place Do not mix old batteries with new ones or mix different types of batteries Avoid leaving the remote control and batteries in an excessive hot or humid environment like the kitchen bathroom...

Page 14: ...jector Installing or Removing the Optional Lens Installing the New Lens 1 Remove the lens cap Push LENS CHANGE button and then insert the Lens with arrow mark on top Arrow Mark 2 No more push LENS CHA...

Page 15: ...r wait until the cooling fans stop and turn off the main power switch Do not touch the lens surface when removing or installing the lens Keep fingerprints dust or oil off the lens surface Do not scrat...

Page 16: ...floor in front of the screen This is the most common way to position the projector for quick setup and portability 2 Ceiling Front Select this location with the projector suspended from the ceiling i...

Page 17: ...106 2 69 139 4 3 54 226 4 5 75 322 9 8 20 311 7 7 92 409 6 10 40 400 5 10 17 665 0 16 89 300 7 62 254 6 46 159 4 04 210 0 5 33 340 6 8 65 485 3 12 33 468 9 11 91 615 7 15 64 602 3 15 30 999 0 25 38 40...

Page 18: ...66 108 2 74 116 6 2 96 189 1 4 80 270 1 6 86 260 5 6 62 342 5 8 70 334 8 8 50 556 7 14 14 200 5 08 160 4 06 120 3 05 129 7 3 30 210 4 5 34 300 3 7 63 289 8 7 36 380 8 9 67 372 3 9 46 618 9 15 72 300 7...

Page 19: ...sted The drawings below apply to the standard lens only Vertical Shift Vertical Shift Max 0 5V Max 0 5V 1V 1V 0 1H 0 1H 1H Desk Front Projection Normal projection position Ceiling Mount Front Projecti...

Page 20: ...Use only the correct type cables for each source with proper type plugs 3 Ensure that all cable plugs are firmly fitted to the equipment jacks Note that all cables shown in the following connection d...

Page 21: ...sed video data transmission between compatible devices like DTV tuners DVD players and displays over a single cable It provides pure digital viewing and listening experience You should use an DVI D ca...

Page 22: ...source device you need not connect to this device again using a composite Video connection as this makes an unnecessary second connection of poorer picture quality If the selected video image is not d...

Page 23: ...ctor Usually a key combination like Fn F3 or CRT LCD key turns the external display on off Locate a function key labeled CRT LCD or a function key with a monitor symbol on the laptop Press Fn and the...

Page 24: ...ITOR OUT jack is available on your projector you can connect the MONITOR OUT signal output jack on the projector The MONITOR OUT only works when an appropriate D Sub input is made to the PC jack If yo...

Page 25: ...f not already in plug the supplied power cable into the AC inlet on the rear of the projector 3 Plug the power cable into a wall power outlet and turn the wall switch on Please use the original access...

Page 26: ...he projector The Power and Lamp LED flashes green and the cooling fan start operating 3 The projected image will be displayed on the screen for a few second while it is warming up 4 Once the power LED...

Page 27: ...anel or from the remote control Refer to the following guide to select the desired input source 1 Press INPUT key on the remote control or control panel to display INPUT Menu 2 Select your desired inp...

Page 28: ...ilingual On Screen Display OSD for making various adjustment and settings below is the overview of the OSD menu To use the OSD menu please set the OSD menu to your familiar language Main menu Highligh...

Page 29: ...panel or the remote control unit Refer to the following guides to adjust Picture Position manually 1 Press the LENS SHIFT key on the projector in any direction or LENS SHIFT key on the remote control...

Page 30: ...control panel or the remote control Adjusting the projection angle There are two adjuster feet on the bottom of the projector these can be used if necessary to change the projection angle Screw the f...

Page 31: ...with the shape When the values reach their maximum or minimum with repeated key presses the picture s shape will stop changing You will not be able to change the picture further in that direction Aut...

Page 32: ...tor of the projector and or the prong plug of the power cable Do not turn off the AC power supply within 10 seconds of making adjustment or setting changes and closing the menu it may cause loss of ad...

Page 33: ...make changes to the OSD The following illustration shows the corresponding buttons on the remote control and on the projector 1 To open the OSD press the Menu button on the OSD control panel or remote...

Page 34: ...o RGB YCbCr YPbPr Color Temperature Standard Cold Warm Red Blue Color Manager R G B C M Y Hue Saturation Value Film Mode Auto Off Noise reduction Level 1 Level 2 Level 3 Off Dynamic Black On Off Reset...

Page 35: ...e Normal High Up Down Test Pattern None RGB Ramps Color Bars Step Bars Checkboard Grid Horizontal Lines Vertical Lines Diagonal Lines Horizontal Ramp Vertical Ramp White Advance Setting Keystone Image...

Page 36: ...e images regardless of brightness setting It is most suitable for viewing photos taken with an sRGB compatible and properly calibrated camera and for viewing PC graphic and drawing applications Red Bl...

Page 37: ...sing or to sharpen or blur the borders between colors and objects Advance Setting Signal Type This function allows you to select the input signal from COMPUTER 1 2 COMPONENT or DVI D input Auto Recogn...

Page 38: ...erature A white color with a low color temperature appears to be reddish white A white color with a high color temperature appears to have more blue in it Color temperature is not selectable when Pict...

Page 39: ...image projected at 24fps such as movies from DVD device Auto Films are detected automatically Off Films are not detected Film Mode is available for below input and signals 480I 576I 1080I from COMPUTE...

Page 40: ...the input signal automatically Auto Recognize the input signal resolution automatically Wide Set when the wide signal is received 4 3 Standard TV screen 4 3 proportionally four units wide for every th...

Page 41: ...or cannot receive the signal or a clear image selectableVideo signal are Auto PAL SECAM NTSC4 43 NTSC3 58 PAL M PAL N and PAL 60 Video System can only be set inVideo or S Video mode Video Setup Set th...

Page 42: ...e function to On to enable Auto Power off or to Off to disable it Auto Power On This function enables the projector to be turned on automatically when the power cord is plugged into the AC outlet or t...

Page 43: ...system To watch 3D images you need a pair of 3D LCD shutter glasses that displaythe projected images for the left and right eyes alternately and are synchronized with a control signal transmitted fro...

Page 44: ...end to view 3D images in front of the screen directly as much as possible See the operation manual of your 3D LCD glasses Aspect Ratio Select from Normal Full 4 3 16 9 as follows Normal the image will...

Page 45: ...ed operation by projector control panel use this function to lock the buttons on the projector No Turn off the Keypad Lock Function Yes Lock All of buttons on the projector except ON STANDBY button Un...

Page 46: ...e is done Delete Image Press Enter or and select Yes to delete captured image The image can be captured only when the input source is non interlace signal from COMPUTER COMPONET 1 2 or DVI D input the...

Page 47: ...oom Press arrow key to reduce the image size or arrow key magnify the image on projection screen Messaging The function allows you to turn off below message on the projected image Select On to display...

Page 48: ...modes for different purposes Select Lamp Control then press Enter to display lamp control option Lamp Mode Select Normal to deliver brightest and clear image Eco to extend the lamp life and reduce fa...

Page 49: ...mounted projection from behind the screen by inverting and reversing the image Fan Mode Fan control is used to set the speed of the internal cooling fan according to the installation condition Normal...

Page 50: ...tern Display a test pattern for installation The test pattern can be displayed by using or or TEST Pattern on the remote control If using remote control press or on the remote control to select the de...

Page 51: ...rection Image Resizing When Keystone correction works the image may be shrunk or enlarged Use or to enlarge or shrink the image vertically Filter Message Set the interval time to display a message for...

Page 52: ...Address Subnet Mask Gateway and DNS automatically Off Set IP Address Subnet Mask Gateway and DNS manually IP Address Press or to display IP address input window as below use or to change the IP addres...

Page 53: ...g an IP address that duplicates the IP Address of other network equipment For details about network setting consult your network administrator Communication Speed Select communication speed to set the...

Page 54: ...gs The follow items can not be initialized Lamp Timer Imaged retained using Image Capture Filter Timer Filter Timer Reset The function allows you to reset the filter timer please make sure to reset th...

Page 55: ...aining lamp life and usage The lamp life and remaining are calculated numbers for reference only actual lamp life may vary with lamp mode application condition etc Filter Timer Current filter usage ti...

Page 56: ...ollowing guide 1 Press Menu on the OSD control panel on the projector or remote control to display the Main menu Press arrow keys to select Security Lock under Setup Advance Setting menu 2 Enter the p...

Page 57: ...ocked message is displayed 2 To unlock the projector press Menu on the control panel or remote control The PIN code window is displayed Enter the previously defined PIN code to activate the projector...

Page 58: ...the lens with your finger or rub the lens with abrasive materials Even paper towels can damage the lens coating Only ever use a proper photographic lens brush cloth and cleaning solution Do not attem...

Page 59: ...eplacement section of this manual Continuous use of the lamp with LAMP 1 and or LAMP 2 lighted may increase the risk of lamp explosion A Lamp may explode as a result of vibration shock or degradation...

Page 60: ...near flammable materials Do not insert your hand into the projector when the lamp is removed If you touch the optical components inside it could cause blurred images 1 Turn the power off and disconnec...

Page 61: ...Reconnect the lamp connector Please be careful to not over tighten the screws Loose screws may cause a bad connection which could result in malfunction 5 Reverse steps 1 to 3 to install the new lamp m...

Page 62: ...to lamp 1 refer to the following guide Wait until the lamp house and the color wheel cool off 1 Turn the power off and disconnect the projector from the power outlet Turn off all connected equipment a...

Page 63: ...e retaining screws as shown and then close the lamp cover Storing Unused ColorWheel Keep the unused color wheel in the zipper bag in which the 6 segment color wheel not supplied was packaged This bag...

Page 64: ...d the filters must be cleaned When the Please clean filter message is displayed please clean all three filters at the same time to synchronize the Filter time display The Filter Message item should be...

Page 65: ...s from all three filter holders in the direction shown Remove them completely from each filter holder and discard 5 Place a replacement foam and press down firmly 6 Replace the filter holders by push...

Page 66: ...on Normal lamp mode is set to Normal Orange on Normal lamp mode is set to ECO Green blinks Lamp model is set to Normal and is warming up Orange blinks Lamp model is set to Eco and is warming up LED IN...

Page 67: ...g to the problem specific solutions Use some other electrical device to confirm that the electrical outlet is working Ensure the projector is turned on Ensure all connections are securely attached Ens...

Page 68: ...s not caused by a connected PC s video card connect to another computer Problem The image is flat with no contrast 1 Adjust the Contrast setting on the Picture menu of the OSD 2 Adjust the Brightness...

Page 69: ...nd sensor is not obstructed 3 Turn off any fluorescent lights in the room 4 Check the battery polarity 5 Replace the batteries 6 Turn off other Infrared enabled devices in the vicinity 7 Have the remo...

Page 70: ...Component D sub 15 p 1 Trigger 3 5mm stereo min jack X1 DC 12V Output Control and Service terminal Lan RJ 45 1 Wired Remote 3 5mm stereo minjack 1 RS 232C 1 USB Type B for service 1 Power Requirement...

Page 71: ...71 English Dimensions 505 386 206...

Page 72: ...60 O O 48 1 72 O O 46 9 75 O O 53 7 85 O XGA 1024x768 48 4 60 O O 56 5 70 O O 60 0 75 O 68 7 85 O WXGA 1280x720 45 0 60 O O 1280x768 47 8 60 O O 1280x800 49 7 60 O O 62 8 75 O 1360x768 47 7 60 O 1366...

Page 73: ...31 5 60 0 O O 576p 31 3 50 0 O O HDTV 720p 45 0 60 0 O O 720p 37 5 50 0 O O 1080 33 8 60 0 O O 1080 28 1 50 0 O O 1080 56 3 50 O O 1080 67 5 60 O O An image with higher or lower resolution than the p...

Page 74: ...bri CR Read Brightness value CR bri CR Write Color CR color CR Write Color CR color CR Read Color value CR color CR Write Sharpness CR sharp CR Write Sharpness CR sharp CR Read Sharpness value CR shar...

Page 75: ...ode CR lampm eco CR Read Lamp Mode Status CR lampm CR Miscellaneous Read Model Name CR modelname CR Write Blank On CR blank on CR Write Blank Off CR blank off CR Read Blank Status CR blank CR Write Fr...

Page 76: ...t CR lst right CR Write Focus Plus CR focus CR Write Focus Minus CR focus CR Write Zoom Plus CR zoom CR Write Zoom Minus CR zoom CR Write AutoSync NA Read Get Filter Timer NA Write System Reset NA Rea...

Page 77: ...ndards pertaining to environmental management BenQ has spared no efforts in pushing our initiatives further to incorporate life cycle design in the aspects of material selection manufacturing packagin...

Page 78: ...for the latest version of this manual Statement regarding hyperlinks and third party websites BenQ is not responsible for the content of the websites or of similar resources which are maintained and...

Reviews: