BenQ MP778 User Manual Download Page 19

Positioning your projector

19

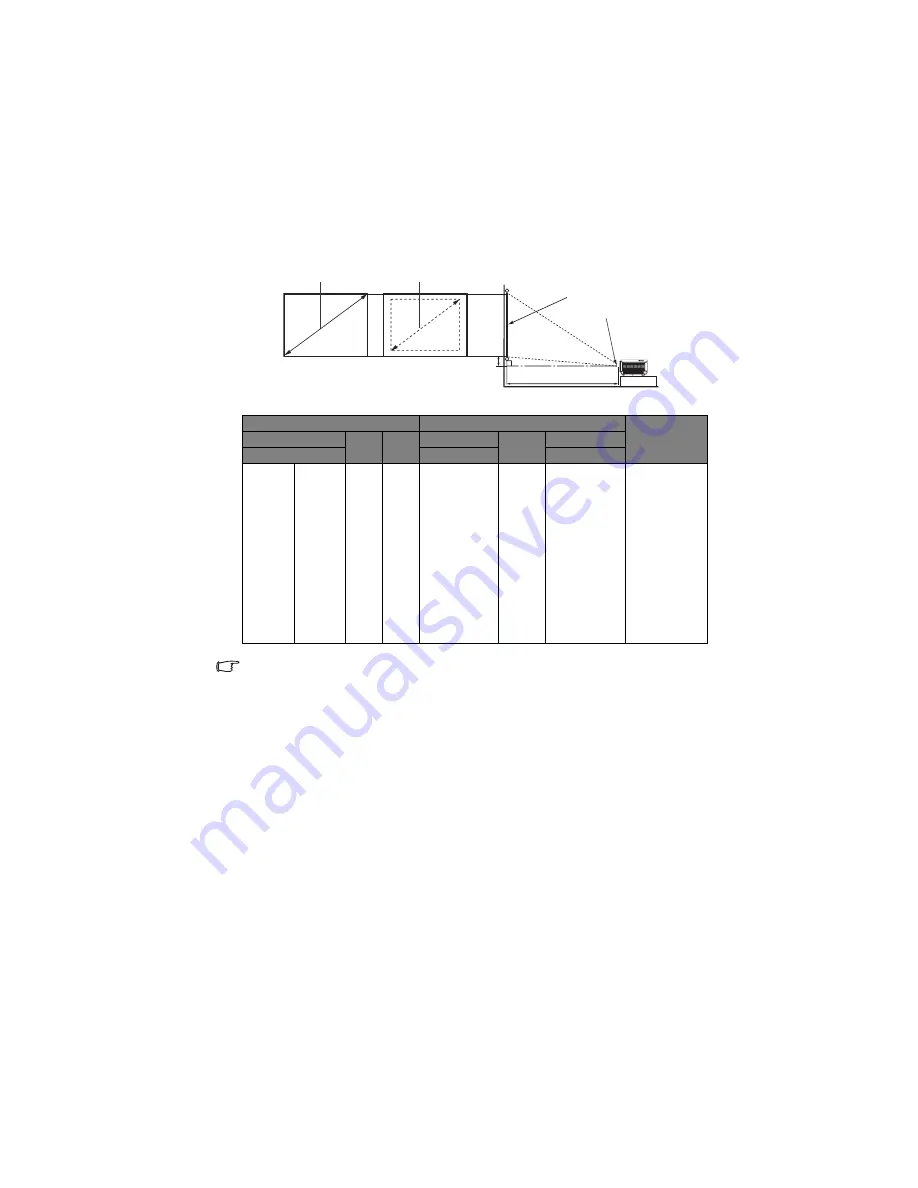
MP778 Projection dimensions

Refer to 

"Dimensions" on page 92

 for the center of lens dimensions of this projector before 

calculating the appropriate position.

There is 3% tolerance among these numbers due to optical component variations. BenQ 
recommends that if you intend to permanently install the projector, you should physically test 
the projection size and distance using the actual projector in situ before you permanently 
install it, so as to make allowance for this projector's optical characteristics. This will help you 
determine the exact mounting position so that it best suits your installation location.

Screen size

Distance from screen (mm)

Vertical offset 

(mm)

Diagonal

W

(mm)

H

(mm)

 Min length

Average

Max length

Inch

mm

(max. zoom)

 (min. zoom)

30

762

610

457

850

1105

1360

69

40

1016

813

610

1133

1473

1813

91

50

1270

1016

762

1417

1842

2267

114

60

1524

1219

914

1700

2210

2720

137

80

2032

1626

1219

2267

2947

3627

183

100

2540

2032

1524

2833

3683

4533

229

120

3048

2438

1829

3400

4420

5440

274

150

3810

3048

2286

4250

5525

6800

343

200

5080

4064

3048

5667

7367

9067

457

220

5588

4470

3353

6233

8103

9973

503

250

6350

5080

3810

7083

9208

11333

572

300

7620

6096

4572

8500

11050

13600

686

Maximum zoom

Minimum zoom

Projection distance

Center of lens

Screen

Vertical offset

Summary of Contents for MP778

Page 1: ...Welcome MP778 MP780 ST Digital Projector User Manual...

Page 2: ...e 39 Creating your own startup screen 42 Setting the presentation timer 43 Remote paging operations 43 Hiding the image 44 Freezing the image 44 Utilizing FAQ function 44 Locking control keys 45 Opera...

Page 3: ...qualified service personnel 4 A Always open the lens shutter or remove the lens cap when the projector lamp is on 5 In some countries the line voltage is NOT stable This projector is designed to opera...

Page 4: ...lugged 10 Do not place this product on an unstable cart stand or table The product may fall sustaining serious damage 11 Do not attempt to disassemble this projector There are dangerous high voltages...

Page 5: ...s with an ambient temperature above 40 C 104 F Locations where the altitudes are higher than 3000 m 10000 feet 14 Do not block the ventilation holes Do not place this projector on a blanket bedding or...

Page 6: ...l damage to the projector doing so may result in accidents and possible injury 18 Do not place liquids near or on the projector Liquids spilled into the projector may cause it to fail If the projector...

Page 7: ...or cool in a shorter time Presentation timer for better control of time during presentations One key auto adjustment to display the best picture quality Digital keystone correction to correct distorte...

Page 8: ...essories will be suitable for your region and may differ from those illustrated The warranty card is only supplied in some specific regions Please consult your dealer for detailed information MP778 pr...

Page 9: ...apter PointDrawTM pen holder PointDrawTM pen wrist strap PointDrawTM pen quick start guide Q Draw interactive software 1 Spare lamp kit 2 Ceiling mount kit 3 Soft carry case standard accessory for MP7...

Page 10: ...nput jack 16 HDMI input jack 17 RS 232 control port 18 USB B type jack 19 USB A type jack 20 RJ45 LAN input jack 21 Rear IR remote sensor 22 Rear adjuster foot 23 USB mini B type jack 24 Kensington an...

Page 11: ...Activates panel key lock See Locking control keys on page 45 for details 10 LAMP indicator light Indicates the status of the lamp Lights up or flashes when the lamp has developed a problem See Indicat...

Page 12: ...a non BenQ brand projector ceiling mount kit there is a safety risk that the projector may fall from the ceiling due to an improper attachment through the use of the wrong gauge or length screws You c...

Page 13: ...d On Screen Display OSD menu item See Using the menus on page 33 for details 8 Left Starts the FAQ function See Utilizing FAQ function on page 44 for details 9 ZOOM ZOOM Magnifies or reduces the proje...

Page 14: ...Selects the display aspect ratio See Selecting the aspect ratio on page 37 for details 24 MIC VOL Adjusts the microphone s sound level See for details See Adjusting the microphone s sound level on pa...

Page 15: ...teries if necessary and install two AAA batteries observing the battery polarities as indicated in the base of the battery compartment Positive goes to positive and negative goes to negative 3 Refit t...

Page 16: ...the screen This is the most common way to position the projector for quick setup and portability 2 Front Ceiling Select this location with the projector suspended upside down from the ceiling in front...

Page 17: ...image to be vertically offset from the horizontal plane of the projector When ceiling mounted this refers to the top edge of the projected image If the projector is positioned further away from the s...

Page 18: ...n size is limited by the physical space available in your room 1 Measure the distance between the projector and where you want to position the screen This is the projection distance 2 Refer to the tab...

Page 19: ...ou determine the exact mounting position so that it best suits your installation location Screen size Distance from screen mm Vertical offset mm Diagonal W mm H mm Min length Average Max length Inch m...

Page 20: ...l it so as to make allowance for this projector s optical characteristics This will help you determine the exact mounting position so that it best suits your installation location Screen size Distance...

Page 21: ...cables may not be included with the projector see Shipping contents on page 8 They are commercially available from electronics stores For detailed connection methods see pages 22 29 1 Audio cable 6 V...

Page 22: ...ments Windows XP Windows Vista Supports USB 2 0 CPU Pentium 1G RAM 512MB RAM Disk 20MB hard driver space Operation System Requirements Minimum Hardware Requirements Windows XP Windows Vista WiFi 54 Mb...

Page 23: ...ni B type to USB A type cable and connect one end to the A type jack of the computer 2 Connect the other end of the cable to the M MINI B jack on the projector 3 If you wish to make use of the project...

Page 24: ...J45 cable to connect the projector to your computer Because this connection needs an IP router To connect the projector to a notebook or desktop computer using HDMI 1 Take a HDMI cable and connect one...

Page 25: ...ur monitor is equipped with a DVI input jack take a VGA to DVI A cable and connect the DVI end of the cable to the DVI input jack of the video monitor 3 Connect the other end of the cable to the M MON...

Page 26: ...ll most likely depend upon the availability of matching terminals on both the projector and the Video source device as described below Terminal name Terminal appearance Reference Picture quality HDMI...

Page 27: ...n HDMI source device 1 Take an HDMI cable and connect one end to the HDMI output jack of the HDMI source device Connect the other end of the cable to the HDMI signal input jack on the projector Once c...

Reviews: