background image

  37

Navigating the main menu

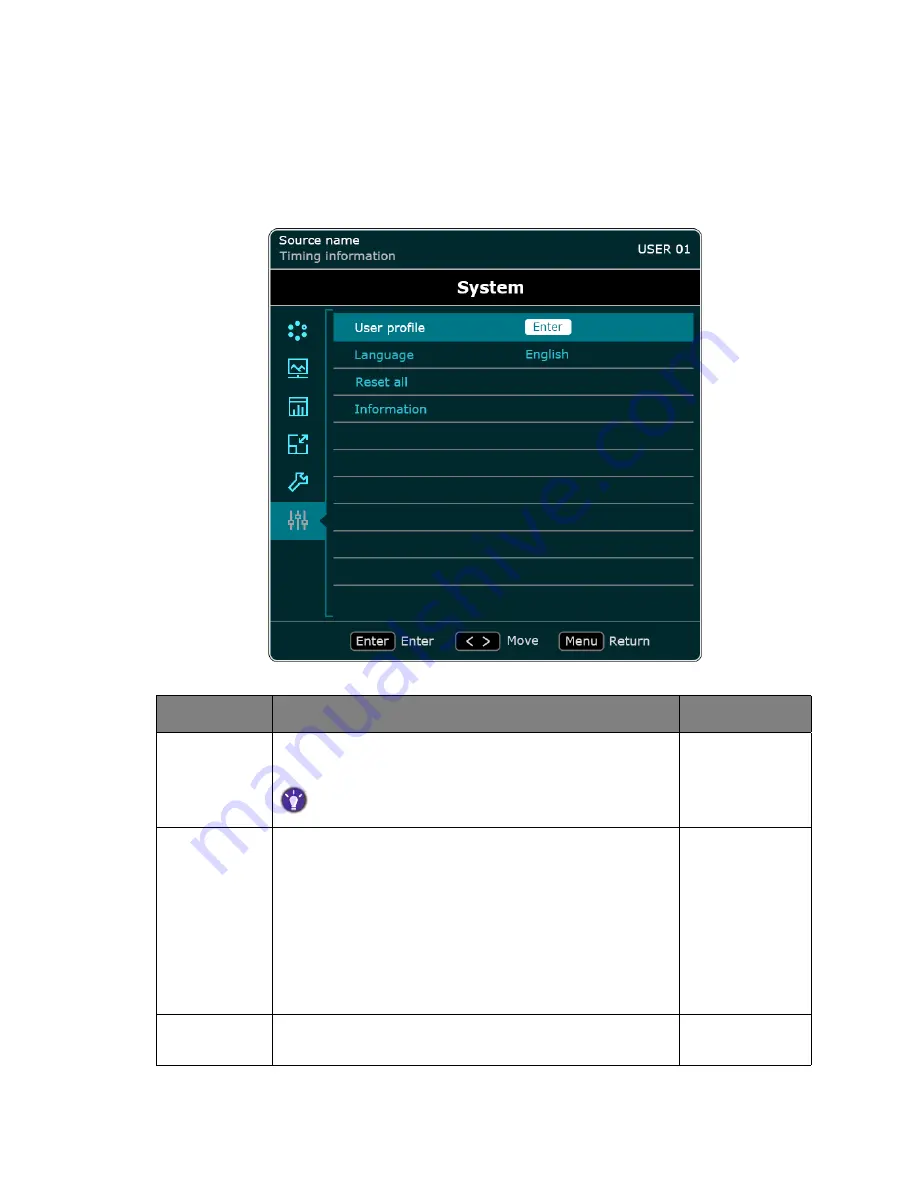
System

 menu

Available menu options may vary depending on the input sources, functions, settings, and the 
product specifications. Menu options that are not available temporarily will become grayed out. 
And keys that are not available will be disabled and the corresponding OSD icons will disappear. 
For models without certain functions, their settings and related items will not appear on the 
menu.

Item

Description

Options

User Profile

  Allows you to create distinct user scenarios for individual 

usages. You can save up to 10 user profiles.

Whenever text input is required, a virtual keyboard is displayed.

Load profile


Save profile


User naming


Language

Sets the OSD menu language.

English

Français


Deutsch 


Italiano


Español


日本語


简中

Reset all


Resets all mode, color and geometry settings to the 
factory default values.

Summary of Contents for MD SERIES

Page 1: ...MD Series LCD Monitor User Manual ...

Page 2: ...hereof without obligation of BenQ Corporation to notify any person of such revision or changes BenQ ecoFACTS BenQ has been dedicated to the design and development of greener product as part of its aspiration to realize the ideal of the Bringing Enjoyment N Quality to Life corporate vision with the ultimate goal to achieve a low carbon society Besides meeting international regulatory requirement an...

Page 3: ...he same image for extended periods of time an afterimage may appear Use the screen saver or timer to avoid displaying the same image for extended periods of time The screen may have defective pixels These pixels may appear as slightly light or dark area on the screen or may appear spontaneously This is due to the characteristics of the panel itself and is not a malfunction of the product Over a lo...

Page 4: ...ved when the equipment is connected to an equivalent receptacle marked Hospital Only or Hospital Grade This device is intended to be used 1 outside the patient vicinity area or 2 within the patient vicinity to the patient such as consulting rooms That SIP SOPs need to be connected properly and that any unused SIP SOPs shall not be accessible for the patient to contact in the patient area after the...

Page 5: ...nded to replace the panel after it has been used for 3 years Warning Do not touch a damaged LCD panel directly with bare hands The liquid crystal which leaks from the panel is poisonous if it enters the eyes or mouth Do not leave the LCD screen facing the sun as it can damage the LCD screen Take care when you place the unit by a window Do not push or scratch the LCD monitor s screen Do not place a...

Page 6: ...icates the need for the user to consult the instructions for use Indicates the manufacturing date Indicates the manufacturer Indicates the authorized representative in the European community Indicates the device s serial number Indicates the range of humidity to which the medical device can be safely exposed when being stored Indicates the temperature limits to which the medical device can be safe...

Page 7: ...urce in Australia use the power cord provided with the monitor If a power cord is not supplied with this equipment please contact your supplier For all other cases use a power cord that matches the AC voltage of the power outlet and has been approved by and complies with the safety standard of your particular country Main switch ON Main switch OFF DC input AC input Supplementary information Useful...

Page 8: ...s 15 How to assemble your monitor hardware 16 OSD controls 20 The control panel 20 Locking and unlocking the OSD control keys 21 Changing a Preset mode 21 Adjusting Brightness 21 Adjusting Gamma to view DICOM images 21 Using User Profile 22 Navigating the main menu 23 Preset mode menu 25 Display menu 28 Color menu available for color displays only 31 Image menu available for models with VGA inputs...

Page 9: ...9 Product information 45 Specifications MD210G 45 Specifications MD310G 47 Specifications MD310C 49 Display mode 51 Dimensions 53 Regulatory statements 54 FCC Information 54 EMC Information 54 ...

Page 10: ...ed medical practitioners These devices cannot be used in digital mammography and life support system These devices are designed for exclusive interconnection with IEC60601 1 1 certified equipment To guarantee the display performance as specified it must only be used for in conjunction with BenQ approved graphic cards Equipment connected to the analog or digital interfaces must comply with the resp...

Page 11: ...mpliance of conformity assessment Annex VII to be self declaration the Restriction of The Use of Certain Hazardous Substances in Electrical And Electronic Equipment Directive 2011 65 EU Turkish EEE and ErP Directive Commission Regulation EC No 1275 2008 implementing Directive 2005 32 EC of the European Parliament and of the Council with regard to ecodesign requirements for standby and off mode ele...

Page 12: ... If any are missing or damaged please contact the place of purchase for a replacement BenQ LCD Monitor Quick Start Guide CD ROM Power Cord Picture may differ from product supplied for your region VGA Cable Optional accessory for models with VGA inputs DVI D Cable Dual link DVI D cable for MD310C MD310G only ...

Page 13: ...ly For the latest information about the accessories and the compatible graphics board refer to the BenQ website www BenQ com Consider keeping the box and packaging in storage for use in the future when you may need to transport the monitor The fitted foam packing is ideal for protecting the monitor during transport Use an approved power cord only In the US market US approved hospital grade power c...

Page 14: ...ns 5 Power button 3 4 5 1 2 6 Power switch 7 AC power input jack 8 DVI D socket 9 DisplayPort socket 10 VGA socket MD210G only 11 USB port downstream 12 USB port upstream 13 Kensington lock slot 14 Cable management hole Above diagram may vary depending on the model Picture may differ from the product supplied for your region 7 8 6 14 9 11 12 13 10 ...

Page 15: ...monitor Connections The following connection illustrations are for your reference only For cables that are not supplied with your product you can purchase them separately For detailed connection methods see page 17 MD210G only ...

Page 16: ...ot touch the integrated front sensor or apply any stress to it while carrying the monitor 1 Rotate the monitor Gently lift the monitor turn it over and place it upright on its stand on a flat even surface Extend the monitor to the maximum extended position Then tilt the monitor And rotate the monitor 90 degrees clockwise as illustrated You should position the monitor and angle the screen to minimi...

Page 17: ...e end without the ferrite filter to the monitor video socket Connect the other end of the cable at the end with the ferrite filter to the computer video socket Tighten all finger screws to prevent the plugs from accidently falling out during use To Connect the DP Cable Connect the plug of the DP cable to the monitor video socket Connect the other end of the cable to the computer video socket The v...

Page 18: ... port See picture on the right 5 Connect the power cable to the monitor Plug one end of the power cord into the socket labelled on the rear of the monitor Do not connect the other end to a power outlet just yet 6 Organize the cables 7 Connect to and turn on the power Plug the other end of the power cord into a power outlet and turn it on Picture may differ from product supplied for your region ...

Page 19: ...are Switch the power switch next to the AC power input jack to ON Turn on the monitor by pressing the power button on the monitor To extend the service life of the product we recommend that you use your computer s power management function ...

Page 20: ...ent MD310G only This is the hot key for TSPM Press to enable disable the TSPM function See TSPM on page 36 for more information 3 For UP Increase adjustment This is the hot key for Input Press to select an input source 4 MENU Activates the main menu Returns to the previous menu 5 Power Turns the power on or off 1 2 3 4 5 The hot keys only operate while the main menu is not currently displaying Hot...

Page 21: ...to view DICOM images To view DICOM images you can either follow the gamma setting suggested by your monitor or change the setting according to your reading room Making adjustment as suggested by your monitor Your monitor can work with the ambient light sensor to suggest the gamma setting that best suit your need 1 Go to Setup Ambient sensor On to enable the ambient light sensor Check if there are ...

Page 22: ...he preference of display settings of up to 10 users If you prefer to keep the current display settings go to System User Profile Save profile Rename the user profile in System User Profile User naming Load a user profile from System User Profile Load profile ...

Page 23: ...product specifications Menu options that are not available temporarily will become grayed out And keys that are not available will be disabled and the corresponding OSD icons will disappear For models without certain functions their settings and related items will not appear on the menu Screen images and icons in this manual are simulated for illustrative purposes only Actual displays may vary by ...

Page 24: ... menu on page 28 Color menu available for color displays only on page 31 Image menu available for models with VGA inputs only on page 32 Geometry menu on page 33 Setup menu on page 34 System menu on page 37 The OSD menu languages may differ from the product supplied to your region see Language on page 37 under System for more details ...

Page 25: ...appear on the menu For color displays Item Description Preset mode Select a picture mode that best suits the current application and the type of images shown on the screen Normal Allows you to adjust the basic display settings as desired DICOM For viewing DICOM images It is recommended for displaying medical images DICOM as the abbreviation of Digital Imaging and Communications in Medicine is a st...

Page 26: ...s the current application and the type of images shown on the screen Normal Allows you to adjust the basic display settings as desired DICOM For viewing DICOM images It is recommended for displaying medical images DICOM as the abbreviation of Digital Imaging and Communications in Medicine is a standard for handling storing printing and transmitting medical imaging DICOMDR Recommended for viewing m...

Page 27: ...ight box Sets the display area to bright and white which is ideal for viewing X ray images Reading For reading e books or documents Calibration 1 Displays the screen optimized by calibration software Calibration 2 Item Description ...

Page 28: ...alance between light and dark shades When the display cannot keep the desired brightness setting a warning message will show on the brightness menu Please contact your supplier for further assistance 0 100 300nits 400nits 500nits 600nits selected models only Gamma Adjusts the tone luminance See Adjusting Gamma to view DICOM images on page 21 for more information See DICOM settings and ambient ligh...

Page 29: ...29 Navigating the main menu Sharpness Adjusts the clarity and visibility of the edges of the subjects in the image 0 100 Item Description Options ...

Page 30: ...t light conditions recommended by the American Association of Physicists in Medicine AAPM Each of these rooms is defined by the following parameters To select an appropriate option see Adjusting Gamma to view DICOM images on page 21 Gamma setting Area DICOM 1 Diagnostic reading stations X rays DICOM 2 Diagnostic reading stations CT MR NM DICOM 3 Staff offices DICOM 4 Hospital clinical viewing stat...

Page 31: ...thout certain functions their settings and related items will not appear on the menu Item Description Options Color temperature Applies a color tint cool or warm to the image Color temperature is measured in K Kelvin degrees The display becomes reddish if the color temperature is low and becomes bluish if the color temperature is high 5500K 6500K 7500K 9300K UserRGB Hue Adjusts the degree of how w...

Page 32: ...tions Auto adjustment Optimizes and adjusts the screen settings automatically for you Not applicable to a digital input signal Clock Adjusts the pixel clock frequency timing to synchronize with the analog input video signal 0 100 Phase Adjusts the pixel clock phase timing to synchronize with the analog input video signal 0 100 H position Adjusts the horizontal position of the screen image 0 100 V ...

Page 33: ... and the corresponding OSD icons will disappear For models without certain functions their settings and related items will not appear on the menu Item Description Scaling This feature is provided to allow desired ratios to be displayed Full screen Scales the input image to fill the screen Aspect ratio The input image is displayed without geometric distortion filling as much of the display as possi...

Page 34: ...supply of video monitors for computers through the graphics card On Off LED indicator Enables disables LED indications On Off Ambient sensor Enables disables ambient light sensor Ambient light sensor detects the current light conditions and helps provide a suggested gamma setting If the sensor is enabled the suggested DICOM setting will be displayed on the screen when the monitor is powered on See...

Page 35: ...are locked except for the Brightness adjustment input source switch and User Profile change Press the key to bring up the OSD lock page Press MENU to adjust the brightness Press the key to switch the input source Press ENTER to access User Profile Defogging Under certain circumstances condensation may occur on the inner side of the cover glass it s a natural phenomenon and will not affect the oper...

Page 36: ...By manipulating the sub pixels the edges of the lines can be measured and positioned precisely and thus to obtain a better image resolution and tiny image details This function is helpful if check of a specific area instead of the whole image is desired If TSPM is set to On the screen is not displayed properly On Off Item Description Options ...

Page 37: ...sappear For models without certain functions their settings and related items will not appear on the menu Item Description Options User Profile Allows you to create distinct user scenarios for individual usages You can save up to 10 user profiles Whenever text input is required a virtual keyboard is displayed Loadprofile Saveprofile Usernaming Language Sets the OSD menu language English Français D...

Page 38: ...imit of backlight life time may differ by product When the backlight is used to almost 10 000 hours a warning message will be displayed Contact your supplier then for further assistance FWversion Modelname Serial number Lifehours Current temperature Calibrated counter Item Description Options ...

Page 39: ...hic card Refer to the graphic card or system manuals for more information Check the monitor and your graphic card with respect to compatibility and recommended settings Make sure there are no bent or pushed in pins in the signal cable connectors Check the signal cable connectors and make sure no pin is bent or broken off Image persistence image sticking Image persistence is when a residual or ghos...

Page 40: ...en the monitor is powered on the LED indicator lights up in solid green If the LED is illuminated in orange the power management mode is active Press any button on the computer keyboard or move the mouse If that does not help check the signal cable connectors If any pin is bent or broken off please contact your dealer to get necessary support The OSD controls are inaccessible To unlock the OSD con...

Page 41: ...efer servicing to qualified service personnel under the following conditions When the power supply cord or plug is damaged If liquid has been spilled or objects have fallen into the monitor If the monitor has been exposed to rain or water If the monitor has been dropped or the cabinet damaged If the monitor does not operate normally by following operating instructions Do not bend power cord Do not...

Page 42: ...er and neck fatigue Check the following when you position the monitor For optimum performance allow 30 minutes for warm up Adjust the monitor height so that the top of the screen is at or slightly below eye level Your eyes should look slightly downward when viewing the middle of the screen Position your monitor no closer than 40 cm and no further away than 70 cm from your eyes The optimal distance...

Page 43: ... the following solvents on the display Harsh chemicals may cause damage to the cabinet front glass and the sensors Alcohol solvents at higher concentration 5 Strong alkalis lye strong solvents Thinner Spray type cleaner Abrasive cleaner acid Benzene Wax Detergents with fluoride Detergents with ammonia Detergents with abrasives Steel wool Sponge with abrasives Steel blades Cloth with steel thread C...

Page 44: ...MI ES 60601 1 CAN CSA C22 2 No 60601 1 Indicates comply with TÜV Rheinland EN IEC 60601 1 Indicates the device is approved according to the Japan VCCI regulations Indicates the device is approved according to the China CCC regulations Indicates the device is approved according to the Taiwan BSMI regulations Indicates the USB connectors on the device Indicates the DisplayPort connectors on the devi...

Page 45: ...ess 1000 cd m Typ Contrast ratio 1400 1 Typ Connectivity Input terminals VGA x 1 DVI D x 1 DisplayPort x 1 USB ports standard 1 upstream 2 downstream Rev 2 0 Power supply Power input AC 100 240V 50 60 Hz Power consumption 55 W Maximum Physical Dimensions with stand W x H x D Portrait 369 x 523 593 x 264 9 mm Landscape 490 4 x 462 2 532 2 x 264 9 mm Dimensions w o stand W x H x D Portrait 369 x 490...

Page 46: ... atmospheric pressure 700hPa to 1060hPa Transport storage atmospheric pressure 200hPa to 1060hPa Certification and compliance cTÜVus ANSI AAMI ES 60601 1 CAN CSA C22 2 No 60601 1 CB IEC 60601 1 IEC 60950 1 TÜV RH EN 60601 1 CE FCC CCC BSMI VCCI RoHS WEEE REACH Supplied accessories DVI D cable USB cable Power cord Manual CD QSG Specifications and functions are subject to change without notice for q...

Page 47: ...0 Power supply Power input AC 100 240V 50 60 Hz Power consumption 80 W Maximum Physical Dimensions with stand W x H x D Portrait 369 x 523 593 x 264 9 mm Landscape 490 4 x 462 2 532 2 x 264 9 mm Dimensions w o stand W x H x D Portrait 369 x 490 4 x 94 4 mm Landscape 490 4 x 369 x 94 4 mm Net weight with stand Approximately 10 9 kg Net weight w o stand Approximately 7 kg Mounting 100 x 100 mm VESA ...

Page 48: ... 2 No 60601 1 CB IEC 60601 1 IEC 60950 1 TÜV RH EN 60601 1 CE FCC CCC BSMI VCCI RoHS WEEE REACH Supplied accessories DVI D Dual Link cable DisplayPort cable USB cable Power cord Manual CD QSG Specifications and functions are subject to change without notice for quality improvement Item MD310G ...

Page 49: ...d m Typ Contrast ratio 1400 1 Typ Connectivity Input terminals DVI D Dual Link x 1 DisplayPort x 1 USB ports standard 1 upstream 2 downstream Rev 2 0 Power supply Power input AC 100 240V 50 60 Hz Power consumption 95 W Maximum Physical Dimensions with stand W x H x D Portrait 369 x 523 593 x 264 9 mm Landscape 490 4 x 462 2 532 2 x 264 9 mm Dimensions w o stand W x H x D Portrait 369 x 490 4 x 94 ...

Page 50: ...ressure 700hPa to 1060hPa Transport storage atmospheric pressure 200hPa to 1060hPa Certification and compliance cTÜVus ANSI AAMI ES 60601 1 CAN CSA C22 2 No 60601 1 CB IEC 60601 1 IEC 60950 1 TÜV RH EN 60601 1 CE FCC CCC BSMI VCCI RoHS WEEE REACH Supplied accessories DVI D Dual Link cable DisplayPort cable USB cable Power cord Manual CD QSG Specifications and functions are subject to change withou...

Page 51: ...z 40 00 37 88 60 32 800 600 72 Hz 50 00 48 08 72 19 800 600 75 Hz 49 50 46 87 75 00 832 624 75 Hz 57 28 49 73 74 5 1024 768 60 Hz 65 00 48 36 60 00 1024 768 70 Hz 75 00 56 48 70 07 1024 768 75 Hz 78 75 60 02 75 03 1152 864 75 Hz 108 00 67 50 75 00 1280 1024 60 Hz 108 0 63 98 60 02 1280 1024 75 Hz 135 00 79 98 75 02 1600 1200 60 Hz 162 0 75 00 60 00 Modes not listed in the table may not be supporte...

Page 52: ...0 600 72 Hz 50 00 48 08 72 19 800 600 75 Hz 49 50 46 87 75 00 832 624 75 Hz 57 28 49 73 74 5 1024 768 60 Hz 65 00 48 36 60 00 1024 768 70 Hz 75 00 56 48 70 07 1024 768 75 Hz 78 75 60 02 75 03 1152 864 75 Hz 108 00 67 50 75 00 1280 1024 60 Hz 108 0 63 98 60 02 1280 1024 75 Hz 135 00 79 98 75 02 1600 1200 60 Hz 162 0 75 00 60 00 2048 1536 60 Hz 267 25 95 45 59 95 Modes not listed in the table may no...

Page 53: ... 52 24 53 20 67 30 16 18 5 264 9 44 2 94 4 306 210 3 11 2 11 141 28 21 9 0 1 196 5 80 59 592 9 327 43 Glass black area 435 68 Glass black area 324 86 Active area 433 15 Active area Unit mm The illustration is for MD310C only The display area may vary by model ...

Page 54: ...ence by one or more of the following measures Reorient or relocate receiving antenna Increase the separation between the equipment and receiver Connect the equipment into an outlet on a circuit different from that to which the receiver is connected Consult the dealer or an experienced radio TV technician for help This device complies with Part 18 of the FCC rules Operation is subject to the follow...

Page 55: ...try to correct the interference by one or more of the following measures Reorient or relocate the receiving antenna or equipment Increase the separation between the equipment and receiver Connect the equipment into an outlet on a circuit different from that to which the receiver is connected Consult the dealer or an experienced technician for help Emissions test Compliance Electromagnetic environm...

Page 56: ...00 4 5 1 kV line s to line s 2 kV line s to earth 1 kV line s to line s 2 kV line s to earth Mains power quality should be that of a typical commercial or hospital environment Voltage dips short interruptions and voltage variations on power supply input lines IEC EN 61000 4 11 5 UT 1 95 dip in UT for 0 5 cycle 40 UT 60 dip in UT for 5 cycles 70 UT 30 dip in UT for 25 cycles 5 UT 95 dip in UT for 5...

Page 57: ... the transmitter in watts W according to the transmitter manufacturer and d is the recommended separation distance in meters m Field strengths from fixed RF transmitters as determined by an electromagnetic site survey should be less than the compliance level in each frequency range Interference may occur in the vicinity of equipment marked with symbol Immunity test IEC EN 60601 Test levels Complia...

Page 58: ...D series LED Display as recommended below according to the maximum output power of the communications equipment DN MD10 M V0 4 7 15 Rated maximum output power of transmitter W Separation distance according to frequency of transmitter m 150kHz to 80MHz d 1 2 P 80MHz to 800MHz d 1 2 P 800MHz to 2 5GHz d 2 3 P 0 01 0 12 0 12 0 23 0 1 0 38 0 38 0 73 1 1 2 1 2 2 3 10 3 8 3 8 7 3 100 12 12 23 At 80 MHz ...

Reviews: