background image

BenQ DC 5530  User’s Manual

Eng
lish

Using the DC C51

17

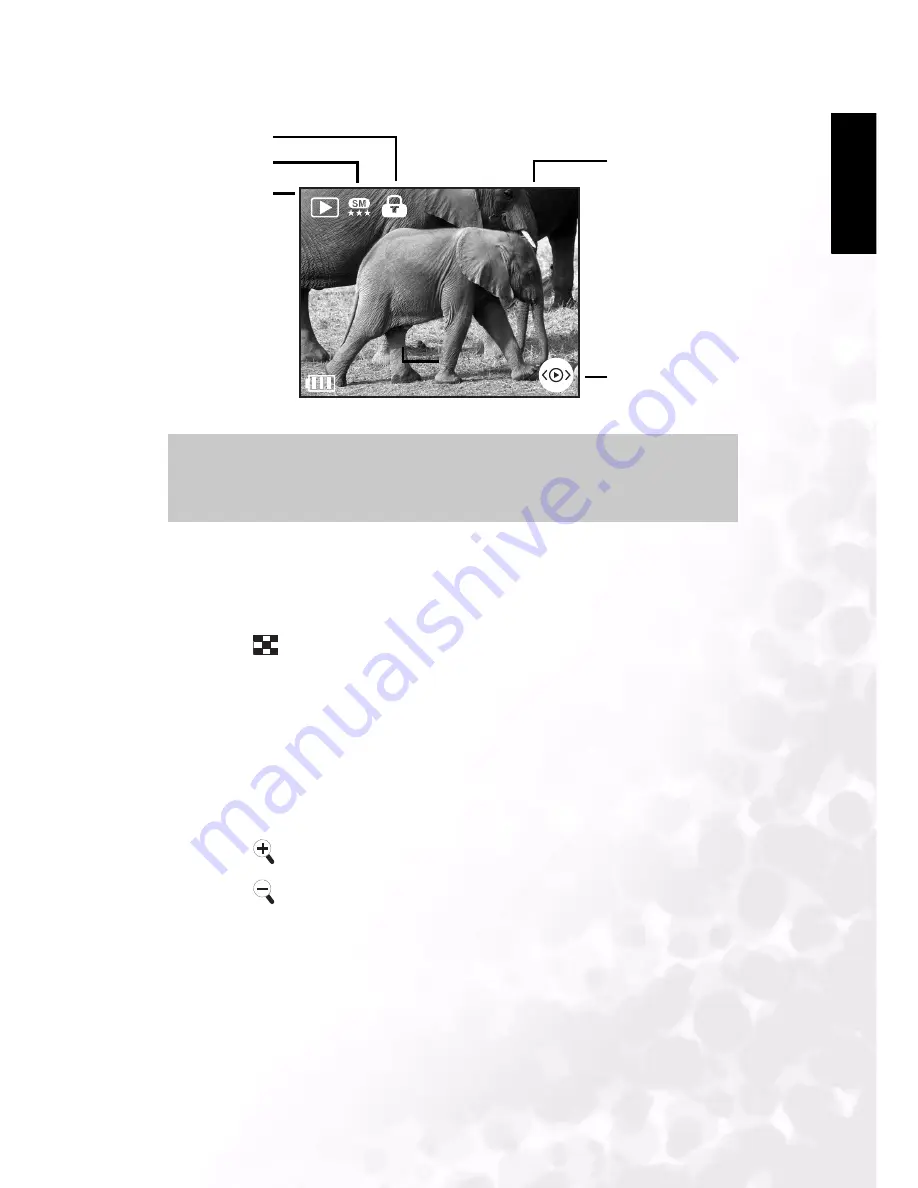
The following illustration shows the movie and image playback screen in OSD mode.


3.3.1  Thumbnail Display

This function allows you to view nine thumbnail images on the LCD monitor simultaneously 
so that you can quickly scan for a particular image. 

1. Press the 

 button until nine images are displayed simultaneously.

2. Press the navigation buttons to scroll through the thumbnails.
3. Press the OK button to display the selected image or movie on the full screen.

3.3.2 Using Zoom

The camera has up to 4x playback digital zoom. While reviewing your images, you may 
enlarge a selected portion of an image. This magnification allows you to view fine details of 
the image. Movies cannot be displayed using the zoom playback feature.

1. Press the 

 button to zoom in on details of the selected image and enlarge the image.

2. Press the 

 button to return to normal magnification.

3. When zooming in on an image, use the navigation buttons to pan across the image.

 Note

Press the LCD button to switch between standard OSD mode with complete 
information, image only mode, and LCD off.

002/002

2004-08-31

File number

Still image

Image size and

quality

Image locked

Playback or voice memo 
icon

Summary of Contents for DC C51

Page 1: ...Welcome DC C51 Digital Camera User s Manual ...

Page 2: ...a Do not use your camera in the following environmental range temperature below 0 C or above 40 C Do not use or store your camera in the environments listed below Direct sunlight High and dusty places Next to an air conditioner electric heater or other heat sources In a closed car that is in direct sunlight Unstable locations If your camera becomes wet wipe it with a dry cloth as soon as possible ...

Page 3: ...se 6 2 1 Inserting the Batteries 6 2 2 Loading an SD Memory Card 6 2 3 Attaching the Strap 7 3 Using the DC C51 8 3 1 Capturing Images 8 3 1 1 About the LCD Monitor Icons 8 3 1 2 LCD Icon Index 9 3 1 3 LCD Monitor Display 10 3 1 4 Using the Optical Zoom 10 3 1 5 Using the Flash 11 3 1 6 Changing the Focus 11 3 1 7 Setting the Capture Mode 11 3 1 8 Using Quick Review 12 3 1 9 Using the OSD Menu 12 ...

Page 4: ...Setup mode 20 3 4 1 Memory 20 3 4 2 Date Time 20 3 4 3 Date Format 20 3 4 4 LCD Brightness 20 3 4 5 Sound Volume 20 3 4 6 File Number Reset 21 3 4 7 TV Out Format 21 3 4 8 Power Saving 21 3 4 9 Quick View 21 3 4 10 Language 21 3 4 11 Reset 21 4 PC Dependent Features 22 4 1 Installing the Digital Camera Software 22 4 2 Transferring Files with your PC 22 4 3 Viewing Images on TV 22 5 Service Informa...

Page 5: ...missing or appear to be damaged contact your dealer Save the packaging in the event you need to ship your camera for service User Manual 1 2 3 4 5 7 6 A F O PTICAL 3X ZOOM L E N S F 5 8 17 4mm 1 2 8 4 8 A F O PTICAL 3X ZOOM L E N S F 5 8 17 4mm 1 2 8 4 8 1 User manual 2 DC C51 digital camera 3 USB cable 4 AA alkaline batteries x2 5 DC C51 software CD ROM 6 AV cable 7 Hand strap ...

Page 6: ...5 6 3 7 1 2 3 4 5 6 7 8 9 11 12 18 13 14 15 16 17 19 10 1 Optical viewfinder 2 Power button 3 Microphone 4 Zoom out Thumbnail button 5 Shutter button 6 Hand strap eyelet 7 Zoom in button 8 Menu Cancel button 9 Quick view Up navigation button 10 OK button 11 Flash Right navigation button 12 Self timer Down navigation but ton 13 Macro Left navigation button 14 LCD button 15 Delete button 16 LCD pane...

Page 7: ...o navigate thumbnail images 3 Menu Cancel Recording Playback Video modes Displays the menu Menu mode Cancels an operation or exits the menu 4 Delete In playback mode deletes the current image or movie 5 Q View In Still Image Video modes displays the last image that was taken Note The LCD on the digital camera is manufactured with sophisticated technol ogy However the display may have some light sp...

Page 8: ...s of people and animals in low light conditions Forced Flash The flash fires regardless of the surrounding brightness Select this mode to record images with high contrast back lighting and deep shadows Flash Off The flash does not fire Select this mode when taking images in a place where flash photography is prohibited or when the distance to the subject is beyond the effective range of the flash ...

Page 9: ...F Playback mode Switches between playback display modes standard image with OSD information and image only 1 2 5 Viewfinder LED Indicator Green Orange ON 1 Power on detected 2 Ready to use or AF auto focus action completed 3 USB connection non accessing Blinking slow Processing 1 Warning message 2 Power low Blinking fast Accessing mass storage Flash charging in progress ...

Page 10: ...ecure Digital card as well as the camera s internal memory 13MB Images are stored in the internal memory if the SD card is not inserted If the SD card is inserted new images are stored on the card and not in the internal memory 1 Make sure the camera is off 2 Slide the battery SD card cover on the bottom of the camera in the direction of the arrow 3 Insert an SD card The front side of the memory c...

Page 11: ...op of the hand strap through the strap eyelet on the camera A 2 Pull the large loop through the small loop until the strap is firmly secured B Notes To prevent valuable data from being accidentally erased from an SD card slide the write protect tab on the side of the SD card to LOCK To save edit or erase data on an SD card you must unlock the card Format your SD card before use Refer to 3 4 1 Memo...

Page 12: ...al viewfinder conserves battery power Using the LCD monitor helps you to accurately compose pictures and review all details However the LCD consumes more battery power 1 Turn the camera on by pressing the power button 2 Set the mode switch to Still Image mode 3 Compose your shot in the viewfinder or on the LCD 4 Press the shutter button down halfway to enable the autofocus AF to get a clear image ...

Page 13: ...n Off White Balance Auto Sunny Cloudy Tungsten Fluorescent Light meter ing Center Spot Multi Effect Normal Black and White Sepia Vivid Scene Auto Manual A Icon Options Scene Portrait Landscape Night Sport Backlight EV bias 2 0 to 2 0 ISO Auto 100 200 Image size 3264 x 2448 inter polated 2832 x 2128 inter polated 2592 x 1944 2048 x 1536 1600 x 1200 1024 x 768 Image quality Fine Normal Economy A ...

Page 14: ... the or buttons Pressing zooms in on the subject and enlarges the subject in the LCD monitor Pressing provides a wider angle picture The lens position moves according to the zoom button setting 3 Press the shutter button down halfway to enable the autofocus to get a clear image and then press it down fully to capture the image Notes The image on the LCD monitor darkens in strong sunlight or bright...

Page 15: ... information 3 1 7 Setting the Capture Mode The DC C51 provides three modes to capture a digital still image Press the self timer button to set the capture mode in Still Image mode or Movie mode See 7 Timer on page 4 for more information Note After the flash fires it takes approximately 5 to 10 seconds to be ready for the next shot Notes When shooting a close up in Macro mode use the LCD monitor t...

Page 16: ...xit the menus Refer to the following sections to learn more about the different menu options 3 1 9 2 Shooting Mode Select the environment in which you are capturing a picture or a video using the Scene option in the menu This enables you to load preset settings for different shooting conditions Auto enables the camera to make automatic adjustments default mode Manual enables you to make camera adj...

Page 17: ...t that actually enter the lens You may setthe white balance in advance when taking photographs under specific lighting conditions Auto Auto white balance default Automatically adjusts the white balance Daylight Adjusts the white balance for bright daylight conditions Cloudy Adjusts the white balance for cloudy twilight or shady conditions Tungsten Adjusts the white balance for subjects illuminated...

Page 18: ... 9 8 Exposure Value This setting allows you to intentionally lighten or darken the entire image Use this setting when the optimum brightness exposure cannot be obtained for example when the brightness between the subject and the background is not balanced or when the subject to photograph occupies only an extremely small part of the screen EV BIAS Press the left or right to adjust the EV from 2 0 ...

Page 19: ...lity On enables the AE brakcet Off disables the AE bracket 3 1 9 12 Long Shutter The Long Shutter option allows you to adjust the length of time the shutter button must be pressed to capture and image press the shutter for 1 second press the shutter for 2 seconds press the shutter for 4 seconds press the shutter for 6 seconds Note The long shutter option can only be used with the Night Scene shoot...

Page 20: ...y is automatically stopped when there is no more free space on the SD Memory Card or built in memory 3 3 Reviewing Images and Video Clips Playback mode enables you to view your images or movies either one at a time or in thumbnail mode 1 Set the mode switch to and power on the camera The last recorded image or movie appears on the LCD monitor 2 Press left and right navigation buttons to advance to...

Page 21: ...reen 3 3 2 Using Zoom The camera has up to 4x playback digital zoom While reviewing your images you may enlarge a selected portion of an image This magnification allows you to view fine details of the image Movies cannot be displayed using the zoom playback feature 1 Press the button to zoom in on details of the selected image and enlarge the image 2 Press the button to return to normal magnificat...

Page 22: ... learn how to access the menu options 3 3 5 Slide Show The slide show function enables you to play back your images automatically in sequential order as a slide show This is a very useful and entertaining feature for reviewing recorded images and for presentations disables the slide show displays images and movies within an interval of 1 second displays images and movies within an interval of 3 se...

Page 23: ... protects all images and movies Unprotect One unprotects the currently selected image or movie Unprotect All unprotects all images and movies 3 3 7 DPOF The DPOF feature enables you to store data to be printed along with the images This can then be used to print the images according to your specifications on special DPOF printers After selecting the DPOF function select the number of copies to be ...

Page 24: ... you copy images and movies on the internal memory to the SD Memory Card Copy copies the contents of the internal memory to the external SD card Format formats the memory 3 4 2 Date Time This function enables you to set the date and time for the camera Use the left navigation buttons to select each field and adjust the time and date using the up down arrow buttons 3 4 3 Date Format The Date Format...

Page 25: ...ely disables power saving mode 3 4 9 Quick View This feature enables you to quickly review the last recorded image on the camera while in recording mode Use the left or right arrow buttons to select ON to enable the feature and press the OK button to confirm To see how to use the quick view feature see 3 1 8 Using Quick Review on page 12 3 4 10Language This feature enables you to set the display l...

Page 26: ...click the Browse CD button and install the software you want to install 4 2 Transferring Files with your PC This section explains how to transfer images and movie files to your PC 1 Turn on the PC 2 Switch on the camera 3 Connect the camera to the PC using the USB cable Ensure that the connection is secure Once the USB cable is connected to the PC a hard disk is created in Windows Explorer labeled...

Page 27: ...and the camera driver program please send an E mail containing detailed descriptions of the problem you came upon the hardware and software environment of your system to the following addresses http support BenQ com For free driver program updates product information and news release please visit the following web address http www BenQ com ...

Reviews: