background image

Working with Android OS

61

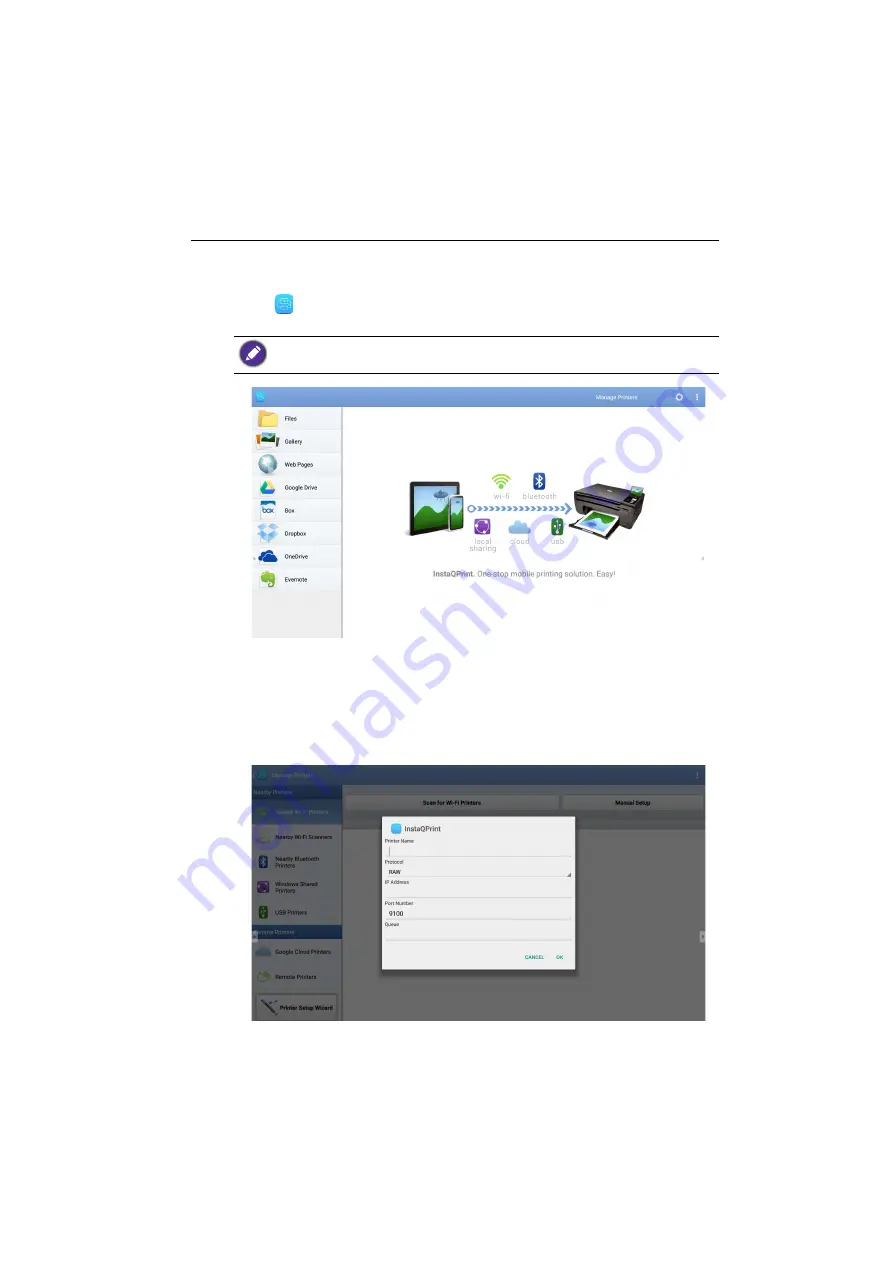
InstaQPrint

• Use your mouse or cursor to control the mouse pointer.
• Click 

 to launch 

InstaQPrint

. With this application, you can print a file or website 

image using a Wi-Fi or remote printer.

1. Click the option on the left panel and browse and select the desired file, photo, page, 

or image you want to print.

2. Click 

Manage Printers

 to choose which printer that you want to use.

3. To select a printer:

• Click an option from the list of available printers on the left panel.
• Click 

Scan for Wi-Fi Printers

 to search for printers automatically.

• Click 

Manual Setup

 to add a new printer manually.

• Before launching the application, make sure your display is properly connected to lnternet.
• For the list of supported printers, see https://printhand.com/list_of_supported_printers.php.

Summary of Contents for CS6501

Page 1: ...CS6501 CS7501 CS8601 LCD Monitor User Manual...

Page 2: ...ontents thereof without obligation to notify any person of such revision or changes Copyright Copyright 2020 BenQ Corporation All rights reserved No part of this publication may be reproduced transmit...

Page 3: ...t www BenQ com BenQ DISPLAY SUPPORT Downloads model name User Manual EU only Dismantled information Available on the user manual download page This document is provided based on Regulation EU 2019 202...

Page 4: ...the display and their functions 13 Front panel 13 Rear panel 14 Input output terminals 15 Remote control 17 Using the remote control 18 Connection 20 Connecting the VGA input 20 Connecting the USB 20...

Page 5: ...oom 365 49 Multimedia files 52 BenQ Suggests 57 InstaShare 2 57 InstaQPrint 61 WPS Office 62 Email 64 Floating Annotation Toolbar 65 Side Tool Bar 66 Collaboration 67 Duo Boards 74 Blizz 78 Saffi 79 P...

Page 6: ...Using wrong or unsuitable accessories may cause the display to fall and result in serious personal injuries Make sure that the surface and fixing points are strong enough to sustain the weight of the...

Page 7: ...ufacturer or sold with the apparatus When a cart is used use caution when moving the cart apparatus combination to avoid injury from tip over 13 Unplug this apparatus during lightning storms or when u...

Page 8: ...the operation of the display This condensation will usually disappear after around 2 hours of normal operation CS series does not offer image retention function for more information please refer to in...

Page 9: ...ringing Enjoyment N Quality to Life corporate vision with the ultimate goal to achieve a low carbon society Besides meeting international regulatory requirement and standards pertaining to environment...

Page 10: ...start guide RS232 cable x 1 USB cable x 1 Mouse x 1 The type of power cord supplied may differ from that illustrated depending on your region of purchase Before discarding the package check that you h...

Page 11: ...ified technicians Improper installation may cause the display to fall or malfunction Installing the display on a wall 1 Place a clean dry and lint free cloth on a flat horizontal and object free surfa...

Page 12: ...ightened and secured properly Recommended torque 470 635N cm The mounting means should be strong enough to bear the weight of the display Thickness of the wall mounting bracket 25 mm 0 39 LCD display...

Page 13: ...lay and their functions Front panel No Name Description Remote Control Signal Receiver Receives remote control IR signals Do not obstruct the receiver CS6501 CS7501 s remote control signal receiver is...

Page 14: ...OL Scroll through settings and options in the OSD menu CH Scroll through settings and options in the OSD menu up and down INPUT Select confirm options in On Screen Display OSD menu Select input source...

Page 15: ...ntrol LAN 10 100 1000 Mbps connecting RJ45 terminals AUDIO OUT Connects to an external audio device such as a speaker stereo system or headphone to output the audio that is supplied by the video sourc...

Page 16: ...irectly Refer to Connecting the USB on page 20 for more information HDMI IN 1 Receives HDMI signals from an external device HDMI IN 2 Receives HDMI signals from an external device HDMI IN 3 Receives H...

Page 17: ...rd selection Android system main screen button Return key Voice command key Press to activate Saffi BenQ Voice Assistant hold the button for two seconds then say the command you can use Release the bu...

Page 18: ...and the enclosed dongle have been paired in default Using the remote control Installing remote control batteries Dongle 1 Open the remote control battery compart ment cover 2 Insert the supplied batt...

Page 19: ...dongle to signage s USB port and place the remote control near it 2 Press the and at the same time and the indicator light starts flashing 3 The pairing is completed once the indicator stops flashing...

Page 20: ...USB peripheral sharing All devices plugged into USB 2 0 Type A can be shared to external computers via USB 2 0 Type B For example you can share a webcam between computers If any ghost image occurs ple...

Page 21: ...ecting the video output For computer 1 Use HDMI cable to connect from HDMI OUT to the respective jacks of the devices 2 Plug in power cord and switch power on 3 Press on the remote control to turn on...

Page 22: ...via central control equipment such as machine on off and adjustment of sound volume etc The supplied power cord is suitable for use with 100 240V AC power only The power cord and outlet illustrated ma...

Page 23: ...ess the Power button on the control panel or on the remote control The system will automatically enter standby mode To turn on the display press the ON OFF button on the control panel or on the remote...

Page 24: ...ete the initial setup 1 Turn on the display Wait for the display to boot up with the BenQ screen This may take a moment 2 Click Next on the screen to begin Follow the on screen instructions to set up...

Page 25: ...st account You are able to change the headshot wallpaper volume and brightness Admin Log in as Admin Under Personal settings you can change the headshot wallpaper and password You can also enable AMS...

Page 26: ...rsonal account you have to ask the administrator to activate AMS service first and create your account through IAM service Refer to User Management on page 26 for more information User Management To a...

Page 27: ...s 27 1 As an administrator to create a new account for regular users go to BenQ Service website https ams benq com Suggested browsers are Chrome Firefox 2 Log in and choose IAM 3 Click Create New Acco...

Page 28: ...ress and activate the X Sign and Broadcast service Click Submit to create a new account 5 The account has been created and a verifying email is sent to the new account owner You can easily switch to d...

Page 29: ...ftware update available for your device or to obtain the software license key please visit https business display benq com en findproduct signage software partner software download html Then enter the...

Page 30: ...s shown please connect the display to the ethernet cable Wireless connection You must use a wireless adapter in order to connect the display to the Internet wirelessly Please contact your local dealer...

Page 31: ...oftware is available the system will automatically detect the update and will prompt you to download it every time you turn on the display If you want to update the software choose NETWORK UPDATE or U...

Page 32: ...on the remote control to adjust the volume Press on the front panel of the display Go to Setting General to adjust the volume Refer to General settings on page 33 for more information Software update...

Page 33: ...s OK to confirm or directly click a desired input source Press on the remote control or click a blank area outside the menu to exit the menu General settings Go to General to access the Audio and Pict...

Page 34: ...m could affect vision and age the eyes Eye Care solution is designed for eyesight protection the display provides proprietary eye care technology with zero flicker performance and ultra low blue light...

Page 35: ...ture settings Press on the remote control and press OK to confirm or directly click an item Menu Description Balance Press on the remote control to adjust Balance Sound Mode Choose a preset sound envi...

Page 36: ...emote control and press OK to adjust image Menu Description Picture Mode Press on the remote control to select a picture mode Options are Standard Bright Soft and Custom Brightness Under Custom mode p...

Page 37: ...e Device settings Go to Device to enter the Device menu Display Go to Device Display Menu Description H Position Press to move the screen to the left or right V Position Press OK on the remote control...

Page 38: ...y Set to Off to turn off the function HDMI CEC Allow devices connected to your display through HDMI ports to communicate back and forth with your display HDMI output resolution Only support FHD out Ch...

Page 39: ...ess on the remote control or click a blank area outside the menu to exit the menu Menu Description Key lock Press OK on the remote control or click the switch to lock or unlock the buttons on the fron...

Page 40: ...con to set a pixel shift preventing from image retention If keypad and IR are locked all at once please follow the steps to unlock Press on the remote control for five seconds For image retention plea...

Page 41: ...Input methods in Android Startup Shutdown Click to set the Startup channel OPS startup option Wake on Lan and Power off reminder Refer to Startup Shutdown on page 44 for more information Floating too...

Page 42: ...Menu operations 42 Proxy setting Go to Network Ethernet Press Proxy to go to the proxy setting You can choose None Manual and Proxy Auto Config...

Page 43: ...Menu operations 43 Enter the proxy host name Enter the using channel...

Page 44: ...Menu operations 44 Startup Shutdown Go to System Startup Shutdown For Startup channel you can choose Last shutdown channel or other sources...

Page 45: ...Menu operations 45 For Close power off reminder you can set on or off time Schedules can be made by choosing the days of the week...

Page 46: ...and Widgets Long clicking the app to add it to the shortcut Video Conference Wireless Projection Collaboration are three main feature shortcuts The corresponding Apps for three main feature shortcuts...

Page 47: ...desired app to launch the app AMS file manager overview Use your mouse or cursor to control the mouse pointer Click to launch AMS With this application you can access your personalized workspace envir...

Page 48: ...ocal devices like Internal My Folder or connected USBs The icon next to Google Drive Dropbox shows that the account is bound to AMS service 2 Folder Path You can browse the file folder in this area 3...

Page 49: ...g into your account to customize the display and administer all of the mobile devices from a single website Use your mouse or cursor to control the mouse pointer Adding Meeting Room 365 widget To add...

Page 50: ...n on the home screen launcher Go to START to proceed 4 Enter Meeting Room 365 display key You can scan the QR code to see the introduction of Meeting Room 365 in BenQ software partner page 5 You can s...

Page 51: ...th Android OS 51 6 You can see upcoming five days schedule for more information Meeting Room information 1 Select Meeting Room Information 2 Long press the OK button on the remote control to enter the...

Page 52: ...he functions shown on the screen Supported image format maximum resolution Icon Function Preview thumbnails of photos in the same folder Play the previous image Play pause the current playback Play th...

Page 53: ...Repeatedly play audio files in the playlist Play the previous audio file Play pause the current audio file Play the next audio file Check the audio information File Format Audio Codec Supported range...

Page 54: ...Layer3 MPEG1 2 layer3 Sample Rate 8K 48KHz Bit Rate 32K 320Kbps ogg Vorbis Vorbis Sample Rate 8K 48KHz Bit Rate max 256Kbps wav WAV LPCM Sample Rate 8K 192KHz Bit Rate max 320Kbps Icon Function Rewin...

Page 55: ...PEG 2 1920 1088 30 Fps 80Mbps MPEG 4 1920 1088 30 Fps 50Mbps MJPEG 1920 1080 30 Fps 150Mbps flv H 263 MPEG1 2 Layer3 AAC 1920 1088 30 Fps 5Mbps VP6 1920 1088 30 Fps 40Mbps H 264 3840 2160 30 Fps 160Mb...

Page 56: ...Mbps MPEG 1 1920 1088 30 Fps 80Mbps MPEG 2 1920 1088 30 Fps 80Mbps ts H 264 AACAAC MPEG1 2 Layer3 3840 2160 30 Fps 160Mbps H 265 3840 2160 60 Fps 160Mbps MPEG 2 1920 1088 30 Fps 80Mbps MPEG 4 1920 108...

Page 57: ...ror content from a personal device to the display and vice versa This feature lets users easily share content with all devices in a meeting Use your mouse or cursor to control the mouse pointer Two wa...

Page 58: ...se InstaShare 2 1 Make sure your mobile device such as smartphone or tablet and the display are connected to the same network 2 Press How to Cast to download and install the InstaShare 2 app on your m...

Page 59: ...t once you enable Confirm Before Casts Contents the casting should be allowed on the display or by the host 4 Enter the connect code shown on the upper right corner of the display or you can also find...

Page 60: ...en on your mobile device by clicking Screen Mirroring on your mobile device Mirror the device s screen on the display by clicking on your mobile device Operate the display by using your mobile device...

Page 61: ...to page or image you want to print 2 Click Manage Printers to choose which printer that you want to use 3 To select a printer Click an option from the list of available printers on the left panel Clic...

Page 62: ...ith WPS Office 1 Click Open on the left panel to browse and open a file located in either the display s internal memory an external storage device or cloud storage 2 Click the function menu on the top...

Page 63: ...pply or adjust the timing of a transition Pen Click to write draw paint or sketch to the slides Play Click to start a slide show Save As Click to save the presentation file on either the display s int...

Page 64: ...to launch Email To use Email set up an account first Type your Email address and click NEXT After you ve signed up you will receive a verification email After you respond to the Email verification yo...

Page 65: ...unch the Floating Annotation Toolbar menu as shown below Icon Function Description Close and Move Click the button to close and move the floating toolbar and clear all the brushes Annotate Click to sw...

Page 66: ...SwitchQ Click to switch tasks between recent apps and input sources Duo Windows Click to open Duo Windows Read Duo Windows on page 67 for more information Duo OS Click to open Duo OS Read Duo OS on p...

Page 67: ...fect collaboration and co creation scenario Use your mouse or cursor to control the mouse pointer Duo Windows With Duo Windows you can use two Apps at the same time Duo Windows makes the collaboration...

Page 68: ...68 3 Now you can start the collaboration of two Apps using Duo Windows To replace the existing Apps in the left right windows click Duo Windows and choose the newly selected App to replace the previou...

Page 69: ...ting window in any Apps The floating window shows the current screen image of the external source HDMI 1 HDMI 2 HDMI 3 VGA OPS The current screen image can be saved as an image file To use Duo OS foll...

Page 70: ...Apps 70 2 Enlarge or shrink the window or swiftly change to full screen is for full screen There are three window sizes Small Middle Large is for entering Windows is for going back to Android...

Page 71: ...Working with Android OS 71 3 Select the external source or switch source...

Page 72: ...Apps 72 4 You can save the current screen image as an image file...

Page 73: ...Working with Android OS 73 5 You can also capture the current screen image and import the image to EZWrite 5 0...

Page 74: ...Duo Boards follow the steps below Pairing mode 1 Keep the two displays next to each other A notification window will pop up asking if you want to pair the two displays 2 Select Pair to proceed After t...

Page 75: ...Working with Android OS 75 4 Click to unpair the displays Remote link transfer files 1 Open DuoBoard from APPs...

Page 76: ...76 2 Select Remote Link 3 Select the display to be linked and request pairing 4 The remote link is successful when Paired is shown on the screen You can start selecting and transferring files to each...

Page 77: ...Working with Android OS 77 5 Click to unpair the displays...

Page 78: ...gs with any other Blizz users 1 On the home screen select Apps Blizz 2 Select Sign In if you want to create a new meeting select Join a Meeting if you want to join an already created meeting After sig...

Page 79: ...ings by allowing them to start timers or search the Internet from anywhere in the room Already enable AMS service but did not bind your Amazon account to it If you already enable Multi Account Mode an...

Page 80: ...ed 4 It will then show the instruction for the setup Follow the instruction on the screen to complete the setup 5 Download and install Alexa app on your phone Search Saffi and enable it 6 The setup is...

Page 81: ...01 1428 48 x 803 52 CS7501 1649 664 x 927 936 CS8601 1895 04 x 1065 96 Input Computer VGA IN x 1 Video HDMI IN x3 2 0 Audio Line in 3 5 mm jack x 1 USB Type A x 6 2 0 x 3 3 0 x 3 Type B x 2 Control RS...

Page 82: ...8 CS7501 9 9 9 13 3 CS8601 13 9 13 9 13 9 23 4 Specifications and functions are subject to change without notice Item CS6501 CS7501 CS8601 System CPU ARM A73 2 A53 2 quad core Hisi V811 System Memory...

Page 83: ...Product information 83 Dimensions CS6501 Unit mm 287 1 287 1 7 9 5 23 1 1 23 1 1 7 9 5 028176 5 7 5 37 0...

Page 84: ...Product information 84 Dimensions CS7501 Unit mm 287 1 23 1 1 7 9 5 7 9 5 23 1 1 287 1 02817 6 5 7 5 37 0...

Page 85: ...Product information 85 Dimensions CS8601 Unit mm 287 1 23 1 1 7 9 5 7 9 5 23 1 1 287 1 028176 5 7 5 37 0...

Page 86: ...1152 x 864 60Hz 1280 x 720 50Hz 1280 x 768 60Hz 1280 x 800 60Hz 1280 x 960 60Hz 1280 x 1024 60Hz 1360 x 768 60Hz 1366 x 768 60Hz 1400 x 1050 60Hz 1440 x 900 60Hz 1600 x 900 60Hz 1680 x 1050 60Hz 1920...

Page 87: ...Product information 87 720p 50Hz 720p 60Hz 1080i 50Hz 1080i 60Hz 1080p 50Hz 1080p 60Hz supported Vacant not supported Display Port HDMI timing table should follow EDID1 4 or EDID2 0...

Page 88: ...n and try again No sound Check the following Have you turned on the mute function on the display or the input source device Turn off the mute function or increase the audio volume level and try again...

Page 89: ...trode in the remote control is correct Check whether remote control needs to replace battery Machine automatically shutdown Whether set sleep or not Check whether there is sudden power outage Check wh...

Page 90: ...Check whether mute button is pressed for mute Press VOL VOL to adjust volume Check whether audio line is connected correctly Only one speaker has sound Adjust sound balance in menu Check whether compu...

Reviews: