background image

Eng
lish

Using the Camera

8

3.3.3 Capture mode

3.3.3.1

Getting started with capturing images

1. Press [

] for more than one second to turn on 

the camera.

2. Compose your image in the LCD monitor in the 

capture mode.

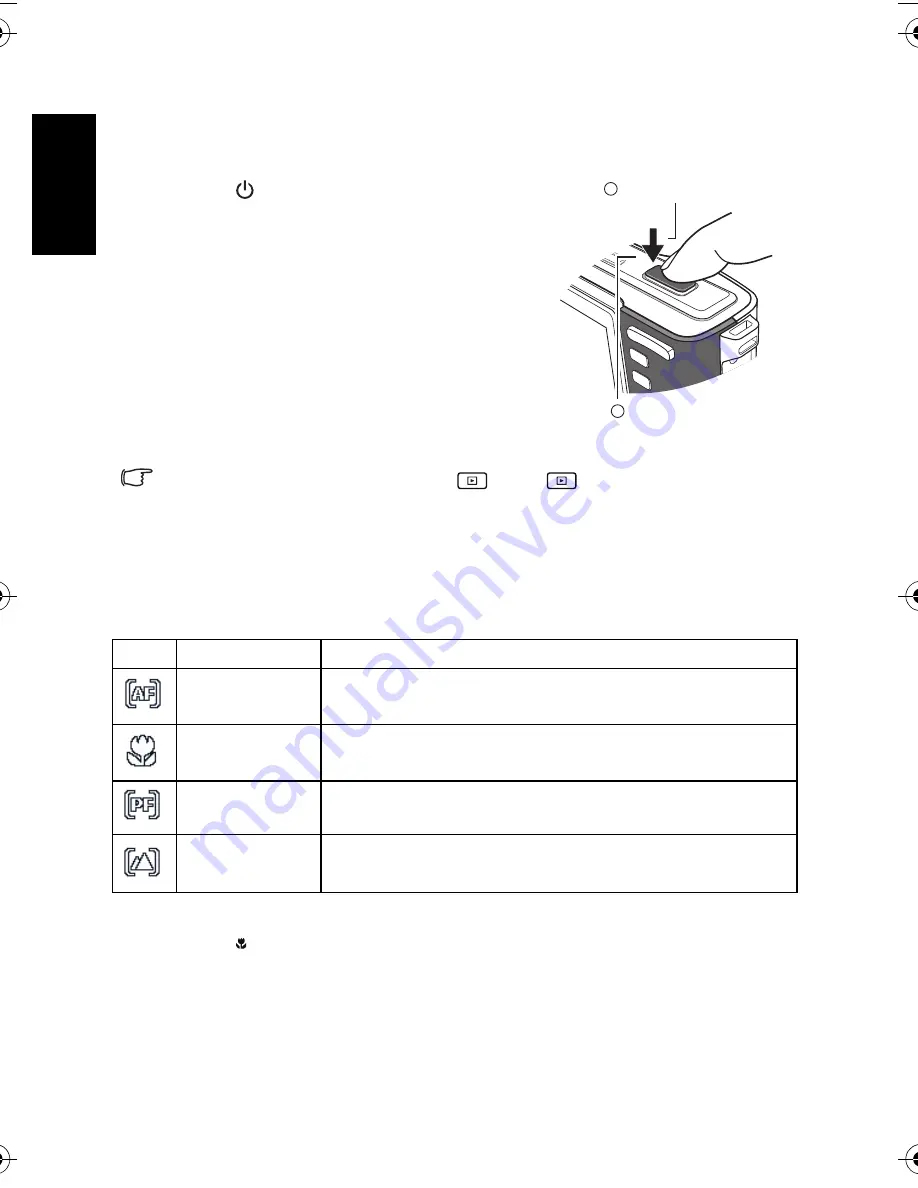
3. Press the shutter button down halfway (1), and 

then press it down fully (2).

Pressing the shutter button down halfway 
automatically focuses and adjusts the 
exposure.

The focus area frame turns yellow-green when 
the camera is focused and the exposure is 
determined.

When the focus or exposure is not suitable, the 
frame of the focus area turns red.

• To review the last captured image, press 

. Press 

 again to return to the capture 

mode.

• The LCD monitor looks darker in strong sunlight or bright light. This is not a malfunction.
• To prevent your images from being blurred while pressing the shutter button, always hold 

the camera steady. This is especially important when you are shooting under low lighting 
conditions, under which your camera may reduce the shutter speed to ensure your 
images are properly exposed.

3.3.4 Using the focus mode

1. Turn the power on, and set the camera to the capture mode.

2. Press [

] to toggle between different focus modes.

Icon

Focus mode

Description

Auto focus

Adjusts focus automatically.

Macro

Used when capturing images at close distance.

Pan Focus

Used when you want to capture the subjects in a certain focus 
range.

Infinity

Used when capturing images at long distance.

1

2

Press down halfway.

Press down fully.

DSC_C1020_UM CD EN.book  Page 8  Monday, March 2, 2009  12:00 PM

Summary of Contents for C1020

Page 1: ...DC C1020 Digital Camera User Manual ...

Page 2: ...for informational purposes only Disposal of Waste Electrical and Electronic Equipment by users in private households in the European Union This symbol on the product or on the packaging indicates that this can not be disposed of as household waste You must dispose of your waste equipment by handing it over to the applicable take back scheme for the recycling of electrical and electronic equipment ...

Page 3: ...etermined by turning the equipment off and on the user is encouraged to try to correct the interference by one or more of the following measures Reorient or relocate the receiving antenna Increase the separation between the equipment and receiver Connect the equipment into an outlet on a circuit different from that to which the receiver is connected Consult the dealer or an experienced radio TV te...

Page 4: ...al circuit and become quite hot Exercise care in handling any charged battery particularly when placing it inside your pocket purse or other container with metal objects Do not dispose of batteries in fire as they may explode To prevent electric shock do not attempt to disassemble or repair your camera by yourself Some camera models accept non rechargeable batteries When using these batteries do n...

Page 5: ...ler Under no circumstances should you push the lens back manually as this may damage the camera All original accessories are designed only for use with this camera model you purchased Do not use these accessories to other camera models or cameras of other brands to avoid unpredictable danger or damage Before initial use of a memory card always format the card first using the camera Remember to sli...

Page 6: ...ert batteries with full power ASAP When the camera is not in use always turn the power off and make sure the lens has retracted successfully before storing the camera in its case If you do not intend to use the camera for a long time please remove the batteries from the camera and store the batteries carefully Keep your camera away from sharp objects and avoid collision When the camera is not in u...

Page 7: ...etting 7 3 3 2 1 Setting the language 7 3 3 2 2 Setting the date and time 7 3 3 3 Capture mode 8 3 3 3 1 Getting started with capturing images 8 3 3 4 Using the focus mode 8 3 3 5 Flash mode 9 3 3 6 Drive mode 9 3 3 7 Using the zoom function 10 3 4 Menu options 10 3 4 1 Changing the mode 10 3 4 1 1 Switching between capture and playback modes 10 3 4 1 2 Selecting the shooting mode 11 3 4 2 Using t...

Page 8: ...Detector 20 3 8 Playback 21 3 8 1 Playing back images 22 3 8 2 Playing back movie clips 22 3 8 3 Adjusting the playback volume 22 3 8 4 Magnifying trimming still images 22 3 8 5 Viewing in thumbnail 23 3 8 6 Playing a slideshow 23 3 8 7 Deleting a single file or all files 23 3 8 8 Deleting multiple files 24 3 8 9 Setting the startup screen 24 3 8 10 Setting the DPOF for printing 24 3 8 11 Other pl...

Page 9: ...rance may vary depending on sales region If any of the items are missing or appear to be damaged contact your dealer Save the packaging in case you need to ship your camera for service All electronic accessories such as USB cable are designed to work with this BenQ digital camera model only Do not use them with other digital camera models to avoid possible damage 1 Quick Guide User Manual 2 Digita...

Page 10: ...ker 5 PC USB AV Out terminal 6 Lens 7 Microphone 8 Self timer LED D C C 10 20 3 X OPTICAL ZOOMLEN S f 6 2 18 6mm F 2 8 5 2 1 LCD monitor 2 W Wide Zoom out turn off the Shooting mode description or enter the thumbnail view Playback mode 3 T Tele Zoom in or turn on the Shooting mode description 4 Strap eyelet 5 Playback mode button Toggle between Capture and Playback modes 6 Menu 7 Status LED 8 Navi...

Page 11: ...he LCD display may have some light spots or show unusual colors This is normal and does not indicate display malfunction nor will this affect the pictures you take with the camera Indicator State Description Status LED No light The digital camera is off Solid green The digital camera is ready to capture images Blinking green The digital camera is powering on and cannot focus or capture video clips...

Page 12: ...upward and then open the battery cover 3 Remove the batteries Please select the correct battery type before use see Battery Type on page 15 for details High capacity such as 2500 mAh rechargeable batteries are recommended Carbon zinc batteries are not recommended Remove the batteries from the camera if you do not intend to use the camera for a long time If the lens cannot retract into the camera p...

Page 13: ...amera is turned off Press lightly on the edge of the memory card and it will eject Be sure to format the SD memory card with this camera before the initial use To prevent valuable data from being accidentally erased from an SD memory card you can slide the write protect tab on the side of the SD memory card to LOCK To save edit or erase data on an SD memory card you must unlock the card SD memory ...

Page 14: ...y vary depending on the shooting mode you select 1 Shooting mode 10 Face tracking 2 Flash mode 11 ISO 3 Focus mode 12 White balance 4 Drive mode 13 AE metering 5 AEB 14 EV compensation 6 S S F 15 AF area 7 Number of shots available 16 Histogram 8 Image size 17 Battery status 9 Image quality 18 Camera shake warning 1 Up or Play video playback only 2 Focus mode or left 3 Down 4 Flash mode or right 5...

Page 15: ...the camera is turned on for the first time 1 Press and then press to move to the Setup menu 2 Press or to move to Language and then press or Steps 1 and 2 are skipped when the camera is turned on for the first time 3 Press or to locate the language you want 4 Press to set the language 3 3 2 2 Setting the date and time You need to set the date and time when the camera is turned on for the first tim...

Page 16: ... the capture mode The LCD monitor looks darker in strong sunlight or bright light This is not a malfunction To prevent your images from being blurred while pressing the shutter button always hold the camera steady This is especially important when you are shooting under low lighting conditions under which your camera may reduce the shutter speed to ensure your images are properly exposed 3 3 4 Usi...

Page 17: ...ure to ask the subject to look at the camera lens or get as close to the camera as possible The flash fires automatically based on the photographic conditions Force On The flash always fires regardless of the surrounding lighting conditions Select this mode when capturing images with high contrast backlighting and deep shadows Slow Sync Fires the flash immediately at the beginning of exposure with...

Page 18: ...a switches to the digital zoom automatically and zooming continues You can use optical zoom in movie capturing 3 Press the shutter button to take a picture 4 To turn digital zoom on or off Press and then press to select the capture menu Press to select Digital Zoom and then press or to launch the submenu Press to select On or Off and press to apply the setting Press to close the menu 3 4 Menu opti...

Page 19: ...ge file Landscape Captures a scene in the distance with the focus area set to infinity and a lower aperture value The maximum depth of view can also be achieved Backlight Increases exposure by turning on the flash when light illuminates the subject from behind Night Scene Captures photos in a low light environment such as in the evening or at night Building Enhances lines contracts to highlight th...

Page 20: ...ress to close the menu 3 4 2 1 Capture menu list still image Sunset Captures the warmth and atmosphere represented by hue of sunrise or sunset Voice Rec Voice Record Captures background sound only no images or videos When listening to the captured audio file later you can see a unique icon that appears on the screen and indicates that this is an audio file Menu item Available settings Resolution Q...

Page 21: ... described here AEB Off On Highlight Off highlighted in the rectangular area surrounded by the four corners highlighted in the portrait area highlighted in the horizontal portrait area Sharpness High Normal Low Effect Normal B W Sepia Negative Vivid Red Vivid Green Vivid Blue Date Stamp Off Date Date Time S S F Off On Face Tracking Off On Photo Frame Off Choose one out of 10 frames Digital Zoom Of...

Page 22: ...ter shooting During instant review half press the shutter to return to the capture mode LCD Save Off The LCD screen remains bright when the camera is idle On For power conservation the LCD screen is dimmed automatically after 5 seconds Power Save Off The camera remains on when idle 1 min For power conservation the LCD screen is turned off automatically after a period of time you set 3 min 5 min Da...

Page 23: ... there is no card inserted A Busy please wait message displays while the memory card is being formatted A Completed message displays when formatting is finished All data will be deleted including protected files Be sure to download important files to your computer before formatting Battery Type To ensure the camera displays battery level correctly set the type to match the batteries used Carbon Zi...

Page 24: ...hutter again to end capturing The camera will stop capturing automatically when the memory capacity has been reached 3 6 Capturing audio clips 1 Turn the power on and set the camera to the voice capture mode 2 Press the shutter button to start capturing Audio is captured from the microphone of the camera Be careful to avoid touching the microphone while capturing 3 Press the shutter button again t...

Page 25: ...an exposure based on a single reading taken from the center of your picture Icon Mode Description Auto Automatically corrects white balance Ideal for general photography Daylight Adjusts for bright sun conditions or natural light conditions Cloudy Adjusts for cloudy days or twilight conditions Tungsten Adjusts for normal indoor lighting conditions Corrects the orange hue of household light bulbs I...

Page 26: ...ages in the capture or playback mode Icon Mode Description High The edges of the image are emphasized The edges will become sharp but noise may occur in the captured image Normal The edges of the image are sharp This is suitable for printing Low The edges of the image are softened This is suitable for editing images on PC Icon Mode Description Normal No effect is added to the image capture mode on...

Page 27: ... Focus and infinite focus range will automatically be set to normal when face tracking is enabled 3 7 13 Setting photo frame You can add 10 kinds of frames to still images making them more interesting 3 7 14 Setting Av Tv M Pressing the Av Tv M button toggles between the current shooting mode Aperture priority Av or A Shutter priority Tv or S and Manual M when determining the exposure value Apertu...

Page 28: ...eaves your composition area Face tracking one face only is always on in the Smile Catch mode 3 7 16 Smart Scene Smart Scene automatically selects the best shooting mode from Backlight Landscape Macro Portrait and Night Scene 1 In the capture mode press and select 2 Press the shutter halfway to set automatic focus The selected shooting mode is displayed in the top left corner of the screen 3 Press ...

Page 29: ...camera is in the Playback mode 2 Indicates that the file is protected and cannot be deleted 3 Indicates the file is marked for printing 4 Indicates this file has a voice memo or the file is an audio file 5 Displays the shooting parameters when you took the picture or playback controls Press to toggle between different displayed information 6 Date and time when the file was created 7 File number 8 ...

Page 30: ...ill image in the VGA format While pausing video playback you can view the video frame by frame Press to fast forward one frame or press to rewind one frame Press and hold to fast forward frame by frame continuously or press to rewind frame by frame continuously 3 8 3 Adjusting the playback volume 1 Turn the power on and set the camera to the playback mode 2 Press or to select a video clip audio cl...

Page 31: ... the camera to the playback mode 2 Enter the slideshow Press and use to select Slideshow and press or 3 Change the slideshow settings Use the four way control to set the slideshow interval music transition and repeat You can set the interval between 1 10 seconds 4 Play the slideshow Press to select Start and press or to play the slideshow During the slideshow press to pause the slideshow and press...

Page 32: ...n select Yes and press All selected images will be deleted To cancel delete press in this step 3 8 9 Setting the startup screen You can set the welcome image that is displayed when the camera is powered on 1 Turn the power on and set the camera to the playback mode 2 Open the menu Press then use to select the playback menu Press to select Startup Image and press or 3 Press to select My Photos and ...

Page 33: ...y the number of copies for the current image Press to set or cancel the date stamp of the current image 5 After you complete all image settings press to apply them 3 8 11 Other playback functions You can also protect lock images from being deleted edit images copy files or enter setup for more options To do so press in the playback mode and select a function Photo Frame Back Back OK MENU Enter Ent...

Page 34: ...ep 1 Connect the digital camera to your computer 1 Connect the supplied USB cable to the computer USB port and turn on the camera 2 The LCD screen turns off when the connection to the computer has been successfully completed ArcSoft PhotoImpression 5 Combines photo editing with creative enhancement and sharing tools that maximize your digital media experience ArcSoft VideoImpression 2 Creates mult...

Page 35: ...uble click on the DCIM folder to find more folders Your images are inside these folder s Select the desired still images or video clips and then choose Copy from the Edit menu Open the destination location folder and choose Paste from the Edit menu You may also drag and drop image files from the digital camera to a desired location Memory card users may prefer to use a memory card reader highly re...

Page 36: ...ra or flash was used continuously over a long period of time The flash does not fire The flash does not recharge The camera flash is turned off Set the flash to Auto Flash The light source is sufficient The flash is not available in some modes Even though the flash fired the image is dark The distance to the subject is greater than the flash s effective range Get closer to the subject and shoot Th...

Page 37: ... screen stops flashing The camera does not recognize the memory card Format the memory card before the initial use or before using with another camera After connecting the camera to a computer an error message Device not ready or Camera not ready appears The computer runs on Windows 98 or earlier When connecting the camera to a computer the computer freezes The memory card inside the camera may no...

Page 38: ...1 2000 1 sec Night Scene 8 sec Fireworks 2 sec White Balance Manual 6 modes in manual selection Daylight Cloudy Tungsten Fluorescent H Fluorescent L Manual Exposure 2 0 2 0 EV 0 3EV step ISO Auto 100 200 400 800 1600 3200 ISO 3200 for resolution 3M or under only Flash Auto Flash Auto Anti Red eye Force On Slow Sync Force Off Drive Mode Off 10 sec 2 sec Double Burst Power Source AA Battery x 2 Stor...

Page 39: ...English Service Information 31 6 Service Information Technical Support For further services product information user manual and news releases visit the following web site http www BenQ com ...

Reviews: