background image

5

RE-6

 & RE-6NC

 VALVES SERVICE 

APPLICATION

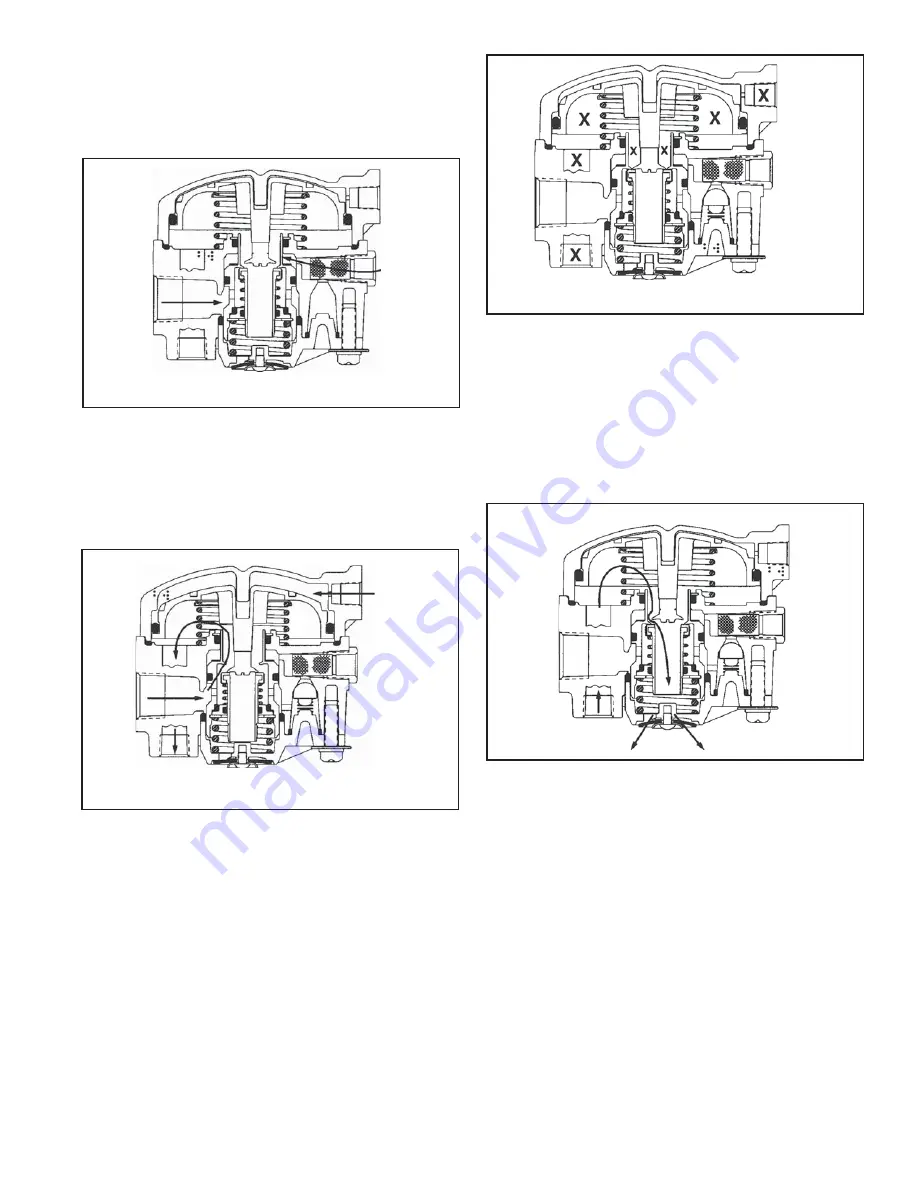
During normal, service braking operation, the valve serves 
as a relay valve, synchronizes tractor service (application) 

enough to allow the inlet / exhaust valve to re-seat on the 
emergency piston and close the inlet / exhaust valve.  Air 
is trapped between the seal of the emergency piston and 
inlet / exhaust valve and the service chambers, making the 
service brake application.  The entrapment of air constitutes 
the holding position of the valve.  At this time, no air is 
fl owing through the valve.  Refer to Figure 9.

air pressure with trailer service (application) air pressure 
as the service foot brake valve on the tractor is operated.  
If the tractor is equipped with a trailer hand (TC) valve, the 
trailer brakes can be applied independently of the tractor 

RE-6NC

 Relay Valve

RESERVOIR 

70 PSI

EMERGENCY 

SUPPLY

70 PSI

FIGURE 7 

RE-6NC

 RELAY VALVE CHARGING ABOVE 70 

PSI

FIGURE 8 

RE-6

 & RE-6NC

 RELAY VALVES SERVICE 

APPLICATION

CHAMBER 

APPLICATION 

10 PSI

SERVICE 

BRAKE 

APPLICATION 

10 PSI

FIGURE 9 

RE-6

 & RE-6NC

 RELAY VALVES SERVICE 

HOLD

CHAMBER 

HOLD 5 PSI

SERVICE 

HOLD

5 PSI

NO AIR FLOW

brakes.  Air is applied to the control  port of the RE-6

 and 

RE-6NC

 valves, acting on the primary piston and moving 

the inlet / exhaust valve away from the seat on the 
emergency piston.  Service application allows air to fl ow 
from the reservoir, past the shoulder (on the emergency 
piston) to the underside of the relay piston and on to the 
service chambers to apply the brakes.  Refer to Figure 8.

RE-6

 & RE-6NC

 VALVES SERVICE HOLD

Air is still being applied to the control port of the RE-6


and RE-6NC

 valves, but the relay piston has moved 

FIGURE 10 

RE-6

 & RE-6NC

 RELAY VALVES SERVICE 

EXHAUST

0 PSI

RE-6

 & RE-6NC

 VALVES SERVICE EXHAUST

When air is removed from the control port of the RE-6

 and 

RE-6NC

 valves, the relay piston moves upward.  As the 

air is let off the control port, the relay piston moves from 
its seat on the inlet / exhaust valve, opening the exhaust 
path to atmosphere.  Air fl ows from the service chambers, 
past the relay piston, through the emergency piston and 
inlet / exhaust valve to atmosphere past the diaphragm.   
Refer to Figure 10.

Summary of Contents for RE-6 RELAY EMERGENCY VALVE

Page 1: ...6NC RELAY VALVE SPECIAL IDENTIFICATION TAG RE 6NC SPECIAL XXXXXX SVC REPL XXXXXX Bendix RE 6 and RE 6NC Relay Valves FIGURE 1 RE 6 RE 6NC RELAY VALVES CAP SCREW SEALING RING O RING RELAY PISTON SERVI...

Page 2: ...voir Single Check Valve R 12P Valve SV 4 Valve Bulkhead Drain Valve PR 3 Valve Trailer Gladhand Single Check Valve RE 6 RELAY VALVE DOLLY SYSTEM CONFIGURATION Bulkhead SV 4 Valve RE 6 Valve Slack Adju...

Page 3: ...e acts upon the emergency piston pushing the emergency piston toward the inlet exhaust valve seat System pressure in the chambers and reservoir are still at 0 psi in the RE 6NC valve system allowing f...

Page 4: ...g drive away In the RE 6NC valve air is still acting upon the emergency piston but there is no pressure in the reservoir and the chambers The emergency piston and inlet exhaust valve have moved to the...

Page 5: ...10 PSI SERVICE BRAKE APPLICATION 10 PSI FIGURE 9 RE 6 RE 6NC RELAY VALVES SERVICE HOLD CHAMBER HOLD 5 PSI SERVICE HOLD 5 PSI NO AIR FLOW brakes Air is applied to the control port of the RE 6 and RE 6...

Page 6: ...nts 3 Do not attempt to install remove disassemble or assemble a component until you have read and thoroughly understand the recommended procedures Use only the proper tools and observe all precaution...

Page 7: ...ust port Leakage of a 1 bubble in 5 seconds is permissible 4 Make and hold a full brake application and again apply a leak check solution to the RE 6 or RE 6NC valve s exhaust Leakage of a 1 bubble in...

Page 8: ...nspect all air line fittings for corrosion Replace as necessary Remove all old thread sealant before reuse ASSEMBLY Before assembly lubricate all o rings seals and pistons as well as body and cover bo...

Page 9: ...in the maintenance kit INLET EXHAUST VALVE ASSEMBLY O RING 7 SPRING 5 SEALING RING 6 A O RING 8 O RING 2 O RING 13 O RING 14 O RING 19 O RING 21 SPRING 18 SPRING 20 SPRING 12 CHECK VALVE 17 SEAT 4 RE...

Page 10: ...ecks may be made With air pressure present at outlet side of check valve and the inlet side open to atmosphere coat the open end of the check valve with soap suds a 1 bubble in 5 seconds is permissibl...

Page 11: ...11...

Page 12: ...12 BW1570 2007 Bendix Commercial Vehicle Systems LLC All rights reserved 7 2007 Printed in U S A...

Reviews: