BENDIX EC-60 ABS Service Data Download Page 31

31

Pressure Modulator Valve Repair Tests:

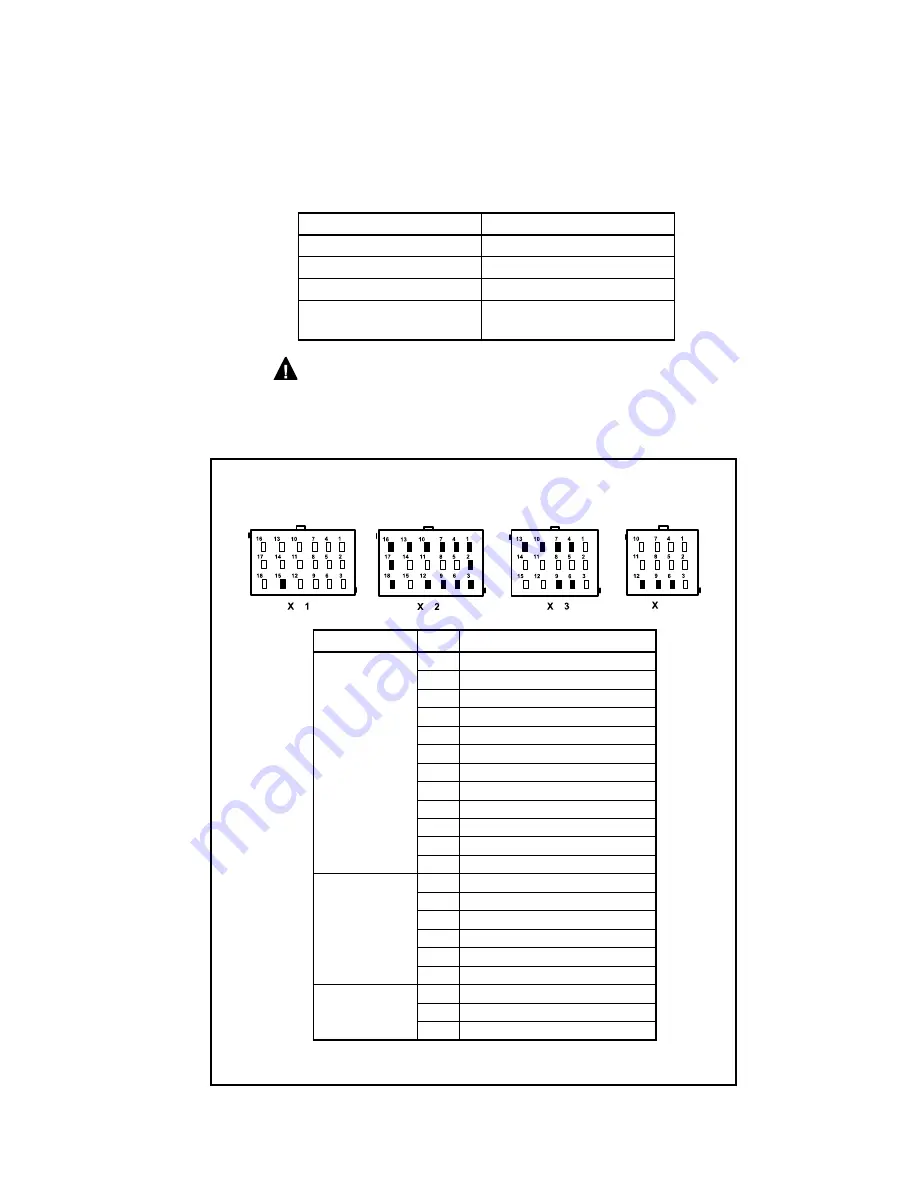
1.  Take all measurements at ECU harness connector pins in 

order to check wire harness and PMV.  Probe the connector 

carefully so that the terminals are not damaged.

2.  Pressure modulator resistance should read:

Location

Measurement

Release to Common

4.9 to 5.5 Ohms

Hold to Common

4.9 to 5.5 Ohms

Release to Hold

9.8 to 11.0 Ohms

Release, Hold, Common to 
Voltage or Ground

Open Circuit (no continuity)


CAUTION

:

 When troubleshooting modulator trouble 

codes, check inactive trouble codes and event history for over-

voltage or excessive noise trouble codes.  If one of these is 

found, troubleshoot these trouble codes first before the PMV.

Cab-mount ECU: Looking into 

wire harness connector

4

Connector

Pin PMV Location

X2

18 Way

1

Left Steer Axle Hold

2

Left Steer Axle Release

3

Left Steer Axle Common

4

Right Steer Axle Hold

6

Right Steer Axle Common

7

Right Steer Axle Release

9

Right Drive Axle Common

10 Right Drive Axle Hold
13 Right Drive Axle Release
12 Left Drive Axle Common
16 Left Drive Axle Hold
17 Left Drive Axle Release

X3

15 Way 

(if ECU is 

configured for 

6 modulators)

4

Left Additional Axle Hold

6

Left Additional Axle Common

7

Left Additional Axle Release

9

Right Additional Axle Common

10 Right Additional Axle Hold
13 Right Additional Axle Release

X4

12 Way

6

Trailer PMV Hold

9

Trailer PMV Release

12 Trailer PMV Common

Summary of Contents for EC-60 ABS

Page 1: ...ain limited variations of an approved vehicle platform are permitted without further validation of the ESP system application ESP stability system consists of Yaw Control YC and Roll Stability Program...

Page 2: ...ated or electrically charged components Do not attempt to install remove disassemble or assemble a component until you have read and thoroughly understand the recommended procedures Use only the prope...

Page 3: ...QR Pressure Modulator Valves 4 5 or 6 depending on configuration Dash mounted tractor ABS Indicator Lamp Service brake relay valve Dash mounted trailer ABS Indicator Lamp Optional blink code activatio...

Page 4: ...tic Traction Control ATC feature of our ABS system to provide improved traction at low speeds e g pulling away on an inclined ramp or in slippery conditions such as mud or snow covered surfaces etc Wh...

Page 5: ...Inputs The ECU operates at a nominal supply voltage of 12 or 24 volts depending on the ECU The battery input is connected through a 30 amp fuse directly to the battery The ignition input is applied by...

Page 6: ...d All Wheel Drive AWD use the status of the stop lamp to determine when the driver makes a brake application This can be provided to the ECU via J1939 communications or hardware input Brake Demand Sen...

Page 7: ...er Mode Indicator Lamp Operation When the Bendix EC 60 controller is put into the Dynamometer mode for testing purposes theATC Indicator Lamp will be illuminated Retarder Relay Disable Output The reta...

Page 8: ...h the Hill Start Feature Hill Start Assist During HSA Event Lamp OFF Lamp remains ON if HSA DTC is present HSA Manually Disabled Flashes slowly Deep Mud Snow Mode Normal Off Flashes slowly every 2 5 s...

Page 9: ...assist maintenance personnel in verifying proper PMV wiring and installation When ignition power is applied each modulator solenoid is briefly energized If the air system is fully charged and the serv...

Page 10: ...on a steer axle wheel and a drive axle wheel Optional ABS Off Road Mode On some road conditions particularly when the driving surface is soft the stopping distance with conventional ABS may be longer...

Page 11: ...owing conditions 1 During power up e g when the vehicle is started until the ECU detects a service brake application 2 If the ECU receives a J1939 message indicating that the vehicle is parked 3 When...

Page 12: ...f How Yaw Control Operates Excessive speed exceeds the threshold creating a situation where a vehicle is likely to spin and jackknife The Bendix Yaw Control system reduces engine throttle and selectiv...

Page 13: ...the brake and even when the throttle is being applied CAUTION To minimize unexpected deceleration and reduce the risk of a collision the operator must Avoid aggressive driving maneuvers such as sharp...

Page 14: ...engaged ATC brake control and engine control along with drag torque control and ESP are turned off This test mode is used to avoid torque reduction or torque increase and brake control activation whe...

Page 15: ...e diagnostic trouble code is still controlled by using input from the remaining wheel speed sensor on the steer axle ABS remains active on the rear wheels ATC and ESP are disabled Drive Axle Additiona...

Page 16: ...le has a retarder device present the ECU will configure itself to communicate with the retarder device for improved ABS performance For example if the ECU detects the presence of a retarder disable re...

Page 17: ...s air brake system or any auxiliary pressurized air systems make certain to drain the air pressure from all reservoirs before beginning ANY work on the vehicle If the vehicle is equipped with a Bendix...

Page 18: ...nce issues REMOVAL OF THE STEERING ANGLE SENSOR Service Checks 1 Check all wiring and connectors Some installations also include an intermediate connector from the steering angle sensor to the main ve...

Page 19: ...he Yaw Rate Sensor on the vehicle the means of fastening the unit to the vehicle and the sensor s orientation must not be altered When servicing an identical component must be used in the same orienta...

Page 20: ...ly from body of sensor Pull gently on the mounting tab and connector until it disengages 2 Remove sensor from its pressure mounting using approved air brake push in fitting tools Installation 1 Obtain...

Page 21: ...s are 1 5 seconds 3 Pauses between blink code messages are 2 5 seconds 4 The lamp remains on for 5 seconds at the end of messages ECU DIAGNOSTICS The Bendix EC 60 controller contains self testing diag...

Page 22: ...s valid wheel speed from all wheel speed sensors Alternately codes may be cleared by pressing the diagnostic blink code switch 3 times to enter the Clear Active Diagnostic Trouble Code Mode or by usin...

Page 23: ...Configuration 1 No Stability Program 2 Electronic Stability Program ESP which includes RSP 3 Roll Stability Program RSP Only CHART 3 system configuration check Reconfigure ECU Mode Controller reconfig...

Page 24: ...ctive Diagnostic Trouble Code the RDU tool displays the first diagnostic trouble code by illuminating the red LEDs indicating the malfunctioning ABS component and its location on the vehicle See Figur...

Page 25: ...o be used to diagnose the EC 30 EC 17 Gen 4 Gen 5 and MC 30 ABS Controllers For more information on the Bendix application card visit www bendix com Nexiq at www nexiq com or your local authorized Ben...

Page 26: ...5 13 ECU page 36 14 Wheel Speed Sensors pages 27 28 15 Wheel Speed Sensors pages 27 28 16 Pressure Modulator Valves pages 30 31 17 Pressure Modulator Valves pages 30 31 18 Drive Axle Traction Control...

Page 27: ...ECU and the wheel speed sensor 4 Loss of Sensor Signal Adjust sensor to contact exciter ring Rotate wheel and verify a minimum of 0 25 VAC sensor output at 0 5 RPS Verify condition of sensor head Ver...

Page 28: ...ed Sensor Repair Tests 1 Take all measurements at ECU harness connector pins in order to check wire harness and sensor Probe the connector carefully so that the terminals are not damaged 2 Wheel speed...

Page 29: ...Check for damaged or corroded connectors and connections 3 Battery Voltage Too Low During ABS Measure battery voltage under load Check vehicle battery and associated components Check for damaged wiri...

Page 30: ...ound Verify no continuity between PMV leads and ground Verify 4 9 to 5 5 ohms from REL to CMN HLD to CMN and 9 8 to 11 ohms from REL to HLD Check for corroded damaged wiring or connectors between ECU...

Page 31: ...s If one of these is found troubleshoot these trouble codes first before the PMV Cab mount ECU Looking into wire harness connector 4 Connector Pin PMV Location X2 18 Way 1 Left Steer Axle Hold 2 Left...

Page 32: ...of vehicle controller Check for damaged or reversed J1939 wiring Check for damaged or corroded connectors Check for other devices inhibiting J1939 communications 6 J1939 ESP Messages Invalid Data Inva...

Page 33: ...Troubleshooting Tests 1 Take all measurements at ECU harness connector 2 Check for damaged or reversed J1939 wiring 3 Check for corroded or damaged wiring connector problems such as opens or shorts t...

Page 34: ...Open Circuit or Shorted to Ground Verify vehicle contains a retarder relay or Hill Start Assist HSA lamp Verify ECU configuration Check wiring between ECU and retarder relay or HSA lamp Verify no con...

Page 35: ...mentarily at key ON 15 21 Reserved 22 ESP Sensor Voltage Out of Range Incorrect supply voltage for the SAS 60 and the Yaw Rate sensor Verify proper voltage at sensor connectors Verify wiring between t...

Page 36: ...DTC or a misleading 13 8 or 13 18 DTC may result 9 ECU DTC 17 13 9 through 13 17 Check for damaged or corroded connectors Check for damaged wiring including power and ground wiring Clear the trouble...

Page 37: ...Description Repair Information 1 TCV Solenoid Shorted to Ground Verify 7 to 19 ohms between TCV and TCV common Verify no continuity between TCV leads and ground Check for corroded damaged wiring or c...

Page 38: ...gnal is invalid Verify proper installation of the SAS Verify proper wiring between the ECU and the SAS Check SAS output Verify that correct SAS is being used 7 SAS Gradient Error SAS signal is invalid...

Page 39: ...ltage Ground Verify open circuit no continuity 4 To perform a calibration procedure of the SteeringAngle Sensor ACom Diagnostics V4 0 or higher is required Using the program select the Configuration o...

Page 40: ...n of the YRS Verify proper wiring between the ECU and the YRS Check YRS output Verify that correct YRS is being used Verify proper ECU programming Perform YRS calibration procedure 10 YRS Normal Calib...

Page 41: ...option The following screen should be displayed 5 Follow the prompts to perform a calibration of the Yaw Rate Sensor 6 To test the Yaw Rate Sensor ACom V4 0 or higher is required Using BendixACom V4...

Page 42: ...proper wiring between the ECU and the YRS LAS Check YRS LAS output Verify that correct YRS LAS is being used Verify proper ECU programming Perform LAS calibration procedure 5 LAS Plausibility Error In...

Page 43: ...nsor ACom V4 0 or higher is required Using the program select the Component Test option followed by the ESP Test option The following screen should be displayed 6 Follow the prompts to test the Brake...

Page 44: ...al 4 TCV CMN DA PMV SA Right HLD PMV AA Left HLD Pressure Sensor Supply 5 TCV DA WSS SA Left TCV SA Brake Demand Secondary CKT Signal 6 ATC ESP Indicator and ATC ORS PMV SA Right CMN PMV AA Left CMN P...

Page 45: ...void contact with rotating elements Wiring must be properly secured approximately every 6 to 12 inches using UV stabilized non metallic hose clamps or bow tie cable ties to prevent pinching binding or...

Page 46: ...34145 12155975 WS 24 Wheel Speed Sensor Connectors Packard GT 150 series Packard Metripack 150 2 series Deutsch DTM06 series Packard Metripack 280 series female Packard Metripack 280 series male Deuts...

Page 47: ...peed Sensor Mounting Block 100 Tooth typical Speed Sensor Exciter Ring WS 24 Speed Sensor Hub Assembly WS 24 Speed Sensor 100 Tooth Exciter Ring Mounting Block Max Gap Sensor to Exciter 015 Inches Bra...

Page 48: ...48 FIGURE 20 STANDARD CAB WIRING SCHEMATIC Troubleshooting Wiring Schematic...

Page 49: ...ion IR Independent Regulation Acontrol method in which a wheel is controlled at optimum slip a point where retardation and stability are maximized The brake pressure that is best for the wheel in ques...

Page 50: ...Solenoid 8 If the 12 7 DTC does not reappear remove power and connect the X2 connector reapply power then clear all DTCs If the 12 7 DTC is no longer present connect the X3 connector and clear all DTC...

Page 51: ...792 8 5 6 DA Right WSS Erratic Sensor Signal 4 792 10 5 4 DA Right WSS Loss of Sensor Signal 4 792 13 5 7 DA Right WSS Tire Size Calibration 4 792 14 5 2 DA Right WSS Output Low Drive Off 5 793 1 14 1...

Page 52: ...97 5 9 6 DA Left PMV HLD Solenoid Open Circuit 45 798 3 10 5 DA Right PMV HLD Solenoid Shorted to Voltage 45 798 4 10 4 DA Right PMV HLD Solenoid Shorted to Ground 45 798 5 10 6 DA Right PMV HLD Solen...

Page 53: ...Open Miscellaneous DTCs 79 1069 13 12 10 Tire Size Out of Range Front to Rear Steering Angle Sensor DTCs 89 1807 2 21 3 SAS Static Signal 89 1807 2 21 4 SAS Signal Out of Range 89 1807 2 21 5 SAS Sign...

Page 54: ...ausibility Error Outside ECU Specific Limits 103 1808 2 22 16 Yaw Rate Sensor Vibration Detected 103 1808 9 22 5 YRS CAN Timeout Miscellaneous 151 611 14 12 18 wheel speed sensor failure in previous p...

Page 55: ...28 254 629 2 13 4 ECU 12 254 629 2 13 5 ECU 13 254 629 2 13 7 ECU 15 254 629 2 13 17 ECU 0D 254 629 2 13 18 Invalid ESP Configuration 254 629 12 13 1 ECU 02 254 629 12 13 2 ECU 10 254 629 12 13 3 ECU...

Page 56: ...21 13 07 254 02 0629 02 ECU 15 ON ON 22 13 08 254 13 0630 13 ECU 16 ON ON 23 13 09 254 13 0630 13 ECU 17 ON ON 24 13 10 254 12 0630 12 ECU 18 ON ON 25 13 18 254 02 0629 02 ECU 19 ON ON 26 13 11 254 1...

Page 57: ...69 02 1059 02 Open or Shorted Load Sensor ON 65 02 03 001 02 0789 02 SA Left WSS Open or Shorted ON ON 66 24 01 077 02 1067 02 Shorted Brake Demand Sensor Primary CKT Open ON 67 24 02 078 02 1068 02 S...

Page 58: ...3 10 06 045 05 0798 05 DA Right PMV HLD Solenoid Open Circuit ON ON 114 10 04 045 04 0798 04 DA Right PMV HLD Solenoid Shorted to Ground ON ON 115 10 05 045 03 0798 03 DA Right PMV HLD Solenoid Shorte...

Page 59: ...pen circuit 161 04 03 003 02 0791 02 DA Left WSS Open or Shorted ON ON 165 04 05 003 07 0791 07 DA Left WSS Wheel End ON ON 167 04 01 003 01 0791 01 DA Left WSS Excessive Air Gap ON ON 168 04 02 003 1...

Page 60: ...A Left PMV REL Solenoid Open Circuit ON ON 230 16 01 052 04 0799 04 AA Left PMV REL Solenoid Shorted to Ground ON ON 231 16 02 052 03 0799 03 AA Left PMV REL Solenoid Shorted to Voltage ON ON 232 11 1...

Reviews: