background image

22

5.3 AC APPLICATIONS

1. 

Start engine and make sure output indicator light (READY TO USE) is on.

2. 

Confirm all electrical appliances are switched off, and connect the 
appliance plugs to the generator receptacle.

3. 

Turn on the appliances.

4. 

Turn EcoMode ON.

NOTE


Confirm all electrical appliances are in good working condition before 
connecting them to the generator. If an electrical appliance becomes 
abnormal, sluggish, or stops suddenly, shut off the generator engine 
immediately, and disconnect the appliance.


Most appliances require more than their rated wattage upon startup.


For continuous operation do not exceed the rated output of the 
generator.


The grounding system is not connected to the AC neutral wire.


Neutral floating for AC system.

OFF

ON

STOP

OFF

1

2

3

4

1

2

3

4

Summary of Contents for BG4500i

Page 1: ...BG4500i MANUAL TM...

Page 2: ...to be valid It only takes a minute do it now while you still have your purchase receipt Support for your product is available online including parts service center locations and live expert advice Or...

Page 3: ...wed All information in this guide is based on information available at the time of print This guide or revised editions can be found on our website for download No part of this publication may be repr...

Page 4: ...Operation 23 5 5 Extending the Handle 24 6 Stopping the Engine 25 7 Maintenance 26 7 1 Maintenance Schedule 27 7 2 Changing the Oil 28 7 3 Cleaning the Air Filter 30 7 4 Spark Plug Service 31 7 5 Spa...

Page 5: ...g the generator read the user guide carefully Otherwise personal injuries or equipment damage may result Never run the generator in an enclosed area to avoid harm from exhaust emissions of a poisonous...

Page 6: ...enerator in rain or snow Do not allow any moisture to come in contact with the generator 1 2 AC SAFETY WARNING Before connecting the generator to an electrical device or power cord Make sure that ever...

Page 7: ...receptacle ground pin Electrical devices that require a grounded receptacle pin connection will not function if the receptacle ground pin is not functional 1 3 MAINTENANCE SAFETY WARNING After any ma...

Page 8: ...ng from vibration Have damaged items repaired or replaced as necessary Do not use plugs or cords that show signs of damage such as broken or cracked insulation or damaged blades If you start to feel s...

Page 9: ...the terminology below will make sure we re on the same page 2 1 COMPONENT IDENTIFICATION Telescoping Handle Control Panel Air Filter Maintenance Panel Recoil Grip Oil Maintenance Panel Fuel Cap Rear...

Page 10: ...120V 30A TT 30 Outlet 6 Electric Start Button 7 Fuel Valve 8 30A AC Breaker 9 EcoMode 10 Battery Power Switch 11 Ready to Use Indicator 12 Overload Indicator 13 Low Oil Indicator 14 5V 4 8A USB C and...

Page 11: ...lly shuts off when the charging circuit is overloaded If the current has exceeded its limits the breaker will automatically pop out to the OFF position Reduce the electrical load on the generator and...

Page 12: ...engine damage caused by an insufficient amount of oil in the crankcase Before the oil level in the crankcase reaches an unsafe limit the oil alert system will automatically shut down the engine the ba...

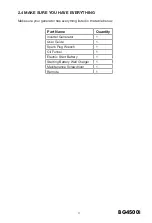
Page 13: ...e your generator has everything listed in the table below Part Name Quantity Inverter Generator 1 User Guide 1 Spark Plug Wrench 1 Oil Funnel 1 Electric Start Battery 1 Starting Battery Wall Charger 1...

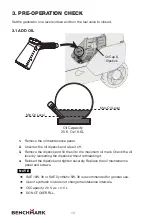
Page 14: ...l level by reinserting the dipstick without rethreading it 4 Reinsert the dipstick and tighten securely Replace the oil maintenance panel and screws NOTE SAE 10W 30 or SAE Synthetic 5W 30 is recommend...

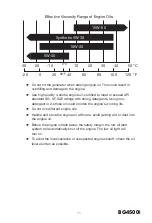
Page 15: ...e engine oil certified to meet or exceed API standard SG SF SAE ratings with strong detergents Using non detergent or 2 stroke oil could shorten the engine s working life Do not mix different engine o...

Page 16: ...starting the engine Gasoline substitutes such as gasohol are not recommended They may be harmful to the fuel system components NOTE Use of gasoline with an ethanol content greater than 10 can damage...

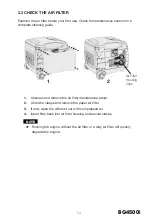
Page 17: ...remove the air filter maintenance panel 2 Undo the clasps and remove the paper air filter 3 If dirty clean the dirt dust out with compressed air 4 Insert filter back into air filter housing and secur...

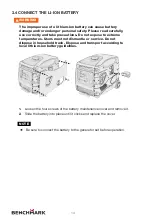
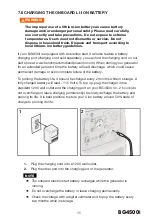
Page 18: ...o not expose to extreme temperatures Users must not dismantle or service Do not dispose in household trash Dispose and transport according to local lithium ion battery guidelines 1 Loosen the four scr...

Page 19: ...monoxide can build up in these areas Using a fan or opening windows and doors will NOT supply enough fresh air ONLY use a generator outdoors and far away from open windows doors and vents These openin...

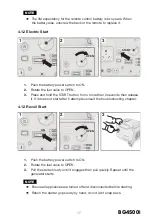
Page 20: ...the first time If there is no battery in the generator or the battery has died the generator can only be started using the recoil method If there is a battery and it is drained running the generator...

Page 21: ...ore than 2 seconds then release it If it does not start after 5 attempts consult the troubleshooting chapter 4 1 3 Recoil Start 1 Push the battery power switch to ON 2 Rotate the fuel valve to OPEN 3...

Page 22: ...ft the air fuel mixture will then be too lean for low altitude use Always use the correct Main Jet for your altitude The engine s carburetor governor if so equipped and any other parts that control th...

Page 23: ...with the replacement Main Jet needed for your altitude range 7 Replace the Fuel Cup Seal fuel cup Bolt Seal and bolt Tighten in place Do not cross thread bolt when tightening Finger tighten first and...

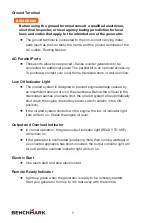
Page 24: ...r intended use This generator is floating neutral Use only grounded 3 prong extension cords in good condition ensure the wire size is sufficient to safely carry the generator s wattage See Chapter 1 2...

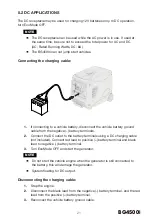
Page 25: ...cable from the negative battery terminals 2 Connect the DC outlet to the battery terminals using a DC charging cable not included Connect red lead to positive battery terminal and black lead to negati...

Page 26: ...iances are in good working condition before connecting them to the generator If an electrical appliance becomes abnormal sluggish or stops suddenly shut off the generator engine immediately and discon...

Page 27: ...llel cable For single unit operation the parallel cable must be removed The onboard generator outlets will not function when the parallel kit is plugged in 1 Make sure both generators are OFF 2 Connec...

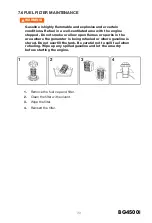
Page 28: ...e fuel cap and filter 8 7 2 Clean the filter with solvent 8 7 3 Wipe the filter and insert it 8 7 Cleaning Fuel Tank Filter e muffle 8 7 1 Remove the fuel cap and filter 8 7 2 Clean the filter with so...

Page 29: ...the fuel valve to CLOSED 3 Press the STOP button to turn off the generator 4 Switch the battery power to OFF NOTE Make sure the fuel valve is in the CLOSED position when stopping transporting and stor...

Page 30: ...o malfunction and can lead to serious injury Contact customer support if you have any maintenance questions General Inspection Tips Look for fuel leaks around the fuel tank fuel hose and fuel valve Cl...

Page 31: ...5 Hours or First Month Change engine oil Every 50 Hours or 6 Months Check and clean air filter1 Check and clean sediment cup Every 100 Hours or 12 Months Change engine oil2 Inspect clean spark arrest...

Page 32: ...pan underneath 2 Loosen the interior rubber plug by pulling on it from the top shown from below here to allow oil to drain down into the pan 3 Loosen the oil drain bolt and allow oil to drain complet...

Page 33: ...not mix different engine oils Handle and store the engine oil with care avoid getting dirt or dust into the engine oil Before the engine oil falls below the safety margin the low oil alert system will...

Page 34: ...retor Clean and maintain the air filter regularly especially in dusty areas NOTE Never run the generator without an air filter doing so will quickly degrade the engine 1 Unscrew and remove the air fil...

Page 35: ...a new one if the insulation is cracked or chipped Clean with a wire brush if the spark plug is reused 5 Measure the spark plug gap with a feeler gauge The normal value is 0 6 0 7mm 0 024 0 028in Adjus...

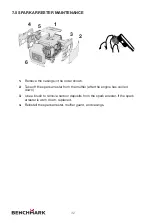
Page 36: ...r shown 2 Take off the spark arrester from the muffler after the engine has cooled down 3 Use a brush to remove carbon deposits from the spark arrester If the spark arrester is worn down replace it 4...

Page 37: ...any spilled gasoline and let the area dry before starting the engine 1 Remove the fuel cap and filter 2 Clean the filter with solvent 3 Wipe the filter 4 Reinsert the filter a brush to remove carbon d...

Page 38: ...ator to start See Starting the Engine for more details 1 Turn the battery power switch to ON 2 Push and hold the ON OFF electric start for 10 seconds then release to initiate remote sync The remote st...

Page 39: ...discharge which could cause permanent damage or even complete failure of the battery To prolong the battery life it should be charged every 2 months while in storage A fully charged battery will read...

Page 40: ...emove the cover 2 Remove the old battery and snap in the new battery 3 Reinstall the battery maintenance cover NOTE If the battery is dead start the generator manually The battery will charge while th...

Page 41: ...ndards regarding the emission control systems Tune up specifications are provided in the Specifications section and a description of the emission control system may be found in the appendix to this ma...

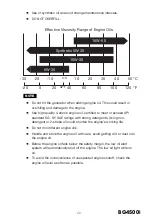
Page 42: ...placement parts other than those from an authorized service centre will void the warranty Air Index Models certified for sale in California An Air Index Information label is applied to engines certifi...

Page 43: ...arburetor Transporting the Generator 1 Do not overfill the fuel tank No residual fuel on the neck of tank 2 Do not use the generator in the vehicle The generator should ONLY be used while in a well ve...

Page 44: ...p prevent deposits from forming in the fuel system Turn the fuel switch to OPEN and loosen the carburetor drain bolt Take off the spark plug cap and revolve the engine 3 or 4 times by pulling the reco...

Page 45: ...trical appliance for any fault Check the electrical appliance for any fault Is the DC circuit protector OFF Stop the engine and then replace or repair the appliance Repair or replace the appliance Tur...

Page 46: ...ry power switch in ON Add the recommended oil Turn the battery power switch to ON Clean readjust the gap and dry the spark plug Replace if necessary Is there enough oil in the engine Is the spark plug...

Page 47: ...0 6L Oil Type SAE 10W 30 GENERATOR Model Name BG4500i Rated Frequency 60Hz Rated Voltage 120V Rated Current 30 8A Rated Speed 2800 3600rpm Max Output Power 4500W Rated Output Power 3700W OTHER SPECIF...

Page 48: ...44 11 WIRING DIAGRAM Control Panel CQ Grounding System AC Neutral Floating 1 2 3 4 5 6 1 2 1 2 1 2 1 2 3 4 1 2 3 4 5 6 4 5 3 2 1 J5...

Page 49: ...03 Relative humidity 100 correction factor C 0 04 Example Rated power PN 2 8kVA generator Altitude 1000m Ambient temperature 35 C Relative humidity 80 P Pn C 0 02 2 8 0 82 0 02 2 24kVA Altitude m Ambi...

Page 50: ...First 6 Months Parts and Labour Replacement parts sold to a consumer or installed by an authorized service center are warranted for a period of 90 days from date of purchase Labour must be performed...

Page 51: ...ny written or verbal statement or advertisement California The California Air Resources Board and Midland Power Inc are pleased to explain the emission control system warranty on your Midland Power In...

Page 52: ...re sensor Engine control module Fuel regulator Intake manifold Evaporative Fuel Tank Fuel Cap Fuel Hoses Vapor Hoses Carbon Canister Canister Mounting Brackets Fuel Strainer Fuel cock Fuel Pump Fuel H...

Page 53: ...Service Online www benchmark midlandpowerinc com E mail support midlandpowerinc com Toll Free 1 877 528 3772 TM MC Enjoy Be sure to check www benchmark midlandpowerinc com for updates regarding your...

Page 54: ...BG4500i TM MC TM MC...

Page 55: ...BG4500i MC MANUEL...

Page 56: ...a ne prend qu une minute faites le maintenant pendant que vous avez toujours votre re u d achat L assistance pour votre produit est disponible en ligne y compris les pi ces les emplacements des centre...

Page 57: ...s es sur les informations disponibles au moment de l impression Ce guide ou des ditions r vis es peuvent tre t l charg s sur notre site Web Aucune partie de cette publication ne peut tre reproduite sa...

Page 58: ...all le 24 5 5 Extension de la poign e 25 6 Arr t du moteur 26 7 Entretien 27 7 1 Programme d entretien 28 7 2 Changement d huile 29 7 3 Entretien du filtre air 31 7 4 Remplacement et nettoyage de la b...

Page 59: ...nner le g n rateur selon les instructions pour un service s curitaire et fiable Lisez attentivement le Guide de l utilisateur avant de faire marcher ce produit Ne pas le faire pourrait entra ner de s...

Page 60: ...s les contr les Ne permettez jamais quelqu un de faire marcher le g n rateur sans des instructions correctes Gardez les enfants les animaux familiers et la machinerie avec des parties pivotantes loign...

Page 61: ...nt stator de la g n ratrice est isol du cadre et de la broche de mise terre du r ceptacle CA Les dispositifs lectriques qui doivent tre reli s par une broche de prise terre ne fonctionnerint pas si la...

Page 62: ...Pendant et apr s l utilisation du g n rateur v rifier le g n rateur ainsi que les rallonges et les cordons d alimentation reli s elle pour les dommages r sultant des vibrations Faites r parer ou rempl...

Page 63: ...nous sommes sur la m me page 2 1 IDENTIFICATION DES COMPOSANTS Poign e t lescopique Panneau de Contr le Panneau D entretien du Filtre D air Poign e du lancer rappel Panneau d entretien d huile Couver...

Page 64: ...ce 8 Disjoncteur CA 30A 9 Bouton EcoMode 10 Interrupteur d alimentation de batterie 11 Indicatrice de sortie 12 Indicatrice de surcharge 13 Indicatrice de niveau d huile basse 14 5V 4 8A USB C et USB...

Page 65: ...e branchez le chargeur de batterie chaque trois mois dans une prise de 120V pour recharger la batterie et prolonger sa dur e de vie Chargeur vendu s par ment Interrupteur d alimentation de batterie D...

Page 66: ...ion D huile Basse Le syst me d alerte pour l huile est con u pour viter des dommages au moteur caus s par un manque d huile dans le carter Avant que le niveau d huile dans le carter atteigne une limit...

Page 67: ...tout ce qui est inscrit sur le tableau ci dessous Nom de la pi ce Quantit G n rateurs onduleurs 1 Guide d utulisateur 1 Entonnoir huile 1 La cl bougie 1 Batterie de d marrage 1 Chargeur mural pour ba...

Page 68: ...u au rep re d huile maximum V rifiez le niveau d huile en r ins rant la jauge sans la resserrer Si le niveau est sous le minimum remettez de l huile jusqu la marque de niveau maximum 4 R ins rez la ja...

Page 69: ...r d haute qualit avec d tergents forts Ne m langez pas deux huiles moteur diff rentes Avant que l huile tombe sous la marge de s curit le syst me d alerte de bas niveau arr tera automatiquement le mot...

Page 70: ...s substituts d essence comme le gasohol ou alco essence ne sont pas recommand s Ils peuvent endommager les composants du syst me d essence REMARQUE L utilisation de l essence avec un contenu d thanol...

Page 71: ...t 1 D vissez et enlevez le panneau d entretien du filtre air 2 D nouez les attaches et enlevez le filtre air en papier 3 S il est sale nettoyez la poussi re avec de l air comprim 4 R ins rez le filtre...

Page 72: ...ratures extr mes Utilisateurs ne doivent pas d manteler ou faire de l entretien Ne pas jeter dans les ordures m nag res Jetez et transportez en accordance aux directives de batteries lithium ion local...

Page 73: ...n tres ouvertes des portes et des vents Ces ouvertures peuvent tirer dans chappement de la g n ratrice M me lorsque vous utilisez un g n rateur correctement le CO peut s infiltrer dans la maison Toujo...

Page 74: ...de faire d marrer manuellement la g n ratrice lors du premier d marrage S il n y a pas de batterie dans le g n rateur ou si la batterie est morte le g n rateur ne peut d marrer qu en utilisant la m th...

Page 75: ...e est de deux 2 ans quand la pile est morte d vissez l arri re de la commande et remplacez la pile 4 1 2 D marreur lectrique 1 Poussez l interrupteur d alimentation de batterie ON 2 Tournez la manette...

Page 76: ...ez doucement la poign e de d marrage jusqu engagement puis tirez la rapidement R p tez jusqu au d marrage du moteur REMARQUE Avant le d marrage de l appareil d branchez tout appareil des prises sur le...

Page 77: ...l est utilis en dessous de 2000 pieds le m lange air carburant sera alors trop pauvre pour une utilisation basse altitude Utilisez toujours le gicleur principal adapt votre altitude Le carburateur du...

Page 78: ...lacement n cessaire pour votre plage d altitude 7 Remplacez le joint de la coupelle de carburant la coupelle de carburant le joint de boulon et le boulon Serrer en place Ne croisez pas le filetage du...

Page 79: ...lentes La longueur maximale de la rallonge est de 60 m tres 196 pi pour un c ble de 1 5mm2 15 5 jauge 100 m tres pour un c ble de 2 5mm2 13 25 jauge Tenez vous loin des c bles ou fils lectriques 5 1 P...

Page 80: ...2 Connectez la sortie CC aux terminaux de la batterie branchez avec un c ble de chargement DC pas inclus Connectez la t te rouge au terminal positif de la batterie et la t te noire n gative au termina...

Page 81: ...umez les appareils 4 Mettez le mode co sur ACTIF REMARQUE V rifiez que tous les appareils lectriques sont en tat de marche avant de les brancher au g n rateur Si un appareil lectrique devient anormal...

Page 82: ...ancher ou d brancher le c ble parall le Pour l utilisation d une seule g n ratrice le c ble parall le doit tre d connect Les prises embarqu es du g n rateur ne fonctionneront pas quand le kit parall l...

Page 83: ...1 Remove the fuel cap and filter 8 7 2 Clean the filter with solvent 8 7 3 Wipe the filter and insert it 8 7 Cleaning Fuel Tank Filter e muffle 8 7 1 Remove the fuel cap and filter 8 7 2 Clean the fil...

Page 84: ...e bouton ARR T 4 Poussez l interrupteur d alimentation de batterie ARR T REMARQUE Assurez vous que le levier d a ration du couvercle de carburant est la position ARR T lorsque vous arr tez transportez...

Page 85: ...rieuses blessures Contactez le soutien la client le si vous avez des questions sur l entretien Trucs pour L inspection G n rale R servoir d essence tuyau de carburant et valve de carburant Fermez la...

Page 86: ...ation du moteur Chaque 50 heures ou 6 mois V rifiez et nettoyez le filtre air1 V rifiez et nettoyez la tasse s diments Chaque 100 heures ou 12 mois Remplacer l huile de lubrification du moteur2 Inspec...

Page 87: ...ouchon d acc s au trou de vidage Placez un bac de r cup ration d huile en dessous 2 D serrez le bouchon int rieur en caoutchouc en tirant du dessus d montr ici d en bas pour laisser l huile couler dan...

Page 88: ...vie du moteur Utilisez une huile moteur d haute qualit avec d tergents forts Ne m langez pas deux huiles moteur diff rentes Avant que l huile tombe sous la marge de s curit le syst me d alerte de bas...

Page 89: ...yez et maintenez le filtre air r guli rement en particulier dans les zones industrielles REMARQUE Ne faites jamais tourner un g n rateur sans son filtre air le faire d graderait rapidement le moteur 1...

Page 90: ...mage 1 D vissez et enlevez le panneau d acc s de la bougie Enlevez le couvercle du filtre 2 Enlevez le capuchon de la bougie d allumage 3 Enlevez la bougie avec la cl universelle pour bougie 4 Examine...

Page 91: ...chaleur inad quate 7 5 ENTRETIEN DU PARE TINCELLES 1 Retirez les bo tiers dans l ordre indiqu 2 Apr s que le moteur ait refroidi retirez le pare tincelles du silencieux 3 Utilisez une brosse pour enle...

Page 92: ...he avant de faire d marrer le moteur Les substituts d essence comme le gasohol ou alco essence ne sont pas recommand s Ils peuvent endommager les composants du syst me d essence 1 Retirer le bouchon d...

Page 93: ...rateur Voir D marrage du moteur pour plus de d tails 1 Allumez l interrupteur de batterie ACTIF 2 Poussez et retenez le d marrage lectrique ON OFF pour 10 secondes ensuite rel chez pour initialiser l...

Page 94: ...benchmark midlandpowerinc com Lorsque vous entreposer votre g n rateur pendant une p riode prolong e la batterie se d charge automatiquement ce qui peut causer des dommages irr versibles ou m me une...

Page 95: ...9 REMPLACEMENT DE BATTERIE 1 D serrez les quatre vis du couvercle d entretien de batterie et enlevez le 2 Glissez la batterie en place jusqu ce qu il fasse un clic 3 Remplacez le couvercle REMARQUE S...

Page 96: ...a t con u pour r pondre aux normes d air pur de l Environmental Protection Agency EPA et du California Air Resource Board CARB Les r glements imposent que le fabricant fournisse les normes de fonctio...

Page 97: ...c utiliser que les pi ces et accessoires provenant d un service qualifi pour garantir que les produits de remplacement n affecteront pas de fa on n gative les performances des missions Les pi ces de r...

Page 98: ...teur 1 Ne remplissez pas trop le r servoir de carburant aucun r sidu de carburant dans le col du r servoir 2 N utilisez pas le g n rateur sur un v hicule de transport Le g n rateur doit tre utilis dan...

Page 99: ...ilisateur de carburant de qualit peut maintenir le gaz frais jusqu un an 1 ans ou plus Vider l essence du r servoir de carburant et l entreposer dans un r cipient appropri Ceci aidera pr venir la form...

Page 100: ...pour d ventuels d fauts V rifiez l appareil lectrique pour d ventuels d fauts Le protecteur de circuit CC est il sur OFF Arr tez le moteur puis replacez ou r parez l appareil R parez ou remplacez l a...

Page 101: ...l huile recommand e Mettez le commutateur lectrique sur RUN Nettoyez et r ajustez l interstice et s chez la bougie d allumage Remplacez la si n cessaire Y a t il assez d huile dans le moteur La bougi...

Page 102: ...10W 30 G N RATEUR Nom du mod le BG4500i Fr quence nominale 60 Hz Tension nominale 120 V Courant nominale 30 8 A Vitesse nominale 2800 3600 rpm Puissance max de sortie 4500 W Puissance de sortie nomina...

Page 103: ...45 45 11 DIAGRAMME DU C BLAGE Control Panel CQ Grounding System AC Neutral Floating 1 2 3 4 5 6 1 2 1 2 1 2 1 2 3 4 1 2 3 4 5 6 4 5 3 2 1 J5 BG4500i...

Page 104: ...0 03 Relative humidity 100 correction factor C 0 04 Example Rated power PN 2 8kVA generator Altitude 1000m Ambient temperature 35 C Relative humidity 80 P Pn C 0 02 2 8 0 82 0 02 2 24kVA Altitude m A...

Page 105: ...pi ces de rechange vendues un consommateur ou install es par un centre de service autoris sont garanties pendant une p riode de 90 jours compter de la date d achat La main d oeuvre doit tre effectu e...

Page 106: ...ndirect ou cons cutif inconv nient ou perte commerciale Cette garantie est la seule et enti re garantie donn e par Midland pour les produits ou quipements Midland Aucun agent ou employ n est autoris t...

Page 107: ...pi ces et main d oeuvre Votre syst me antipollution peut inclure des pi ces telles que le carburateur ou syst me d injection de carburant le syst me d allumage et le convertisseur catalytique Il peut...

Page 108: ...ux de vapeur r servoir charbon actif supports de montage tra neaux filtre essence robinet d essence Pompe essence Joint Tuyau de carburant tuyau de purge Canister commun Exhaust Catalyseur Collecteur...

Page 109: ...e www benchmark midlandpowerinc com Courriel support midlandpowerinc com Num ro gratuit 1 877 528 3772 TM MC Profitez en Veuillez v rifier chaque mois sur www benchmark midlandpowerinc com les mises j...

Page 110: ...BG4500i TM MC TM MC...

Reviews: