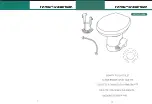
background image

6

7

Bidet attachment

2 Adjustable  
mounting brackets

2 Adjustable Splice 
mounting bracket tray

*T-Valve connector 
with rubber cone 
washer
(7/8” x 7/8” x 3/8”)

27.5” Braided  
metal hose

2 Non-slip mats

Teflon tape

PARTS

DIMENSIONS

3 Toilet bumpers

*Alternate fittings available, contact [email protected]

8.66 in

4.33 in

5.51 in

12.4 in

Summary of Contents for WELLSPRING 100

Page 1: ...User Manual WELLSPRING 100 ...

Page 2: ... OF CONTENTS PRODUCT INFORMATION Features 5 Parts 6 Dimensions 7 PRODUCT INSTALLATION Pre Installation 8 Installation 9 PRODUCT OPERATION How To Use 13 MAINTENANCE Cleaning 14 Short Term Non Use 14 Warranty 15 ...

Page 3: ... inlet and installation parts Dual nozzle Ambient temperature bidet wash Adjustable water pressure Unified internal brass valve Durable braided metal cold water hose No electricity or batteries required Adjustable toilet fit One year warranty FEATURES ...

Page 4: ...le Splice mounting bracket tray T Valve connector with rubber cone washer 7 8 x 7 8 x 3 8 27 5 Braided metal hose 2 Non slip mats Teflon tape PARTS DIMENSIONS 3 Toilet bumpers Alternate fittings available contact bidets bemismfg com 8 66 in 4 33 in 5 51 in 12 4 in ...

Page 5: ...e on the other end If you do not have access to the fill valve under the toilet tank contact Bemis Customer Service at 920 467 4621 and we may be able to provide alternative fittings INSTALLATION 1 Remove the existing toilet seat by locating the bolts and nuts typically under a plastic cover and removing them first 2 Close the water supply valve and flush the toilet completely so that there is lit...

Page 6: ...bidet 9 Place the circular mounting brackets into the bidet attachment 10 Place the bidet on the toilet with the mounting brackets over the bolt holes and make any needed adjustments to make sure the bidet is centered on the toilet 11 Place the toilet seat back on the toilet over the bidet and secure the bolts down so that the seat and bidet attachment are stable 12 Connect the hose from step 6 to...

Page 7: ...vate the flow of water If there are no immediate leaks check again in about 5 10 minutes and your Wellspring 100 is ready for use If any leaks occur check all rubber washers and make sure all connections are tight and secure 13 Slowly turn the water supply valve back on check for leaks and test the unit for functionality 14 After installing your bidet attachment check to see if there is a gap betw...

Page 8: ...malfunction of the unit as a result of improper and negligent installation 5 Any and all damages to plumbing walls floors ceiling and personal properties resulting from water leaks or breakage The product must be used at the user s own risk Therefore the owner hereby releases the manufacturer and distributor from any and all claims for damages where the above condition exits No implied warranty in...

Page 9: ...Thank You 300 Mill Street Sheboygan Falls WI 53085 T 920 467 4621 Bidets Bemismfg com ToiletSeats com ...

Reviews: