background image

29

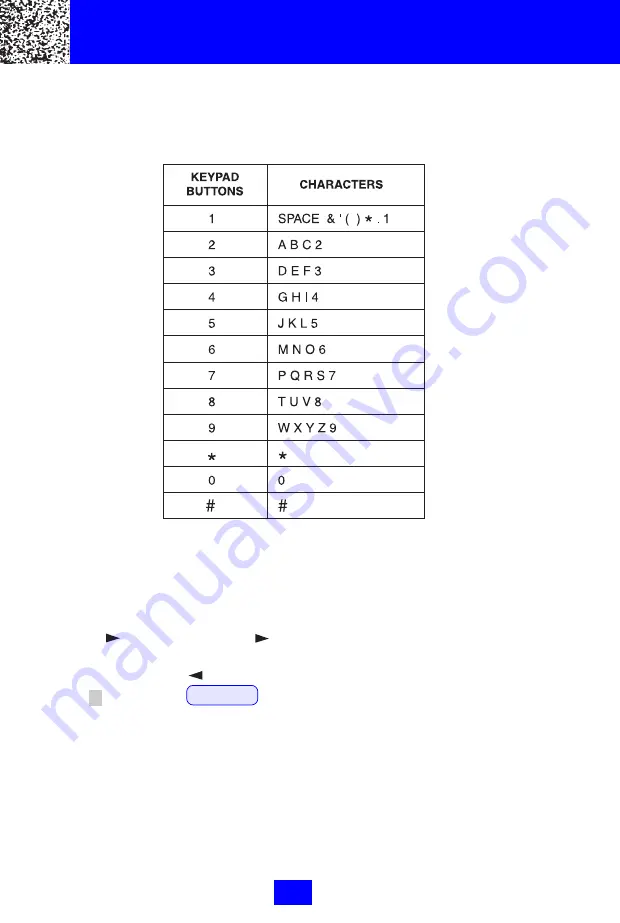
Telephone Keypad Characters

The Telephone Keypad buttons (1~9) are used to enter the characters when
entering names. Press the appropriate keypad button to get the following
characters.

For example, if you want to enter the character "S", press the "7" key, the first
character displayed will be "P". Press the "7" key again to display "Q", and
twice more to display the letter "S".
To enter the next character, press the appropriate key. If, however, the next
character is on the same key as the previous character, you will first need to
press the  

  key. Pressing the  

  a second time will produce a space.

If you want to change any character, you can go back to the incorrect
character by pressing  

  button. To delete the character inside the

cursor "     ", press the   DELETE   button.

Caller ID System Operation

Summary of Contents for FILTERED SOUND MH9910V4

Page 1: ...Operation 17 Caller ID System 17 Viewing Caller Information During Incoming Calls 17 MessageWaiting 17 Call Waiting 18 Caller List 18 Viewing the Caller List 18 Placing a Call from the Caller List 19...

Page 2: ...ive Deleting in the Directory 24 Function Operation 25 A Language 26 B Silent On Off 26 C Time Set 26 D Ringer Volume 27 E Contrast 27 F PBX Number 27 G PBX Mode 28 H Pause Time 28 I MSG Waiting Messa...

Page 3: ...one where people will walk on the cord 9 Do not overload wall outlets and extension cords This can increase the risk of fire or electric shock 10 Never push objects of any kind through slots in the ph...

Page 4: ...del B650 See page 35 for ordering information 2 Do not dispose of the battery pack in a fire It may explode Check with local codes for possible special disposal instructions 3 Do not open or mutilate...

Page 5: ...Blinks in red when receiving Message Waiting signal if you have subscribed from your local telephone company See page 17 for details 2 Large LCD Screen Shows call information phone status prompts and...

Page 6: ...ave Call Waiting 9 Charge Contacts For charging battery inside the HANDSET We recommend cleaning the charge contacts periodically with a damp cloth 10 ANTENNA 11 Volume Control HI LOW Switch Select th...

Page 7: ...7 BASE UNIT Controls...

Page 8: ...ON or when the HANDSET is placed on the BASE UNIT for charging It flashes to indicate an incoming call 6 Page Button Press to page the HANDSET press again to stop 7 Charge Contacts We strongly recomm...

Page 9: ...s telephone from its shipping carton If there is any visible damage do not attempt to operate this equipment Return it to the place of purchase 2 Check to be sure you have all items that come with thi...

Page 10: ...cing this unit next to appliances Doing so may cause interference 9 TONE PULSE Select Switch A If your home is equipped with a tone dialing system set the TONE PULSE select switch to the TONE position...

Page 11: ...e no dial tone refer to the Problem Solving section on page 33 10 Before initial use charge the HANDSET for 12 hours You are now ready to use your new BellSouth Cordless Telephone IMPORTANT In order t...

Page 12: ...om 1 NORMAL POSITION Mounting Bracket not required For Normal Position as shown in Figure 1 place the BASE UNIT on any desired but suitable location 2 45 POSITION See Figure 2 With the back of the BAS...

Page 13: ...of the BASE UNIT as shown below Then push the bottom hooks of the MOUNTING BRACKET into place Plug the free end of the SHORT TELEPHONE LINE CORD into the MODULAR WALL JACK 3 Align the upper keyhole o...

Page 14: ...After 12 hours remove the HANDSET from the BASE UNIT 3 RAISE THE BASE UNIT ANTENNA FOR BEST RECEPTION Before you can use your cordless telephone you must charge the HANDSET for 12 hours Failure to do...

Page 15: ...up 2 Start your conversation 3 To end your conversation either press the TALK button or place the HANDSET on the BASE UNIT If the HANDSET is placed on the BASE UNIT charge cradle the automatic STANDB...

Page 16: ...utton to hang up 2 Press the TALK button again 3 Listen for a dial tone 4 Press the REDIAL button This will automatically redial the last telephone number you called 5 When finished with your call pre...

Page 17: ...WN will appear if the origin of the incoming call has no name and does not support Caller ID system OR PRIVATE NAME and or P will appear if the caller s name and or telephone number is blocked OR EXT...

Page 18: ...L D C Long Distance Appears on the upper left hand side when the incoming call is a long distance call and the service is provided by your local telephone company Caller List Records call information...

Page 19: ...2 Press the EDIT button 3 Move the cursor by pressing the or button to the digit you want to change To erase digits press the DELETE button To add digits use the TELEPHONE KEYPAD 0 9 buttons 4 Press t...

Page 20: ...Telephone Number Directory This Directory lets you scroll through the list to find the person you need for one touch dialing You can store up to 40 names and telephone numbers in the memory Viewing th...

Page 21: ...STANDBY mode NOTE It will not save a duplicate telephone number or a name without the corresponding telephone number in the Directory Preferred Calls You can assign Preferred Call which will generate...

Page 22: ...details 5 Press the or button to edit the number 6 Press the or button to move the cursor to the number you want to change To erase press the DELETE button To add use the TELEPHONE KEYPAD buttons 0 9...

Page 23: ...TE button To add use the TELEPHONE KEYPAD buttons 6 Press the EDIT button 7 Press the 7 button for local call or press the 10 button for local call with area code or press the 1 button for long distan...

Page 24: ...n or place the HANDSET on the BASE UNIT Deleting All Records in the Directory 1 Press the DIR button 2 Press and hold down the DELETE button at STANDBY mode 3 Press the DIR button to return to STANDBY...

Page 25: ...ccess press the FUNC button at STANDBY mode then press the TELEPHONE KEYPAD 1 9 or the or buttons IMPORTANT In order to utilize the Caller ID feature you must subscribe to Caller ID service from your...

Page 26: ...d 1 Press the FUNC button 2 Press the TELEPHONE KEYPAD 2 button 3 Press the EDIT button 4 Press the or button Silent Off is the preset mode 5 Press the SAVE button 6 Press the FUNC button to go back t...

Page 27: ...or the Large LCD display 1 Press the FUNC button 2 Press the TELEPHONE KEYPAD 5 button 3 Press the EDIT button 4 Press the or button to adjust the brightness of the display Level 4 is the preset brigh...

Page 28: ...ust the pause time for dialing on switchboard system or long distance calls 1 Press the FUNC button 2 Press the TELEPHONE KEYPAD 8 button 3 Press the EDIT button 4 Press the or button to adjust the pa...

Page 29: ...be P Press the 7 key again to display Q and twice more to display the letter S To enter the next character press the appropriate key If however the next character is on the same key as the previous c...

Page 30: ...ew combination Resetting Security Code and Channel Information Communication between HANDSET and BASE UNIT may not be possible in any of the following situations 1 After a power failure 2 After reloca...

Page 31: ...90 days of non use to avoid battery failure When the battery pack can no longer be charged replace ment of the battery pack will be necessary The battery used in your telephone may develop a conditio...

Page 32: ...ide the HANDSET battery compartment cover firmly into place in its closed position 5 Before use charge the new battery pack for 12 hours ATTENTION The product that you have purchased contains a rechar...

Page 33: ...T replace the HANDSET on the BASE UNIT for 2 to 5 seconds to reset the system Received signal flutters or fades check the following 1 Battery pack in HANDSET is fully charged 2 HANDSET is not too far...

Page 34: ...ssing the TALK button you receive three beeps and no dial tone check the following 1 Reset the HANDSET by placing it on the BASE UNIT for 2 to 5 seconds NOTE If no telephones in the house are working...

Page 35: ...nterference Electronic circuits activate a relay to connect the cordless telephone to your telephone line These electronic circuits operate in the radio frequency spec trum While several protection ci...

Page 36: ...ble the telephone company may temporarily discontinue service without notice if such action is necessary under the circumstances The telephone company may make changes in its communication facilities...

Page 37: ...ference to radio communications However there is no guarantee that interference will not occur in a particular installation If this equipment does cause harmful interference to radio or television rec...

Page 38: ...no responsibility for any special incidental or consequential damages This warranty gives you specific legal rights and you may have other rights which vary from state to state Some states do not all...

Page 39: ...roduct received which was not made for BellSouth Products or which is not defective as determined by our test procedures will not be re paired and will be returned C O D freight To Obtain Warranty Ser...

Page 40: ...40 Notes...

Page 41: ...crews to the wall when mounting this telephone on the wall 1 Cut out this page 2 Use this template to determine the distance between screws when mounting this phone on the wall The two cross hairs ide...

Page 42: ...H 40 CHANNEL AUTOSCAN Model MH9910 OWNER S MANUAL INSTALLATION AND OPERATING INSTRUCTIONS PLEASE READ THIS MANUAL CAREFULLY BEFORE USE KEEP FORYOUR REFERENCE For Getting Started Information please see...

Reviews: