background image

25

g Wireless router

sections

table of contents

1

2

3

5

6

7

8

9

10

4

connEcting anD conFiguring your routEr 

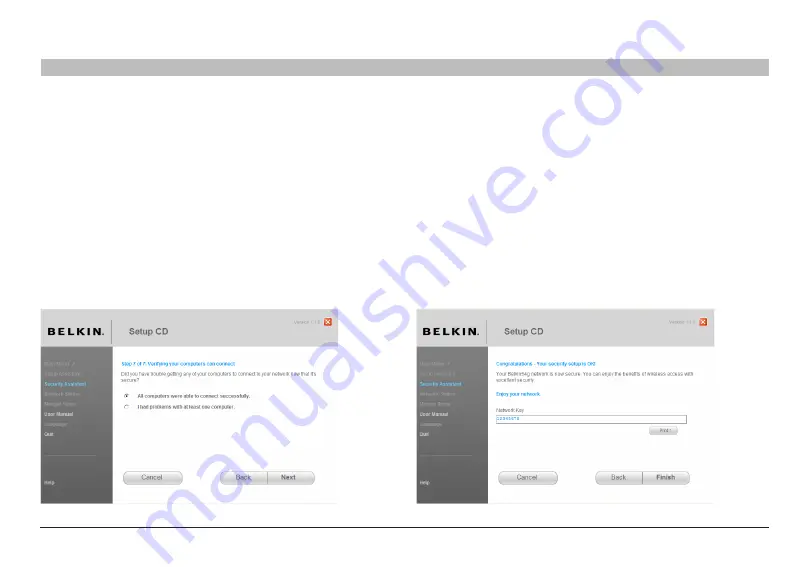
Congratulations

Once you have verified that your wireless computers are properly 

connected, your wireless network is set up and secured� You now can run 

your network wirelessly and securely� Click “Finish” to take you back to 

the main menu�

3�4 Verifying the Connection

if all your wireless computers are able to connect to the router, click 

“Next”� if you are having trouble, select “i had problem with at least one 

computer” and click “Next”� Then, follow the on-screen instructions�

Summary of Contents for Wireless G Router

Page 1: ...English Français Deutsch Nederlands Español Italiano G Wireless Router User Manual PM01110ea A F5D7234 4 ...

Page 2: ...g Network Settings 86 8 Recommended Web Browser Settings 91 9 Troubleshooting 93 10 Information 109 1 Introduction 1 Benefits of a Home Network 1 Advantages of a Wireless Network 1 Placement of your Router for Optimal Performance 2 2 Product Overview 5 Product Features 5 3 Knowing your Router 7 Package Contents 7 System Requirements 7 Setup Assistant Software System Requirements 7 4 Connecting and...

Page 3: ...nt software makes setup simple Flexibility set up and access printers computers and other networking devices from anywhere in your home Easy Expansion the wide range of Belkin networking products lets you expand your network to include devices such as printers and gaming consoles No cabling required you can spare the expense and hassle of retrofitting Ethernet cabling throughout the home or office...

Page 4: ... be stronger the closer your computer is to your Router Typical indoor operating range for wireless devices is between 100 and 200 feet In the same way your wireless connection and performance will degrade somewhat as the distance between your Router and connected devices increases This may or may not be noticeable to you As you move farther from your Router connection speed may decrease Factors t...

Page 5: ...ection change the channel on the phone to the farthest channel from your wireless network For example change the phone to channel 1 and move your Router to channel 11 See your phone s user manual for detailed instructions If necessary consider switching to a 900MHz cordless phone 2 Avoid Obstacles and Interference Avoid placing your Router near devices that may emit radio noise such as microwave o...

Page 6: ...st the Belkin Wireless G Universal Range Extender Access Point 5 Secure Connections VPNs and AOL Secure connections typically require a user name and password and are used where security is important Secure connections include Virtual Private Network VPN connections often used to connect remotely to an office network The Bring Your Own Access program from America Online AOL which lets you use AOL ...

Page 7: ... of and best of all you can make changes and perform setup functions from any computer on the network quickly and easily Product Features NAT IP Address Sharing Your Router employs Network Address Translation NAT to share the single IP address assigned to you by your Internet Service Provider while saving the cost of adding IP addresses to your Internet service account SPI Firewall Your Router is ...

Page 8: ...ork settings for you and sets up the Router for connection to your Internet Service Provider ISP In a matter of minutes your Wireless Router will be up and running on the Internet NOTE Setup Assistant software is compatible with Windows 2000 XP Vista and Mac OS X v10 4 and v10 5 If you are using another operating system the Wireless Router can be set up using the Alternate Setup Method described i...

Page 9: ...th an installed network interface adapter TCP IP networking protocol installed on each computer RJ45 Ethernet networking cable Internet browser Setup Assistant Software System Requirements A PC running Windows 2000 XP or Vista or a Mac computer running Mac OS X v10 4 or v10 5 Minimum 512MB RAM Internet browser The Router has been designed to be placed on a desktop All of the cables exit from the r...

Page 10: ...8 G Wireless Router sections Table of Contents 1 2 4 5 6 7 8 9 10 Knowing your Router 3 6 1 2 3 4 5 1 Modem LED 2 Power LED 3 Security LED 4 Wireless LED 5 Internet LED 6 Wired LEDs 1 2 3 4 ...

Page 11: ...ctivity 1 Modem LED This LED lights in GREEN to indicate that your modem is connected properly to the Router It blinks rapidly when information is being sent over the port between the Router and the modem OFF Not connected to the modem Solid Green Connected to the modem Blinking Green Router is connecting to the ISP indicates modem activity 2 Power LED When you apply power to the Router or restart...

Page 12: ...useful in monitoring the status of your Router s connection OFF Router is not connected to the Internet Blinking Green Router is attempting to connect to the Internet Solid Green Router is connected to the Internet 6 Wired LEDs 1 2 3 4 These LEDs are labeled 1 4 and correspond to the numbered ports on the rear of the Router When a computer is properly connected to one of the wired computer ports o...

Page 13: ...e Router to connect the modem to this port Use of a cable other than the cable supplied with the Router may not work properly 10 Reset Button The Reset button is used in rare cases when the Router may function improperly Resetting the Router will restore the Router s normal operation while maintaining the programmed settings You can also restore the factory default settings by using the Reset butt...

Page 14: ...RJ45 Ethernet port on it Setup Assistant Belkin has provided our Setup Assistant software to make installing your Router a simple and easy task You can use it to get your Router up and running in minutes The Setup Assistant requires that your Windows 2000 XP or Vista or Mac OS X v10 4 or v10 5 computer be connected directly to your cable or DSL modem and that the Internet connection is active and ...

Page 15: ... your new networking cable included in the box with your Router and connect it to the yellow port on the back of the Router Connect the other end to your modem in the port that s now free D Plug in your modem s power cord Wait 60 seconds for the modem to start up Plug the Router s power supply into the black port on the back Plug the other end into the wall outlet E Wait 20 seconds for the Router ...

Page 16: ...Step 2 Set Up the Router Run the Setup Assistant Software A Shut down any programs that are running on your computer at this time Turn off any firewall or Internet connection sharing software on your computer B Insert the CD into your computer The Setup Assistant will automatically appear on your computer s screen within 15 seconds Click on Go to run the Setup Assistant Follow the instructions the...

Page 17: ... 9 10 4 Connecting and Configuring your Router Confirmation Screen Verify that you have completed all QIG steps by checking the box to the right of the arrow Click Next to continue Select Country Select your country from the drop down box Click Begin to continue ...

Page 18: ...your Router 2 1 Checking Settings The Setup Assistant will now examine your computer s network settings and gather information needed to complete the Router s connection to the Internet Progress Screen Setup Assistant will show you a progress screen each time a step in the setup has been completed ...

Page 19: ...fault wireless network name or Service Set Identifier SSID This is the name of your wireless network to which your computers or devices with wireless network adapters will connect You can either use the default or change it to something unique Write down this name for future reference 2 2 Verifying Hardware Connections The Setup Assistant will now verify your hardware connection ...

Page 20: ...onnecting and Configuring your Router If your Internet account requires a login and password you will be prompted with a screen similar to the illustration below Click Next to continue 2 4 Requesting Internet Account Info if needed Select your ISP from the drop down boxes ...

Page 21: ... now configure your Router by sending data to the Router and restarting it Wait for the on screen instructions Note Do not disconnect any cable or power off the Router while the Router is rebooting Doing so will render your Router inoperable 2 6 Checking Internet Connection We are almost done The Setup Assistant will now check your connection to the Internet ...

Page 22: ... surfing by opening your browser and going to any website You can use the Setup Assistant to set up your other wired and wireless computers to connect to the Internet by clicking Next If you decide to add computers to your Router later select Finish return to Main Menu and then click Next Troubleshooting If the Setup Assistant is not able to connect to the Internet you will see the following scree...

Page 23: ... Other Computers This optional step will help you to connect additional wired and wireless computers to your network Follow the on screen instructions Once you have verified that your other wired and wireless computers are properly connected your network is set up and working You can now surf the Internet Click Next to return to the main menu ...

Page 24: ...rk is set up and working it is recommended that you turn on wireless security to prevent unauthorized access to your network from neighboring wireless enabled computers The Security Assistant will guide you through the process Click Security Assistant and follow the on screen instructions IMPORTANT Run the Setup Assistant from the computer that is directly connected to the Router from Step 1 B ...

Page 25: ...8 9 10 4 Connecting and Configuring your Router 3 1 Picking the Security Type Select the security type for your wireless network and click Next to continue Progress Screen The Security Assistant will show you a progress screen each time a step has been completed ...

Page 26: ... will have to transfer the network key to each of your wireless computers Click on Transfer Key if you have a USB flash drive Follow the on screen instructions or click on Print to print the information Manually enter it to each wireless computer Then click Next to continue 3 2 Creating a Network Key Enter a network key PSK for your wireless network and click Next to continue ...

Page 27: ...y connected your wireless network is set up and secured You now can run your network wirelessly and securely Click Finish to take you back to the main menu 3 4 Verifying the Connection If all your wireless computers are able to connect to the Router click Next If you are having trouble select I had problem with at least one computer and click Next Then follow the on screen instructions ...

Page 28: ...strictions MAC address filtering WEP and WPA Enable the DMZ feature for a single computer on your network Change the Router s internal password Enable Disable UPnP Universal Plug and Play Reset the Router Back up your configuration settings Reset the Router s default settings Update the Router s firmware Step 1 Connect your Router 1 1 Turn off the power to your modem by unplugging the power supply...

Page 29: ...1 6b 1 5 1 1 1 6a 1 2 1 3 1 8 Verify that your computer is connected properly to the Router by checking the lights labeled 1 4 The light that corresponds to the numbered port connected to your computer should be ON if your computer is connected properly If it is not recheck your connections 1 7 Verify that your modem is connected to the Router by checking the lights on the front of the Router The ...

Page 30: ...r directions Step 3 Configure the Router Using the Web Based Advanced User Interface PLEASE NOTE If you have difficulty accessing the Router s Web Based Advanced User Interface go to the section entitled Manually Configuring Network Settings Using your Internet browser you can access the Router s Web Based Advanced User Interface In your browser type 192 168 2 1 you do not need to type in anything...

Page 31: ...entered In the login screen leave the password blank and click the Submit button to log in Logging out of the Router One computer at a time can log into the Router for the purposes of making changes to the settings of the Router Once a user has logged in to make changes there are two ways that the computer can be logged out Clicking the Logout button will log the computer out The second method is ...

Page 32: ...Using the Web Based Advanced User Interface The home page is the first page you will see when you access the Web Based Advanced User Interface UI The home page shows you a quick view of the Router s status and settings All advanced setup pages can be reached from this page 2 4 5 10 6 7 3 1 8 9 ...

Page 33: ...ected to the Internet When the Router is not connected to the Internet the indicator will read no connection in RED The indicator is automatically updated when you make changes to the settings of the Router 4 Login Logout Button This button enables you to log in and out of the Router with the press of one button When you are logged into the Router this button will change to read Logout Logging int...

Page 34: ...ings by clicking on any one of the links or by clicking the Quick Navigation links on the left side of the screen 8 Internet Settings Shows the settings of the Internet WAN side of the Router that connects to the Internet Changes to any of these settings can be made by clicking on the links or by clicking on the Internet WAN Quick Navigation link on the left side of the screen 9 Version Info Shows...

Page 35: ...he settings that your ISP gave you click Connection Type A on the left side of the screen Select the connection type you use If your ISP gave you DNS settings clicking DNS B allows you to enter DNS address entries for ISPs that require specific settings Clicking MAC address C will let you clone your computer s MAC address or type in a specific WAN MAC address if required by your ISP When you have ...

Page 36: ...complete the connection to your ISP Some dynamic connection types may require a host name You can enter your host name in the space provided if you were assigned one Your host name is assigned by your ISP Some dynamic connections may require that you clone the MAC address of the PC that was originally connected to the modem Change WAN MAC Address If your ISP requires a specific MAC address to conn...

Page 37: ...g your Internet Service Provider ISP Connection Type to Static IP A static IP address connection type is less common than other connection types If your ISP uses static IP addressing you will need your IP address subnet mask and ISP gateway address This information is available from your ISP or on the paperwork that your ISP left with you Type in your information then click Apply Changes After you...

Page 38: ...to log you into the service If you have an Internet connection in your home or small office that doesn t require a modem you may also use PPPoE Your connection type is PPPoE if 1 Your ISP gave you a user name and password which is required to connect to the Internet 2 Your ISP gave you software such as WinPOET or Enternet300 that you use to connect to the Internet or 3 You have to double click on ...

Page 39: ...the IP address here Only available when user selects Use Static IP address from IP Address Assignment above 6 MTU The MTU setting should never be changed unless your ISP gives you a specific MTU setting Making changes to the MTU setting can cause problems with your Internet connection including disconnection from the Internet slow Internet access and problems with Internet applications working pro...

Page 40: ...ean Countries Only Some ISPs require a connection using PPTP protocol a type of connection most common in European countries This sets up a direct connection to the ISP s system Type in the information provided by your ISP in the space provided When you have finished click Apply Changes After you apply the changes the Internet Status indicator will read Connected if your Router is set up properly ...

Page 41: ... Provided by your ISP Enter the IP address here Only available when user selects Use Static IP address from IP Address Assignment above 7 My Subnet Mask Provided by your ISP Enter the subnet mask here Only available when user selects Use Static IP address from IP Address Assignment above 8 Connection ID Optional Provided by your ISP Enter the connection ID here 9 Disconnect after X minutes This fe...

Page 42: ...ctions Table of Contents 1 2 3 4 6 7 8 9 10 5 Alternate Setup Method Setting your Connection Type if you are a Telstra BigPond OptusNet Cable User Use this connection type for BigPond Cable and OptusNet Cable connections only ...

Page 43: ...o the Router The Automatic from ISP box should be checked if your ISP did not give you a specific DNS address If you are using a static IP connection type then you may need to enter a specific DNS address and secondary DNS address for your connection to work properly If your connection type is dynamic or PPPoE it is likely that you do not have to enter a DNS address Leave the Automatic from ISP bo...

Page 44: ...stem as the original MAC address and will allow the connection to work If you are not sure whether your ISP needs to see the original MAC address simply clone the MAC address of the computer that was originally connected to the modem Cloning the address will not cause any problems with your network Cloning your MAC Address To clone your MAC address make sure that you are using the computer that wa...

Page 45: ...ress the Enter key You will see the Router s home page in your browser window Viewing the LAN Settings Clicking on the header of the LAN Setup tab will take you its header page A quick description of the functions can be found here To view the settings or make changes to any of the LAN settings click on LAN Settings or to view the list of connected computers click on DHCP Client List Changing LAN ...

Page 46: ...nless you have a specific reason to do so The default setting is 255 255 255 0 3 DHCP Server The DHCP server function makes setting up a network very easy by assigning IP addresses to each computer on the network automatically The default setting is On The DHCP server can be turned OFF if necessary however in order to do so you must manually set a static IP address for each computer on your networ...

Page 47: ...e set any of the other advanced features of the Router such as DMZ or client IP filters these are dependent on the IP address For this reason you will not want the IP address to change 6 Local Domain Name The default setting is Belkin You can set a local domain name network name for your network There is no need to change this setting unless you have a specific advanced need to do so You can name ...

Page 48: ...ifier is used The default SSID of the Router is belkin54g You can change this to anything you want to or you can leave it unchanged If there are other wireless networks operating in your area you will want to make sure that your SSID is unique does not match that of another wireless network in the area To change the SSID type in the SSID that you want to use in the SSID field and click Apply Chang...

Page 49: ...work To switch modes select the desired mode from the Wireless Mode drop down box Then click Apply Changes 11b Only Mode We recommend you DO NOT use this mode unless you have a very specific reason to do so This mode exists only to solve unique problems that may occur with some 802 11b client adapters and is NOT necessary for interoperability of 802 11g and 802 11b standards off Mode This option w...

Page 50: ...e proper channels for the country you reside in The default channel is 11 unless you are in a country that does not allow channel 11 The channel can be changed if needed If there are other wireless networks operating in your area your network should be set to operate on a channel that is different than the other wireless networks For best performance use a channel that is at least five channels aw...

Page 51: ...rioritizes important data on your network such as multimedia content and Voice over IP VoIP so it will not be interfered with by other data being sent over the network Based on 802 11e you can turn this feature on or off by selecting it from the drop down menu and choosing the acknowledgement mode you want to use If you plan to stream multimedia content or use VoIP on your network we recommend tha...

Page 52: ...e rotated and encryption is strengthened AES Advanced Encryption Standard does not cause any throughput loss Wired Equivalent Privacy WEP WEP is a common protocol that adds security to all Wi Fi compliant wireless products WEP was designed to give wireless networks the equivalent level of privacy protection as a comparable wired network 64 Bit WEP 64 bit WEP was first introduced with 64 bit encryp...

Page 53: ...urers might have different methods on generating the keys If you have multiple vendors equipment in your network the easiest thing to do is to use the hex WEP key from your Router or access point and enter it manually into the hex WEP key table in your Router s configuration screen Wi Fi Protected Access WPA WPA is a new Wi Fi standard that was designed to improve upon the security features of WEP...

Page 54: ... up your key by writing in two characters between A F and 0 9 in each box You will use this key to program the encryption settings on your Router and your wireless computers Note to Mac users Original Apple AirPort products support 64 bit encryption only Apple AirPort 2 products can support 64 bit or 128 bit encryption Please check your product to see which version you are using If you cannot conf...

Page 55: ...your passphrase Click Generate to generate four different hex keys A hex hexadecimal key is a combination of numbers and letters from A F and 0 9 For 64 bit WEP you need to enter 10 hex keys For instance AF 0F 4B C3 D4 64 bit WEP key 3 Click Apply Changes to save the setting WARNING If you are configuring the G Wireless Router or access point from a computer with a wireless client you will need to...

Page 56: ...ent you will need to reconnect to the Router and set up the connection with the security key you ve set up 1 Select WEP from the Security menu s Allowed Client Type 2 Select 128 bit from the drop down menu in WEP Mode 3 After selecting your WEP encryption mode you can enter your key by typing in the hex key manually or you can put a check mark in Passphrase then type in your passphrase Click Apply...

Page 57: ... the Wireless tab Using Wi Fi Protected Setup WPS uses WPA2 described below for encryption It does not provide additional security but rather standardizes the method for securing your wireless network You may use either the Push Button S W Configuration PBC method or PIN method to allow a device access to your wireless network Conceptually the two methods work as follows PBC Click the Start PBC bu...

Page 58: ...ing WPS The Router features WPA2 which is the second generation of the WPA based 802 11i standard It offers a higher level of wireless security by combining advanced network authentication and stronger Advanced Encryption Standard AES encryption methods WPA Setup Note To use WPA security all your clients must be upgraded to drivers and software that support it At the time of this User Manual s pub...

Page 59: ...h 1 Select WPA WPA2 Personal PSK from the Security Mode drop down box 2 Select WPA PSK for just WPA authentication or WPA2 PSK for just WPA2 authentication or you may select WPA PSK WPA2 PSK for WPA and WPA2 as the authentication type 3 Enter your pre shared key This can be from eight to 63 characters and can be letters numbers or symbols This same key must be used on all of the clients that you s...

Page 60: ...ng systems are not supported at this time Important You also need to ensure that the wireless card manufacturer supports WPA and that you have downloaded and installed the latest driver from their support site Supported Operating Systems Windows XP Professional Windows XP Home Edition Setting up Windows XP Wireless Network Utility to use WPA PSK In order to use WPA PSK ensure you are using the Win...

Page 61: ...s is 192 168 2 254 and subnet mask is 255 255 255 0 These can be customized for your need 1 Enable the AP mode my selecting Enable in the Use as Access Point only page When you select this option you will be able to change the IP settings 2 Set your IP settings to match your network Click Apply Changes 3 Connect a cable from the Modem port on the Router to your existing network 5 For a home or sma...

Page 62: ...sed Advanced User Interface The Router is now acting as an access point To access the Router s Web Based Advanced User Interface again type the IP address you specified into your browser s navigation bar You can set the encryption settings MAC address filtering SSID and channel normally ...

Page 63: ...he Firewall Your Router is equipped with a firewall that will protect your network from a wide array of common hacker attacks including IP Spoofing SYN flood Land Attack UDP flooding Ping of Death PoD Tear Drop Attack Denial of Service DoS ICMP defect IP with zero length RIP defect Smurf Attack Fragment flooding TCP Null Scan ...

Page 64: ...ll not leave your network completely vulnerable to hacker attacks it is recommended that you leave the firewall enabled Configuring Internal Forwarding Settings The Virtual Servers function will allow you to route external Internet calls for services such as a web server port 80 FTP server Port 21 or other applications through your Router to your internal network Since your internal computers are ...

Page 65: ...he two fields with the same value e g 7500 7500 or a wide range of ports e g 7500 9000 If you need multiple single port values or a combination of ranges and a single value you must use multiple entries up to the maximum of 20 entries e g 1 7500 7500 2 8023 8023 3 9000 9000 You can only pass one port per internal IP address Opening ports in your firewall can pose a security risk You can enable and...

Page 66: ...om and the time to stop on the bottom Select Enable Click Apply Changes The computer at the IP address you specified will now be blocked from Internet access at the times you specified Note Be sure you have selected the correct time zone under Utilities System Settings Time Zone Setting MAC Address Filtering The MAC address filter is a powerful security feature that allows you to specify which com...

Page 67: ...he Router s administrative functions the computer you are using now Enabling the Demilitarized Zone DMZ The DMZ feature allows you to specify one computer on your network to be placed outside of the firewall This may be necessary if the firewall is causing problems with an application such as a game or video conferencing application Use this feature on a temporary basis The computer in the DMZ is ...

Page 68: ...ions below 1 Select DynDNS as the DDNS Service 2 Enter your DynDNS org user name in the User Name field 3 Enter your DynDNS org password in the Password field 4 Enter the DynDNS org domain name you set up with DynDNS org in the Domain Name field 5 Click Update Dynamic DNS to update your IP address If your IP address assigned by your ISP changes the Router will automatically update DynDNS org s ser...

Page 69: ...response from the IP address a hacker can determine that something of interest might be there The Router can be set up so it will not respond to an ICMP ping from the outside This heightens the level of security of your Router Utilities Tab This screen lets you manage different parameters of the Router and perform certain administrative functions To turn off the ping response select Block ICMP Pin...

Page 70: ...ng the Router Sometimes it may be necessary to restart or reboot the Router if it begins working improperly Restarting or rebooting the Router will NOT delete any of your configuration settings 2 The following message will appear Click OK Restarting the Router to Restore Normal Operation 1 Click the Restart Router button ...

Page 71: ...fault Settings Using this option will restore all of the settings in the Router to the factory default settings It is recommended that you back up your settings before you restore all of the defaults 1 Click the Restore Defaults button 4 A 25 second countdown will appear on the screen When the countdown reaches zero the Router will be restarted The Router s home page should appear automatically If...

Page 72: ...n the countdown reaches zero the Router s defaults will be restored The Router s home page should appear automatically If it does not type the Router s address default 192 168 2 1 into the navigation bar of your browser 3 The following message will appear Restoring the defaults includes restarting the Router It can take up to 25 seconds It is important not to turn the power to the Router off durin...

Page 73: ...nfiguration You can save your current configuration by using this feature Saving your configuration will allow you to restore it later if your settings are lost or changed It is recommended that you back up your current configuration before performing a firmware update 1 Click Save A window called File Download will open Click Save ...

Page 74: ...n where you want to save the configuration file Select a location You can name the file anything you want or use the default name user conf Be sure to name the file so you can locate it yourself later When you have selected the location and name of the file click Save 3 When the save is complete you will see the following window Click Close The configuration is now saved ...

Page 75: ...estoring a Previous Configuration This option will allow you to restore a previously saved configuration 1 Click Browse A window will open that allows you to select the location of the configuration file All configuration files end with a conf Locate the configuration file you want to restore and double click on it ...

Page 76: ... 7 8 9 10 6 Using the Web Based Advanced User Interface 2 Please wait while the Router loads the configuration file The Router s home page should appear automatically If not type the Router s address default 192 168 2 1 into the navigation bar of your browser ...

Page 77: ...firmware Firmware updates contain feature improvements and fixes to problems that may exist When Belkin releases new firmware you can download the firmware from the Belkin update website and update your Router s firmware to the latest version Searching for a New Version of Firmware From http www belkin com support downloads asp type in the Belkin part number F5D7234 4 in the Search field Click Sea...

Page 78: ...ased Advanced User Interface Updating the Router s Firmware 1 In the Firmware Update page click Browse A window will open that allows you to select the location of the firmware update file 2 Browse to the firmware file you downloaded Select the file by double clicking on the file name ...

Page 79: ...5 You will see one more message This message tells you that the Router may not respond for as long as one minute as the firmware is loaded into the Router and the Router is rebooted Click OK 6 A 45 second countdown will appear on the screen When the countdown reaches zero the Router s firmware update will be complete The Router s home page should appear automatically If not type in the Router s ad...

Page 80: ...ommended that you set a password if you plan to use the remote management feature of your Router Changing the Login Time Out Setting The login time out option allows you to set the period of time that you can be logged into the Router s Web Based Advanced User Interface The timer starts when there has been no activity For example you have made some changes in the Web Based Advanced User Interface ...

Page 81: ...ting the Time and Time Zone The Router keeps time by connecting to a Simple Network Time Protocol SNTP server This allows the Router to synchronize the system clock to the global Internet The synchronized clock in the Router is used to record the security log and control client filtering Select the time zone that you reside in If you reside in an area that observes daylight saving then place a che...

Page 82: ...n the Local Area Connection associated with your network adapter and select Properties from the drop down menu 4 In the Local Area Connection Properties window click Internet Protocol TCP IP and click the Properties button The following screen will appear 5 If Use the following IP address 2 is selected your Router will need to be set up for a static IP connection type Write the address information...

Page 83: ...below You will need to enter this information into the Router 4 Write in the IP address and subnet mask from the IP Address tab 3 5 Click the Gateway tab 2 Write the gateway address down in the chart 6 Click the DNS Configuration tab 1 Write the DNS address es in the chart 7 If not already selected select Obtain IP address automatically in the IP Address tab Click OK Restart the computer When the ...

Page 84: ...type Write the address information in the table below You will need to enter this information into the Router 4 If not already set at Configure choose Using DHCP Server This will tell the computer to obtain an IP address from the Router 5 Close the window If you made any changes the following window will appear Click Save Restart the computer When the computer restarts your network settings are no...

Page 85: ...ow in the Network menu 4 Select the TCP IP tab 2 Next to Configure 3 you should see Manually or Using DHCP If you do not check the PPPoE tab 4 to make sure that Connect using PPPoE is NOT selected If it is you will need to configure your Router for a PPPoE connection type using your user name and password 1 Click on the System Preferences icon 2 Select Network from the System Preferences menu 1 3 ...

Page 86: ...d your Router will need to be set up for a static IP connection type Write the address information in the table below You will need to enter this information into the Router 1 3 4 2 6 If not already selected select Using DHCP next to Configure 3 then click Apply Now Your network adapter s are now configured for use with the Router ...

Page 87: ...r Interface then change your browser s settings to the recommended settings in this section Internet Explorer 4 0 or Higher 1 Start your web browser Select Tools then Internet Options 2 In the Internet Options screen there are three selections Never dial a connection Dial whenever a network connection is not present and Always dial my default connection If you can make a selection select Never dia...

Page 88: ...no check marks next to any of the displayed options Automatically detect settings Use automatic configuration script and Use a proxy server Click OK Then click OK again in the Internet Options page Netscape Navigator 4 0 or Higher 1 Start Netscape Click on Edit then Preferences 2 In the Preferences window click on Advanced then select Proxies In the Proxies window select Direct connection to the I...

Page 89: ...omatically it could be that the computer is running other applications that are interfering with the CD drive 2 Next double click on the CD ROM drive that the Setup Assistant Software CD has been placed in to start the installation 1 If the Setup Assistant screen does not appear within 15 20 seconds open up your CD ROM drive by double clicking on the My Computer icon that is located on your deskto...

Page 90: ...ould start within a few seconds If instead a window appears showing the files on the CD double click on the icon labeled SetupAssistant exe 4 If the Setup Assistant still does not start reference the section titled Manually Configuring Network Settings page 86 of this User Manual for an alternate setup method ...

Page 91: ... down and restarting your computer then rerunning the Setup Assistant If the Setup Assistant is still unable to find the Router reference the section titled Manually Configuring Network Settings for installation steps 1 If the Setup Assistant is not able to find the Router during the installation process there may be third party firewall software installed on the computer attempting to access the ...

Page 92: ... The Setup Assistant completed installation but my web browser doesn t work I am unable to connect to the Internet The Router s Internet light is off and the Modem light is blinking Solution If you cannot connect to the Internet the Internet light is off and the Modem light is blinking the problem may be that your modem and Router are not connected properly 1 Make sure the network cable between th...

Page 93: ...lkin com support and type in ISP If you are still unable to access the Internet after verifying these settings please contact Belkin Technical Support Problem The Setup Assistant completed but my web browser doesn t work I am unable to connect to the Internet The Modem light on my Router is blinking and the Internet light is solid Solution If the Modem light is blinking and the Internet light is s...

Page 94: ...is listed go to the troubleshooting solution titled I can t connect to the Internet wirelessly but my network name is listed No my network name is not listed go to the troubleshooting solution titled I can t connect to the Internet wirelessly and my network name is not listed 1 Look at the lights on your Router Your Belkin Router s lights should be as follows The Power light should be on The Inter...

Page 95: ... to the Internet wirelessly and my network name is not listed Solution If the correct network name is not listed under Available Networks in the wireless configuration utility please attempt the following troubleshooting steps 1 Temporarily move your computer if possible five to 10 feet away from the Router Close the wireless configuration utility and reopen it If the correct network name now appe...

Page 96: ...ent with different connection rates until you find the best one for your environment note that all available transmission rates should be acceptable for browsing the Internet For more assistance see your wireless card s user manual Solution Wireless technology is radio based which means connectivity and the throughput performance between devices decreases when the distance between devices increase...

Page 97: ...ss Router and is connected to the Router using either an Ethernet cable or through your home s power lines using two Powerline Ethernet Adapters For 802 11g 54g wireless networks Belkin offers a Wireless G Range Extender Access Point that can be connected wirelessly to a Belkin G Wireless Router without requiring an Ethernet cable or Powerline Ethernet Adapters These Belkin products are available ...

Page 98: ...ou are using If you cannot configure your network with 128 bit encryption try 64 bit encryption Solution 1 Log into your Wireless Router or Access Point Open your web browser and type in the IP address of the Wireless Router or Access Point The Router s default is 192 168 2 1 the Access Point s default is 192 168 2 254 Log into your Router by clicking on the Login button in the top right hand corn...

Page 99: ...4 128 bit key 7 Click OK and then Apply to save the settings If you are NOT using a Belkin wireless client card please consult the manufacturer s user manual for that wireless client card Solution The client card must use the same key as the G Wireless Router or access point For instance if your Wireless Router or access point uses the key 00112233445566778899AABBCC then the client card must be se...

Page 100: ...Microsoft s patch only supports devices with WPA enabled drivers such as Belkin 802 11g products Download the latest driver at http web belkin com support for the following products F5D7000 F5D7001 F5D7010 F5D7011 F5D7230 4 F5D7234 4 F5D7231 4 F5D7130 Problem I am having difficulty setting up Wi Fi Protected Access WPA security on a Belkin Wireless Router or Belkin Access Point for a home network ...

Page 101: ... 6 Click OK then Apply to save the settings Solution Clients must use the same key that the G Wireless Router or access point uses For instance if the key is Smith Family Network Key in the G Wireless Router or access point the clients must also use that same key 1 Double click the Signal Indicator icon to bring up the Wireless Network Utility screen The Advanced button will allow you to view and ...

Page 102: ...network administrator 6 Click OK then Apply to save the settings Solution 1 Double click the Signal Indicator icon to bring up the Wireless Network Utility screen The Advanced button will allow you to view and configure more options of your client card 2 Once the Advanced button is clicked the Belkin Wireless LAN Utility will appear This Utility will allow you to manage all the advanced features o...

Page 103: ...oint that you set up 6 Type in your encryption key in the Network key box Important Enter your pre shared key This can be from eight to 63 characters and can be letters numbers or symbols This same key must be used on all of the clients that you set up 7 Click OK to apply settings Solution If you are NOT using a Belkin WPA Wireless Desktop or Wireless Notebook Network Card and it is not equipped w...

Page 104: ... and microwave ovens may interfere with the unlicensed band 2 4GHz Common household devices such as cordless phones and microwave ovens may interfere with the unlicensed band 2 4GHz Common household devices such as cordless phones and microwave ovens may interfere with the unlicensed band 2 4GHz Common household devices such as cordless phones and microwave ovens may interfere with the unlicensed ...

Page 105: ...1 West Walnut Street Compton CA 90220 declare under our sole responsibility that the product F5D7234 4 to which this declaration relates Complies with Part 15 of the FCC Rules Operation is subject to the following two conditions 1 this device may not cause harmful interference and 2 this device must accept any interference received including interference that may cause undesired operation Caution ...

Page 106: ...numérique de la classe B conforme á la norme NMB 003 du Canada Europe European Union Notice Radio products with the CE 0682 or CE alert marking comply with the R TTE Directive 1995 5 EC issued by the Commission of the European Community Compliance with this directive implies conformity to the following European Norms in brackets are the equivalent international standards EN 60950 1 IEC60950 Produc...

Page 107: ...warranty covers Belkin International Inc Belkin warrants to the original purchaser of this Belkin product that the product shall be free of defects in design assembly material or workmanship What the period of coverage is Belkin warrants the Belkin product for the lifetime of the product What will we do to correct problems Product Warranty Belkin will repair or replace at its option any defective ...

Page 108: ...urchaser may have How state law relates to the warranty THIS WARRANTY CONTAINS THE SOLE WARRANTY OF BELKIN THERE ARE NO OTHER WARRANTIES EXPRESSED OR EXCEPT AS REQUIRED BY LAW IMPLIED INCLUDING THE IMPLIED WARRANTY OR CONDITION OF QUALITY MERCHANTABILITY OR FITNESS FOR A PARTICULAR PURPOSE AND SUCH IMPLIED WARRANTIES IF ANY ARE LIMITED IN DURATION TO THE TERM OF THIS WARRANTY Some states do not al...

Page 109: ...ti stabilite dalla direttiva 1999 5 CE Latviski Latvian Ar šo Belkin Ltd Belkin Ltd deklarƝ ka F5D7234 4 iekƗrtas tips atbilst DirektƯvas 1999 5 EK bnjtiskajƗm prasƯbƗm un citiem ar to saistƯtajiem noteikumiem Lietuviǐ Lithuanian Šiuo Belkin Ltd deklaruoja kad šis F5D7234 4 atitinka esminius reikalavimus ir kitas 1999 5 EB Direktyvos nuostatas Nederlands Dutch Hierbij verklaart Belkin Ltd dat het t...

Page 110: ...ww belkin com de networking GREECE 00800 44 14 23 90 www belkin com uk networking HUNGARY 06 17 77 49 06 www belkin com uk networking ICELAND 800 8534 www belkin com uk networking IRELAND 0818 55 50 06 www belkin com uk networking ITALY 02 69 43 02 51 www belkin com it networking LUXEMBOURG 34 20 80 85 60 www belkin com uk networking NETHERLANDS 0900 040 07 90 0 10 per minute www belkin com nl net...

Page 111: ...e 2 80637 Munich Germany Belkin B V Boeing Avenue 333 1119 PH Schiphol Rijk Netherlands 2008 Belkin International Inc All rights reserved All trade names are registered trademarks of respective manufacturers listed Apple AirPort Mac Mac OS and AppleTalk are trademarks of Apple Inc registered in the U S and other countries Windows Windows Vista NT and Microsoft are either registered trademarks or t...

Reviews: