


Hookup and Installation
Pur
eA
V
HD
TV
P
ow
er
C
onditioner
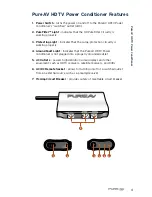
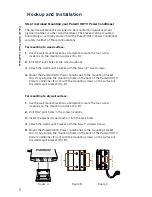
Step 2 Connect Components to the AC Outlets
A. PureAV power cord labels
—Attach labels to each component’s power
cord before you plug the cord into the corresponding outlet on the
PureAV HDTV Power Conditioner.
B. HDTV (always ON)
—Connect your HDTV video display or any TV to the
outlet labeled “HDTV”. This outlet is ALWAYS ON and provides power
regardless of whether or not the power switch is in the ON position.
C. AUX 01 (always ON)
—This outlet can be used to connect any other
equipment you may have including an HDTV receiver, satellite receiver,
DVD player, etc. This outlet is ALWAYS ON and provides power
regardless of whether or not the power switch is in the ON position.
D. AUX 02 (switched)
—This outlet can be used to connect any other
equipment you may have including a DVD player, VCR, or any product
you want to switch ON and OFF from time to time.
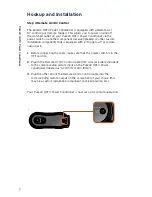
• Note about switched outlet:
Certain components do not need to
be powered on at all times or should not be powered on at all times.
For this reason, this outlet is “switched” and can be controlled with
the power switch located on the end of the PureAV HDTV Power
Conditioner. When you set the power switch to the ON position, the
switch will illuminate and power will now be flowing to the switched
outlet (AUX 02). To turn off the switched outlet, simply set the power
switch to the OFF position. Power will stop flowing to the switched
outlet, but will continue to flow to the unswitched outlets
(HDTV, AUX 01).
6


