background image

2

Two Computers Sharing One Printer

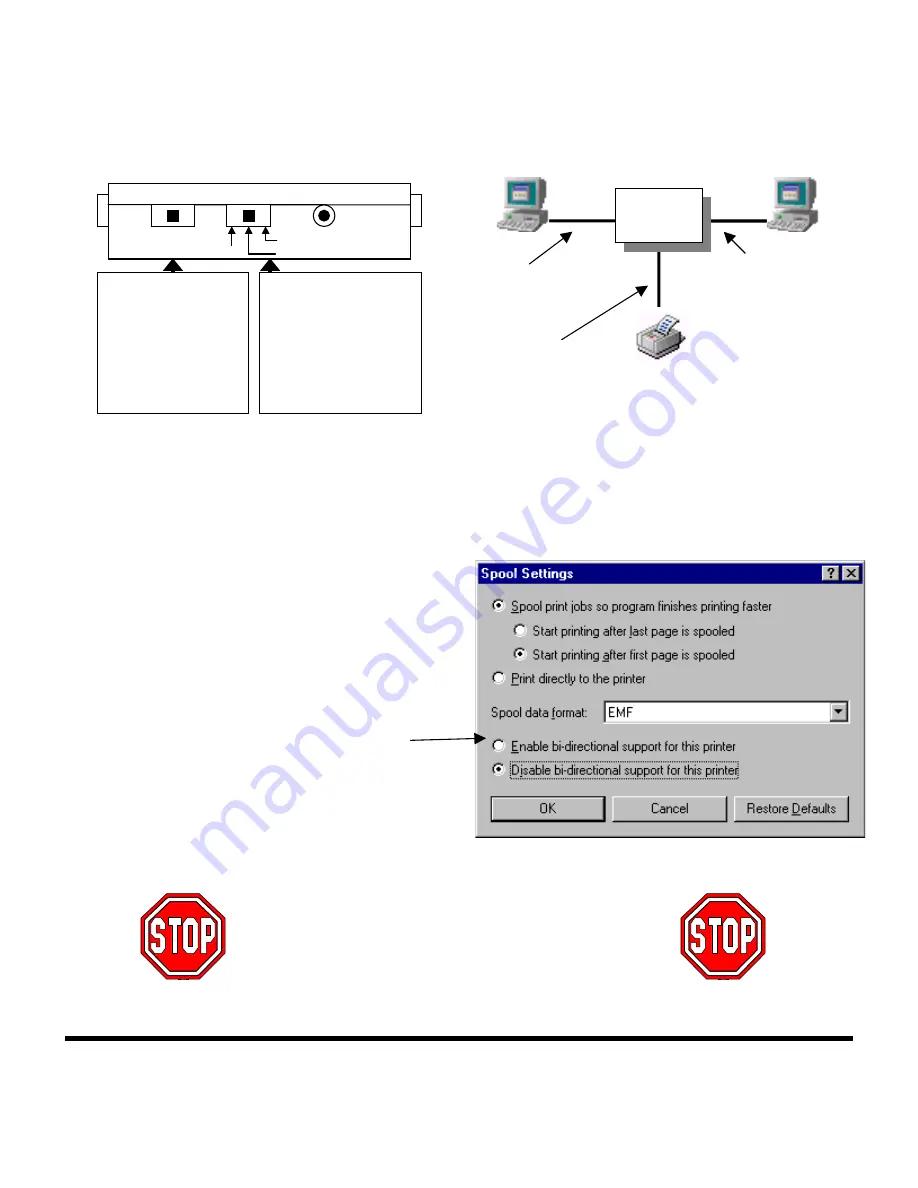
Set the Switches on the AutoSwitch, and connect the PCs, and the printer to the AutoSwitch as follows:

Important Notes:


It does not matter if a PC connects to Port A or Port B.


The software is not necessary, and must NOT be installed.  Doing so may cause your printer to print garbage.


Make sure the cables you are using are not file-transfer cables, otherwise the setup will not work.


For best results, we recommend Belkin Components® cables:

!


F3D111-XX

Belkin Pro Series DB25 M/M, straight through

!


F2A032-XX

Belkin Pro Series DB25

M/Centronics 36 M parallel printer cable

“XX” is the length of the cable in feet


Avoid using any status monitoring software, status toolbox,
or bi-directional printer drivers.  As much as possible,
please use “output-only” or “Raster” drivers.  This is so

that it will not lock up the AutoSwitch.


Turn off bi-directional communication on your printer
driver.   To do this, click on START, SETTINGS, PRINTERS,

right-click on your printer, choose Properties.  Click on the
DETAILS tab, then on the SPOOL SETTINGS button.  The

following window will pop up:

Make sure “Disable bi-directional support for this printer” is
selected.  Ignore if grayed out.


Check the end of this manual for information on disabling
bi-directional communication on your specific printer.

Using the AutoSwitch

The AutoSwitch automatically connects a computer to the
printer when a computer is ready to print.  This is done on a first-come first-served basis.  Just set the selector switch to the

middle “AUTO” position, and both LEDs should be lit up.  Now it is set for automatic sharing mode.

YOU’RE DONE!

(Do not continue to the next page)

You DO NOT have to install the software, or do anything anymore.  Just print like you normally do on any computer, and the
AutoSwitch will direct the print job automatically.

F1U109

A             B

        C

F3D111-XX

F3D111-XX

F2A032-XX

Set this switch to the
AUTO (middle)

position.

Setting to “A” or “B”  is

a manual override, and
locks the AutoSwitch to

that port.

Set this switch to the
FD (right) position.

Setting to “FE” is only
used if you are in DOS,

and your printer does not
eject paper after printing.

AUTO

A

B

FD

FE

(SPARE)

DC 3.6-9V

1

4

2

Summary of Contents for F1U109

Page 1: ...E_OUT period the switch will return to scanning both ports The AutoSwitch can also be reversed allowing one computer to select between two printers For instance you can easily switch between a laser and ink jet printer from any application The included software creates special virtual ports which give you printer selection capability from any Windows 95 or 98 application The Reversible AutoSwitch ...

Page 2: ...nter choose Properties Click on the DETAILS tab then on the SPOOL SETTINGS button The following window will pop up Make sure Disable bi directional support for this printer is selected Ignore if grayed out Check the end of this manual for information on disabling bi directional communication on your specific printer Using the AutoSwitch The AutoSwitch automatically connects a computer to the print...

Page 3: ... toolbox or bi directional printer drivers As much as possible please use output only or Raster drivers This is so that it will not lock up the AutoSwitch Check the end of this manual for information on disabling bi directional communication on your specific printer Software Installation Windows 95 and 98 only The software will not work in Windows 3 1 or NT 1 Insert the software disk into your flo...

Page 4: ...stall program will then ask you for the location of the install files Because your floppy drive is A just click OK 6 When done the program will display the following message Click OK and installation is complete 7 Next you will see a box with the following instructions Click OK 8 Reboot your computer THIS IS A VERY IMPORTANT STEP YOU MUST REBOOT OTHERWISE THE SOFTWARE WILL NOT INITIALIZE AND YOU C...

Page 5: ...When you are asked to choose a port select AUTOLPTx where x corresponds to the port letter you would like to use For instance your DeskJet printer is connected to Port A of the AutoSwitch Select AUTOLPTA in the Add New Printer setup Do the same for the printer connected to Port B on the AutoSwitch But this time select AUTOLPTB 10 Turn off bi directional communication on your printer driver To do t...

Page 6: ...led a DeskJet and LaserJet in Windows The DeskJet is connected to Port A of the AutoSwitch and the LaserJet is connected to Port B of the AutoSwitch as shown in the diagram on the right 1 Click on START SETTINGS PRINTERS and right click on your printer Select PROPERTIES 2 Click on the DETAILS tab above You will see the Window on the right Click on this pull down menu to select which port your prin...

Page 7: ...itch will automatically direct your print job to the correct port This image is the Print dialog box showing how the DeskJet is using Port AUTOLPTA because it is connected to Port A on the AutoSwitch This image is the Print dialog box showing how the LaserJet is using Port AUTOLPTB because it is connected to Port B on the AutoSwitch ...

Page 8: ...rors such as Parameter not set or Parameter not correct or Illegal Function showing up Solutions Disable the printer s bi directional software see attached document When connecting 1 computer to 2 printers make sure the switch is set to auto in the middle and 1 2 all the way to the left Confirm cable from the PC to the AutoSwitch is straight through Belkin cable number F3D111 xx If you have a Belk...

Page 9: ...FCFG14 exe HP DeskJet 820C HPFCFG04 exe or HPFCFG09 exe HP DeskJet 850C 855C HPRCFG01 exe or HPRCFG02 exe or HPRCFG03 exe or HPVCNFIG exe or HPRCFG08 exe HP DeskJet 870C HPRCFG03 exe or HPRCFG08 exe or HPRCFG06 exe or HPRCFG11 exe HP DeskJet 890C HPRCFG07 exe or HPRCFG06 exe or HPRCFG08 exe HP DeskJet 895C HPFCFG15 exe HP DeskJet 1000C HPW3CFG exe HP DeskJet 1100C HPW4CFG exe or HPW5CFG exe HP Des...

Page 10: ...n menu Select I O MENU From this menu change the line that reads FUNCTION ON to FUNCTION OFF Other HP Printers Older HP printers do not require any changes For NEW printers contact HP for proper information EPSON PRINTERS Epson Stylus 400 600 and 800 printers Windows 3 x Windows 95 In Program Manager go to Epson folder Open the Spool Manager and make sure the Epson Stylus Color printer is selected...

Page 11: ...1 1992 Belkin Components Lifetime Limited Warranty Belkin Components warrants this product against defects in materials and workmanship for its lifetime If a defect is discovered Belkin will at its option repair or replace the product at no charge provided it is returned during the warranty period with transportation charges prepaid to the authorized Belkin dealer from whom you purchased the produ...

Reviews: