background image

INSTALLATION

20

USING YOUR KVM SWITCH

21

9.

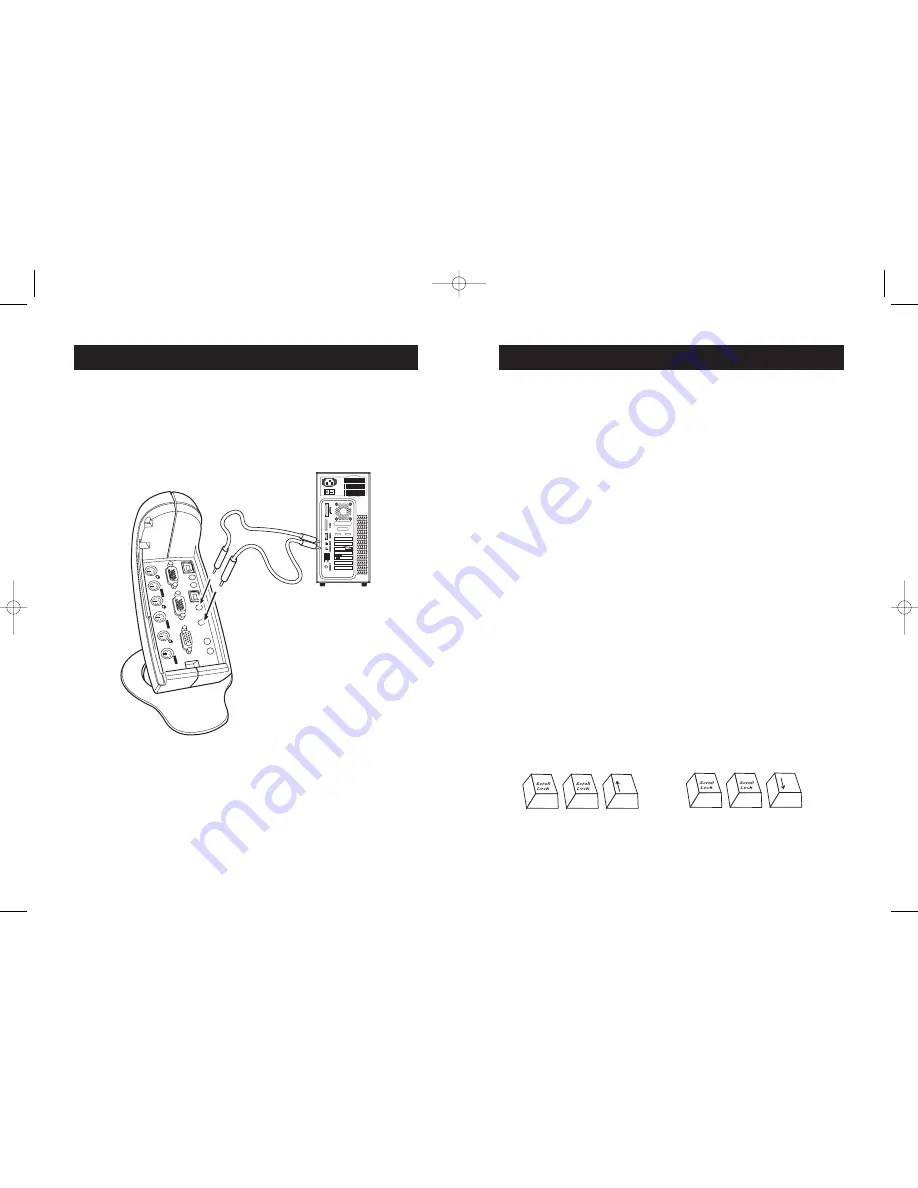
Using the OmniView KVM Cable for SOHO Series with Audio (the KVM
Cable), connect one end of the lime male 3.5mm plug to the speaker jack
of your sound card or computer and connect the other end to the lime
audio jack of the KVM Switch. See Fig. 14.

10.

Using the KVM Cable, connect one end of the pink male 3.5mm plug to
the mic jack of your sound card or computer and connect the other end
to the pink mic jack of the KVM Switch. See Fig. 14.

Powering Up the Systems 

Once all cables have been connected, power up the CPUs that are
attached to the KVM Switch. All computers can be powered on
simultaneously. The KVM Switch emulates a mouse and keyboard on each
port and allows your computer to boot normally. 
Your KVM Switch should now be ready for use. 
You can select which computer to operate by either the direct-access port
selectors located on the front panel of the KVM Switch or through
keyboard hot key commands. Note that it will take 1–2 seconds for the
video to display after switching. This is due to the refresh of the video
signal. There is also re-synchronization of the mouse and keyboard signal
that takes place. This is normal operation and ensures that proper
synchronization is established.

Selecting a Computer Using Direct-Access Port Selectors

You can directly select which computer you wish to control by pressing
the corresponding direct-access port selector next to the appropriate
port. The LED will be lit to indicate that the port is currently selected.

Selecting a Computer Using Keyboard Hot Key Commands

You can command the KVM Switch to switch ports with a simple keyboard
command sequence by using the “SCROLL LOCK” key and up/down arrow
keys. To send commands to the KVM Switch, the “SCROLL LOCK” key must
be pressed twice within two seconds. You will hear a beep for
confirmation. Then you can press the up/down arrow keys to switch
between ports.

Fig. 14

Switch to next active port, 
up arrow

Switch to previous active port,
down arrow

P73778-C-SOHO-man-9_02.qxd  9/18/02  5:17 PM  Page 20

Summary of Contents for F1DS104T-B-DL - OmniView SOHO Series 4 Port KVM Switch

Page 1: ... Belkin Corporation 501 West Walnut Street Compton CA 90220 USA Tel 310 898 1100 Fax 310 898 1111 2002 Belkin Corporation All rights reserved All trade names are registered trademarks of respective manufacturers listed Macintosh Apple Mac and Mac OS are trademarks of Apple Computer Inc registered in the U S and other countries Belkin Components Ltd 7 Bowen Crescent West Gosford NSW 2250 Australia ...

Page 2: ...ew SOHO Series KVM Switch with Audio We appreciate your business and have confidence that you will soon see for yourself why over 1 million Belkin OmniView KVM Switches are being used worldwide Contents of Package OmniView SOHO Series KVM Switch with Audio Attachable Base DB25 to RJ45 Flash Cable Two PS 2 Extension Cables User Manual Quick Installation Guide Registration Card INTRODUCTION 1 TABLE ...

Page 3: ...selector is located next to the LED When pushed the LED should light next to the direct access port selector selected The Belkin OmniView SOHO Series KVM Switch with Audio allows you to control up to four computers depending on the model with one keyboard monitor and mouse All SOHO Series KVM Switches with Audio support PS 2 input devices keyboard and mouse as well as VGA SVGA XGA and XGAII video ...

Page 4: ...coded connectors for easier identification and connection Cables are available in USB and PS 2 protocols Please refer to your KVM Switch to determine if it supports USB The following cables are recommended for your KVM Switch F1D9101 XX USB Style F1D9100 XX PS 2 Style XX denotes the length in feet Operating Systems OmniView SOHO Series KVM Switches with Audio are for use on CPUs using Platforms Wi...

Page 5: ... Computer VGA Port VGA 2 2nd Computer USB Port USB 2 2nd Computer Audio Microphone Jacks 1st Computer USB Port USB 1 Removable Shroud Base Front View Fig 1 Back View Fig 2 1st Computer Audio Microphone Jacks 1st Computer VGA Port VGA 1 Console Audio Microphone Jacks DC Power Jack Unit Display Diagrams SOHO Series 2 Port KVM Switch with Audio PS 2 and USB shown P73778 C SOHO man 9_02 qxd 9 18 02 5 ...

Page 6: ...ulation PS 2 Monitor Supported VGA and SVGA MultiSync LCD with use of adapter cable Max Resolution 2048X1536 85Hz Keyboard Input 6 pin miniDIN PS 2 Mouse Input 6 pin miniDIN PS 2 Audio Input Output 3 5mm jack Microphone Input Output 3 5mm jack VGA Port 15 pin HDDB type LED Indicators 2 F1DS102P 4 F1DS104P Enclosure High impact plastic Dimensions F1DS102P H 6 75 x W 4 25 x D 7 75 inches H 17 2 x W ...

Page 7: ...ing with one hand and the base with the other With the narrow part of the base facing toward the rear of the housing align the hooks of the base to the base holes located underneath the housing Put the hooks through the holes and push the base toward the front of the housing to lock the base into place See Fig 3 PS 2 Installation Keyboard Video and Mouse Connections Connect the Console 1 Using the...

Page 8: ...f the computer and the female end to the VGA port of the KVM Switch labeled VGA1 See Fig 6 Fig 6 5 Connect the PS 2 keyboard and PS 2 mouse cables Belkin part number F1D9100 XX to the appropriate ports on the KVM Switch See Fig 7 6 Repeat steps 4 and 5 for each additional computer you wish to connect Fig 7 P73778 C SOHO man 9_02 qxd 9 18 02 5 17 PM Page 12 ...

Page 9: ...ig 9 2 Using the mic cable attached to your microphone connect the male 3 5mm plug to the pink mic jack in the Console section of the KVM Switch See Fig 8 3 Using the OmniView KVM Cable for SOHO Series with Audio the KVM Cable connect one end of the lime male 3 5mm plug to the speaker jack of your sound card or computer and connect the other end to the audio jack of the KVM Switch See Fig 9 4 Usin...

Page 10: ... Connect the Console 1 Using the cable that is included with your monitor connect it to the VGA port in the Console section of the KVM Switch See Fig 10 2 Connect a PS 2 keyboard to the purple port in the Console section of the KVM Switch See Fig 11 3 Connect a PS 2 mouse to the green port in the Console section of the KVM Switch See Fig 11 4 Power on your computer as you would normally and wait u...

Page 11: ...if not already installed on your computer Audio and Microphone Connections Recommended Belkin OmniView KVM Cables for SOHO Series with Audio are included with Belkin part number F1D9101 XX Note Speakers and microphones are not required for use of your KVM Switch Connect the Audio 7 Using the audio cable attached to your speakers connect the male 3 5mm plug to the lime audio jack in the Console sec...

Page 12: ...hrough keyboard hot key commands Note that it will take 1 2 seconds for the video to display after switching This is due to the refresh of the video signal There is also re synchronization of the mouse and keyboard signal that takes place This is normal operation and ensures that proper synchronization is established Selecting a Computer Using Direct Access Port Selectors You can directly select w...

Page 13: ...unit include hot key functionality PS 2 keyboard and mouse emulations for error free boot up and a Belkin Two Year Warranty F1DB102P E Series 2 Port KVM Switch PS 2 F1DB104P E Series 4 Port KVM Switch PS 2 OmniView SOHO Series with Audio This innovative design provides built in cable management and uses little space while adding a whole new sculpted look to your desktop The PS 2 KVM Switch allows ...

Page 14: ...full control of as many as 256 computers through dedicated daisy chain ports and is natively rack mountable for server room environments Video resolutions of up to 2048x1536 85Hz are supported through a 400MHz bandwidth On Screen Display allows you to name and select attached servers using an on screen interface Switch between ports by using hot key commands or direct access port selectors The MAT...

Page 15: ...ay PVC Flextec jacket Work with OmniView MATRIX2 Series KVM Switches F1D9300 XX PS 2 Style F1D9301 XX USB Style OmniView Gold Series All In One KVM Cables Belkin Gold Series Cables offer the highest possible cable performance providing maximum conductivity and error free data transmission These cables allow you to easily connect all your computers and servers to your OmniView KVM Switches and are ...

Page 16: ...tension cables and SOHO Series User Manual OmniView Power Supplies F1DS001 PWR 9V AC 1A F1D084 PWR 9V AC 500mA F1D065 PWR 9V DC 600mA F1D108 PWR 12V DC 1A Q What operating systems does the KVM Switch support A The KVM Switch will support any operating system that runs on a PS 2 and USB platform It will also work with non USB enabled Sun and Mac operating systems using the appropriate adapters Belk...

Page 17: ...r and mouse to the Console port and it is ready for use Q Does the KVM Switch require an AC adapter A The KVM Switch can be powered by the PS 2 keyboard port of your computer An optional 9V DC 600mA power adapter with center pin positive polarity may be used for instances where power cannot be drawn from a PS 2 port of a computer The KVM Switch can also be powered from the USB port available on th...

Page 18: ... functioning properly KEYBOARD Computer does not detect keyboard and I get a keyboard error reported at boot up Check that the keyboard cable between the KVM Switch and the computer is connected properly Tighten any loose connections Try swapping your keyboard with a different one Try connecting the computer to a different port If you are using the keyboard software that was included with your key...

Page 19: ... mouse directly to it Make sure that the keyboard and mouse cables are connected tightly between the KVM Switch and the computer Check that the keyboard and mouse cables are not crossed USB F1DS102T F1DS104T only I am connecting my computer to the USB SOHO Series KVM Switch via USB and my keyboard and mouse do not work Prior to connecting the USB SOHO Series KVM Switch make sure that the HID USB d...

Page 20: ...provided it is returned during the warranty period with transportation charges prepaid to the authorized Belkin dealer from whom you purchased the product Proof of purchase may be required This warranty does not apply if the product has been damaged by accident abuse misuse or misapplication if the product has been modified without the written permission of Belkin or if any Belkin serial number ha...

Reviews: