8
Test Run
8.1 Turn on the water supply and Stop Valve, the water will flow through the Handshower.
8.2 Switch on the electrical supply. The 3 LED Indicator lights shall run ON/OFF 3 times in sequence
to indicate the set are self checking.
8.3 Turn the Temperature Control Knob to ‘ON’, the Red Indicator light (HEATER) will turn on, hot
water will flow out within a few seconds. The More Temperature Control Knob being turned in
clockwise direction, the hotter is the shower.
8.4 The shower might not be hot enough even at ‘MAX’ position if incoming water supply from the
mains is too cold or the pressure of the water is too high. In this case, you may adjust the Stop
Valve to reduce the water inflow in order to get the desired showering temperature.
8.5 Check the Built-in-ELCB as following :
- Press the “TEST” Button, the Built-in-ELCB should trip and cut off the power supply, all LED
Indicators should light off.
- Press the “RESET” Button, the 3 LED Indicator lights shall run ON/OFF 3 times in sequences
to indicate self check as in 8.2 above and the Heater unit should resume normal function, the
Green LED indicator should light on.
If procedures stated above prevailed, the ELCB is functioning in normal condition.
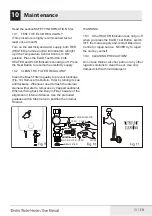
8.6 The height and direction of Shower Holder are adjustable by realeasing the shower holder knob
clockwise and anticlockwise.
8.7 It is unnecessary to turn the Temperature Control Knob to “OFF” position when the Heater
is not in use.
8.8 Switch OFF the electricity supply after shower.
8.9 For Pump Models:
Turn on the Pump Control Knob to test on Pump’s funcationality. If the shower is not hot enough,
you may adjust
the pump speed until the desired shower temperature is obtained.
11 / EN
Summary of Contents for BWI45S1D-242
Page 1: ...BWI45S1D 242 EN VN Electric Water Heater User Manual ...
Page 2: ......
Page 30: ......
Page 31: ......

