background image

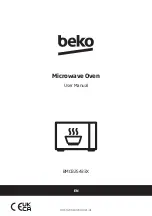
Microwave Oven / User Manual

2 / EN

CONTENTS

1  Important safety and 

environmental instructions 

4

1.1 Safety warnings  . . . . . . . . . . . . . 4
1.2 Compliance with the WEEE Directive 

and Disposing of the Waste Product:  . 8
1.3 Compliance with RoHS Directive  . 9
1.4 Package information . . . . . . . . . . 9
1.5 Plug Wiring. . . . . . . . . . . . . . . . . 9

2 Your microwave oven 

10

2.1 Overview  . . . . . . . . . . . . . . . . . 10
2.2 Technical data. . . . . . . . . . . . . . 10
2.3 Installing the turntable. . . . . . . . 11

3 Installation and connection  11

3.1 Installation and connection  . . . . 11
3.2 Built-in installation  . . . . . . . . . . 12
3.2.1 Furniture dimensions for built-in 

installation  . . . . . . . . . . . . . . . . . . . 12
3.2.2 Preparing the cabinet. . . . . . . 12
3.2.3 Fixing the oven  . . . . . . . . . . . 13
3.3 Radio interference. . . . . . . . . . . 14
3.4 Microwave cooking principles  . . 14
3.5 Grounding instructions  . . . . . . . 14
3.6 Utensil test . . . . . . . . . . . . . . . . 15

4 Operation 

16

4.1 Control panel  . . . . . . . . . . . . . . 16
4.2 Setting the time  . . . . . . . . . . . . 16
4.3 Cooking with microwave oven  . . 16
4.4 Cooking with grill or combination 

mode . . . . . . . . . . . . . . . . . . . . . . . 17
4.5 Convection . . . . . . . . . . . . . . . . 17
4.5.1 Convection cooking(with 

preheating funtion)  . . . . . . . . . . . . . 17
4.5.2 Convection cooking( without pre-

heating function). . . . . . . . . . . . . . . 18

4.6 Quick start  . . . . . . . . . . . . . . . . 18
4.7 Defrost by weight  . . . . . . . . . . . 18
4.8 Defrost by time . . . . . . . . . . . . . 18
4.9 Kitchen timer (counter)  . . . . . . . 18
4.10 Auto menu  . . . . . . . . . . . . . . . 19
4.11 Multi-step cooking  . . . . . . . . . 19
4.12 Query function  . . . . . . . . . . . . 20
4.13 Child lock . . . . . . . . . . . . . . . . 20
4.14 Opening the oven door  . . . . . . 20

5 Cleaning and maintenance 

21

5.1 Cleaning. . . . . . . . . . . . . . . . . . 21
5.2 Storage  . . . . . . . . . . . . . . . . . . 21
5.3 Handling and transportation. . . . 22

6 Troubleshooting 

22

Summary of Contents for BMCB25433X

Page 1: ...BMCB25433X EN 01M 9200113200 1321 01 User Manual Microwave Oven ...

Page 2: ...abinet 12 3 2 3 Fixing the oven 13 3 3 Radio interference 14 3 4 Microwave cooking principles 14 3 5 Grounding instructions 14 3 6 Utensil test 15 4Operation 16 4 1 Control panel 16 4 2 Setting the time 16 4 3 Cooking with microwave oven 16 4 4 Cooking with grill or combination mode 17 4 5 Convection 17 4 5 1 Convection cooking with preheating funtion 17 4 5 2 Convection cooking without pre heatin...

Page 3: ...eferenceforfuture use If you handover the product to someone else give the user manual as well Fol low all warnings and information in the user manual Meanings of the symbols Following symbols are used in the various section of this user manual C Important information and useful hints about usage A Warnings for dangerous situations concerning the safety of life and pro perty Warning for hot surfac...

Page 4: ...ssuchas Staff kitchen areas in shops officesandotherworkingenvi ronments Farm houses By clients in hotels and other residential type environments Bed and Breakfast type envi ronments It is not intended for industrial or laboratoryuse Do not attempt to start the oven when its door is open otherwise you may be exposed to harmful microwave energy Safety locks shouldnotbedisabledortampered with Themic...

Page 5: ...oper atedwithanexternalclocktimeror separateremotecontrolsystem Before using the appliance for the first time clean all parts Please see the details given in the Clean ingandMaintenance section Operate the appliance for its in tended purpose only as described inthismanual Appliance becomes very hot while it is in use Pay attention not to touchthehotpartsinsidetheoven Donotoperatetheovenempty Cooki...

Page 6: ...when the appli anceisinuse Unplug the appliance before each cleaningandwhentheapplianceis notinuse Do not pull the power cable of the appliance to disconnect it from its power supply and never wrap its powercablearoundtheappliance Do not immerse the appliance powercable orpowerpluginwater or any other liquids Do not hold it underrunningwater When heating food in plastic or paper containers keep an...

Page 7: ...and whole hard boiled eggs must not be heated in microwave ovens since they may explode even after microwave heatinghasended WARNING If the door or door seals are damaged the oven must not be operated until it has been repaired by a competent person WARNING Itishazardousforanyo ne other than a competent person to carry out any service or repair operation which involves the remo val of a cover whic...

Page 8: ... propriate kitchen utensils before placingthemintheoven Metallic containers for food and beverages are not allowed during microwave cooking Otherwise sparkingmayoccur Microwaveovenmustnotbeplaced in a cabinet that is not in compli ance with the installation instruc tions Microwave oven is intended for built inuseonly If built in appliances being used equal or higher than 900 mm above the floor car...

Page 9: ...ction points designated by the local authorities 1 5 Plug Wiring The moulded plug on this appliance incorporates a 13 A fuse Should the fuse need to be replaced an ASTA approved BS1362 fuse of the same ra ting must be used Do not forget to refit the fuse cover In the event of losing the fuse cover the plug must not to be used until a replacement fuse cover has been fitted Colour of the replacement...

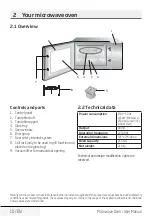
Page 10: ... Controls and parts 1 Control panel 2 Turntable shaft 3 Turntable support 4 Glass tray 5 Oven window 6 Door group 7 Door safety interlock system 8 Grill rack only to be used in grill function and placed on the glass tray 9 Vacuum lifter for manual door opening 2 2 Technical data Power consumption 230 V 50 Hz 1450 W Microwave 2500 W Convection 1100 W Grill Output 900 W Operating frequency 2450 MHz ...

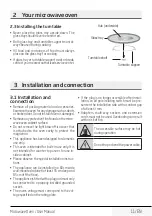
Page 11: ...inet surface Do not remove the light brown Mica cover that is attached to the oven cavity to protect the magnetron This appliance has been designed for domestic use only This oven is intended for built in use only It is not intended for counter top use or for use in side a cabinet Please observe the special installation instruc tions The appliance can be installed in a 60cm wide wall mounted cabin...

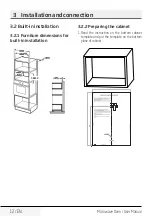
Page 12: ... 2 Built in installation 3 2 1 Furniture dimensions for built in installation 380 2 3 2 2 Preparing the cabinet 1 Read the instruction on the bottom cabinet template and put the template on the bottom plane of cabinet a a CENTER LINE FRONT EDGE LEFT EDGE T EDGE RIGH ...

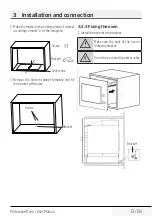
Page 13: ...s a of the template a a Vida A Braket Merkez çizgi Screw Centre line Bracket 3 Remove the bottom cabinet template and fix the bracket with screw Braket Vida A Screw Bracket 3 2 3 Fixing the oven 1 Install the oven into the cabinet A Make sure the back of the oven is locked by bracket B Donottraporbendthepowercable braket Bracket ...

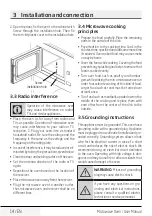
Page 14: ...f the dish Pay attention to the cooking time Cook in the shortesttimespecifiedandaddsomemoretime if required Overcooked food may cause smoke or may be burnt Coverthefoodwhilecooking Coveringthefood preventsanysplashingandhelpstoensurethat food is cooked evenly Turn over food such as poultry and hambur gers while cooking them in a microwave oven in order to accelerate cooking of this kind of food L...

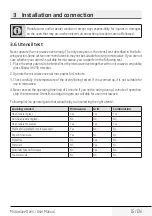
Page 15: ...ater 2 Operate the microwave oven at max power for 1 minute 3 Check carefully the temperature of the utensil being tested If it is warmed up it is not suitable for use in microwave 4 Never exceed the operating time limit of 1 minute If you notice arcing during 1 minute of operation stop the microwave Utensils causing arcing are not suitable for use in microwave Following list is a general guide th...

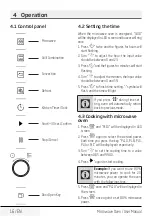
Page 16: ... will automatically return back to previous mode 4 3 Cooking with microwave oven 1 Press and PL10 will be displayed in LED screen 2 Press again to select the desired power Each time you press the key PL10 PL8 PL5 PL3 or PL1 will be displayed respectively 3 Turn to set the cooking time to a value between 0 05 and 95 00 4 Press again to start cooking C Example If you want to use 80 microwave power t...

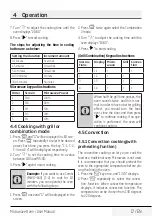
Page 17: ...1 Press once and G will be displayed in the screen 2 Press twice again select the Combination 2 mode 3 Turn to adjust the cooking time until the oven displays 10 00 4 Press to start cooking Grill Combination Keypad instructions Instruc tions Display Micro wave Grill Convec tion 1 C 1 2 C 2 3 C 3 4 C 4 C When half the grill time passes the oven sounds twice and this is nor mal In order to have a be...

Page 18: ...start cooking with 100 microwave power Each time you press the key cooking time will increase until 95 minutes with steps of 30 seconds 2 In microwave oven cooking grill and combinati on cooking or defrost by time modes the coo king time will increase by 30 seconds each time you press 3 In standby mode turn counterclockwise to set the cooking time in order to start cooking with 100 microwave power...

Page 19: ...60 0 C AC06 Potato 1 about 230 g 1 100 2 about 460 g 2 3 about 690 g 3 AC07 Fish 150 g 150 g 80 250 g 250 g 350 g 350 g 450 g 450 g 650 g 650 g AC08 Beverage 1 cup about 240 g 1 100 2 cup about 480 g 2 3 cup about 720 g 3 AC09 Popcorn 50 g 50 100 microware 100 g 100 AC10 Chicken 500g 500g C 4 200 0 C 750g 750g 1000g 1000g 1200g 1200g 4 11 Multi step cooking At most 3 steps can be set for cooking I...

Page 20: ...r 3 seconds After 3 seconds the oven will return to the previous mode 2 While cooking press and the current time will be displayed for 3 seconds 4 13 Child lock 1 Locking In standby mode press and a buzzer will sound After 3 seconds two buzzer will sound If the time is already set current time will also be displayed otherwise 0 00 will be displayed in the LED screen 2 Unlocking To disable the chil...

Page 21: ...ay need to remove the glass tray for cleaning Wash the tray in warm soapy water or in a dishwasher 5 Cleaning and maintenance 9 Therollerringandovenfloorshouldbecleaned regularly to avoid excessive noise 10 Itwouldbesufficienttowipethelowersurface of the oven with a mild detergent Roller ring may be washed in warm soapy water or in a dishwasher When you remove the roller ring from oven internal fl...

Page 22: ...n plug again after 10 seconds 2 Fuse is blown or circuit breaker is activated Replace fuse or reset circuit breaker repaired by professional personnel of our company 3 Trouble with outlet Test the outlet with other electrical appliances Oven does not heat 4 Door is not closed properly Close the door properly Glass turntable makes noise when microwave oven operates 5 Turntable and bottom of the ove...

Page 23: ... Republic of Ireland Any parts removed during repair work or any product that has been replaced becomes our property The guarantee is not transferrable if the product is resold The Guarantee does not cover Transit installation or delivery damage Accidental damage Misuse or abuse Replacement of any consumable item or accessories These include but are not limited to plugs cables light bulbs knobs fi...

Page 24: ...Arçelik A Ş Karaağaç Caddesi No 2 6 34445 Sütlüce İstanbul Türkiye www beko com ...

Reviews: