background image

EN

7

power failure continues for longer than 15 

minutes, the memory cannot be maintained 

and you will need to start the breadmaker 

again. However, if the dough has not 

passed the stage of rising when the power 

failure occurs, you should directly press 

"Start/Stop" button to start the program.

12. Baking: 

No kneading or rising, only 

baking. 

Start / Stop 

Starts and stops the selected program. 

Press 

“Start/Stop”

 button once to start 

a program. You will hear a short beep 

and when the colon (:) on the timer begins 

flashing, this means that the program has 

started. After starting a program, all buttons 

become inactive except for the 

“Start/

Stop”

 button.

Press and hold the 

“Start/Stop”

 button 

for approximately 3 seconds to stop the 

program. A long beep confirms that the 

program has turned off. This feature ends 

the program.

Baking Selection

This button allows the user to select 

cooking the crust 

LESS, MODERATE  

or 

MORE

. Press this button to select the crust 

colour of your choice. On the LCD display, 

the " ” arrow will turn to the colour that 

was selected.

Size of Loaf

Press this button to select the size of bread 

loaf. On the LCD display, you will see that 

the  arrow will move to the positions of 

Small I and Large II. Total time of running 

will vary according to different loaf sizes.

Keeping Warm

The appliance may keep the bread warm 

for 60 minutes after baking is complete. If 

you want to remove the bread in the keep 

warm stage, press and hold the Start/

Stop button for 3 seconds to turn off the 

program.

IMPORTANT NOTE: AFTER REMOVING 

THE BREAD AT THE END OF THE 

PROGRAM, PRESS AND HOLD START/

STOP BUTTON FOR 3 SECONDS TO 

STOP THE APPLIANCE AND TURN OFF 

THE PRODUCT VIA ON/OFF BUTTON 

ON THE BACK.

Memory

If a power failure occurs during the baking 

process; even if you don't press on the 

Start/Stop button, the baking automatically 

resumes if less than 15 minutes. If the 

Ambient Conditions

The breadmaker can operate within a wide 

range of temperature, but the size of loaf 

may vary when the room is too warm or 

too cold. We recommend storing bread 

ingredients at room temperature, between 

20°C and 34°C.

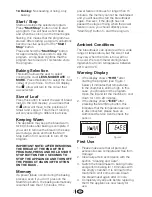
1.  If the display shows 

“H:HH” 

after 

starting the program (see Figure 1 

below), it indicates that temperature 

in the chamber is still too high. In this 

case, you should end the program. 

Open the lid and let the machine to cool 

down for 10 to 20 minutes.

2.  If the display shows 

“E:EE”

 after 

pressing the 

Start/Stop 

button, this 

indicates that the temperature sensor 

is disconnected, please have an 

Authorized Service Centre check the 

sensor.

1.  Please make sure that all parts and 

accessories are complete and free from 

damage.

2.  Clean all parts in accordance with the 

section "Cleaning and Care".

3.  Switch the breadmaker to baking mode 

and perform baking for 10 minutes with 

the empty chamber. It is normal for the 

machine to emit some smoke. Clean 

the breadmaker again after it cools. 

4.  Completely dry all parts before replacing 

them; the appliance is now ready for 

use.

First Use

Figure 2

Figure 1

AZ     ORTA    ÇOK

AZ     ORTA    ÇOK

Warning Display

Summary of Contents for BKK 2505

Page 1: ...BKK 2505 BreadMaker User Manual ...

Page 2: ...r machine in a fast and safe way Read the User Manual before installing and starting your product In particular follow the instructions related to safety Keep this User Manual within easy reach for future reference Also read all additional documents supplied with this product Remember that this User Manual is also applicable for several other models Differences between models will be identified in...

Page 3: ...criptions 6 Start Stop 7 Baking Selection 7 Size of Loaf 7 Keeping Warm 7 Memory 7 Ambient Conditions 7 Warning Display 7 First Use 7 How To Make Bread 8 Specific Information 9 4 Important Tips for Baking Tasty Bread 9 About Bread Ingredients 10 Useful Tips Recommendations 11 Bread Recipes 12 5 Cleaning and Care 14 6 Troubleshooting 15 ...

Page 4: ...em or inside heated ovens 12 Never touch moving or rotating parts when the machine is cooking 13 Never turn on the appliance before placing the chamber securely in place when it contains dough 14 Never hit the edge of the chamber in order to remove the bread otherwise the chamber may be damaged 15 Due to the risk of fire or short circuit avoid putting metal foils or similar materials in the breadm...

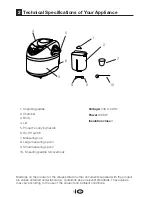
Page 5: ...e values may vary according to the use of the product and ambient conditions 2 Technical Specifications of Your Appliance Voltage 230 V 50 Hz 2 Chamber 3 Body 4 Lid 5 Product s carrying handle 6 On Off switch 7 Measuring cup 8 Large measuring spoon 9 Small measuring spoon 10 Kneading paddle removal hook Power 600 W Insulation class 1 1 Kneading paddle 1 2 3 4 5 6 7 8 9 10 ...

Page 6: ... and baking with whole wheat flour This setting provides a longer preheating time to help the grain soak in water Delaying function is not recommended to avoid unintended results 4 Quick This function does not allow the selection of loaf size Kneading rising and baking normal bread with baking soda as described in the recipe This setting generally bakes the bread with a thicker texture and smaller...

Page 7: ...rm stage press and hold the Start Stop button for 3 seconds to turn off the program IMPORTANT NOTE AFTER REMOVING THE BREAD AT THE END OF THE PROGRAM PRESS AND HOLD START STOP BUTTON FOR 3 SECONDS TO STOP THE APPLIANCE AND TURN OFF THE PRODUCT VIA ON OFF BUTTON ON THE BACK Memory If a power failure occurs during the baking process even if you don t press on the Start Stop button the baking automat...

Page 8: ...s the user to set the time for up to 13 hours You may skip this step if you would like the breadmaker to start immediately 9 Press the Start Stop button to start the operation 10 You will hear a beep when operating programs Normal Village Bread Whole Wheat Bread Wholemeal Bread and Bread Rolls This reminds you to add ingredients such as olives walnuts raisins and cereals Open the lid and quickly a...

Page 9: ... accurately determine amounts otherwise the bread quality will be effected 1 Measuring liquid ingredients Water fresh milk or oil should be measured with a measuring cup Visually check the horizontal level of the measuring cup For baking bread Instant dry yeast powder must be used 2 Measuring solid ingredients Flour salt sugar and Instant dry yeast powder can be measured by using a measuring cup o...

Page 10: ...t flavour 5 Corn flour and oatmeal Corn flour and oatmeal are prepared by milling corn and oats respectively Both are additives used for baking coarse bread and to enrich the flavour and texture Sugar Sugar is a very important ingredient that increases flavour and colour of the bread It leavens the bread and increases nutritional value generally white sugar is used Optionally brown sugar icing sug...

Page 11: ...e village bread Oil butter and vegetable oil Oil makes the bread soft and extends storage life After removing the butter from the refrigerator you should melt it or cut it into small pieces to make it suitable for mixing Baking soda Baking soda is used in quick bread programs It does not require time for rising and generates air bubbles that soften the texture of the bread according to its chemica...

Page 12: ...ge measuring spoon 1 Large measuring spoon White Flour 3 full measuring cups 450g 3 and 1 3 Measuring cups 500g Milk 1 Large measuring spoon 1 Large measuring spoon Sugar 2 Small measuring spoons 2 Small measuring spoons Salt 1 Small measuring spoons 1 Small measuring spoons Instant dry yeast powder 1 Small measuring spoons 1 Small measuring spoons Whole Wheat Bread Program Position Whole Wheat Br...

Page 13: ...election Larger II Auto selection Hot Water 45 50 C 280 ml 300 ml Vegetable oil 1 Larger measuring spoon 1 Larger measuring spoon Milk 1 Larger measuring spoon 1 Larger measuring spoon White Flour 3 Measuring Cups 450g 3 and 1 3 Measuring cups 500g Sugar 2 Small measuring spoons 3 Small measuring spoons Salt 1 Small measuring spoons 1 Small measuring spoons Baking soda 1 packet 10g 1 packet 10g In...

Page 14: ... Large II Water 280 ml 300 ml Vegetable oil 1 Larger measuring spoon 1 Larger measuring spoon Milk 1 Larger measuring spoon 1 Larger measuring spoon White Flour 3 Measuring Cups 450g 3 and 1 3 Measuring cups 500g Salt 1 Small measuring spoons 1 Small measuring spoons Instant dry yeast powder 1 Small measuring spoons 1 Small measuring spoons Jam Recipes Program Position Jam Preparation Strawberry 5...

Page 15: ...oo high Check the factors above and reduce amounts to intended levels 8 The size of bread is too small or the bread is not rising You haven t add yeast or it is not enough also yeast does not function properly if the water temperature is too high or the yeast mixes with salt or the ambient temperature is low Check the amount and performance of the yeast raise to the intended ambient temperature 9 ...

Page 16: ...www beko com ...
Reviews: