background image

23 / 36  EN

Refrigerator / User Manual

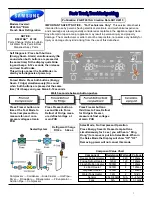
Operating the product

14. FN button

Using this key, you can switch between the 
functions that you want to select. Upon pressing 
this key, the icon, whose function is required to be 
activated or deactivated, and this icon's indicator 
starts flashing. The FN button gets deactivated if 
not pressed for 20 seconds. You need to press this 
button to change the functions again.

15. Celsius indicator 

It is a Celsius indicator. When the Celsius indication 
is activated, the temperature set values are shown 
in Celsius and the relevant icon turns on.

16. OK button

After navigating the functions using the FN button, 

when the function is cancelled via the OK button, 

the relevant icon and the indicator flashes. When 

the function is activated, it remains on. The 

indicator continues to flash in order to show the 

icon it is on.

17. Temperature change cabin icon

Indicates the cabin whose temperature is to be 
changed. When the temperature change cabin icon 
starts flashing, it is understood that the relevant 
cabin has been selected.

18. Temperature change cabin icon

Indicates the cabin whose temperature is to be 
changed. When the temperature change cabin icon 
starts flashing, it is understood that the relevant 
cabin has been selected.

19. Set increasing button

Select the relevant cabin with the select button; 
the cabin icon representing the relevant cabin will 
start to flash. If you press the set increasing button 
during this process, the set value gets increased. If 
you keep pressing it in a loop, the set value returns 
to the beginning.

20. Temperature change cabin icon

Indicates the cabin whose temperature is to be 
changed. When the temperature change cabin icon 
starts flashing, it is understood that the relevant 
cabin has been selected.

21. Setting the Celsius and Fahrenheit 

indicator

Hover over this key using the FN key and select 
Fahrenheit and Celsius via the OK key. When 
the relevant temperature type is selected, the 
Fahrenheit and Celsius indicator turns on.

22. Ice machine off icon

Press the FN key (until it reaches the ice icon and 

the lower line) to switch off the ice machine. The 

ice machine off icon and the ice machine function 

indicator start flashing when you hover over them, 

thus you can understand whether the ice machine 

will be turned on or off. When you press the OK 

button, the ice machine icon lights continuously 

and the Indicator continues to flash during this 

process. If you do not press any button after 20 

seconds, the icon and the indicator remains on. 

Thus, the ice machine is switched off. In order to 

switch on the ice machine again, hover over the 

icon and the indicator; thus, both the ice machine 

off icon and the indicator will start flashing. If you 

do not press any button within 20 seconds, the 

icon and the indicator will go off and thus the ice 

machine will be switched on again.

C

Indicates whether the icematic is 
on or off.

C

Water flow from water tank 
will stop when this function is 
selected. However, ice made 
previously can be taken from the 
icematic.

23. Eco fuzzy function icon

Press the FN key (until it reaches the letter e 
icon and the lower line) to activate the eco fuzzy. 
When you hover over the eco fuzzy icon and the 
eco fuzzy function indicator, they start flashing. 
Thus, you can understand whether the eco fuzzy 
function will be activated or deactivated. When you 
press the OK button, the eco fuzzy function icon 
lights continuously and the Indicator continues to 
flash during this process. If you do not press any 
button after 20 seconds, the icon and the indicator 
remains on. Thus, the eco fuzzy function is 

Summary of Contents for BFD629DX

Page 1: ...EN BFD629X BFD629DX ...

Page 2: ...use the product quickly and safely Please read the user guide carefully before installing and operating the product Always observe the applicable safety instructions Keep the user guide within easy reach for future use Please read any other documents provided with the product Keep in mind that this user guide may apply to several product models The guide clearly indicates any variations of differe...

Page 3: ... for the fresh food compartment 14 4 3 Initial use 15 5 Operating the product 19 5 1 Indicator panel 19 5 2 Indicator panel 21 5 3 Dual cooling system 25 5 4 Freezing fresh food 25 5 5 Recommendations for preserving the frozen food 26 5 6 Placing the food 26 5 7 Deep freeze information 26 5 8 Removing door shelves 26 5 9 Moving door rack 26 5 10 Glass shelves 26 5 11 Frost Free Chill compartment 2...

Page 4: ... by the manufacturer This appliance is intended to be used in household and similar applications such as staff kitchen areas in shops offices and other working environments farm houses and by clients in hotels motels and other residential type environments bed and breakfast type environments catering and similar non retail applications 1 1 General safety This product should not be used by persons ...

Page 5: ...lfunction do not use the product as it may cause electric shock Contact the authorised service before doing anything Plug the product into an earthed socket Earthing must be done by a qualified electrician If the product has LED type lighting contact the authorised service for replacing or in case of any problem Do not touch frozen food with wet hands It may adhere to your hands Do not place liqui...

Page 6: ...he product away from sources of fire and ventilate the room immediately C The label on the inner left side indicates the type of gas used in the product 1 1 2 For models with water dispenser Pressure for cold water inlet shall be maximum 90 psi 6 2 bar If your water pressure exceeds 80 psi 5 5 bar use a pressure limiting valve in your mains system If you do not know how to check your water pressur...

Page 7: ...plies with EU WEEE Directive 2012 19 EU This product bears a classification symbol for waste electrical and electronic equipment WEEE This product has been manufactured with high quality parts and materials which can be reused and are suitable for recycling Do not dispose of the waste product with normal domestic and other wastes at the end of its service life Take it to the collection center for ...

Page 8: ...rispers 10 İnner water dispenser 11 Adjustable glass shelf 12 Fan 13 Water filter 14 Ice container 15 Frozen food storage compartment upper 16 Frozen food storage compartment upper 17 Seperator 2 3 1 7 5 8 9 10 12 13 11 6 4 14 15 16 17 C Figures in this user manual are schematic and may not match the product exactly If the subject parts are not included in the product you have purchased then those...

Page 9: ...ces after installation Appropriate air ventilation must be provided around your product in order to achieve an efficient operation If the product is to be placed in a recess in the wall pay attention to leave at least 5 cm distance with the ceiling and side walls Do not place the product on the materials such as rugs or carpets Place the product on an even floor surface to prevent jolts Do not ins...

Page 10: ...oduct The corner where the foot exists is lowered when you turn in the direction of arrow and raised when you turn it in the opposite direction 3 6 Door open warning This feature may vary depending on the door of the product and may not exist in some models An audio warning signal will be given when the door of your product is left open for 1 minute This warning will be muted when the door is clos...

Page 11: ...over is fixed with two screws 3 7 Water connection Depending on the model of the refrigerator you can connect it either to water mains First you must connect the water hose to the refrigerator A WARNING Refrigerator and the pump if any must be unplugged during connection Check that following part have been delivered together with the product External water filter ...

Page 12: ... the refrigerator 1 Slip the union B onto the water hose A 2 Push the water hose downwards firmly to slip it onto the water inlet valve C 3 Tighten the union C by hand to secure it onto the water inlet valve C Normally you are not required to tighten the union with a tool However you can use a spanner or pliers to tighten the union if there is a leakage 3 9 Connecting the water line to the water s...

Page 13: ...has been removed 3 Place the water filter cover into the mechanism and push forwards to lock it in place 4 Press Ice Off button on the display again to exit this mode C Water filter must be replaced every 6 months When replacing the water filter or if you will not use the filter anymore remove it as illustrated in the figure and install the bypass cover Make sure that the Ice Off mode is enabled b...

Page 14: ...e can melt down causing water leakage If you experience such a problem empty and clean the ice container Ice cubes can stick to each other if they are left in the container for a long time Water system installation of the refrigerator must be performed by a qualified plumber If the product is to be connected to the water mains make sure that you use potable water Water system of the product is des...

Page 15: ... heat sources such as hobs ovens heater cores and stoves and at least 5 cm away from electrical ovens Pay attention to store your food in refrigerator in closed containers You can load maximum amount of food to the freezer compartment of the refrigerator by removing the freezer compartment shelf of drawer Declared energy consumption value of the refrigerator was determined with the freezer compart...

Page 16: ...ry before operating it Plug the refrigerator into the grounded wall outlet When the door is opened the interior illumination will turn on Run the refrigerator without putting any food for 6 hours and do not open its door unless certainly required C You will hear a noise when the compressor starts up The liquids and gases sealed within the refrigeration system may also give rise to noise even if th...

Page 17: ...16 36 EN Refrigerator User Manual Preparation DIMENSIONS 36 FRENCH REFRIGERATOR PRODUCT DIMENSIONS ...

Page 18: ...G TotalDepth DrawerOpen H 737mm 29 01 908mm 35 74 1157mm 45 55 1178 5mm 46 40 Depth Doors Open90 I TotalDepth Doors Open90 J Width Doors Open90 WithHandles K Width Doors Open90 FromCabinetToHandle L 1072 6mm 42 22 1094mm 43 07 1059 2mm 41 70 75 6mm 2 97 Width Doors Open130 FromHandleToHandle M Width Doors Open130 FromCabinetToHandle N Depth Doors Open130 P Depth Doors Open130 R 1530 2mm 41 70 311 ...

Page 19: ...18 36 EN Refrigerator User Manual Preparation DIMENSIONS 36 FRENCH REFRIGERATOR 3 Fresh Food Door Open 90 Fresh Food Door Open 130 Max ...

Page 20: ...temperature This function is not recalled when power restores after a power failure 3 Vacation Function Press the Quick Fridge Vacation button for 3 se conds to activate Vacation function icon co mes on when the function is active Function is deactivated by pressing the same button for 3 se conds again or by pressing Fridge set button When vacation mode is activated set values does not seem for fr...

Page 21: ...e Quick Freeze button before putting the food into the freezer compartment If you press the Quick Freeze button repeatedly with short inter vals the electronic circuit protection will be activa ted immediately This function is not recalled when power restores after a power failure 15 Eco Extra Special Economic Usage Function Press the Quick Freeze Eco Extra button for 3 seconds to activate the Eco...
Page 22: ... relevant buttons for function settings Select Quick Freeze Quick Cool FN OK 3 3 1 2 3 4 5 6 9 10 11 12 13 14 15 16 17 18 19 20 27 28 29 30 31 32 33 34 1 34 2 Select Quick Freeze Quick Cool FN OK 3 3 7 8 22 21 23 24 25 26 C Figures in this user manual are schematic and may not match the product exactly If the subject parts are not included in the product you have purchased then those parts are val...

Page 23: ... the filter needs to be reset 7 Temperature change cabin icon Indicates the cabin whose temperature is to be changed When the temperature change cabin icon starts flashing it is understood that the relevant cabin has been selected 8 Multizone freezer icon Hover over the Multizone freezer icon using the FN button the icon will start to flash When you press the OK key multizone cabin freezer icon tu...
Page 24: ...rts flashing it is understood that the relevant cabin has been selected 21 Setting the Celsius and Fahrenheit indicator Hover over this key using the FN key and select Fahrenheit and Celsius via the OK key When the relevant temperature type is selected the Fahrenheit and Celsius indicator turns on 22 Ice machine off icon Press the FN key until it reaches the ice icon and the lower line to switch o...

Page 25: ...ing it in a loop the set value returns to the beginning 28 Temperature change cabin icon Indicates the cabin whose temperature is to be changed When the temperature change cabin icon starts flashing it is understood that the relevant cabin has been selected 29 Temperature change cabin icon Indicates the cabin whose temperature is to be changed When the temperature change cabin icon starts flashing...

Page 26: ... oils and acids and they must also be airtight Moreover they must be well closed and they must be made from easy to use materials that are suitable for deep freezers Frozen food must be used immediately after they are thawed and they should never be re frozen Do not freeze too large quantities of food at one time The quality of the food is best preserved when it is frozen right through to the core...

Page 27: ...put in a refrigerator in order to keep them in good quality You can keep the freshness of food for many months at 18 C 0 F or lower temperatures in the deep freeze C Pack the food in an airtight manner to prevent them from drying even if they are going to be stored for a short time Materials to be used for packaging the foodstuff must be tear proof and resistant to cold humidity odour oils and aci...

Page 28: ... Free Chill compartments allow you to prepare the food for freezing You can also use these compartments to store your food at a temperature a few degrees below the fridge compartment You can increase the inner volume of your refrigerator by removing any of the chiller compartments 1 Pull the compartment towards yourself until it stops 2 Lift the compartment about 1 cm up and pull towards yourself ...

Page 29: ...hylene gas which is emitted by these fruit may cause the other fruit to ripen faster and decompose in a shorter time 5 14 Butter Cheese section in some models Store food such as butter cheese and margarine in this section a a a a 5 15 Egg holder You can install the egg holder to the desired door or body shelf Never keep the egg holder in the freezer compartment Never leave the vegetables inside th...

Page 30: ...ft door of the fridge compartment is open Movable middle section moves with the aid of the plastic part on the body while closing the door Do not try to open by hand A When the rotating storage container is open do not close the door of the refrigerator ADo not overload the rotating storage con tainer by placing a lot of materials in it 5 17 Ice container The ice container is used for ice collecti...

Page 31: ... begins to flow continue depressing and releasing the dispenser paddle 5 seconds on 5 seconds off until a total of 4 gal 15L has been dispensed This will flush air from the filter and water dispensing system and prepare the water filter for use Additional flushing may be required in some households As air is cleared from the system water may spurt out of the dispenser Allow 24 hours for the refrig...

Page 32: ... 15 days This is normal If you cannot break the bulk apart you can empty the ice contai ner and make ice again C It is recommended to change the water in the water tank if it remains in the wa ter tank for more then 2 3 weeks C Strange noises you hear from the refrige rator at 120 minute intervals are the so unds of ice making and pouring This is normal C If you do not want to make ice press the I...

Page 33: ...Limitations Freshfood compartment centilever shelves those that only have rear supports are tested for max 25kg 55pounds per each part Crispers will hold up to 15kg 33pounds per each one Chiller zone will hold up to 20kg 44pounds These are dynamic loads for crispers and chiller zone Ice container bin holds up to 10kg 22pounds it is for usage without ice Upper frezer bin will hold up to 24kg 53 pou...

Page 34: ...all Never use cleaning agents or water that contain chlorine to clean the outer surfaces and chromium coated parts of the product Chlorine causes corrosion on such metal surfaces 6 1 Avoiding bad odours Materials that may cause odour are not used in the production of our refrigerators However due to inappropriate food preserving conditions and not cleaning the inner surface of the refrigerator as ...

Page 35: ... of the refrigerator is left ajar Do not leave the doors of your refrigerator open for a long time Thermostat is set to a very cold level Set the thermostat to a suitable level Compressor is not running Protective thermic of the compressor will blow out during sudden power failures or plug out plug ins as the refrigerant pressure in the cooling system of the refrigerator has not been balanced yet ...

Page 36: ...n for a longer period of time in order to maintain the current temperature Freezer temperature is very low while the fridge temperature is sufficient The freezer temperature is adjusted to a very low value Adjust the freezer temperature to a warmer degree and check Fridge temperature is very low while the freezer temperature is sufficient The fridge temperature is adjusted to a very low value Adju...

Page 37: ...ensation will disappear If moisture forms in the area between the two refrigerator doors disable the Energy Saving mode Bad odour inside the refrigerator No regular cleaning is performed Clean the inside of the refrigerator regularly with a sponge lukewarm water or carbonate dissolved in water Some containers or package materials may cause the smell Use a different container or different brand pac...

Page 38: ...www beko com tr www beko com au 57 8373 0000 AD EN ...

Reviews: