background image

133 / RO  

2 Utilizare   

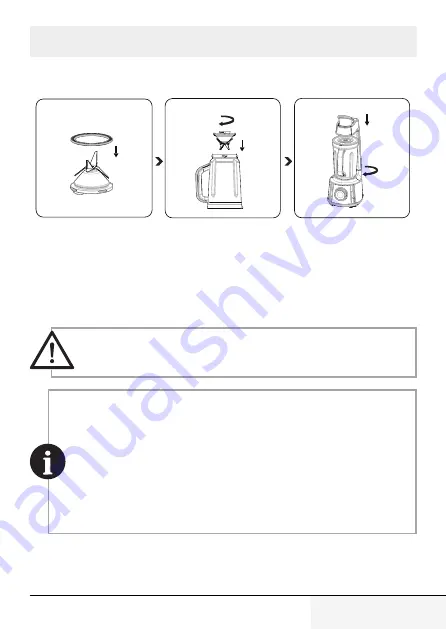
2.4 Montarea lamei de tăiere  

2  

1  

2  

1  

Introduceți inelul de silicon în 

locașul acestuia aflat pe lama 

de tăiere (6) și plasați lama 

sub vas (4).

Puneți-l la loc în vas (4) ră-

sucind în sens antiorar.  

Puneți vasul pe capacul mo-

torului (8).   

2.5 Utilizarea

AVERTISMENT:

 Nu utilizați produsul fără alimente.  

•  Temperatura maximă a lichidului care trebuie preparat în in-

teriorul aparatului nu trebuie să depășească 40 de grade C.

•  Introduceți alimentele moi sau lichidele înainte de a adăuga 

alimente dure sau gheață.  

•  Adăugați apă pentru ca blenderul să funcționeze corespun-

zător (de ex. 40 ml apă la 60 g alimente solide). Adăugați apa 

înainte de a introduce ingredientele.  

Summary of Contents for 8690842205446

Page 1: ...TBV8106BX 01M 8813893200 4419 03 Vacuum Blender User Manual EN DE TR FR ES RO PL IT AR ...

Page 2: ...ENGLISH 06 26 DEUTSCH 27 51 TÜRKÇE 52 75 FRANÇAIS 76 99 ESPAÑOL 100 123 ROMÂNĂ 124 147 POLSKI 148 171 ITALIANO 172 195 01 20 عربى CONTENTS ...

Page 3: ...hich are declared in the markings affixed on your product or the other printed documents supplied with it represent the values which were obtained in the laboratories pursuant to the pertinent standards These values may vary according to the usage of the appliance and ambient conditions ...

Page 4: ... 13 Sauce button 14 Vacuum button 15 Vacuum Blend button 16 Auto Clean button 17 Non slip feet 18 Cable storage compartment 19 Filter 20 Vacuum seal 21 Suction head cover 22 Measuring cup Anti insect cap 23 Portable bottle 24 Vacuum lid 25 Portable bottle Lid 26 Bottle stand Technical data Voltage 220 240V 50 60 Hz Powerconsumption 1000W Rightstomaketechnicalanddesign changes are reserved ...

Page 5: ...e give the user manual as well Follow the in structions by paying attention to all the information and warnings in the user manual Meanings of the symbols Following symbols are used in various sections of this manual Suitable for contact with food Do not immerse the appliance the power ca ble or the power plug in water or any other liquid Important information and useful hints about usage WARNING ...

Page 6: ...ople whose physical perceptiveormentalskillsareimpaired orwhoareinexperiencedornotknowledgeable about the appliance as long as they are supervised or informed and made aware of the safe use of the appliance and the encountered dangers Children should not play with the appliance Do not operate any appliance with a damaged cordorplugoraftertheappliancemalfunctions or is dropped or damaged in any man...

Page 7: ...y to persons Do not attempt to dismantle the appliance Donotoperateorplaceanypartofthisappliance or its parts on or near hot surfaces Do not use the device for hot food Your mains power supply should comply with the information supplied on the rating plate of the appliance Do not use the appliance with an extension cable Do not touch the plug of the appliance with damp or wet hands 1 Important saf...

Page 8: ...finjuryduetoincorrect usage Avoid contacting moving parts Do not use outdoors Do not let cord hang over edge of table or counter Keep hands and utensils out of jug while blending to reduce the risk of severe injury to persons or damage to the blender A scraper may be used but must be used only when the blender is not running Blades are sharp Handle carefully Always operate blender with cover in pl...

Page 9: ...ug in any way After cleaning dry the appliance and all parts beforeconnectingittomainssupplyandbefore attaching the parts Donotimmersetheappliance thepowercable or the power plug in water or any other liquid Ifyoukeepthepackagingmaterials storethem out of the reach of children Children shall not use the appliance Keep the appliance out of the reach of children Always disconnect the blender from th...

Page 10: ... Waste Product This product complies with EU WEEE Directive 2012 19 EU This prod uct bears a classification symbol for waste electrical and electronic equip ment WEEE This symbol indicates that this product shall not be disposed withotherhouseholdwastesattheendofitsservicelife Used device must be returned to offical collection point for recycling of electrical and electronic devices To find these ...

Page 11: ...Take them to the packaging material collection points designated by the local authorities 1 5 Plug Wiring The moulded plug on this appliance incorporates a 13 A fuse Should the fuse need to be replaced an ASTA approved BS1362 fuse of the same rating must be used Do not forget to refit the fuse cover In the event of losing the fuse cover the plug must not to be used until a replacement fuse cover h...

Page 12: ...ortant safety and environmental instructions Green yellow cable must be connected to ground E line With the alternative plugs a 13 A fuse must be fitted either in the plug or adaptore or in the main fuse box If in doubt contact a qualified elec trician ...

Page 13: ...r to initial use see 3 1 2 3 Removing the Chopping Blade WARNING Do not touch the blades with your bare hands 2 1 3 4 1 2 1 2 Unplug the appliance and move the speed adjustment knob 9 to OFF position Pull upthelever 7 andunlockthe jug 4 anti clockwise accord ing the Open arrow on the motorunit 8 Open the vacuum valve by rotatingit and remove the vacuum from 4 the valve Remove the lid from the jug ...

Page 14: ...ockwise Place the jug onto the motor housing 8 2 5 Operation WARNING Do not operate the appliance when empty Themaximumtemperatureoftheliquidtobepreparedinside the appliance must not exceed 40 C degrees Put soft foods or liquids before adding hard foods or ice Adding some water into the appliance will allow it run smoothly e g 40mlwaterfor60grsolidfood Addthewater before the ingredients 2 Use ...

Page 15: ...tothe Lock positionandse cure 1 2 3 1 2 On Min Max On Min Max 3 4 2 1 Plug in the appliance and move the speed adjustment knob 9 to ON position Process the ingredients at the desired speed using the speed adjustment knob 9 When the process is com plete movethespeedadjust ment knob 9 to OFF posi tionandunplugtheappliance Removethejugfromthemo tor unit by rotating it coun terclockwise 4 8 Open the l...

Page 16: ...utes Let it cool for 5 minute before operating it again Do not insert any foreign objects into the jug 4 when the appliance is in use Donotremoveingredientsfromthejug 4 beforechopping blade 6 has completely stopped Donotusecarbonatedbeverage crop frozenfood orsticky food boiled bean yam etc Aftereachuse thejuglid 3 22 mustbewashedand remove moisture for next use Dry it well before use 2 Use ...

Page 17: ... 9 to ON position Select the desired automat ic program The program that you have chosen will turn on and start functioning at var ious speed settings If you choose the vacuum program it will start vacuuming and will stop after 1 minute If you choose Vacuum Mixing pro gram the program will keep on functioning at various speeds after the vacuum has stopped and the program will stop 2 minutes afterw...

Page 18: ...gredients in the portable bottle 23 and close the vacuum lid 24 Place it into the bottle stand 26 and lock it by turning clockwise on the motor unit 8 Plug in the appliance and move the speed adjustment knob 9 to ON position Select the Vacuum program program The pump will turn on and stop until the sensoris automatic off or about 1 min utelater Thelightwillblink When the process is com plete move ...

Page 19: ... of vacuum storage store such in a refrigerator Do not store this in a freezer Do not use any jug or part other than those meant for the purpose intended 2 9 Maximum quantities Maintain the maximum or the minimum volume for each type of material by the scale on the jug 4 ml 1500 1250 1000 750 50 0 250 L 1 50 1 25 0 75 0 25 Max V acuum Foods Milk Soymilk Milk 0 50 Maximum level for materials to ble...

Page 20: ... using a long slender utensil etc 2 10 Anti insect prevention for vacuum passage The measuring cup 22 accessory can be used as an anti insect cap to prevent insects or bacteria breeding in the vaccum passage 1 2 Take out the jug 4 from the motor housing 8 and pull down the lever 7 Place and secure the measuring cup 22 onto the vacuum suction head 21 If you want to operate the appliance again remov...

Page 21: ...ctly push the safety switch pin with your finger or a rod etc 2 11 Motor Protection Automatic motor protection will get activated and stop the appliance when theappliance overheats In this case 1 Move the speed adjustment knob 9 to OFF position 2 Unplug the appliance 3 Let it cool for 15 20 minutes 2 Use ...

Page 22: ...ps of dish washing liquid into the jug 4 and close the lid 3 Place the jug 4 into the mo tor unit 8 Lock the jug 4 clockwise according to the Lock arrow on the motor unit 8 and press down the lever 7 Plugintheappliance Use Auto Clean program to operateitfor26seconds 3 Cleaning and care ...

Page 23: ... jug 4 to remove it from themotorunit 8 Thenrinseit You can wash the jug portable bottle 4 23 and the caps lids portable bottle lid 3 22 24 25 in your dish washer It is recommended to clean the appliance immediately after using WARNING Do not immerse the motor uni 8 in water You can wipe it with a damp cloth Chopping blade 6 is sharp Do not hold the sharp edge or immerse in water while cleaning 3 ...

Page 24: ...e out the filter 19 from the vacuumseal 20 towash or rinse it or replace a new one Place and secure the suc tion head cover 21 back be foreuse Thejuglid 3 isalsoassembledwithawashablepermanentfilter Open Open Lock Lock L o c k O p e n Turnoverthelid 3 and open the backflow prevention cap byturningitanti clockwiseto removeitfromthelid 3 Take out the backflow pre vention cap to wash or rinse thentod...

Page 25: ... Store it in a cool dry place Always keep the appliance out of the reach of children 3 4 Handling and transportation During handling and transportation carry the appliance in its original packaging The packaging of the appliance protects it against physical damages Do not place heavy loads on the appliance or on the packaging The ap pliance may get damaged Dropping the appliance may render it non ...

Page 26: ... Republic of Ireland Any parts removed during repair work or any product that has been replaced becomes our property The guarantee is not transferrable if the product is resold The Guarantee does not cover Transit installation or delivery damage Accidental damage Misuse or abuse Replacement of any consumable item or accessories These include but are not limited to plugs cables light bulbs knobs fi...

Page 27: ...inen Dritten weitergeben händigen Sie bitte auch diese Anleitung aus Befolgen Sie die Anweisungen indem Sie alle Informationen und Warnhinweise in der Bedienungsanleitung beachten Bedeutung der Symbole Folgende Symbole werden in den verschiedenen Abschnitten dieser An leitung verwendet GeeignetfürdenKontaktmitLebensmitteln Gerät Netzkabel sowie Netzstecker nicht in Wasser oder andere Flüssigkeiten...

Page 28: ...e 12 Eistaste 13 Soßentaste 14 Vakuumtaste 15 Vakuum Mixen Taste 16 Auto Reinigung Taste 17 Rutschfeste Füße 18 Kabelaufbewahrungsfach 19 Filter 20 Vakuumsiegel 21 Saugkopfabdeckung 22 Messbecher Insektenschutzkappe 23 Kunststoffflasche 24 Vakuumdeckel 25 Sportdeckel 26 Flaschenständer Technische Daten Spannung 220 240 V 50 60 Hz Leistungsaufnahme 1000 W Technische und optische Änderungen vorbehal...

Page 29: ...Sie alle Anweisungen Dieses Gerät kann von Kindern und Personen mit eingeschränkten körperlichen sensoriellen odermentalenFähigkeitenoderohnespezielles Wissen oder Erfahrung verwendet werden sofern sie beaufsichtigt werden oder die Anweisungen zum sicheren Umgang mit dem Produkt und dessen potenzielle Gefahren verstehen Kinder dürfen nicht mit dem Gerät spielen 1 Wichtige Sicherheits und Umweltanw...

Page 30: ...den Kundendienst des Herstellers Der Einsatz von Zubehörteilen einschließlich Behältern die nicht vom Hersteller empfohlen wurden kann Verletzungen verursachen Nicht versuchen das Gerät zu demontieren Das Gerät und seine Teile nicht auf oder in der Nähe von heißen Oberflächen verwenden oder platzieren Gerät nicht für heiße Lebensmittel verwenden Ihre Stromversorgung sollte mit den Informationen am...

Page 31: ... aus der Steckdose ziehen Halten Sie bei Transport und Reinigung vorsichtig den Rührschaft des Gerätes Berühren Sie die Klingen niemals bei Verwendung des Gerätes Bei unsachgemäßer Verwendung besteht Verletzungsgefahr Vermeiden Sie den Kontakt mit beweglichen Teilen Nicht im Freien verwenden Lassen Sie das Kabel nicht über die Kante eines Tisches oder einer Arbeitsplatte hängen 1 Wichtige Sicherhe...

Page 32: ... sehr scharf Seien Sie vorsichtig Nehmen Sie das Gerät nur in Betrieb wenn der Deckel angebracht ist Verarbeiten Sie mit dem Gerät keine heißen Flüssigkeiten Zur Vermeidung von Stromschlaggefahr passt dieser Stecker nur in eine geerdete Steckdose Wenden Sie sich an einen qualifizierten Elektriker falls der Stecker nicht vollständig in die Steckdose passt Nehmen Sie keine Änderungen am Stecker vor ...

Page 33: ...Verpackungsmaterialien aufheben möchten bewahren Sie sie außerhalb der Reichweite von Kindern auf Kinder dürfen das Gerät nicht benutzen Halten Sie das Gerät von Kindern fern Trennen Sie den Mixer immer von der Stromversorgung bevor Sie ihn montieren demontieren oder unbeaufsichtigt zurücklassen Schalten Sie das Gerät aus und trennen Sie es von der Stromversorgung bevor Sie Zubehör auswechseln ode...

Page 34: ...ifizierungssymbol für elektrische und elektronische Altgeräte WEEE gekennzeichnet Dieses Symbol zeigt an dass dieses Gerät am Ende seiner Einsatzzeit nicht mit anderem Hausmüll entsorgt werden darf Altgeräte müssen an offizielle Sammelstellen zum Recycling elektrischer und elektronischer Geräte abgegeben werden Nähere Angaben zu diesen Sammelstellen erhalten Sie von Ihrer Stadtverwaltung oder dem ...

Page 35: ...e in der Richtlinie ange gebenen gefährlichen und verbotenen Materialien 1 4 Informationen zur Verpackung Die Verpackungsmaterialien des Produkts sind gemäß unseren nationalen Umweltschutzbestimmungen aus recyclingfähigen Materialien hergestellt Entsorgen Sie die Verpackungsmaterialien nicht mit dem Hausmüll oder ande rem Müll Bringen Sie sie zu von den lokalen Behörden bereitgestellten Sammelstel...

Page 36: ...rofessionellen Einsatz Es wurde zum Zerkleinern geringer Mengen fester Lebensmittel Zwiebeln Kartoffeln Karotten usw und Früchte Erdbeeren Bananen usw entwickelt 2 2 Erste Verwendung Reinigen Sie die Geräteteile vor der ersten Benutzung siehe 3 1 2 3 Klinge entfernen WARNUNG Berühren Sie die Klingen niemals mit bloßen Händen 2 Verwendung ...

Page 37: ...en und entriegeln SiedenBecher 4 gegenden Uhrzeigersinn entsprechend dem Öffnen Pfeil an der Motoreinheit 8 Öffnen Sie das Vakuum ventil indem Sie es dre hen und entfernen Sie den Vakuumeinheit vom Ventil 4 Entfernen Sie den Deckel vom Behälter und drehen Sie denBehälterum 3 4 Entfernen Sie die Klinge neinheit 6 durch Drehen im Uhrzeigersinn 2 Verwendung ...

Page 38: ... 2 5 Bedienung WARNUNG VerwendenSiedasGerätnichtimLeerzustand Die maximale Temperatur der Flüssigkeit im Gerät darf 40 C nicht überschreiten Geben Sie weiche Lebensmittel und Flüssigkeiten vor festen Lebensmitteln und Eis hinein Geben Sie weiche Lebensmittel und Flüssigkeiten vor festen Lebensmitteln und Eis hinein Das Gerät arbeitet besser wenn Sie auch etwas Wasser hin zugeben z B 40 ml Wasser a...

Page 39: ... Max On Min Max 3 4 2 1 Schließen Sie den Netzs tecker an und bringen Sie den Geschwindigkeit seinstellknopf 9 in die Ein Position Verarbeiten Sie die Zutat en mit Hilfe des Geschwind igkeitseinstellknopfs 9 bei der gewünschten Geschwin digkeit Bringen Sie den Geschwindigkeitseinstell knopf 9 bei Abschluss der Verarbeitung in die Aus Po sition und ziehen Sie den Netzstecker Entfernen Sie den Be hä...

Page 40: ...cher 4 Entfernen Sie die Zutaten aus dem Becher 4 erst nach dem die Klinge 6 vollständig zum Stillstand gekommen ist Verzichten Sie auf kohlensäurehaltige Getränke Getreide gefrorene Lebensmittel oder klebrige Lebensmittel ge kochte Bohnen Jamswurzel usw NachjederBenutzungmussderBehälterdeckel 3 22 gereinigt und abgetrocknet werden Trocknen Sie ihn gründlich ab WARNUNG Die Rücklaufschutzkappe muss...

Page 41: ...lknopf 9 in die Ein Position Wählen Sie das gewünschte automatische Programm Das von Ihnen gewählte Pro gramm wird eingeschaltet und startet bei verschiede nen Geschwindigkeitsein stellungen Wenn Sie sich für das Vakuumprogramm entsc heiden startet das Vakuum ieren und stoppt nach 1 Min ute Wenn Sie das Programm Vakuumieren Mixen wählen arbeitet das Programm wei terhin bei verschiedenen Geschwindi...

Page 42: ... 2 On Min Max Geben Sie die Zutaten in den Behälter 23 und bringen Sie den Deckel 24 an Platz ieren Sie ihn im Flaschen ständer 26 und verriegeln Sie ihn durch Drehen im Uhrzeigersinn an der Motore inheit 8 Schließen Sie den Netzstecker an und bringen Sie den Geschwindigkeitsein stellknopf 9 in die Ein Po sition Wählen Sie das Vakuumpro gramm Die Pumpe schaltet sich ein und stoppt bis sich der Sen...

Page 43: ... möglich Sie können das Gerät jederzeit während des Betriebs stop pen indemSiedenGeschwindigkeitseinstellknopf 9 indie Aus Position bringen WARNUNG Wenn Sie Lebensmittel mittels Vakuumaufbewahrung im Smoothie Behälter aufbewahren geben Sie ihn in einen Kühlschrank Nicht in einem Tiefkühlgerät aufbewahren BewahrenSiemitderVakuumaufbewahrungausschließlich die mit dem Vakuum Mixer verarbeiteten Leben...

Page 44: ...Vakuumfunktion mit Materialien die Milchprodukte wie Milch und Sojamilch enthalten 1 000 ml Maximalmenge bei Verwendung der Vakuumfunktion mit Milchprodukten wie Milch und Sojamilch 700 ml WARNUNG Überschreiten Sie nicht die durch die Skala des jeweiligen Lebensmittels am Behälter 4 gezeigte Maximalmenge Wenn Bläschen oder Lebensmittel in die Pumpe gelangen können Störungen auftreten Falls Zutaten...

Page 45: ... Betrieb nehmen möchten entfernen Sie den Messbech er 22 vom Vakuumsaugkopf 21 bevor Sie den Hebel 7 nachobenziehen WARNUNG Achten Sie darauf dass Lebensmittel nicht in die Sicherheitsvorrichtung gelangen Drücken Sie den Kontakt des Sicherheitsschalters niemals direkt mit Ihrem Finger ei nem Stab usw 2 11 Motorschutz DerautomatischeMotorschutzwirdaktiviertundstopptdasGerät sobald es überhitzt Gehe...

Page 46: ...echer 4 und schließen Sie denDeckel 3 Platzieren Sie den Bech er 4 in der Motoreinheit 8 VerriegelnSiedenBecher 4 im Uhrzeigersinn entspre chend dem Sperrpfeil an der Motoreinheit 8 und drück enSiedenHebel 7 nachunt en Schließen Sie das Netzka belan Lassen Sie das Programm Auto Reinigung 26 Se kundenlaufen 3 Reinigung und Pflege ...

Page 47: ...entriegeln Sie den Becher 4 gegen den Uhrzeigersinn entsprechend dem Öffnen Pfeil an der Mo toreinheit 8 Ziehen Sie den Becher 4 nach oben von der Motoreinheit 8 ab SpülenSieihnanschließend Sie können Becher kunststoffflasche 4 23 und Kappen Deckel sportdeckel 3 22 24 25 im Geschirrspüler reinigen Unmittelbar nach dem Gebrauch lässt sich das Gerät einfacher reinigen 3 Reinigung und Pflege ...

Page 48: ...lter versehen damit keine Probleme auftreten falls der Behälterdeckel 3 mit Lebensmitteln bespritzt wird Der Filter verhindert ein Blockieren der Vakuum Passage und damit verbundene Probleme Press Filter Vacuum seal Suction head cover Drücken Sie die Riegel der Saugkopfabdeckung 21 an beiden Seiten und ziehen Sie sienachuntenab Nehmen Sie den Filter 19 zum Waschen Abspülen oder Ersetzen aus der Va...

Page 49: ... weder Wasser noch Flüssigkeiten die Belüftungsöffnungen block ieren Bringen Sie die Rück laufschutzkappe wieder an und sichern Sie sie vor er neuter Benutzung durch DrehenimUhrzeigersinn 3 3 Aufbewahrung WenndasGerätlängereZeitnichtbenutztwird sollteessorgfältigauf bewahrt werden Ziehen Sie den Netzstecker und warten Sie bis sich das Gerät vollstän dig abgekühlt hat bevor Sie es lagern Bewahren S...

Page 50: ...ackung schützt das Gerät vor Beschädi gungen Legen Sie keine schweren Gegenstände auf dem Gerät oder der Ver packung ab Andernfalls könnte das Gerät beschädigt werden Falls das Gerät herunterfällt ist es möglicherweise nicht mehr funk tionsfähig oder weist dauerhafte Schäden auf 3 Reinigung und Pflege ...

Page 51: ...nach den neuesten technischen Erkenntnissen entwickelt produziert und geprüft Sollte trotzdem eine Störung auftreten so bitten wir Sie sich mit Ihrem Fachhändler bzw mit der Verkaufsstelle in Verbindung zu setzen Gewährleistungsansprüche können nicht direkt bei Beko geltend gemacht werden Behalten Sie deshalb immer Ihre Verkaufsquittung als Beleg Wir danken Ihnen für Ihr Vertrauen und wünschen Ihn...

Page 52: ...sına verirseniz kullanım kılavuzunu da birlikte verin Kullanım kılavuzundaki tüm bilgilendirme ve uyarıları dikkate alarak talimatları takip edin Sembollerin anlamları Aşağıdakisembollerbukılavuzunçeşitlibölümlerindekullanılmıştır Gıdalara temas etmesi uygundur Cihazı elektrik kablosunu veya fişini suya ya da diğer sıvılara batırmayın AEEE Direktifine uygundur Kullanımla ilgili önemli bilgiler ve ...

Page 53: ...si 13 Sos düğmesi 14 Vakum düğmesi 15 Vakum Karıştırma düğmesi 16 Otomatik Temizlik düğmesi 17 Kaymaz ayaklar 18 Kablo saklama bölmesi 19 Filtre 20 Vakum sızdırmazlık elemanı 21 Emiş başlığı kapağı 22 Ölçüm kabı Böceklenme önleyici başlık 23 Plastik şişe 24 Vakum kapağı 25 Spor blender kapağı 26 Şişe standı Teknik veriler Voltaj 220 240V 50 60 Hz Güç tüketimi 1000 W Teknik ve tasarımsal değişiklik...

Page 54: ...limatları okuyun Bu cihaz kendilerine cihazın güvenli bir şekilde kullanımına ve olası tehlikelere yönelik bilgilerin verilmesi ve bunları anlamaları veya denetime tabi tutulmaları şartıyla cihazın kullanımı için gereklideneyimevebilgiyesahipolmayankişiler veya fiziksel algısal ve zihinsel yetersizliklere sahip olan kişiler tarafından kullanılabilir Çocuklar cihaz ile oynamamalıdır 1 Önemli güvenl...

Page 55: ... üzere üretici tarafından tavsiye edilmeyen aksesuarların kullanımı kişisel yaralanmalara yol açabilir Cihazı parçalarına ayırmaya çalışmayın Cihazın herhangi bir parçasını sıcak yüzeyler üzerine veya yakınına koymayın veya bu tip yerlerde kullanmayın Cihazı sıcak gıdalarda kullanmayın Elektrik şebekeniz cihazın anma plakasında verilen bilgiyle uyumlu olmalıdır Cihazı uzatma kablosuyla kullanmayın...

Page 56: ...nmaktan kaçının Dış mekanlarda kullanmayın Elektrik kablosunun masa veya tezgahın kenarından sarkmasına izin vermeyin Kişilerin ciddi şekilde yaralanmalarını veya blenderin zarar görmesini engellemek için karıştırmayaparkenellerinizivekaplarıhazneden uzak tutun Yalnızca blenderin kullanılmadığı durumlarda spatula kullanabilirsiniz Bıçaklar keskindir Dikkatli tutun Blenderi daima kapağı kapalı hald...

Page 57: ...e parçalarını takmadan önce cihazı ve tüm parçalarını kurutun Cihazı elektrik kablosunu veya fişini suya ya da diğer sıvılara batırmayın Ambalajmalzemeleriniçocuklarınulaşamayacağı yerlerde saklayın Çocuklar cihazı kullanmamalıdır Cihazı çocukların ulaşamayacağı bir yerde muhafaza edin Ünite gözetim altında değilken ve montaj ya da söküm öncesinde blender ile güç kaynağı arasındaki bağlantıyı daim...

Page 58: ...2 AEEE Yönetmeliğine Uygunluk ve Atık Ürünün Elden Çıkarılması Bu Ürün AB AEEE Direktifine 2012 19 AB uygundur Bu ürün atık ele ktrikli ve elektronik ekipman AEEE sınıflandırma sembolü taşımaktadır Bu ürün tekrar kullanılabilir ve geri dönüşüme uygun yüksek kaliteli parçalardan ve malzemelerden üretilmiştir Kullanım ömrünün sonunda atık ürünü normal evsel ve diğer atıklarla birlikte atmayın Elektr...

Page 59: ...lanmış malzemeleri içermez 1 4 Ambalaj bilgileri Ürünün ambalajı Ulusal Çevre Mevzuatımız gereği geri dönüştürülebilir malzemelerden üretilmiştir Ambalaj malzeme lerini evsel veya diğer atıklarla birlikte atmayın Bu malzemeleri yerel mercilerce görevlendirilen ambalaj malzemesi toplama noktalarına götürün 1 Önemli güvenlik ve çevre talimatları ...

Page 60: ...n bkz 3 1 2 3 Parçalama Bıçağının Sökülmesi UYARI Bıçaklara çıplak elle dokunmayın 2 1 3 4 1 2 1 2 Cihazın fişini çekin ve hız ayar düğmesini 9 OFF KAPALI konumuna getirin Kolu 7 yukarı kaldırın ve sürahiyi 4 motor ünitesinin 8 üzerindeki Open Açma okuna göre saat yönünün tersine doğru çevirin ve kilidi açın Vakum valfini döndürerek açın vakumu kapaktan 4 ayırın Kapağı 3 sürahiden ayırın ve sürahi...

Page 61: ...rahideki 4 konumunayerleştirin Sürahiyimotorbölmesine 8 yerleştirin 2 5 Çalıştırma UYARI Cihazı boşken çalıştırmayın Cihazıniçindehazırlanacakolansıvınınmaksimumsıcaklığı40 C dan fazla olmamalıdır Sert gıdalar veya buz eklemeden önce yumuşak gıdaları veya sıvıları ekleyin Cihaza biraz su eklerseniz ör 60 gr katı gıda için 40 ml su cihaz daha seri çalışacaktır Malzemelerden önce su ekleyin 2 Kullan...

Page 62: ...tirinve Kilitli konumagetirereksabitleyin 1 2 3 1 2 On Min Max On Min Max 3 4 2 1 Cihazın fişini prize takın ve hız ayardüğmesini 9 ON AÇIK konumunagetirin Hız ayar düğmesini 9 kulla narak gıdalar üzerinde iste diğinizhızdaişlemyapın İşlem tamamlandığında hız ayar düğmesini 9 OFF KAPALI konumuna getirin ve cihazın fişiniçekin Sürahiyi 4 saat yönünün tesrsine çevirerek motor ün itesinden 8 çıkarın ...

Page 63: ...herhangi bir yabancı cisim sokmayın Parçalama bıçağı 6 tamamen durana kadar malzemeleri sürahiden 4 çıkarmayın Gazlı içecek tahıl donmuş gıda veya yapışkan gıda haşlan mış fasulye tatlı patates vb kullanmayın Herkullanımdansonrahaznekapağını 3 22 yıkayınvesonraki kullanım için nemi giderin Kullanmadan önce iyice kurutun UYARI Geri akış önleme başlığı konteyner kapağına takılı olmalıdır Su veya gıd...

Page 64: ...ılacak ve farklı hızlarda çalışmaya başlayacaktır Va kumprogramınıseçersenizva kum yapmaya başlayacak ve 1 dakika sonra duracaktır Va kum Karıştırma programını seçerseniz vakum durduktan sonra program farklı hızlarda çalışmaya devam edecek ve 2 dakika sonra duracaktır Işık yanıpsönecektir İşlem tamamlandığında hız ayar düğmesini 9 OFF KAPALI konumuna getirin vecihazınfişiniçekin 2 7 Pulse Darbeli ...

Page 65: ...muna getirin Vakum programını seçin Pompa açılacak ve sensörün otomatik kapanmasıyla bir likte veya 1 dakika sonra du racaktır Işıkyanıpsönecektir İşlem tamamlandığında hız ayar düğmesini 9 OFF KAPALI konumuna getirin vecihazınfişiniçekin Depolama haznesini kullanarak karıştırılmış meyve suyu veya diğer gıda ları vakumda tutabilirsiniz Böylelikle daha uzun süre taze kalmalarını sağlarsınız Vakum o...

Page 66: ...inimum miktarı sürahideki 4 ölçeğe göre ayarlayın ml 1500 1250 1000 750 50 0 250 L 1 50 1 25 0 75 0 25 Max V acuum Foods Milk Soymilk Milk 0 50 Karıştırılacak maksimum malzeme miktarı 1500 ml Karıştırılacak minimum malzeme miktarı 250 ml Süt ve soya sütü gibi vakumlanacak süt ürünleri içeren maksimum malzeme miktar 1000 ml Süt ve soya sütü gibi vakumlanacak süt ürünleri için maksimum miktar 700 ml...

Page 67: ...ağı doğru çekin Ölçüm ka bını 22 vakumemişbaşlığına 21 yerleştirinvesabitleyin Cihazı tekrar çalıştırmak isterseniz kolu 7 yukarı kaldırmadan önce ölçüm kabını 22 vakum emme başlığından 21 çıkarın UYARI Gıda malzemelerinin motor bölmesine girmemesi için gereken önlemleri alın Güvenlik anahtarı pimini asla par mağınızla veya çubukla doğrudan itmeyin 2 11 Motor Koruması Cihaz çok ısınırsa otomatik m...

Page 68: ...terjanı ekleyin ve kapağı 3 kapatın Sürahiyi 4 motor ünites ine 8 yerleştirin Motor üni tesindeki 8 Lock Kilitleme okuna göre sürahiyi 4 saat yönündeçevirerekkilitleyinve kolu 7 aşağı doğru bastırın Cihazınfişiniprizetakın OtomatikTemizlikprogramını başlatın ve 26 saniye boyun caçalıştırın 3 Temizlik ve bakım ...

Page 69: ... Sürahiyi 4 kaldırarak motorünitesinden 8 çıkarın Sonrasındayıkayın Sürahiyi plastik şişe 4 23 ve başlıkları kapakları spor blend er kapağı 3 22 24 25 bulaşık makinenizde yıkayabilirsiniz Cihazı kullandıktan hemen sonra yıkamanız tavsiye edilir Uyarılar Motorünitesini 8 suyadaldırmayın Bununyerinenemlibir bezle silin Parçalamabıçağı 6 keskindir Bıçağıkeskinkenarındantut mayın veya temizlik esnasın...

Page 70: ...alının tıkanmasını ve arızalanmasını önleyebilir Press Filter Vacuum seal Suction head cover Emiş başlığı kapağındaki 21 mandallara her iki taraftan bastırarakkapağıçıkarın Filtreyi 19 vakum sızdırma zlık elemanından 20 çık ardıktan sonra yıkayın ya da durulayın veya yenisiyle değiştirin Kullanım öncesinde emiş başlığı kapağını 21 tekrardan yerine takın ve sa bitleyin 3 Temizlik ve bakım ...

Page 71: ...rereksabitleyin 3 3 Saklama Cihazıuzunsürekullanmayıdüşünmüyorsanızdikkatlibirşekildesaklayın Saklamaöncesindecihazınfişiniçekinvetamamensoğumasınıbekleyin Cihazı ve aksesuarlarını orijinal ambalajlarında saklayın Elektrik kablosunu cihazın etrafına sarmayın Cihazı serin ve kuru bir yerde saklayın Cihazı her zaman çocukların ulaşamayacağı bir yerde muhafaza edin 3 4 Taşıma ve nakliye Taşıma ve nak...

Page 72: ...ğı bilgisini müșteri profili ayrımı yapılmaksızın kendilerine 24 saat içinde veririz Müșteri Hizmetleri sürecimiz Müșterilerimizin istek ve önerilerini İzlenebilir raporlanabilir șeffaf ve güvenli tek bir bilgi havuzunda toplarız Yasal düzenlemelere uygun objektif adil ve gizlilik içinde ele alır ve değerlendiririz Bu geri bildirimleri süreçlerimizin daha mükemmel hale getirilmesinde kullanırız Bek...

Page 73: ...dresi Müșteri Bașvurusu 1 2 3 4 Bașvuru kaydı Hizmet talebinin alınması Memnun Memnun değil Hizmet talebi analizi Hizmet hakkında müșterinin bilgilendirilmesi Keșif nakliye montaj bilgi onarım değișim vb Hizmet hakkında gerekli ișlemin gerçekleștirilmesi 4 Müșteri memnuniyetinin alınması 5 Bașvuru kaydının kapatılıp bilgilerin saklanması Yetkili Servis Yetkili Satıcı Faks ...

Page 74: ...aklımeydanagelenhasarvearızalar 4 Doğa olayları ve yangın su baskını vb kaynaklı meydana gelen hasar ve arızalar 5 Malıntanıtmavekullanmakılavuzlarındayeralanhususlaraaykırıkul lanılmasından kaynaklanan hasar ve arızalar 6 Malın 6502 sayılı Tüketicinin Korunması Hakkındaki Kanununda tarif edilen şekli ile ticari veya mesleki amaçlarla kullanımı durumunda ortaya çıkan hasar ve arızalar 7 Mala yetki...

Page 75: ...ilmemesi durumunda satıcı üretici ile ithalatçı müsteselsilen sorumludur 6 İlgili mevzuatlarda belirlenen kullanım ömrü süresince malın azami tamir süresi 20 iş gününü geçemez Bu süre garanti süresi içerisinde mala ilişkin arızanın yetkili servis istasyonuna veya satıcıya bildirimi tarihinde garanti süresi dışında ise malın yetkili servis istasyonuna teslim tarihinden itibaren başlar Garanti kapsa...

Page 76: ...utilisation Suivez les instructions en accord ant une attention particulière à toutes les informations et les avertissements contenus dans le manuel d utilisation Signification des symboles Les symboles suivants sont utilisés dans différentes sections de ce manuel Adapté au contact avec des aliments Ne plongez pas l appareil le câble d alimen tation ou la prise d alimentation électrique dans de l ...

Page 77: ...iltre 20 Joint hermétique 21 Couvercledelatêted aspiration 22 Verre doseur Bouchon anti insecte Les valeurs indiquées sur les inscriptions apposées sur votre appareil ou les autres documents imprimés fournis avec le produit sont des valeurs obtenues en conditions de laboratoire conformément aux normes en vigueur Ces valeurs peuvent varier en fonction de l utilisation de l appareil et des condition...

Page 78: ...instructions Cet appareil peut être utilisé par les personnes aux capacités physiques sensorielles ou mentalesréduitesouquimanquentd expérience et de connaissances concernant l appareil à condition qu elles soient supervisées ou qu elles aient reçues les consignes concernant l utilisation sûre de l appareil et assimilées les dangers encourus Les enfants ne doivent pas jouer avec l appareil 1 Instr...

Page 79: ...e clientèle du fabricant pour obtenir des informations sur l examen la réparation ou le réglage de l appareil L utilisation des accessoires notamment les bocaux à conserve non recommandés par le fabricant peut provoquer des blessures corporelles Ne tentez jamais de démonter l appareil Ne faites jamais fonctionner ou n installez aucun composant de cet appareil au dessus ou à proximité de surfaces c...

Page 80: ...appareildelaprisesecteurlorsque vous ne l utilisez pas avant d insérer ou de retirer des pièces et avant de le nettoyer Tenez la tige de mixage de l appareil avec soin lors du transport et du nettoyage Ne touchez jamais les lames lorsque vous utilisez l appareil Le mauvais usage de l appareil peut entraîner des blessures Évitez tout contact avec les pièces en mouvement N utilisez pas l appareil en...

Page 81: ...emixeur est à l arrêt Leslamessonttranchantes Manipulez lesavec précaution Utilisez toujours le mixeur avec le couvercle en place Ne mélangez pas les liquides chauds Pour réduire les risques d électrocution cette fiche ne peut être branchée sur une prise polarisée que dans un seul sens Si la fiche ne s insère pas complètement dans la prise contactez un électricien qualifié Ne modifiez pas la fiche...

Page 82: ...r les matériaux d emballage pensez à les tenir hors de portée des enfants Les enfants ne doivent pas utiliser l appareil Tenez l appareil hors de la portée des enfants Débranchez toujours le mixeur de la source d alimentation s il est laissé sans surveillance et avant de le monter démonter Éteignez l appareil et débranchez le du secteur avant d en changer les accessoires ou d approcher les pièces ...

Page 83: ...des équipements électriques et électroniques DEEE Cesymboleindiquequeceproduitnedoitpasêtrejetéavecles déchets ménagers à la fin de sa vie utile Les appareils usagés doivent être retournés au point de collecte officiel destiné au recyclagedesappareilsélectriquesetélectroniques Pourtrou ver ces systèmes de collecte veuillez contacter les autorités locales ou le détaillant auprès duquel vous avez ac...

Page 84: ...res dangereuses et interdites spécifiées dans la Directive 1 4 Information sur l emballage Les matériaux d emballage de ce produit ont été fabriqués à partir de matières recyclables conformément à notre Engagement en matière d environnement Ne jetez pas les matériaux d emballage avec les déchets domestiques et au tres déchets Déposez les dans l un des points de collecte de matériaux d emballage pr...

Page 85: ...onvient pas à un usage professionnel Il a été conçu pour broyer de petite quantités d aliments solides oignons pommes de terre carottes etc et de fruits fraises bananes etc 2 2 Première utilisation Nettoyez les pièces de l appareil avant la première utilisation se reporter au paragraphe 3 1 2 Utilisation ...

Page 86: ...sse 9 à la position OFF Tirezlelevier 7 vers le haut et libérez le bol 4 en le tournant dans le sens an tihoraire suivant le sens de la flèche Ouvrir se trouvant surleblocmoteur 8 Ouvrez la valve à vide en la faisant pivoter pour libérer le videdubol 4 etretirerlecou vercle 3 Retournezlebol 4 Retirez les lames du blender 6 en les tournant dans le senshoraire 2 Utilisation ...

Page 87: ...ur le bloc moteur 8 2 5 Fonctionnement AVERTISSEMENT N utilisez pas l appareil lorsqu il est vide La température maximale de tout liquide à préparer à l in térieur de l appareil ne doit pas excéder 40 C Versez les aliments tendres ou les liquides avant d ajouter les aliments durs ou la glace Ajouter de l eau dans l appareil lui permettra de fonctionner entoutefluidité ex 40mld eaupour60gd aliments...

Page 88: ...uez 1 2 3 1 2 On Min Max On Min Max 3 4 2 1 Branchez l appareil et placez le bouton de réglage de la vitesse 9 sur la position MARCHE by ON Préparez vos ingrédients à la vitesse souhaitée à l aide du bouton de réglage de la vitesse 9 À la fin du pro cessus placez le bouton de réglage de la vitesse 9 à la position OFF et débranchezl appareil Retirez le bol du bloc mo teur en le tournant dans le sen...

Page 89: ...es ingrédients du bol 4 avant que les lames de hachoir 6 ne soient à l arrêt complet N utilisez pas de boissons gazeuses de cultures vivrières daliments congelés ou d aliments collants haricot bouilli igname etc Vous devez laver le couvercle du récipient 3 22 après chaque utilisation afin d éviter à toute moisissure de se former avant la prochaine utilisation Séchez le bien avant de l utiliser AVE...

Page 90: ...nnez le programme automatique souhaité Le programme que vous avez sélectionné s active et com mence à fonctionner à dif férentes vitesses Si vous sélectionnez le programme Vide la pompe se met en marche et ne s arrête que lor sque le capteur s arrête au tomatiquementouauboutde 1 minute Lorsque vous sélec tionnez le programme Vide Mixage une fois la pompe à l arrêt le programme contin ue de fonctio...

Page 91: ...ap pareil 1 2 3 1 On Min Max 4 On Min Max 2 On Min Max Versez les ingrédients dans la bouteille 23 et fermez le couvercle 24 Placez la dans le support de la bouteille 26 et verrouillez la en la tour nant dans le sens horaire sur le bloc moteur 8 Branchez l appareil et placez le bouton de réglage de la vitesse 9 à laposition ON Sélectionnez le programme Aspiration Sous Vide La pompe se met en march...

Page 92: ... vide mettez les au réfrigérateur Neconservezpaslesalimentsautresqueceuxtransformés parmixagepuismissousvideousimplementmissousvide N utilisez aucun récipient ni aucune pièce autres que ceux prévus 2 9 Quantités maximales Respectez scrupuleusement le volume maximal ou minimal pour chaque type d aliments à l aide des graduations inscrites sur le bol 4 ml 1500 1250 1000 750 50 0 250 L 1 50 1 25 0 75...

Page 93: ...n du conduit d aspiration contre les insectes Le verre doseur 22 peut être utilisé comme bouchon anti insectes pour empêcher les insectes ou les bactéries de se multiplier dans le conduit d aspirationaucasoùilsseraientattirésparl odeurdefruitsmixésoud al iments conservés à l intérieur 1 2 Retirez le bol 4 du bloc moteur 8 et tirez le levier vers le bas 7 Placez et verrouillez le verre mesureur 22 ...

Page 94: ...poussez jamais directement la goupille de l inter rupteur de sécurité avec le doigt ou une tige etc 2 11 Protection du moteur Laprotectionautomatiquedumoteurs activeetarrêtel appareilencasde surchauffe Dans ce cas 1 Placez le bouton de réglage de la vitesse 9 sur la position OFF 2 Débranchez l appareil 3 Laissez le refroidir pendant 15 à 20 minutes ...

Page 95: ...outtes de liquidevaisselledanslebol 4 etfermezlecouvercle 3 Placezlebol 4 surleblocmo teur 8 Verrouillez le bol 4 danslesenshoraireselonl in dication de la flèche marquée Verrouiller sur le bloc mo teur 8 etappuyezsurlelevi er 7 Branchezl appareil Utilisez le programme de Nettoyage automatique pendant26secondes ...

Page 96: ...ocmoteur 8 Puisrincez le Le bol bouteille en plastique 4 23 et les bouchons couver cles couvercle sport à emporter 3 22 24 25 sont lavables au lave vaisselle Il est recommandé de nettoyer l appareil juste après utilisation AVERTISSEMENT Ne plongez pas le bloc moteur 8 dans de l eau Vous pouvez l essuyer avec un chiffon humide Les lames du blender 6 sont tranchantes Ne tenez pas les bords coupants ...

Page 97: ...nt bloquer le passage sous vide et causer des problèmes Press Filter Vacuum seal Suction head cover Appuyez sur les loquets du couvercle de la tête d aspira tion 21 des deux côtés pour le retirer en le tirant vers le bas Retirez le filtre 19 du joint hermétique 20 pour le laver le rincer ou le remplacer par unnouveau Installez et verrouillez de nouveau le couvercle de la tête d aspiration 21 avant...

Page 98: ...dans les orifices d aération Verrouillez de nouveau le bouchon de prévention an ti débordement en le tour nant dans le sens horaire avanttouteutilisation 3 3 Rangement Sivousnecomptezpasutiliservotreappareilpendantuncertaintemps veuillez le ranger soigneusement Débranchez l appareil et attendez qu il soit complètement refroidi avant de le ranger Rangez l appareil et ses accessoires dans leurs emba...

Page 99: ...on emballage d origine L emballage de l appareil le protège des dom mages physiques Ne placez pas de charges lourdes sur l appareil ou sur l emballage L ap pareil pourrait subir des dommages Toute chute de l appareil peut le rendre non opérationnel ou l endom mager de façon permanente 3 Nettoyage et entretien ...

Page 100: ... usuario Siga las instrucciones prestando especial atención a toda la información y advertencias incluidas en el manual del usuario Significado de los símbolos Los siguientes símbolos se usan en las diversas secciones del presente man ual Apto para el contacto con comida No sumerja el aparato el cable eléctrico o el enchufe en agua ni en ningún otro líquido Este aparato cumple con la Directiva RAE...

Page 101: ...o de vacío 21 Cubierta del cabezal de aspiración 22 Tapón dosificador tapón anti insectos Los valores declarados en el marcado adherido en su aparato o la otra documentación impresa suministrada con el mismo representa los valores obtenidos en los laboratorios de conformidad con las normas pertinentes Estos valores pueden variar según el uso que se haga del accesorio y de las condiciones ambiental...

Page 102: ...ía 1 1 Seguridad general Lea todas las instrucciones Las personas cuyas facultades físicas sensoriales o mentales estén mermadas o que carezcan de la experiencia o conocimientos necesarios sobre el aparato pueden usar el aparato siempre y cuando lo hagan bajo supervisión o reciban la información pertinente sobresuusoseguroylospeligrosasociados No deje que los niños jueguen con el aparato 1 Normati...

Page 103: ... uso de accesorios incluidos los frascos de conservas no recomendados por el fabricante pueden provocar un riesgo de lesión a las personas No trate de desmontar el aparato No ponga en funcionamiento o sitúe ninguna parte de este aparato o sus piezas cerca de superficies calientes No utilice el dispositivo para comida caliente Su fuente de alimentación eléctrica debe cumplir la información suminist...

Page 104: ...rante el transporte y la limpieza Nunca toque las cuchillas mientras utilice el aparato Existeelriesgodesufrirheridasdebido a un uso incorrecto Evite el contacto con las piezas en movimiento No utilice el aparato en el exterior No permita que el cable cuelgue del borde de la mesa o encimera Mantenga las manos y utensilios fuera del recipiente cuando el aparato esté en funcionamiento para reducir e...

Page 105: ...ada en una única posición Si el enchufe no encaja bien en la toma de salida contacte con un electricista cualificado No modifique el enchufe de ningún modo Después de limpiarlo seque el aparato y todas las piezas antes de conectarlo a la red de alimentación y antes de acoplarle las piezas No sumerja el aparato el cable eléctrico o el enchufe en agua ni en ningún otro líquido Si guarda el material ...

Page 106: ...n durante el uso PRECAUCIÓN Con el fin de evitar situaciones depeligrodebidoalrestablecimientoaccidental del interruptor térmico este aparato no se debe alimentar mediante un un dispositivo conmutador externo como un temporizador o conectarse a un circuito que se apague y encienda regularmente por el servicio público CONSERVE ESTAS INSTRUCCIONES 1 2 Conformidad con la Directiva RAEE y eliminación ...

Page 107: ...pró el pro ducto Cadahogardesempeñaunpapelimportanteenlarecuperaciónyel reciclaje de los aparatos antiguos La eliminación adecuada de los apara tos usados ayuda a prevenir las posibles consecuencias negativas para el medio ambiente y la salud humana 1 3 Conformidad con la Directiva RoHS El producto que ha adquirido cumple con la directiva RoHS de la UE 2011 65 UE Nocontienematerialespeligrosonipro...

Page 108: ...2 3 Retirar la cuchilla de picado ADVERTENCIA No toque las cuchillas con las manos desn udas 2 1 3 4 1 2 1 2 Desenchufeelaparatoymue va la perilla de ajuste de ve locidad 9 a la posición de APAGADO Tire hacia arriba delapalanca 7 ydesbloquee la jarra 4 girándola hacia la izquierda en el sentido de la flecha Abierto indicada en la unidaddelmotor 8 Abra la válvula de vacío girán dola y retire el vac...

Page 109: ...lmotor 8 2 5 Funcionamiento ADVERTENCIA No ponga el aparato en funcionamiento cuando esté vacío Latemperaturamáximadellíquidoaprepararenelinteriordel aparato no debe superar los 40 C Deposite alimentos blandos o líquidos antes de agregar hielo o alimentos duros Si añade algo de agua en el aparato hará que funcione sin problemas p ej 40 ml de agua por cada 60 gr de alimentos sólidos Agregue el agua...

Page 110: ...ón de Bloqueo yasegúrelo 1 2 3 1 2 On Min Max On Min Max 3 4 2 1 Enchufe el aparato y mueva la perilla de ajuste de veloci dad 9 a la posición de EN CENDIDO Procese los ingredientes a la velocidad deseada con la perilla de ajuste de veloci dad 9 Una vez finalizado el proceso mueva la perilla de ajuste de velocidad 9 has ta la posición de APAGADO y desenchufeelaparato Extraer la jarra de la unidad ...

Page 111: ... a uti lizarlo No retire los ingredientes de la jarra 4 antes de que la cuchilla de picado 6 se detenga totalmente No inserte ningún objeto extraño en la jarra 4 cuando el aparato esté en funcionamiento No utilice bebidas carbonatadas comestibles o alimentos congelados o pegajosos legumbres hervidas ñame etc Despuésdecadauso latapadelrecipiente 3 22 debelavarse y eliminar la humedad para el próxim...

Page 112: ... dad 9 a la posición de EN CENDIDO Seleccione el programa au tomático deseado El pro grama que ha elegido se encenderá y comenzará a funcionar a diferentes veloci dades Si elige el programa de vacío comenzará a aspirar y se detendrá después de 1 minuto Si elige el programa Vacío Mezcla el programa seguirá funcionando a vari as velocidades una vez det enido el vacío y el programa se detendrá poster...

Page 113: ...y cierre la tapa 24 Colóquela en el soporte de botella 26 y bloquée la girándola hacia la derecha sobre la unidad del motor 8 Enchufe el aparato y mueva la perilla de ajuste de veloci dad 9 a la posición de EN CENDIDO Seleccione el programa de vacío Se encenderá la bom ba y se detendrá hasta que el sensor se apague automáti camente o al cabo de aprox 1 minuto más tarde La luz comenzaráaparpadear U...

Page 114: ... que aquella procesada utilizando el mezclado al vacío mediante el almacenamiento al vacío Noutiliceningúnotrorecipienteopiezaquenosealaadec uada para el uso previsto 2 9 Cantidades máximas Guarde el volumen máximo o mínimo de cada tipo de material por la mag nitud del recipiente 4 ml 1500 1250 1000 750 50 0 250 L 1 50 1 25 0 75 0 25 Max V acuum Foods Milk Soymilk Milk 0 50 Nivel máximo de materia...

Page 115: ...acío con prevención anti insectos El accesorio del tapón dosificador 22 puede utilizarse como tapón an ti insectos para evitar la propagación de insectos y bacterias en el pasaje de vacío si el aroma de la mezcla del jugo o de los alimentos que quedaron retenidos en el interior 1 2 Retirelajarra 4 delacarcasa delmotor 8 ybajelapalanca 7 Coloque y asegure el tapón dosificador 22 sobre el cabezal de...

Page 116: ...ctamente el pasador del interruptor de seguridad con su dedo o una varilla etc 2 10 Protección del motor Seactivarálaproteccióndelmotorautomáticaydetendráelaparatocuan do se sobrecaliente En este caso 1 Mueva la perilla de ajuste de velocidad 9 a la posición de APAGADO 2 Desenchufe el aparato 3 Déjelo enfriar de 15 a 20 minutos 2 Uso ...

Page 117: ... do lavavajillas en la jarra 4 y cierrelatapa 3 Coloque la jarra 4 en la uni dad del motor 8 Bloquée la jarra 4 hacia la derecha con formealafechade Bloquear indicada en la unidad de mo tor 8 y presione la palan ca hacia abajo 7 Enchufe el aparato Utilice el programa de au tolimpiezaparaquefuncione durante26segundos ...

Page 118: ...el motor 8 Levante la jarra 4 para separarladelmotor 8 Luegoenjuáguela Puedelavarlajarra botelladeplástico 4 23 ylostaponesolas tapas tapa para practicar deporte 3 22 24 25 en su lavavajil las Se recomienda limpiar el aparato inmediatamente después de usar ADVERTENCIA No sumerja el motor 8 en agua Puede limpiarlo con un paño húmedo La cuchilla de picado 6 está afilada No sujete el borde afi lado n...

Page 119: ...mida ya que esto podría bloquear el pasaje de vacío y ocasionar problemas Press Filter Vacuum seal Suction head cover Presione las lengüetas de la cubierta del cabezal de as piración 21 por ambos lados paraquitarlahaciaabajo Saqueelfiltro 19 delsellode vacío 20 para limpiarlo o en juagarlo osustitúyaloporuno nuevo Vuelva a colocar y asegurar la cubierta del cabezal 21 de aspiración antes de us arl...

Page 120: ...a o alimentos que ob struyan los orificios de venti lación Vuelvaacolocaryasegurarel tapón de prevención del ref lujo girándolo hacia la dere chaantesdeutilizarlo 3 3 Almacenamiento Si no va a utilizar el aparato durante un periodo prolongado de tiempo guárdelo cuidadosamente Desenchufe el aparato y espere hasta que se enfríe por completo Guarde el aparato y sus accesorios en su embalaje original ...

Page 121: ... el aparato en su embalaje origi nal El embalaje del aparato lo protege de daños físicos No coloque cargas pesadas en el aparato o en el embalaje El aparato podría dañarse Dejarcaerelaparatopodríacausarquedejaradefuncionarodañarlode forma permanente 3 Limpieza y cuidados ...

Page 122: ... ...

Page 123: ... ...

Page 124: ...ne oferiți i și manualul de utilizare Urmați instrucți unile și acordați atenție tuturor informațiilor și avertismentelor din manualul de utilizare Semnificația simbolurilor Următoarele simboluri sunt utilizate în diverse capitole ale acestui manual de utilizare Potrivit pentru contactul cu alimentele Nu scufundați produsul cablul de alimen tare sau ștecherul în apă sau în alte lichide Produsul es...

Page 125: ...e cablu 19 Filtru 20 Sigiliu vid 21 Capac cap de aspirare 22 Cană de măsurare Capac anti insecte Valorile care sunt declarate în marcajele atașate la produsul dvs sau pe celelalte documente livrate împreună cu acesta reprezintă valorile obținute în laboratoare conform standardelor aferente Aceste valori pot varia în funcție de utilizarea produsului și condițiile ambientale 23 Sticlă de plastic 24 ...

Page 126: ...strucțiunile în întregime Acest produs poate fi utilizat de către persoanele ale căror capacități fizice mintale sau de percepție sunt diminuate sau de către persoanele lipsite de experiență sau care nu au informații cu privire la produs dacă acestea sunt supravegheate sau instruite cu privire la utilizarea în siguranță a produsului și la pericolele întâlnite Copiii nu trebuie să se joace cu produ...

Page 127: ...mații cu privire la examinare reparații sau reglare Utilizarea accesoriilor inclusiv a borcanelor de conserve care nu sunt recomandate de către producătorpoate fiînsoțitădeunriscderănire Nu încercați să demontați produsul Nu utilizați și nu așezați nicio parte a acestui produs sau părți ale sale pe sau în apropiere de alimente fierbinți Nu utilizați aparatul pentru alimentele fierbinți Tensiunea d...

Page 128: ...atingeți niciodată lamele în timpul utilizării produsului În cazul unei utilizări incorecte există pericolul de a vă răni Nu atingeți piesele în mișcare Nu utilizați în exterior Nu lăsați cablul de alimentare să atârne de pe marginea mesei sau a blatului Nu introduceți mâinile și ustensilele în vasul blenderului în timpul amestecării pentru a reduce riscul de rănire gravă sau de deteriorare a blen...

Page 129: ...ștecher va putea fi introdus într o priză polarizată într o singură poziție Dacă ștecherul nu se poate introduce complet în priză contactați un electrician calificat Nu modificați ștecherul în vreun fel După curățare uscați produsul și toate componentele acestuia înainte de a l conecta la sursa de alimentare cu energie electrică și înainte de a atașa componentele Nu scufundați produsul cablul de a...

Page 130: ...ați l Opriți aparatul și deconectați l de la sursa de alimentare înainte de a schimba accesoriile sau de a vă apropia de componentele în mișcare ATENȚIE Pentru a evita orice pericol din cauza unei resetări accidentale a întreruperii termice aparatulnutrebuiealimentatprintr undispozitiv de comutare extern precum cronometrul sau conectat la un circuit care este în mod regulat pornit sau opit în func...

Page 131: ... recuperarea și reciclarea electrocasnicelor vechi Eliminarea corespunzătoare a electrocasnicelor utilizate ajută la preveni rea posibilelor consecințe negative pentru mediu și sănătatea umană 1 3 Conformitatea cu Directiva RoHS Produsul pe care l ați achiziționat este conform cu Directiva RoHS UE 2011 65 UE Acesta nu conține materiale periculoase și interzise spec ificate în această Directivă 1 4...

Page 132: ...nte de prima utilizare consultați 3 1 2 3 Scoaterea lamei de tăiere AVERTISMENT Nu atingeți lamele direct cu mâinile 2 1 3 4 1 2 1 2 Deconectați produsul și comutați butonul de reglare a vitezei 9 în poziția OPRIT Tragețipârghia 7 șideblocați vasul 4 în sens antiorar con form săgeții Deschidere de peunitateamotorului 8 Deschidețisupapaviduluiprin rotire și scoateți vidul din 4 supapă Îndepărtați c...

Page 133: ...o torului 8 2 5 Utilizarea AVERTISMENT Nu utilizați produsul fără alimente Temperatura maximă a lichidului care trebuie preparat în in teriorul aparatului nu trebuie să depășească 40 de grade C Introduceți alimentele moi sau lichidele înainte de a adăuga alimente dure sau gheață Adăugați apă pentru ca blenderul să funcționeze corespun zător de ex 40 ml apă la 60 g alimente solide Adăugați apa înai...

Page 134: ...2 3 1 2 On Min Max On Min Max 3 4 2 1 Conectați produsul și comu tați butonul de reglare a vitezei 9 înpoziția PORNIT Procesați ingredientele la viteza dorită utilizând bu tonul de reglare a vitezei 9 După ce ați terminat apăsați butonul pornit oprit 9 în sus în poziția OFF Oprit și deconectați produsul de la sursa de alimentare cu curent electric Îndepărtați cana din unita tea motorului prin roti...

Page 135: ...tiliza din nou Nu introduceți obiecte străine în vasul blenderului 4 atunci când acesta este pus în funcțiune Nuscoatețiingredienteledinvas 4 înaintecalamadetăiere 6 să fie oprită complet Nu utilizați băuturi carbogazoase alimente de cultură ali mente congelate sau lipicioase fasole fiartă batat etc După fiecare utilizare capacul recipientului 3 22 trebuie spălat iar umiditatea îndepărtată pentru ...

Page 136: ...n poziția PORNIT Selectați programul automat dorit Programul pe care l ați ales va porni și va începe să funcționeze la diferite setări de viteză Dacă alegeți pro gramul de aspirație acesta va începe să aspire și se va opri după 1 minut Dacă alegeți programul de aspirare ame stecare programul va contin ua să funcționeze la diferite viteze după ce aspirația s a oprit iar programul se va opri după 2...

Page 137: ...ntele în vasul blenderului 23 și puneți capacul 24 Puneți l pe suportul pentru sticle 26 și blocați l prin răsucire în sens orar pe unitatea motor ului 8 Conectați produsul și comutați butonul de reglare a vitezei 9 înpoziția PORNIT Selectațiprogramuldeprepa rare în vid Pompa va porni și se va opri până când senzorul se va opri automat sau circa 1 minut mai târziu Indicatorul luminosvaclipiintermi...

Page 138: ...decâtacelea procesate prin amestecarea în vid Nuutilizațialtrecipientsauoparteaaltuiadecâtacelades tinat scopului utilizării 2 9 Cantități maxime Mențineți volumul maxim sau minim pentru fiecare tip de material con form scalei de pe recipient 4 ml 1500 1250 1000 750 50 0 250 L 1 50 1 25 0 75 0 25 Max V acuum Foods Milk Soymilk Milk 0 50 Nivel maxim pentru materialele de amestecat 1500 ml Nivel min...

Page 139: ...lea de trecere a vidului Accesoriul cănii pentru măsurare 22 poate fi utilizat drept capac pentru protejareaîmpotrivainsectelorpentruaîmpiedicaînmulțireaacestorasau abacteriilorînconductuldetrecereavidului încazulîncaremirosurilesau amestecul de suc de fructe sau alimente au fost reținute înăuntru 1 2 Scoateți vasul 4 din capa cul motorului 8 și trageți pârghia 7 în jos Așezați și fixați cana de m...

Page 140: ...ul comutatorului de siguranță cu degetul sau cu o tijă etc 2 11 Protecție motor Protecțiaautomatăamotoruluisevaactivașivaoprifuncționareaaparat ului atunci când acesta este supraîncălzit În acest caz 1 Comutați butonul de reglare a vitezei 9 în poziția OPRIT 2 Scoateți produsul din priză 3 Lăsați aparatul să se răcească timp de 15 20 minute ...

Page 141: ... de lichid de spălare a vase lor în vasul blenderului 4 și închidețicapacul 3 Puneți vasul 4 în unitatea motorului 8 Blocați vasul 4 prin răsucire în sens orar conform săgeții Blocare de pe unitatea motorului 8 și apăsați pârghia 7 în jos Conectațiprodusul Folosiți programul de auto curățare și operați l pentru 26desecunde ...

Page 142: ...i 4 pentru a l în depărtadepebazacumotora blenderului 8 Apoiclătiți l Putețispălavasul sticlădeplastic 4 23 blenderuluișicapacele capac portabil 3 22 24 25 acestuia în mașina de spălat vase Se recomandă curățarea produsului imediat după utilizare AVERTISMENT Nuimersațibazacumotorablenderului 8 înapă Oputeți șterge cu o lavetă umedă Lamadetăiere 6 esteascuțită Întimpulcurățării nuțineți de marginea...

Page 143: ...alimente acestea pot înfunda canalul de trecere a vidului și provoca probleme Press Filter Vacuum seal Suction head cover Apăsați clemele capului de aspirație 21 în ambele părți pentrua lscoateînjos Scoateți filtrul din 19 sigil iul vidului pentru a l spăla sau clăti sau pentru a l înlocui cu unulnou 20 Așezați și fixați capacul capului de aspirare înapoi 21 înaintedeutilizare 3 Curățarea și îngri...

Page 144: ...xați capacul de prevenire a curentului in vers răsucindu l în sens orar înaintedeutilizare 3 3 Depozitarea Dacă intenționați să nu utilizați produsul pentru o perioadă lungă de timp depozitați l cu grijă Deconectați produsul de la sursa de alimentare cu curent electric și așteptați ca acesta să se răcească complet înainte de depozitare Păstrați produsul și accesoriile acestuia în ambalajele origin...

Page 145: ...ajul său original Ambalajul produsului protejează aparatul de deteriorări fizice Nu așezați obiecte grele pe produs sau pe ambalaj Produsul se poate deteriora În cazul în care produsul cade pe sol este posibil ca acesta să nu mai funcționeze sau să fie deteriorat iremediabil 3 Curățarea și îngrijirea ...

Page 146: ......

Page 147: ......

Page 148: ... dołączyć również niniejszą instrukcję Należy postępować zgodnie z instrukcjami zwracając uwagę na wszystkie informacje i ostrzeżenia zamieszczone w niniejszym dokumencie Znaczenie symboli W niniejszej instrukcji stosuje się następujące symbole Urządzenie przeznaczone do kontaktu z ży wnością Urządzenia przewodu zasilającego ani wtyczki nie wolno zanurzać w wodzie ani żadnym innym płynie Urządzeni...

Page 149: ...rzechowywania przewodu 19 Filtr 20 Uszczelka próżniowa Wartości deklarowane na oznaczeniach na urządzeniu lub w drukowanych dokumentach dostarczonych z urządzeniem to wartości uzyskane w laboratoriach zgodnie z obowiązującymi normami Wartości te mogą się różnić w zależności od sposobu użytkowania urządzenia i warunków w jego otoczeniu 21 Pokrywa głowicy ssącej 22 Miarka nakrywka przeciw owadom 23 ...

Page 150: ...czytać wszystkie instrukcje Urządzenie może być używane przez osoby niepełnosprawne fizycznie psychicznie lub umysłowo a także osoby bez doświadczenia lub wiedzy w zakresie obsługi urządzenia o ile znajdują się one pod nadzorem lub zostały szczegółowo poinstruowane na temat bezpiecznego korzystania z urządzenia i potencjalnych zagrożeń Dzieci nie powinny bawić się tym urządzeniem 1 Ważne instrukcj...

Page 151: ...i urządzenia należy skontaktować się z producentem dzwoniąc pod numer obsługi klienta Stosowanie niezatwierdzonych przez producenta końcówek takich jak słoiki na konserwy może stwarzać ryzyko urazu cielesnego Nie podejmować prób demontażu urządzenia Nie uruchamiać i nie kłaść żadnych części tego urządzenia na gorących powierzchniach ani w ich pobliżu Nie używać urządzenia z gorącą żywnością 1 Ważn...

Page 152: ...gniazdka gdy nie jest używane przed włożeniem lub wyjęciem części oraz przed czyszczeniem Podczas transportu i czyszczenia należy ostrożnie przytrzymywać trzonek z ostrzem Nie wolno dotykać ostrzy podczas używania urządzenia Nieprawidłowe użytkowanie może być przyczyną obrażeń Należy unikać kontaktu z ruchomymi elementami Nie należy korzystać z urządzenia na zewnątrz 1 Ważne instrukcje dotyczące b...

Page 153: ...e kiedy blender jest wyłączony Ostrza są ostre Należy ostrożnie obchodzić się z urządzeniem Zawsze należy korzystać z blendera z założoną pokrywką Nie blendować gorących płynów Aby zmniejszyć ryzyko porażenia prądem wtyczkę można włożyć tylko do odpowiedniego gniazdka Jeśli wtyczka nie pasuje dokładnie do gniazdka należy skontaktować się z wykwalifikowanym elektrykiem Nie wolno w żaden sposób mody...

Page 154: ...ądzenia należy przechowywać poza zasięgiem dzieci Urządzenie nie powinno być obsługiwane przez dzieci Urządzenie należy trzymać poza zasięgiem dzieci Zawsze odłączać blender od zasilania jeśli jest pozostawiony bez nadzoru oraz przed jego montażem i demontażem Wyłączyć urządzenie i odłączyć od zasilania przed wymianą akcesoriów lub kontaktem z ruchomymi częściami 1 Ważne instrukcje dotyczące bez p...

Page 155: ...cznych WEEE Ten symbol oznacza że sprzęt nie może być umieszczany łącz nie z innymi odpadami gospodarstwa domowego po okresie jego użytkowania Zużyte urządzenie należy oddać do specjal nego punktu zbiórki zużytego sprzętu elektrycznego i elektro nicznego w celu utylizacji Aby uzyskać informacje o punktach zbiórki w swojej okolicy należy skontaktować się z lokalnymi władzami lub punktem sprzedaży t...

Page 156: ...piecznych 2011 65 WE Nie zawiera szkodliwych i zakazanych materiałów podanych w tej dyrektywie 1 4 Informacje o opakowaniu Opakowanie tego wyrobu wykonano z materiałów nadających się do recyklingu zgodnie z naszym ustawodawstwem krajo wym Nie wyrzucaj materiałów opakowaniowych do śmieci wraz z innymi odpadkami domowymi Oddaj je w jednym z wy znaczonych przez władze lokalne punktów zbiórki materiał...

Page 157: ... patrz 3 1 2 3 Wyjmowanie ostrza do siekania OSTRZEŻENIE Nie dotykać ostrzy gołymi dłońmi 2 1 3 4 1 2 1 2 Odłączyć urządzenie od zasilania i ustawić pokrętło regulacji prędkości 9 w położeniu OFF Pociągnąć dźwignię 7 w górę i odblokować dzbanek 4 w lewo zgodnie ze strzałką otwierania nazespolesilnika 8 Otworzyć zawór podciśnieniowy obracającgoi odprowadzającpodciśnieniez zaworu 4 Zdjąć pokrywkę z ...

Page 158: ... dzbanek na obu dowiesilnika 8 2 5 Obsługa OSTRZEŻENIE Nie uruchamiać urządzenia kiedy jest puste Maksymalna temperatura płynu przygotowywanego wewnątrz urządzenia nie może przekraczać 40 stopni Cels jusza Przed włożeniem produktów stałych lub lodu umieścić w po jemniku produkty miękkie lub płyny Dodanie wody umożliwi blenderowi pracę bez zakłóceń np 40 ml wody na 60 g produktu stałego Wodę dodać ...

Page 159: ...an ie izabezpieczyć 1 2 3 1 2 On Min Max On Min Max 3 4 2 1 Podłączyćurządzeniedozasi lania i ustawić pokrętło reg ulacji prędkości 9 w położe niuON Przetwarzać produkty z wy braną prędkością korzysta jąc z pokrętła regulacji pręd kości 9 Po zakończeniu przetwarzania przesunąć pokrętło regulacji prędkości 9 wpołożenieOFFiodłączyć urządzenieodzasilania Usunąć dzbanek z modułu silnika obracając go w...

Page 160: ...inuty Należy odczekać 5 minut przed ponownym uru chomieniem Podczaspracyurządzenianiewolnowkładaćżadnychprzed miotów do dzbanka 4 Nie wolno wyjmować składników z dzbanka 4 dopóki os trze 4 się obraca Nieużywaćnapojówgazowanych ciętej mrożonejżywności ani lepkiej żywności gotowanej fasoli yamu itd Pokrywkę pojemnika 3 22 należy umyć po każdym użyciu a przed następnym użyciem wysuszyć Przed użyciem ...

Page 161: ...Wybrać żądany program au tomatyczny Wybrany pro gram zostanie uruchomiony i rozpocznie pracę z różny mi ustawieniami prędkoś ci Jeżeli użytkownik wybier ze program podciśnieniowy urządzenie rozpocznie odsy sanie i zatrzyma się po upły wie1minuty Jeżeliużytkown ik wybierze Podciśnienie blendowanie program będzie pracowałzróżnymiprędkości ami po zatrzymaniu odsysa nia samprogramzostanieza trzymanypo...

Page 162: ...yć składniki do pojemni ka 23 i zamknąć pokrywkę 24 Umieścić go w stojaku na butelkę 26 i zablokować obracając w prawo na ze spole silnika 8 Podłączyć urządzenie do zasilania i ust awić pokrętło regulacji pręd kości 9 wpołożeniuON Wybrać program Próżnia Pompa włączy się i zatrzy ma dopiero po automatycz nym wyłączeniu czujnika lub minutę później Lampka będziemigać Po zakończeniu przetwarza nia prz...

Page 163: ...yciu blendowania próżniowego Nie używać żadnych pojemników lub części innych niż przeznaczone do danego celu 2 9 Ilości maksymalne Stosować maksymalną lub minimalną objętość każdego rodzaju materiału zgodnie ze skalą na pojemniku 4 ml 1500 1250 1000 750 50 0 250 L 1 50 1 25 0 75 0 25 Max V acuum Foods Milk Soymilk Milk 0 50 Maksymalny poziom materiałów do blendowania 1500 ml Minimalny poziom mater...

Page 164: ... i usunąć resztki przy użyciu długiego i cienkiego narzędzia 2 9 Zabezpieczenie kanału próżniowego przed owadami Miarka 22 może służyć jako nakrywka zapobiegająca przedostaniu się do kanału próżniowego owadów lub mikroorganizmów zwabionych zapachem blendowanego soku lub żywności 1 2 Zdjąć dzbanek 4 z obu dowy silnika 8 i pociągnąć dźwignię w dół 7 Założyć miarkę 22 na próżniową głowicęssącą 21 Aby...

Page 165: ...łącznika bezpieczeństwa palcem sztućcem itd 2 10 Ochrona silnika Funkcja automatycznej ochrony silnika zostanie uaktywniona i zatrzyma urządzenie w razie przegrzania W takim przypadku 1 Ustawić pokrętło regulacji prędkości 9 w położeniu OFF 2 Odłączyć urządzenie od prądu 3 Pozostawić do wystygnięcia na 15 20 minut 2 Użytkowanie ...

Page 166: ... i kilka kropel płynu do mycia naczyń do dzban ka 4 izamknąćpokrywkę 3 Umieścić dzbanek 4 na zespole silnika 8 Zakręcić dzbanek 4 w prawo zgodnie z kierunkiem strzałki zamykania na zespole silnika 8 i wcisnąć dźwignię 7 Podłączyć urządzenie do zasilania Włączyć program au tomatycznego czyszczenia na26sekund ...

Page 167: ...4 aby odłączyć go od modułu silnika 8 Następnieopłukaćgo Dzbanek pokrywa podciśnieniowa 4 23 i miarki pokrywki pokrywka sportowa 3 22 24 25 można myć w zmywarce do naczyń Zaleca się czyszczenie urządzenia zaraz po jego użyciu OSTRZEŻENIE Nie wolno zanurzać zespołu silnika 8 w wodzie Należy go wycierać wilgotną ścierką Ostrze do siekania 6 jest ostre Nie wolno chwytać ostrza palcami ani zanurzać go...

Page 168: ... pojem nika 3 żywnością co może prowadzić do zatkania kanału próżniowego Press Filter Vacuum seal Suction head cover Nacisnąć zatrzaski po obu stronach pokrywy głowicy ssącej 21 abyjązdjąćwdół Wyjąć filtr 19 z uszczel ki próżniowej 20 i umyć przepłukać lub wymienić go nanowy Założyć i zabezpieczyć pokrywę głowicy ssącej 21 przedużyciem 3 Czyszczenie i konserwacja ...

Page 169: ...e zablokowały otworów wenty lacyjnych Umieścić i założyć nakry wkę zabezpieczającą przed przepływem wstecznym obracając ją w prawo przed użyciem 3 3 Przechowywanie Jeśli urządzenie nie będzie używane przez dłuższy czas należy je bez piecznie przechowywać Odłączyć urządzenie od prądu i zaczekać aż całkowicie ostygnie Urządzenie i jego akcesoria należy przechowywać w oryginalnych opa kowaniach Nie w...

Page 170: ...ć w oryginalnym opakowa niu Zabezpiecza ono urządzenie przed fizycznymi uszkodzeniami Nie wolno kłaść ciężkich przedmiotów na urządzeniu ani opakowaniu Urządzenie może ulec uszkodzeniu Upuszczenieurządzeniamożespowodowaćjegoawarięlubtrwałeusz kodzenie 3 Czyszczenie i konserwacja ...

Page 171: ......

Page 172: ...e persone consegni loro anche queste istruzioni Segua tutte le avvertenze e le informazioni riportate nel manuale utente Significato dei simboli I seguenti simboli sono utilizzati in diverse sezioni del presente manuale Adatto al contatto con alimenti Non immergere l apparecchio il cavo di ali mentazione o la spina elettrica in acqua o in altri liquidi Questo dispositivo risulta conforme alla dire...

Page 173: ...9 Filtro 20 Chiusura sottovuoto 21 Coperchio testa di aspirazione 22 Tazza per misurazione Tappo anti insetto 23 Bottiglia di plastica I valori dichiarati e affissi al dispositivo o in altri documenti stampati e forniti con lo stesso rappresentano i valori ottenuti in laboratorio in conformità alle normative vigenti Tali valori possono variare a seconda dell impiego del dispositivo e delle condizi...

Page 174: ... Sicurezza generale Leggere tutte le istruzioni Questo apparecchio può essere utilizzato da bambini e persone con capacità fisiche sensorialiomentaliridotteoprivediesperienza e o conoscenze purché supervisionate o istruite in merito all uso sicuro del dispositivo e ai possibili rischi I bambini non devono giocare con l apparecchio 1 Istruzioni importanti per la sicu rezza e l ambiente ...

Page 175: ...azioni su ispezioni riparazioni o regolazioni L uso di accessori inclusi barattoli non raccomandatidalcostruttorepotrebbe causare lesioni Non provare a smontare l apparecchio Non utilizzare il dispositivo né posizionare alcuna delle sue parti al di sopra o in prossimità di superfici calde Non utilizzare il dispositivo con del cibo caldo Il proprio impianto elettrico deve essere conforme ai valori ...

Page 176: ...re mai le lame mentre il dispositivo è in funzione Un utilizzo non corretto potrebbe causare lesioni Non toccare le parti in movimento Non utilizzare in aree esterne Non lasciare pendere il cavo dal bordo di tavoli o piani di lavoro Tenerelemaniegliutensilifuoridalcontenitore durante la miscelazione per ridurre il rischio di lesioni o danni È possibile utilizzare un raschiatore ma soltanto se il f...

Page 177: ...la presa contattareunelettricistaqualificato Non modificare la spina in alcun modo Dopo la pulizia asciugare il dispositivo e ogni componente prima di rimontarlo e ricollegarlo allapresaelettrica Nonimmergerel apparecchio il cavo di alimentazione o la spina elettrica in acqua o in altri liquidi Se si desidera conservare i materiali di imballaggio tenerli fuori dalla portata dei bambini I bambini n...

Page 178: ...mbiare gli accessori o avvicinarsi alle parti che si muovono durante l uso ATTENZIONE Per evitare un rischio causato da un ripristino accidentale del dispositivo termico di interruzione il dispositivo non deve essere alimentato attraverso un dispositivo di accensione esterno come un timer o collegato a un circuito che viene regolarmente attivato e disattivato dall utenza CONSERVARE QUESTE ISTRUZIO...

Page 179: ...ato acquistato il prodotto Ciascuna famiglia ha un ruolo importante nel recupero e riciclaggio di vec chi apparecchi Lo smaltimento appropriato degli apparecchi usati aiuta a prevenirepotenzialiconseguenzenegativeperl ambienteelasaluteuma na 1 3 Conformità alla direttiva RoHS Il prodotto acquistato è conforme alla direttiva UE RoHS 2011 65 UE Non contiene materiali dannosi e vietati specificati ne...

Page 180: ...imozione della lama per tritare AVVERTENZA Non toccare le lame a mani nude 2 1 3 4 1 2 1 2 Scollegare il dispositivo e po sizionare la manopola per la regolazione della velocità 9 in posizione OFF Tirare ver so l alto la leva 7 e sblocca re la brocca 4 in senso anti orariosecondolafreccia Apri sull unitàmotore 8 Aprire la valvola sottovuo to ruotandola e rimuovendo il sottovuoto dalla 4 valvo la R...

Page 181: ...rocca sull al loggiamentomotore 8 2 5 Funzionamento AVVERTENZA Non utilizzare l apparecchio quando è vuoto La temperatura massima del liquido da preparare all interno del dispositivo non deve superare i 40 C Inserire alimenti morbidi o liquidi prima di inserire ghiaccio o alimenti duri Aggiungendo dell acqua nel dispositivo lo stesso funzionerà senza intoppi es 40 ml di acqua per 60 gr di cibo sol...

Page 182: ...3 1 2 On Min Max On Min Max 3 4 2 1 Collegare il dispositivo e po sizionare la manopola per la regolazione della velocità 9 inposizione ON Lavorare gli ingredienti alla velocità desiderata usando la manopola per la regolazi one della velocità 9 Quan do il processo è completo po sizionare la manopola per la regolazione della velocità 9 in posizione OFF e scolle gareildispositivo Rimuovere la brocca...

Page 183: ...i azionarlo di nuovo Noninserirecorpiestraneiall internodellabrocca 4 quando il dispositivo è in funzione Non rimuovere gli ingredienti dalla brocca 4 prima del com pleto arresto della lama 6 Non utilizzare bevande gassate pezzi di carne cibo conge lato o cibi appiccicosi fagioli bolliti patate dolci ecc Dopo ogni utilizzo il coperchio del contenitore 3 22 deve essere lavato ed è necessario rimuov...

Page 184: ...ione della velocità 9 in posizione ON Selezionare il programma au tomatico desiderato Il pro grammasceltosiattiveràein izierà a funzionare a diverse impostazioni di velocità Se si sceglie il programma sot tovuoto inizierà l aspirazione etermineràdopo1minuto Se si sceglie il programma Sot tovuoto Miscelazione il pro gramma continuerà a funzi onare a diverse velocità dopo il termine dell aspirazione...

Page 185: ...os itivo 1 2 3 1 On Min Max 4 On Min Max 2 On Min Max Inseriregliingredientinelcon tenitore 23 e chiudere il co perchio 24 Posizionarlo nel supporto bottiglia 26 e bloccarlo girando in senso orario sull unità motore 8 Collegare il dispositivo e po sizionare la manopola per la regolazione della velocità 8 inposizione ON SelezionareilprogrammaSot tovuoto La pompa si accend eràesifermeràfinoaquando i...

Page 186: ...a interrompere l apparecchio in qualsiasi mo mento durante un operazione posizionare la manopola per la regolazione della velocità 16 in posizione OFF AVVERTENZA Quando si conserva del cibo nel contenitore smoothie medi antelaconservazionesottovuoto sipregadiconservarlonel frigorifero Non conservarlo in freezer Nonconservarecibodiversodaquelloprodottoutilizzandoil frullatoresottovuotomediantelacon...

Page 187: ...te e latte di soia per sottovuoto 700ml AVVERTENZA Nonsuperareillivellomassimoperogniingredienteindicato sullascalagraduatapresentesulcontenitore 4 Ingredienti o liquidi gassati che entrano nella pompa possono causare problemi Se ci sono ingredienti attaccati tra le lame per tritare 6 smontarle dalla brocca 4 e rimuovere gli ingredienti attac cati usando un utensile lungo e sottile e così via 2 10...

Page 188: ... sollevarelaleva 7 AVVERTENZA Prestare attenzione per assicurarsi che gli ingredienti non entrino nel dispositivo di sicurezza Non spin gere mai direttamente il perno dell interruttore di sicurezza con le dita o con un bastoncino ecc 2 11 Protezione motore La protezione automatica del motore verrà attivata e arresterà l apparec chio quando l apparecchio si surriscalda In questo caso 1 spostare la ...

Page 189: ...nellabrocca 4 echiudere ilcoperchio 3 Posizionare la brocca 4 nell unità motore 8 Blocca re la brocca 4 in senso orar io secondo la freccia di Bloc co sull unità motore 8 e premere verso il basso la leva 7 Collegareilcavodialimen tazione Utilizzare il programma Au to pulizia per azionarlo per 26secondi 3 Pulizia e manutenzione ...

Page 190: ...à motore 8 Tirare verso l alto la brocca 4 per rimuoverla dall unità motore 8 Quindisciacquare È possibile lavare la brocca bottiglia di plastica 4 23 e i tappi coperchi coperchio da asporto 3 22 24 25 in lavastoviglie Si raccomanda di pulire il dispositivo subito dopo l uso AVVERTENZA Non immergere l unità motore 8 nell acqua È possibile pulirla con un panno umido La lama 6 è affilata Non reggerl...

Page 191: ...uestopuòbloc care il passaggio del sottovuoto e causare problemi Press Filter Vacuum seal Suction head cover Premeresullechiusuredelco perchio della testa di aspirazi one 21 su entrambi i lati per rimuoverloversoilbasso Estrarre il filtro 19 dalla chi usura del sottovuoto 20 per lavarlo o sciacquarlo oppure sostituirloconunonuovo Riposizionare e fissare il co perchio della testa di as pirazione 21...

Page 192: ...locchino i foridiventilazione Posizionare e fissare nuova mente il tappo per la preven zione del reflusso girandolo in senso orario prima dell uti lizzo 3 3 Conservazione Sel apparecchiononvieneutilizzatoperunlungoperiododitempo con servarlo con cura Scollegare l apparecchio e attendere che si raffreddi completamente prima di riporlo Conservare l apparecchio e gli accessori nella confezione origin...

Page 193: ...l suo imballaggio originale L imballo lo proteggerà da eventuali danni materiali Non posizionare carichi pesanti sull apparecchio o sull imballaggio L ap parecchio potrebbe danneggiarsi Un eventuale caduta dell apparecchio potrebbe renderlo non funzion ante o provocare dei danni permanenti 3 Pulizia e manutenzione ...

Page 194: ...sono risultate difettose all origine per vizi di fabbricazione 4 L utente decade dai dritti di garanzia se non denuncia il difetto di conformità entro 2 mesi dalla scoperta dello stesso 5 Diritto di Chiamata gratuita per i primi 12 mesi di garanzia a pagamento per gli altri 12 mesi nel caso l utente non sia in grado di provare che il difetto sia dovuto a vizio di conformità del prodotto 6 Manodope...

Page 195: ...asti dovuti a mancanza di regolare ma nutenzione pulizia e manutenzione del prodotto h Mancanza dei documenti fiscali o se gli stessi risultano contraffatti o non inerenti al prodotto i L usoimpropriodell apparecchio nonditipodomesticoodiversodaquantostabilitodalprodutto re fa decadere il dritto alla Garanzia j Per tutte le circostanze esterne che non siano riconducibili a difetti di fabbricazione...

Page 196: ...االستخدام التخزين 4 3 بعناية تخزينه يجب الوقت من طويلة لفترة الجهاز الستخدام تخطط لم إذا تخزينه قبل ًا م تما يبرد أن إلى وانتظر الجهاز قابس انزع األصلية عبواته في وملحقاته بالجهاز احتفظ الجهاز حول الطاقة كابل بلف تقم ال وجاف بارد مكان في احفظه األطفال أيدي متناول عن ا ً د بعي ًا م دائ الجهاز على حافظ والنقل التعامل 4 4 يحميه الجهاز تغليف األصلية عبوته في الجهاز بحمل قم والنقل التعامل أثناء في مادي...

Page 197: ...سك ال حادة 6 الفرم شفرة التنظيف أثناء الماء في غمرها أو الحادة بالحافة المرشح استبدال أو غسل 4 2 لتجنب للغسل قابل دائم مرشح مع الجهاز على 21 التفريغ شفط رأس تجميع يتم ممر سد يمكنه الذي األمر 3 الحاوية غطاء على الطعام تناثر حالة في المشاكل المشاكل ا ً محدث التفريغ Press رأس غطاء مزالج على اضغط إلزالته الجانبين كال من الشفط ألسفل التفريغ ختم من المرشح أخرج بمرشح استبداله أو شطفه أو لغسله جديد رأس غط...

Page 198: ... ًا ق وف الساعة عقارب اتجاه في 8 المحرك وحدة على القفل وصل ألسفل 7 الذراع واضغط الجهاز قابس التلقائي التنظيف برنامج استخدم ثانية 26 لمدة لتشغيله 3 2 1 التنظيف قبل الجهاز قابس انزع الملحقات تتوقف أن إلى انتظر الذراع اسحب ًا م تما المستخدمة في 4 اإلبريق وافتح ألعلى 7 ًا ق وف الساعة عقارب اتجاه عكس المحرك وحدة على الفتح لسهم أعلى إلى اإلبريق اسحب 8 المحرك وحدة من إلخراجه 4 8 اشطفه ثم والعناية التنظيف...

Page 199: ...ير تدفع ال السالمة جهاز إلى تدخل ال الغذائية المواد أن من للتأكد احذر إلخ بقضيب أو بإصبعك مباشرة السالمة مفتاح مسمار ا ً د أب يرجى 6 تقطيع شفرات بين بين عالقة مكونات هناك كان إذا رفيعة طويلة أداة باستخدام العوالق إزالة و 4 اإلبريق من فكها ذلك إلى وما المحرك حماية 3 10 في الجهاز ويتوقف التلقائية المحرك حماية تفعيل يتم الجهاز حرارة ترتفع عندما الحالة هذه OFF الوضع إلى 9 السرعة ضبط مقبض حرك الجهاز قا...

Page 200: ...ع كل لحجم األدنى الحد أو األقصى الحد على حافظ 4 الحاوية على ml 1500 1250 1000 750 50 0 250 L 1 50 1 25 0 75 0 25 Foods Milk Soymilk Milk 0 50 Max Vacuum إلیھا مشار غذائیة مادة لكل لمستوى األقصی الحد تتجاوز ال تحذير التي الغذائية أو الفقاعية المواد 4 الحاویة علی المقياس طريق عن المشاكل تسبب أن يمكن المضخة في تدخل التفريغ لممر الحشرات من الوقاية 3 10 أو الحشرات لمنع للحشرات مضاد كغطاء 22 القياس كوب ...

Page 201: ...تلقائ المستشعر المصباح سيومض واحدة دقيقة 23 الحاوية في المكونات ضع في وضعها 24 الغطاء وأغلق عن واقفلها 26 الزجاجة حامل عقارب اتجاه في تدويرها طريق 8 المحرك وحدة على الساعة مقبض وحرك الجھاز بتوصیل قم الوضع إلی 9 السرعة ضبط ON حاوية باستخدام الفراغ في األطعمة من غيره أو المخلوط بالعصير االحتفاظ يمكنك طويلة لفترة طازجة عليها للحفاظ التخزين المحتويات بتعقيم يقوم ال ولكن األكسدة تأخير على التفريغ يعمل ...

Page 202: ... اآللي البرنامج اختر اخترته الذي البرنامج تشغيل سيتم سرعة بإعدادات العمل وسيبدأ التفريغ برنامج اخترت إذا مختلفة بعد سيتوقف ثم التفريغ فسيبدأ برنامج اخترت إذا واحدة دقيقة البرنامج فسيستمر الخلط التفريغ بعد مختلفة بسرعات العمل في البرنامج وسيتوقف التفريغ توقف المصباح سيومض دقيقتين بعد حرك التحضير انتهاء عند إلى 9 السرعة ضبط مقبض قابس انزع ثم OFF الوضع الجهاز النبض وضع 3 7 الوضع عند 9 السرعة ضبط مقبض...

Page 203: ...ء أي تدخل ال الفرم شفرة تتوقف أن قبل 4 اإلبريق من مكونات أي بإخراج تقم ال ًا م تما 6 أو المجمدة األغذية أو الحبوب أو الغازية المشروبات تستخدم ال ذلك إلى وما المسلوقة والبطاطا الفاصوليا اللزجة األطعمة الرطوبة وإزالة 22 3 الحاوية غطاء غسل يجب استخدام كل بعد االستخدام قبل ا ً د جي جففه التالي لالستخدام الحاوية غطاء على االرتجاع منع غطاء تجميع يتم أن يجب تحذير التفريغ صمام في الطعام أو للماء ارتجاع حص...

Page 204: ...موجود وثبته قفل وضع إلى وحركه 1 2 3 On Min Max 3 4 2 1 1 2 On Min Max مقبض وحرك الجھاز بتوصیل قم الوضع إلی 9 السرعة ضبط ON السرعة عند المكونات حضر مقبض باستخدام فيها المرغوب انتهاء عند 9 السرعة ضبط ضبط مقبض حرك التحضير OFF الوضع إلى 9 السرعة الجهاز قابس انزع ثم المحرك وحدة من اإلبريق اخلع اتجاه عكس في إدارته خالل من افتح 4 8 الساعة عقارب الطعام وأخرج 3 الغطاء االستخدام 3 ...

Page 205: ... عقارب اتجاه المحرك مبيت على اإلبريق ضع 8 التشغيل 3 5 ا ً غ فار يكون عندما الجهاز تشغل ال تحذير أال يجب الجهاز داخل تحضيره المراد للسائل القصوى الحرارة درجة مئوية درجة 40 تتجاوز الثلج أو الصلبة األطعمة إضافة قبل السوائل أو اللينة األطعمة ضع 40 مثال بسالسة بتحضيره سيسمح الجهاز في الماء بعض إضافة قبل الماء أضف الصلب الطعام من جم 60 على الماء من مل المكونات االستخدام 3 ...

Page 206: ...قبل الجهاز أجزاء نظف الفرم شفرة فك 3 3 العارية باأليدي تلمسها ال تحذير 1 2 1 2 3 4 2 1 ضبط مقبض وحرك الجهاز افصل OFF الوضع إلى 9 السرعة وافتح ألعلى 7 الرافعة اسحب اتجاه عكس في 4 اإلبريق الفتح لسهم ًا ق وف الساعة عقارب 8 المحرك وحدة على خالل من التفريغ صمام افتح التفريغ وحدة أزل ثم تدويره من الغطاء فك 4 الصمام من 4 اإلبريق غطاء وأدر اإلبريق 3 عن 6 الفرم شفرة وحدة أزل عقارب اتجاه في تدويرها طريق الس...

Page 207: ...ص زر 14 14 التفريغ زر 15 15 التفريغ الخلط زر 16 16 األوتوماتيكي التنظيف زر 17 17 االنزالق لمنع قاعدة 18 18 الكابل تخزين مقصورة 19 19 فلتر 20 20 التفريغ سدادة 21 21 الشفط رأس غطاء 22 22 الحشرات ضد غطاء القياس كوب 23 23 بالستيكية زجاجة 24 24 التفريغ غطاء 25 25 رياضي غطاء 26 26 الزجاجة حامل تقنية بيانات 2 2 220 240V 50 60 Hz الفولتية W 1000 الطاقة استهالك التصميم وتعديالت الفنية التعديالت حقوق محفوظة...

Page 208: ...AR 8 الهواء تفريغ بتقنية خالط 2 14 15 16 22 26 2 2 10 18 17 24 25 6 5 4 3 8 7 19 20 21 11 12 13 9 23 1 1 عامة نظرة 2 1 ...

Page 209: ...اسبة وهي استخدامه فترة نهاية في النفايات من غيرها أو المنزلية النفايات مع منه الكهربائية األجهزة تدوير إلعادة التجميع مركز إلى أخذه عليك بل مراكز لمعرفة لديك المحلية السلطات استشارة يرجى واإللكترونية هذه التجميع RoHS توجيه مع التوافق 1 3 RoHS 2011 65 األوروبي االتحاد توجيه مع متوافق اشتريته الذي المنتج في إليها المشار تلك من محظورة أو مؤذية مواد على المنتج هذا يحتوي ال EU التوجيه التعبئة معلومات 1...

Page 210: ...يدي متناول عن ً ا بعيد التغليف مواد احفظ ا ً د بعي الجهاز على حافظ الجهاز استخدام لألطفال يجوز ال األطفال أيدي متناول عن العرض عن الخالط بإبعاد ًا م دائ قم يتفكك فإنه التجميع وقبل مراقبة دون ترك إذا الملحقات تغيير قبل العرض عن وإبعاده الجهاز بتبديل قم االستخدام أثناء تتحرك التي األجزاء من االقتراب أو المقصودة غير اإلعادة بسبب الخطر تجنب أجل من تحذير من الجهاز هذا تزويد يتم أال يجب الحراري القطع من...

Page 211: ...ك والتنظيف أن يمكن الجهاز استخدام أثناء ا ً د أب الشفرات تلمس ال االستخدام سوء جراء لإلصابة تتعرض المتحركة األجزاء مالمسة تجنب الطلق الهواء في بالخارج الجهاز تستخدم ال الطاولة أو المنضدة حواف على يتعلق الطاقة كابل تدع ال في الحاوية عن ا ً د بعي األخرى واألواني األيدي إبقاء عليك إلصابات األفراد تعرض خطر من للحد وذلك الفرم أثناء ولكن المكشطة استخدام يمكن الخالط تلف أو خطيرة االستخدام قيد الخالط يكون...

Page 212: ...للجهاز اآلمن االستخدام كيفية على إطالعهم تم أو للرقابة يلعب أال يجب واستوعبوها يواجهونها قد التي والمخاطر بالجهاز األطفال بعد أو تالف قابس أو كابل ذي جهاز أي بتشغيل تقم ال صورة بأي تلفه أو سقوطه أو بالجهاز عطب حدوث للحصول العمالء خدمة رقم على المصنعة بالجهة اتصل والضبط واإلصالح الفحص حول معلومات على الغير التعليب برطمانات ذلك في بما المرفقات استخدام خطر يسبب أن يمكن المصنعة الشركة قبل من بها موصى ...

Page 213: ...AR 3 المحتويات 04 20 عربى ...

Page 214: ...أعطه آخر لشخص الجهاز بتسليم قمت إذا المستقبلي لالستخدام كمرجع دليل في والتحذيرات المعلومات لجميع خاص اهتمام إيالء مع اإلرشادات اتبع ا ً أيض المستخدم الرموز معاني هذا المستخدم دليل من متعددة أجزاء في التالية الرموز تستخدم لمالمسةالطعام مناسب في الطاقة قابس أو الطاقة كابل أو الجهاز تغمر ال أخرى سوائل أي في أو المياه للبيئة وصديقة حديثة مرافق في المنتج هذا إعداد تم WEEE توجيهات مع يتوافق االستخدام عن...

Page 215: ...TBV8106BX 01M 8813893200 4419 03 Vacuum Blender User Manual AR ...

Reviews: