Page 7 of 9
Instruction Manual A75 Version 6 19th April 2004
BEKA associates Ltd, Old Charlton Road, Hitchin, Hertfordshire. SG5 2DA. UK. Tel: +44 (0) 1462 438301
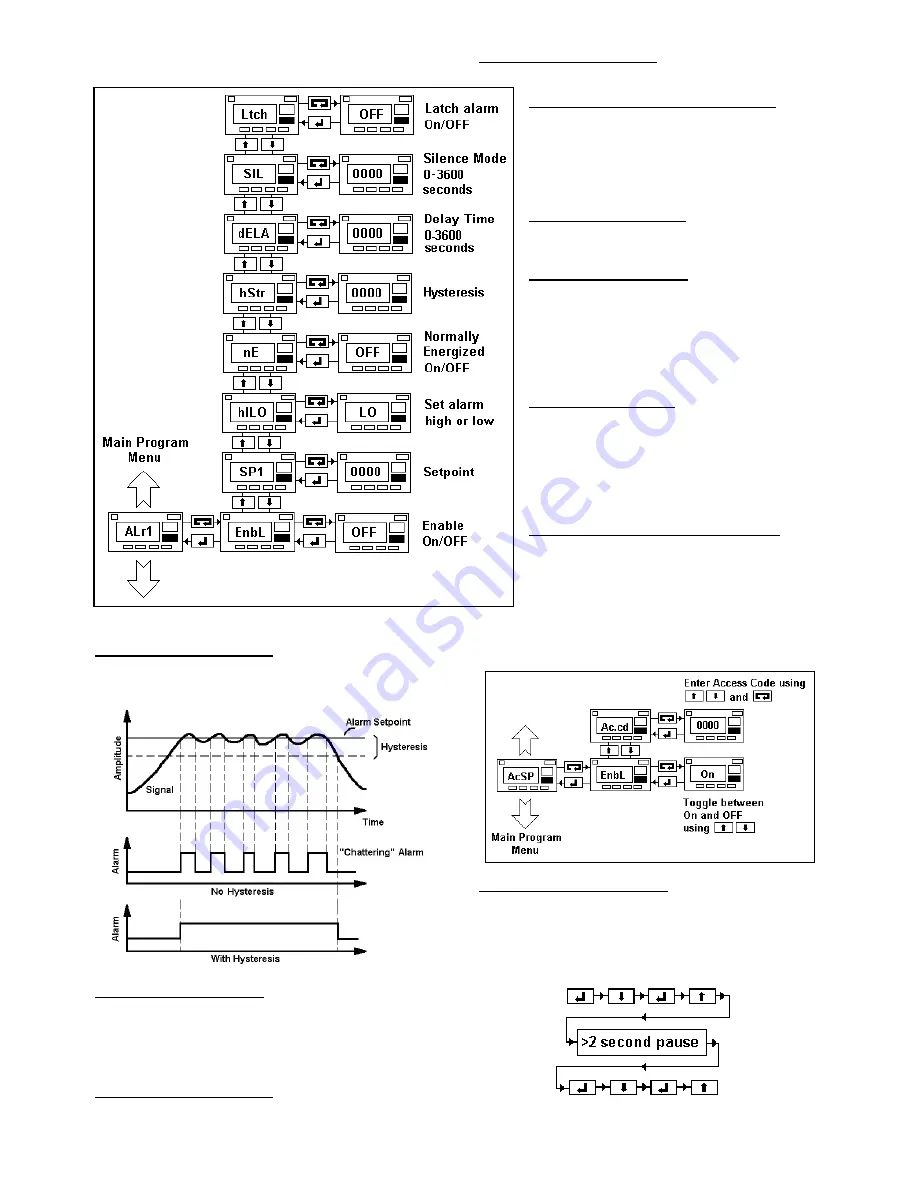
Alarms (1 & 2) have the same set-up parameters, but operate
independently of each other. Each can be set as a high or low
alarm.
8.6.1) “hStr” - Hysteresis
. On an Advisor, hystersis is
set in engineering units not percentage and can be
set to any value. Hysteresis can be used to stop
alarm “chatter” as the diagram shows.
8.6.2) “EnbL” – Enable
. This parameter enables an
alarm to be easily switched on or off without having
to change all the other alarm parameters.
NOTE: If
the alarms are not enabled, the alarm relays will
stay in the position determined by the “nE”
(normally energized) parameter.
8.6.3) “SP1” - Setpoint 1
. (or setpoint 2). This is the
alarm setpoint value and is entered in the same units
as the display.
8.6.4) “hILO” - High/Low
. Each alarm can be set as
either active high or active low.
8.6.5) “nE” - Normally Energised
. This
parameter determines the state of the changeover
relay. If “nE” is “on” then the alarm relay is normally
energised i.e. an alarm state will cause the relay to
be de-energized. If the alarm is normally energised,
this will also produce a “failsafe” condition should
there be a power failure.
8.6.6) “dELA” - Delay
. This function can be
programmed to delay an alarm by up to 3600
seconds. If set to “0000” then the alarm delay is off.
8.6.7) “SIL” – Silence
. This function allows
the relay outputs to be de-activated (or silenced) for
up to 3600 seconds. Hence, an alarm sounder
connected to the output relays could be momentarily
“silenced” by the operator pressing the scroll button.
If the input signal is still in the alarm range after the
silence time had elapsed, the alarm is automatically
re-activated.
8.6.8) “Ltch” - Latch
.
This function allows the
alarms to be latched on. If the input signal causes
the alarm to trip and this function is “on”, the relay
output(s) will be held in the alarm state even if the
input signal falls back into the normal operating
range. In Normal Display Mode, a latched alarm is
acknowledged (released) by pressing the scroll
button.
8.6.9) “AcSP” - Access Setpoints
.
This
option allows an operator direct access to the alarm
setpoints without having to go through all the other
programming menus. When this function has been
enabled, pressing the scroll and up button together
will give the operator access to the setpoints. Access
can be limited by setting a password under the
“Access Code” (“Ac.cd”) parameter. The same
password can be used gain access to both the
alarms and main programming menus.
8.7) Pushbutton Re-enable
The pushbutton disable function or anti-tamper function (see
section 8.5.9) allows the pushbuttons to be disabled - ideal if
the Advisor could be open to tampering from unauthorized
personnel. Once this function has been switched on, the only
way to regain control of the pushbuttons is to push the buttons
in the following sequence.
Once this sequence has been followed, the display will briefly
show “good” and the buttons will be re-enabled.


