background image

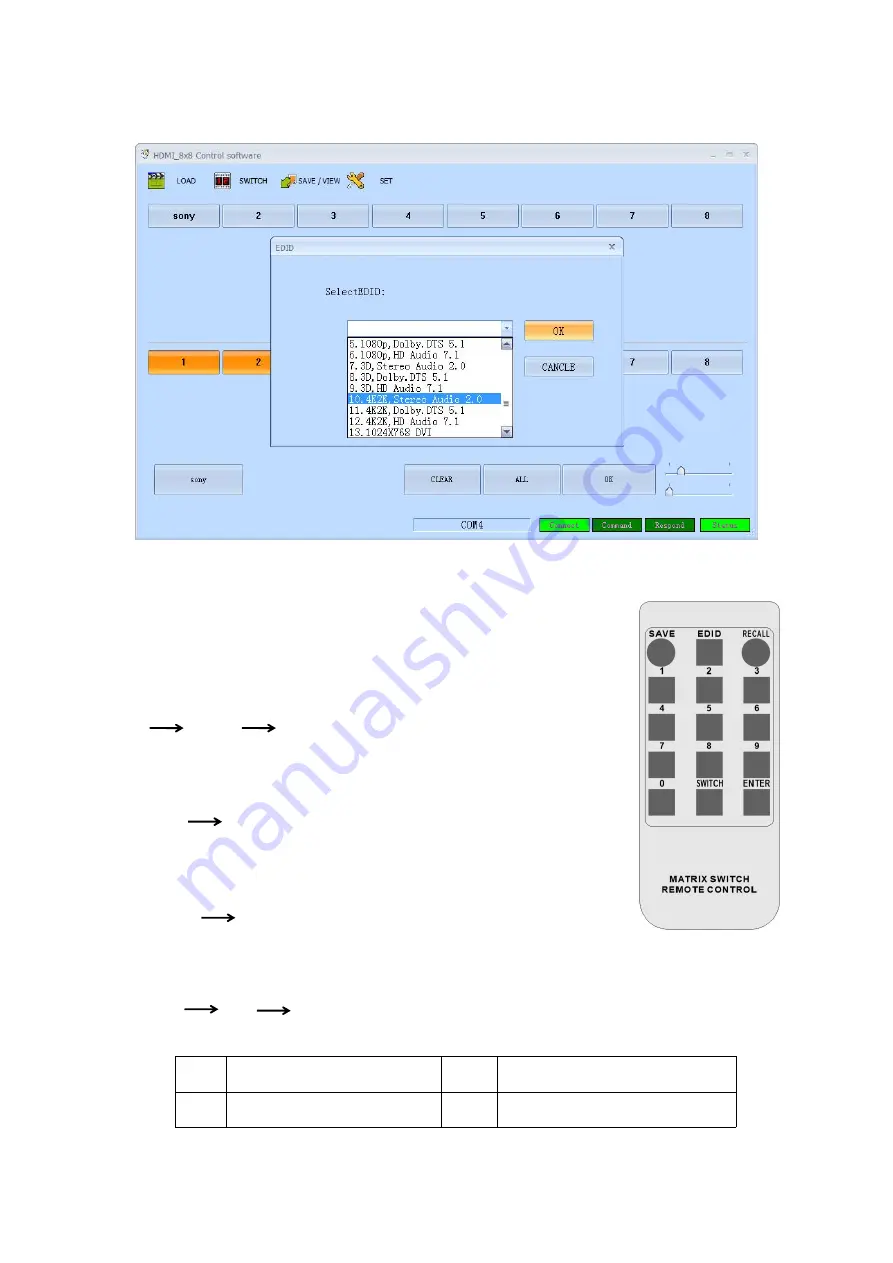
Select needed EDID parameters, click OK. See Figure 6.8-2.

Figure 6.8-2

6.9 Remote Control

Users also can control this matrix switcher with the remote control.

Channel switching:

Press the input from number “1~8”, then press “SWITCH”, then press the
output from number“1~8”, can press the outputs continually.
Eg. Switch input 1 to output 1, 2, 3:
1

SWITCH

1, 2, 3

Scene Save:

Press “SAVE”, then press the scene number from “1~8”.
Eg, Save switching input 1 to output 1,2,3 to scene 2:
"SAVE"

“2”

Scene Recall :

Press “RECALL”, then press the scene number from “1~8”.
Eg, Recall scene 2:
"RECALL"

“2”

EDID Setting:

Press “EDID” button to enter EDID setting mode, then press number “0” to choose the needed
EDID, then press “ENTER” to confirm, or press number “9” to cancel or return to home page.
"EDID"

“0”

“ENTER”

6.10 EDID mode table

NO.

EDID description

NO.

EDID description

1

OUT1(OUTPUT PORT 1)

5

1080p, Dolby. DTS 5.1

Summary of Contents for E Series

Page 1: ...Fixed 4K2K HDMI Matrix Switcher E Series with EDID management FIX MANAGER 400 E Version V2 0 1 USER MANUAL For the products color please refer to the real product ...

Page 2: ...off Please turn off the main power switch on rainy days or when not in use for a long time Please do not put anything upon the cables or tread the cables To avoid damaging the device please turn off power supply before plugging cable into the device or pulling cable from device The damage caused by plugging pulling cables without turning off power supply is outside the scope of the warranty The po...

Page 3: ... 23 formats independent EDID including 4 output EDID 15 internal EDID Supports RS 232 remote control on panel control and TCP IP Control Front panel LCD display for status feedback 3 Operation and connection 1 Connect signal source such as Blu ray player game controller A V receiver cables satellite receiver etc to the HDMI input port of the matrix Please do not hot plug Please turn off power supp...

Page 4: ...l Output ports 4 HDMI ESD Protection Human body Model 8kV Air gap discharge 4kV Air gap discharge ESD Protection 12 V 3 A DC US EU standards CE FCC UL certified Controlling Supports remote control front buttons control RS232 LAN control Input voltage 100VAC 260VAC 50 60 Hz the adaptive power supply 23 W Max 0 5w stand by Dimension mm 480 mm W 252 mm D 44 mm H Weight 3 5Kg Operating Temperature 0 º...

Page 5: ...utton to select OUT5 at the same time button 5 on OUT side lights finally press ENTER button the indicator of ENTER button will flash for one time SAVE Press to save the switching status Down for upward controlling ENTER Press to confirm to save the setting RECALL Press it to recall the presets scenes 5 IR IR receiver for the IR remote control 6 2 Description of back panel 1 For the ground wiring ...

Page 6: ...a network 2 Power up Matrix 3 Double click Client exe icon to run it Figure 6 3 1 pops up Figure 6 3 1 A Operating steps of serial port RS232 controlling matrix Connect the computer s RS232 port and the matrix s RS232 port with the matched RS232 cable Determine the port number such as com4 click Setup select COM and COM4 communication port If the connection is correct the right down STATUS will ch...

Page 7: ...N port parameters The software will search for devices automatically And the IP address of the device will show in the FIND DEVICE see Figure 6 3 3 Double click the IP address to fill it in Figure 6 3 3 Then press LOAD If the connection is correct parameters of the matrix will appear on ...

Page 8: ... when powered on Figure 6 3 4 6 4 Operating steps of changing the name of the input output Click SWITCH to enter the switching interface Select NO 1 input and double click it Figure 6 4 1 pops up Change the name of the NO 1 input signal and then save it Figure 6 4 1 Click SWITCH to enter the switching interface Select NO 1 output and double click it Figure 6 4 2 pops up Change the name of the NO 1...

Page 9: ...5 1 Choose input port first then choose the needed output port on the pop up interface the selected port turns yellow See Figure 6 5 2 Click the number again to cancel the output port and the port turns gray You can choose multiple ports at a time After all selection press OK to achieve the switching operation ...

Page 10: ... OUTPUT 1 2 3 4 5 6 by operating as Figure 6 5 1 and Figure 6 5 2 6 6 Operating steps of saving scene Click SAVE VIEW to enter SAVE VIEW interface See Figure 6 6 1 Press Previous to check the current configuration of the matrix Choose Scene1 press SAVE then ...

Page 11: ...e1 then we can view it Notice Scenes saved in Scene 0 are current configuration it changes according to the matrix s configuration Figure 6 6 1 6 7 Operating steps of recalling scene Click LOAD to enter LOAD interface See Figure 6 7 1 Choose Scene 1 and press LOAD to recall the scene saved in Scene 1 ...

Page 12: ...Figure 6 7 1 6 8 Operating of EDID switching Press SWITCH to enter switching interface choose the needed channel during 1 8 enter EDID by right clicking See Figure 6 8 1 Figure 6 8 1 ...

Page 13: ...2 3 1 SWITCH 1 2 3 Scene Save Press SAVE then press the scene number from 1 8 Eg Save switching input 1 to output 1 2 3 to scene 2 SAVE 2 Scene Recall Press RECALL then press the scene number from 1 8 Eg Recall scene 2 RECALL 2 EDID Setting Press EDID button to enter EDID setting mode then press number 0 to choose the needed EDID then press ENTER to confirm or press number 9 to cancel or return to...

Page 14: ...0 Switch x input to y output EB 90 0C 00 00 80 09 02 0X 00 00 00 Save current scene to X X means number keys from 1 to 9 EB 90 0C 00 00 80 08 02 00 0Y 00 00 Load the input output switching saved in Y Y means number keys from 1 to 9 For example input 1 Switch output 6 send EB 90 0C 00 00 80 0B 02 00 0D 00 00 1 1 0 Hex is 00 6 7 13 Hex is 0D If input 1 Switch output 6 7 8 send EB 90 0C 00 00 80 0B 0...

Page 15: ...e same grounding system Accidental damage Sent back to the manufacturer for recondition 8 After Sales 8 1 Warranty Information The Company warrants that the process and materials of the product are not defective under normal use and service for 2 2 years following the date of purchase from the Company or its authorized distributors If the product does not work within the guaranteed warranty period...

Page 16: ...amaged by over usage incorrectly use ignore accident unusual physical pressure or voltage unauthorized modification alteration or services rendered by someone other than the Company or its authorized agent the company will not have to bear additional obligations Except using the product properly in the proper application or normal usage 9 Version Information Description of version Document number ...

Reviews: