background image

8

ULTRA-GRAPH PRO GEQ3102

+

Use the high and low cut filters as highly efficient tools to limit the frequency range to be

processed.

7

The 

RANGE

 switch allows you to switch over between maximum boost/cut in each frequency band,

from 12 dB to 6 dB (switch pressed).

8

These are the 31 

SLIDE CONTROLS

 for each frequency band. If set to flat (“0”), there is no frequency

response processing. To boost/cut a specific frequency move the corresponding slide control upwards

or downwards respectively.

1.3.2 The rear panel

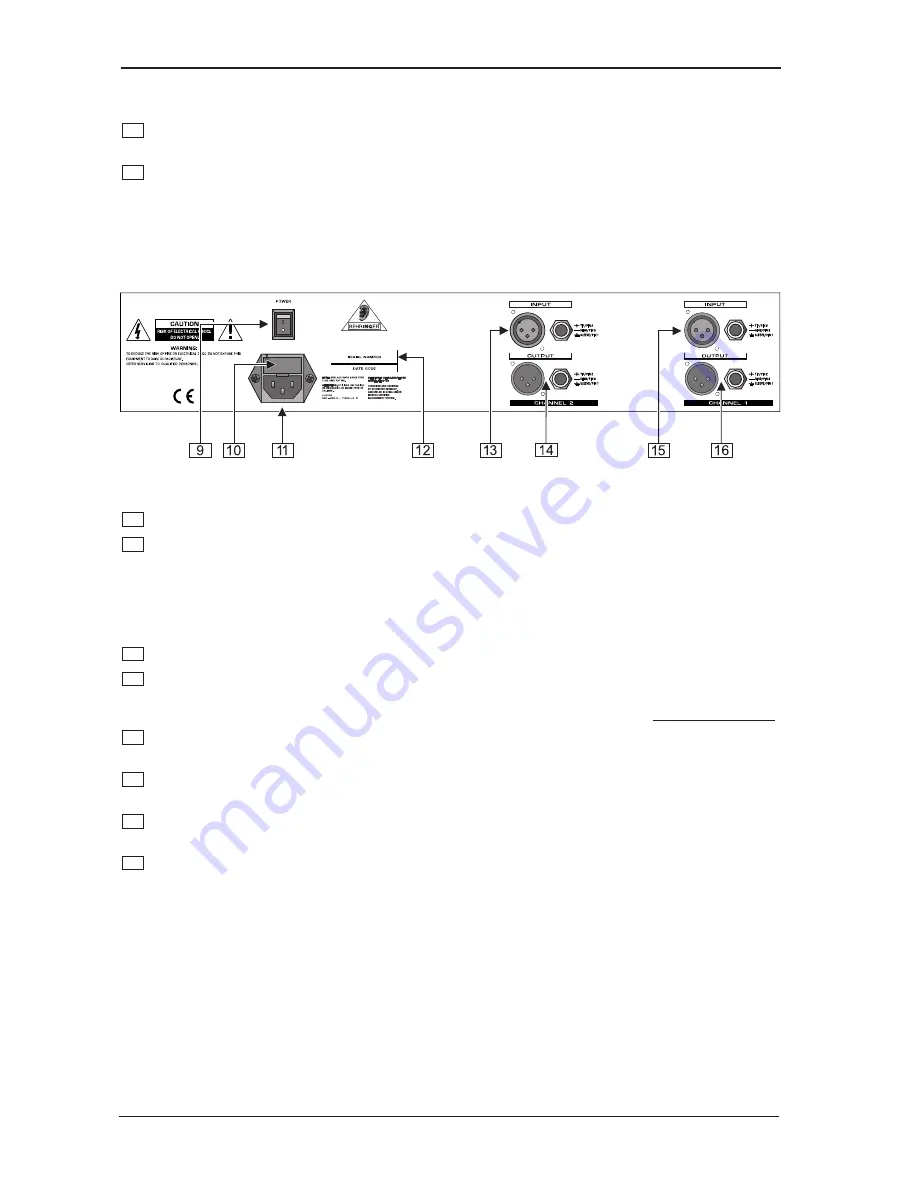
Fig. 1.3: The rear panel connectors

9

Use the 

POWER

 switch to turn on the ULTRA-GRAPH PRO.

10

FUSE HOLDER / VOLTAGE SELECTOR

. Please make sure that your local voltage matches the voltage

indicated on the unit, before you attempt to connect and operate the ULTRA-GRAPH PRO. Blown fuses

may only be replaced by fuses of the same type and rating. Some models allow for inserting the fuse

holder in two different positions, in order to switch over from 230 V to 115 V operation, and vice versa.

Please note that for 115 V operation outside Europe, you need to use a fuse of a higher rating (see

chapter 4 “INSTALLATION”).

11

Use the enclosed power cord to connect the unit to the mains.

12

SERIAL NUMBER

. Please take the time to have the warranty card filled out completely by your specialized

dealer, and return it within 14 days after the date of purchase, so as to be entitled to benefit from our

extended warranty. Or use our online registration option available on the Internet at www.behringer.com.

13

AUDIO IN - CHANNEL 2

. These are the ULTRA-GRAPH PRO’s balanced 1/4" jack and XLR audio

inputs.

14

AUDIO OUT - CHANNEL 2

. These are the audio outputs of the ULTRA-GRAPH PRO. The jack and

XLR plugs of each channel are wired in parallel.

15

AUDIO IN - CHANNEL 1

. These are the ULTRA-GRAPH PRO’s balanced 1/4" jack and XLR audio

inputs.

16

AUDIO OUT - CHANNEL 1

. These are the audio outputs of the ULTRA-GRAPH PRO. The jack and

XLR plugs of each channel are wired in parallel.

2. APPLICATIONS

The flexible concept behind the BEHRINGER ULTRA-GRAPH PRO, with its great variety of audio processing

features, opens up a whole new world of applications. We’d like to present you with a few examples in the

following plus some typical settings.

2. APPLICATIONS

Summary of Contents for ULTRA-GRAPH PRO GEQ3102

Page 1: ...www behringer com Version 1 1 July 2000 User s Manual ULTRA GRAPH PRO GEQ3102 ENGLISH...

Page 2: ...ow of air through the ventilation openings Heat The appliance should be situated away from heat sources such as radiators heat registers stoves or other appliances including amplifiers that produce he...

Page 3: ...t member of the BEHRINGER family With your highly competent suggestions for new products you ve greatly contributed to shaping our company and making it successful In return we guarantee you uncomprom...

Page 4: ...igh and Low Cut filters remove unwanted frequencies e g floor rumble and tape hiss etc s Servo balanced inputs and outputs on gold plated XLR and 1 4 jack connectors s Relay controlled hard bypass wit...

Page 5: ...equalizer in sound reinforcement systems 9 2 2 Equalizer in the monitor path 10 2 2 1 Tuning in of a monitor system 10 2 3 Using the ULTRA GRAPH PRO in the studio 11 3 THE SOUND TOOL 11 3 1 Effects o...

Page 6: ...relays are also active at power on to isolate the unit from potentially damaging power on thump 1 2 Before you begin Your BEHRINGER ULTRA GRAPH PRO was carefully packed in the factory and the packagi...

Page 7: ...itch is released or the unit is switched off Use the AUDIO IN OUT switch to make A B comparisons between direct and processed signals 3 The LEVEL METER monitors the signal level to warn you of distort...

Page 8: ...5 V operation outside Europe you need to use a fuse of a higher rating see chapter 4 INSTALLATION 11 Use the enclosed power cord to connect the unit to the mains 12 SERIAL NUMBER Please take the time...

Page 9: ...ow band resonance should be eliminated with the ULTRA GRAPH PRO before you start doing a sound check Once this basic setting has been made you can continue to fine tune the system by hand Please remem...

Page 10: ...thod will give you valuable headroom Extremely low frequencies are usually faded out completely to avoid a stage sound that lacks transparency due to low frequency feedback Apply the low cut filter un...

Page 11: ...how to process typical frequency ranges of voices and instruments 3 THE SOUND TOOL In recording studios as well as stage or radio plays the ULTRA GRAPH PRO will be your valuable sound tool to modify...

Page 12: ...Hz can produce listening fatigue 5k to 8k Accentuation of percussion cymbals and snare drum Reduction at 5 kHz makes overall sound more distant and transparent Reduction of tape hiss and system noise...

Page 13: ...round connection For your own safety never remove or disable the ground conductor of the unit or of the AC power cable 4 3 Audio connections As standard the BEHRINGER ULTRA GRAPH PRO is installed with...

Page 14: ...Signal Tip hot ve Sleeve Ground Shield Sleeve Ground Shield Tip Tip Sleeve Sleeve Strain relief clamp Strain relief clamp Ring cold ve For connection of balanced and unbalanced plugs ring and sleeve h...

Page 15: ...ands ISO frequencies Bandwidth 1 3 octave Control range 6 dB or 12 dB switchable FUNCTION SWITCHES Audio in out switch to bypass the equalizer functions I O meter in out switches the meter display fro...

Page 16: ...n 30 days of receipt of the product at BEHRINGER 2 If the product needs to be modified or adapted in order to comply with applicable technical or safety standards on a national or local level in any c...

Reviews: