background image

42

43

Quick Start Guide

DIAMOND DOME DD610-R

The device can be controlled in the following ways:
1. 

Master/slave

2. 

IR remote

3. 

DMX control

Master/Slave Control

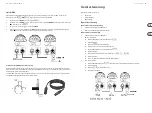
Master/Slave, automatic setting

1. 

Connect the device(s) with DMX cable.

2. 

Master/slave mode will be activated automatically, master unit will be set randomly.

Master/Slave, manual setting (Slave 1 mode operation)

1. 

Connect the device(s) with DMX cable.

2. 

Set the master unit:
2.1.  Press MENU of the first device and select 


2.2.  Press ENTER
2.3.  Then use up and down to select 


2.4.  Press ENTER (now the first unit is the master)
2.5.  Press MENU on the master device and select 


2.6.  Press ENTER
2.7.  Then use up and down to select show mode 0-16  


2.8.  Press ENTER
2.9.  After 5-10 seconds of inactivity, the show mode will be activated

3. 

Set the slave unit(s):
3.1.  Press MENU and select 

. (Use the same operation on all the slave units)

3.2.  Press ENTER
3.3.  Then use up and down to select  


3.4.  Press ENTER to confirm

Controlling the Device

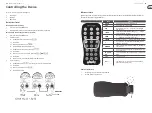
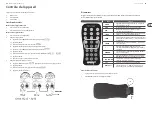
IR Remote Control

When using the remote control, the space between the device and the remote control should be kept free of obstacles. 
The remote control has a range of 10 meters.

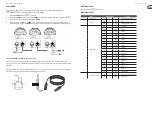
Remote Control Battery

1. 

The battery positive (+) should face as shown below.

2. 

The arrow indicates the plastic lock.

Button

Function

ON/OFF

Press to turn unit on, press again to turn off

AUTO

Active Show, same as AU0 random

PRG

Active Show mode. Use + / - to select the preset program 

from AU1 to 16

SOUND

Turn Sound Control On/OFF. When ON, press + / - to adjust 

the sensitivity from 0 to 100 *

SPEED

Activates speed setting when AUTO and PRG mode is ON. Use 

+ / - to adjust the speed from S001 to S099 *

STROBE

Activates strobe. Use + / - to adjust the speed from 0 to 100 *

+

Press to increase the current value to a maximum value of 

100. Press - to decrease.

DIMMING

Dimmer can be used in AUTO mode, PRG mode, SOUND mode, 

and static color.

-

Press to decrease the current value to a minimum value of 0. 

Press + to increase.

W, A, UV, R, 

G, B

Select color for dimmer mode (White, Amber, UV, Red, Green, 

Blue)

1 to 9

Select preset color

Notes

* Each press of +/- increases/decreases by 1, but if held 

down, the values change faster.

Summary of Contents for EUROLIGHT DIAMOND DOME DD610-R

Page 1: ...Quick Start Guide DIAMOND DOME DD610 R Multimode RGBWA UV LED Mirror Ball Lighting Effect with Remote Control V 1 0...

Page 2: ...imientosiemprequehaya sufridoalg nda o sielcablede Instrucciones de seguridad LIMITEDWARRANTY Terminalsmarkedwith thissymbolcarry electricalcurrentof sufficientmagnitudetoconstituterisk ofelectricshoc...

Page 3: ...uementparun techniciensp cialis 1 Lisezcesconsignes 2 Conservezcesconsignes 3 Respecteztouslesavertissements 4 Respecteztoutesles consignesd utilisation 5 N utilisezjamaisl appareil proximit d unliqui...

Page 4: ...o Instaledeacordocomas instru esdofabricante 8 N oinstalepertodequaisquer fontesdecalortaiscomoradiadores bocasdearquente fog esdesala ououtrosaparelhos incluindo amplificadores queproduzamcalor etCoo...

Page 5: ...uestosimbolo ovunque appaia avvertedella presenzadiunatensionepericolosa nonisolataall internodellochassis tensionechepu esseresufficienteper costituireunrischiodiscossaelettrica Attenzione Questosimb...

Page 6: ...diedoordeproducent isaangegeven ofdieincombinatie methetapparaatwordtverkocht Bij gebruikvaneenwagendientmen voorzichtigtezijnbijhetverrijdenvan decombinatiewagen apparaaten WETTELIJKE ONTKENNING BEPE...

Page 7: ...de garanti se fullst ndig information online p musictribe com warranty 12 13 Quick Start Guide DIAMOND DOME DD610 R Uwaga Terminaleoznaczone symbolemprzenosz wystarczaj cowysokienapi cie elektryczne a...

Page 8: ...ntion to the following points when using and inspecting this product All screws and components of the installed product must be tightly connected and not rusty or damaged The outer casing lens fixing...

Page 9: ...ese de que el aparato est desconectado de la corriente Es muy importante mantener este dispositivo siempre limpio El mantenerlo limpio no solo har que la salida le ofrezca el m ximo brillo luminoso si...

Page 10: ...mische L sungsmittel Das Ger teinnere und der L fter sollten mindestens viertelj hrlich mit einem Staubsauger gereinigt werden Instru esdeSeguran aAdicionais 1 Ao abrir o pacote tire todos os acess ri...

Page 11: ...si con un aspirapolvere Aanvullende veiligheidsinstructies 1 Haal na openen van de verpakking alle accessoires eruit en plaats het apparaat op een tafel voor inspectie Controleer eerst of de accessoir...

Page 12: ...ugare Dodatkowe instrukcje bezpiecze stwa 1 Otwieraj c opakowanie wyjmij wszystkie akcesoria i po urz dzenie na stole w celu inspekcji Najpierw sprawd czy akcesoria s kompletne a nast pnie dok adnie o...

Page 13: ...100 high Item No Silkscreen Function Button 1 MENU Activates main menu and toggles between menu items Closes an open submenu without saving 2 DOWN Decreases the displayed value by one Navigate functi...

Page 14: ...del sonido del modo SOUND CONTROL desde el bajo al alto Item No Silkscreen Function Button 1 MENU Activa el men principal y conmuta entre los elementos del men Cierra y abre los submen s sin almacenar...

Page 15: ...r la valeur affich e d une unit Fonction de navigation 3 UP Permet d augmenter la valeur affich e d une unit Fonction de navigation 4 ENTER Permet d afficher les r glages de la fonction s lectionn e C...

Page 16: ...t die Empfindlichkeit des SOUND Control Modus im Bereich niedrigsten bis h chsten Item No Silkscreen Function Button 1 MENU Aktiviert das Hauptmen und wechselt zwischen Men punkten Schlie t ein offene...

Page 17: ...OUND entre a baixa at alta Item No Silkscreen Function Button 1 MENU Ativa o menu principal e comuta entre os itens de menus Fecha um submenu aberto sem salvar 2 DOWN Diminui o valor exibido em uma un...

Page 18: ...iona la sensibilit al suono del modo di controllo SOUND dal minimo di al massimo di Item No Silkscreen Function Button 1 MENU Attiva il menu principale e passa da una voce all altra del menu Chiude un...

Page 19: ...ligheid van de SOUND modus van laag naar 100 hoog Item No Silkscreen Function Button 1 MENU Activeert het hoofdmenu en schakelt tussen menuopties Sluit een open submenu zonder op te slaan 2 DOWN Verla...

Page 20: ...AV V lj ljudk nslighet f r l get SOUND fr n l gt till 100 h gt Item No Silkscreen Function Button 1 MENU Aktiverar huvudmenyn och v xlar mellan menyobjekt St nger en ppen undermeny utan att spara 2 D...

Page 21: ...taw czu o na d wi k w trybie SOUND od niskiego do wysokiego 100 Item No Silkscreen Function Button 1 MENU Aktywuje menu g wne i prze cza mi dzy opcjami menu Zamyka otwarte podmenu bez zapisywania 2 DO...

Page 22: ...ing the Device IR Remote Control When using the remote control the space between the device and the remote control should be kept free of obstacles The remote control has a range of 10 meters Remote C...

Page 23: ...y abajo para elegir el 3 4 Pulse ENTER para confirmar el ajuste Control del dispositivo DMX Control To use a DMX controller to control the device you must first set the DMX address code The address co...

Page 24: ...rojo G verde B azul 1 to 9 Elige el color de preset Notes Cada pulsaci n de aumenta disminuye el valor en 1 pero si lo mantiene pulsado el valor cambia m s r pido Control DMX Para usar un controlador...

Page 25: ...ace entre l appareil et la commande ne doit contenir aucun obstacle La t l commande a une port e de 10 m Pile de la commande distance 1 Le p le positif de la pile doit tre plac comme indiqu ci dessous...

Page 26: ...e contr le num rique Le terminal DMX est un simple connecteur XLR dont les broches 2 et 3 sont reli es une r sistance de 120 Connectez le terminal la sortie XLR du dernier appareil R f rez vous aux sc...

Page 27: ...A Gelb UV Ultraviolett R Rot G Gr n B Blau 1 to 9 W hlt eine voreingestellte Farbe Notes Jeder Tastendruck auf erh ht verringert den Wert um 1 Bei gedr ckt gehaltener Taste ndern sich die Werte schne...

Page 28: ...trole remoto o espa o entre o dispositivo e o controle remoto deve ser mantido livre de obst culos O controle remoto tem um alcance de 10 metros Bateria de Controle Remoto 1 O lado positivo da bateria...

Page 29: ...re Controllo del dispositivo Controle DMX Para usar o controlador DMX para controlar o dispositivo voc deve primeiro configurar o c digo de controle do DMX A gama do c digo de Isso possibilita o receb...

Page 30: ...e preset Notes Ogni pressione di aumenta diminuisce di 1 ma se tenuto premuto i valori cambiano pi velocemente Controllo DMX Per controllare il dispositivo usando un controller DMX necessario innanzit...

Page 31: ...iening moet de ruimte tussen het apparaat en de afstandsbediening vrij worden gehouden De afstandsbediening heeft een bereik van 10 meter Batterij voor afstandsbediening 1 De batterij moet met de plus...

Page 32: ...ta Styra enheten DMX besturing Om het apparaat te bedienen met een DMX controller moet u eerst de DMX adresseringscode instellen Het bereik van de adresseringscode is Op deze manier kan het apparaat d...

Page 33: ...f r dimmerl ge W vit A ambragul UV ultraviolett R r d G gr n B bl 1 to 9 V lj f rinst lld f rg Notes Varje tryckning p kar minskar med 1 men vid l ngre intryckning ndras v rdena snabbare DMX styrning...

Page 34: ...w g ra d aby wybra 3 4 Wci nij ENTER aby zatwierdzi Sterowanie urz dzeniem Pilot IR Korzystaj c z pilota przestrze mi dzy urz dzeniem a pilotem powinna by wolna od przeszk d Pilot ma zasi g 10 metr w...

Page 35: ...dbiera sygna y DMX 1 Wci nij przycisk MENU wybierz opcj Menu 2 Wci nij przycisk ENTER Kod adresu zamiga U yj UP DOWN aby wybra kod adresu DMX Nasza warto fabryczna to 3 Gdy kod adresu jest ju ustawion...

Page 36: ...1 065 Show 4 066 080 Show 5 081 095 Show 6 096 110 Show 7 111 125 Show 8 126 140 Show 9 141 155 Show 10 156 170 Show 11 171 185 Show 12 186 200 Show 13 201 215 Show 14 216 230 Show 5 231 245 Show 16 2...

Page 37: ...ntpardesmod lesexactement dem metailleetdem mevaleur lectrique sansaucuneexception Important information Aspectos importantes Informations importantes 1 Online registrieren BitteregistrierenSieIhrneue...

Page 38: ...Onlinesupport somocks finnsunder Support p musictribe com Alternativt kanduskickainettonline garantianspr k p musictribe comINNANdureturnerar produkten 3 Str manslutningar Innandu ansluterenhetentille...

Page 39: ...We Hear You...

Reviews: