Behavioral Dynamics Gen5 MotivAider User Manual Download Page 4


Basic Operation    

Video 


First, don’t be alarmed if the screen goes blank. To conserve battery power, your MotivAider is 

designed to automati

cally go to “sleep” when there’s no activity for approximately 15 seconds. To 

wake it up, just hold down the Mode (M) key for a couple of seconds or more.  

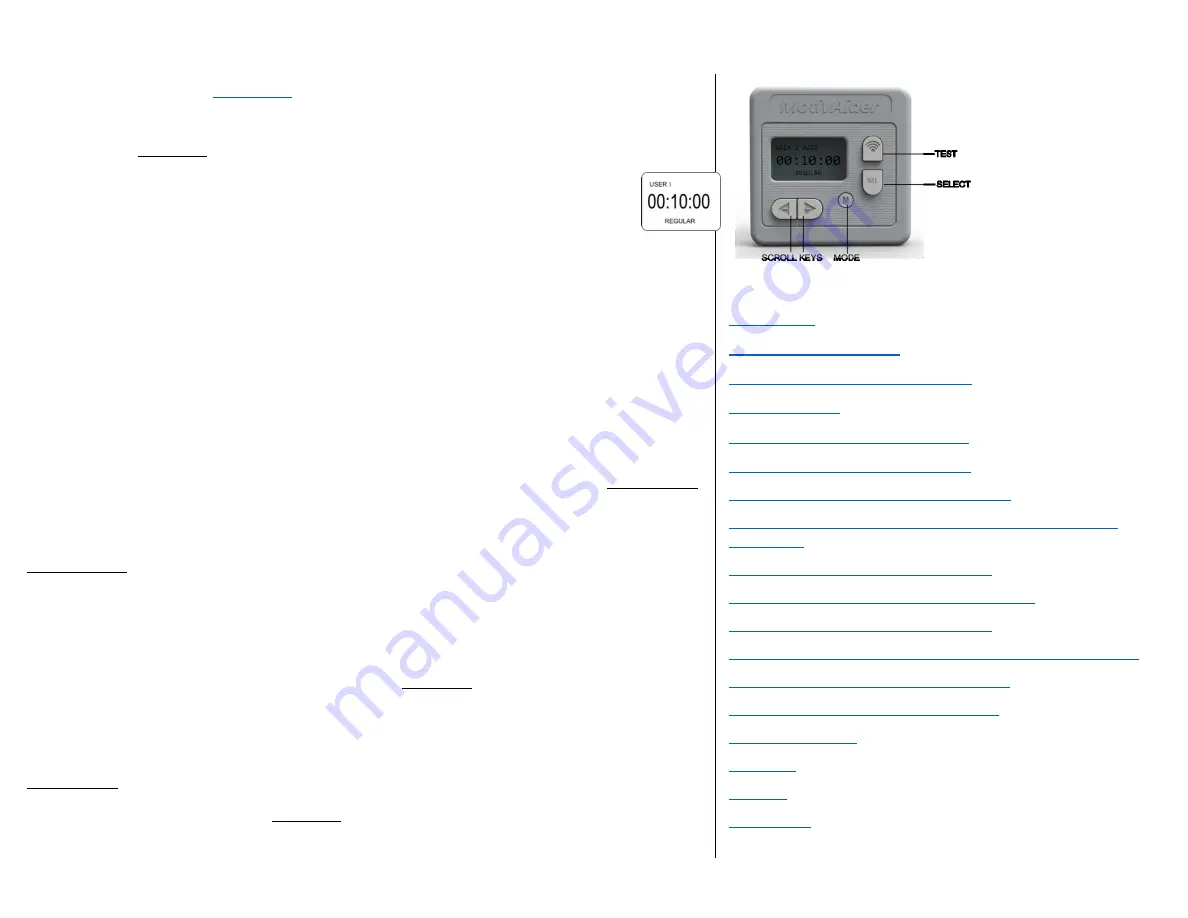
You’re now at the HOME screen. What you see on the screen is 

the prompting interval.


The prompting 

interval is what determines how often you’ll get vibration signals. 

This is 

the MotivAider’s most basic setting, and it’s the only setting that many users will ever 

have to change. 

The Prompting Interval: 

The prompting interval is the number of 

Hours:Minutes:Seconds 

that 

will pass between vibration signals or prompts. The shorter the interval, the more frequent the 

prompts. For example, a prompting interval of 00:10:00 means that you’ll get vibration signals 

every 10 minutes, while a prompting interval of 0

0:00:10 means that you’ll get vibration signals 

every 10 seconds.  

You’ll notice that “REGULAR” appears below the prompting interval. REGULAR refers to the 

type

 of 

interval. REGULAR means that you’ll be getting vibration signals at 

fixed

 intervals, that is, 

intervals of uniform length rather than varying lengths. We’ll explain later how you can set your 

MotivAider to send vibration signals at Average or Random intervals.  

Changing the prompting interval: 

To change the prompting interval from its default value of 

00:10:00 (10 minutes), press the Select key (SEL) to reach a time field (Hours, Minutes or 
Seconds) you wish to change. With the selected field blinking, use the Scroll keys (<- and +>) to 
enter the desired value for that field. Then press SEL again to save the value you entered and 
move to the next time field. [

TIP:

 You can zero-out the entire prompting interval by holding down 

both Scroll keys at the same time.]  

Using the MotivAider with basic settings only: 

Once your desired time interval is displayed, 

you’re ready to use the MotivAider in its most basic way. 


Press and hold M for a couple of seconds or more. The MotivAider will start counting down and will 
send you a vibration signal when the countdown reaches zero. Then it will automatically start 
counting down again from the time interval you entered, and it will send you another vibration 
signal when the countdown reaches zero. The MotivAider will keep repeating this process until you 

tell 

it to stop.  

Note that to prevent accidental input, some keys are automatically disabled during prompting.  

When you want the MotivAider to stop prompting, just hold down M for a couple of seconds or 
more to return to the HOME screen. (You can do this without having to look at the screen.)  

When you’re not usin

g your MotivAider, leave it at the HOME screen. Remember, to conserve 

battery power, it will go to sleep if there’s no input after about 15 seconds. 


Whenever you’re ready to use the MotivAider again, 

first wake it up if the screen is blank by 

holding down M for a couple of seconds. The MotivAider will have remembered the prompting 
interval you previously set (as well as any other settings), so to start prompting again using the 
same interval, all you need to do is hold down M again for a couple of seconds or more. 


CONTENTS 

Introduction


The MotivAider Method


Orientation and Operating Basics 

Getting Started


Advanced Settings: An Overview


How to Change the Interval Type * 

How to Customize the Vibration Signal * 

How to Change What Appears on The Screen During 
Prompting * 

How to Set Up a 

Prompting Session

 *


How to Create and Manage 

User Profiles 

*


How to Restore All Original Settings * 

How to Prevent Unwanted Access to Advanced Settings *


How to Pause and Resume Prompting * 

Installing and Removing the Belt Clip


About the Battery 

Warranty 

Support 

Contact Us 

Summary of Contents for Gen5 MotivAider

Page 1: ...ings and features If you wish to use the MotivAider in its most basic way you can skip these sections CONTENTS Introduction The MotivAider Method Orientation and Operating Basics Getting Started Advanced Settings An Overview How to Change the Interval Type How to Customize the Vibration Signal How to Change What Appears on The Screen During Prompting How to Set Up a Prompting Session How to Create...

Page 2: ...ge professionals behavioral scientists and others who are engaged in helping others make behavioral changes The MotivAider comes preset to operate in a simple way that works well for most users However by accessing the Gen5 MotivAider s Advanced Settings users can exercise greater control over how the device works so they can respond to special needs preferences and circumstances and achieve the b...

Page 3: ... so that whenever you feel the vibration you ll think your message and be urged to take the desired action 5 Set the MotivAider to send you vibration signals as often as necessary to keep your mind focused on your chosen behavioral objective or goal CONTENTS Introduction The MotivAider Method Orientation and Operating Basics Getting Started Advanced Settings An Overview How to Change the Interval ...

Page 4: ...rval by holding down both Scroll keys at the same time Using the MotivAider with basic settings only Once your desired time interval is displayed you re ready to use the MotivAider in its most basic way Press and hold M for a couple of seconds or more The MotivAider will start counting down and will send you a vibration signal when the countdown reaches zero Then it will automatically start counti...

Page 5: ... 00 00 you ll feel the vibration and your MotivAider will start counting down again 6 During the first few hours of use with a new personal message make a point of reciting the message to yourself whenever you feel the vibration This will reinforce the connection between the vibration and your personal message 7 Prompting will continue as long as you want it to Whenever you want it to stop just ho...

Page 6: ... making a change press and release M to return to the HOME screen or scroll through the other categories and options to make more changes Once you re done making changes you can either return to the HOME screen to check or change the prompting interval or you can start prompting directly from any Advanced Settings screen 5 Whether you re at the HOME screen or an Advanced Setting screen to start pr...

Page 7: ...cess the remaining two interval types use the key When the interval type you want is on the screen press SEL to save your selection The interval type you select will be displayed on the screen when you return to the HOME screen If you ve selected RANDOM when you return to the HOME screen you ll be prompted to enter a minimum RAN MIN and maximum RAN MAX time interval CONTENTS Introduction The Motiv...

Page 8: ...el or value you want is blinking then press SEL to save that level or value To make it easier to configure the vibration to your liking you can preview the effect that any changes you make will have on the vibration Just press and release the TEST key to immediately get a vibration signal that reflects all your current SIGNAL settings CONTENTS Introduction The MotivAider Method Orientation and Ope...

Page 9: ...untdown appears The countdown will remain visible for around 15 seconds To change the SCREEN setting from the HOME screen press and release M then use the key to scroll to SCREEN Press SEL and you ll see COUNT To reach HIDE press the key With whichever setting you want on the screen press SEL to save your selection NOTE Using HIDE will extend battery life CONTENTS Introduction The MotivAider Metho...

Page 10: ... enter the length in Hours Minutes Seconds press SEL to save it NOTE If you turn SESSION on it will remain active until you turn it off You can stop prompting by pressing and holding M before a session has expired but if you do the next time you start prompting the session will continue from the point where you stopped it rather than start over again So for example if you were to stop prompting 15...

Page 11: ...n press and release M then use the key to scroll to USERS Next press SEL and you ll see SAVE Use the key to reach the other two options LOAD and RESET With an option you want on the screen press SEL For SAVE or LOAD you ll be prompted to enter a user profile number Use the Scroll keys until the desired profile number is blinking then press SEL to enter it For RESET just press SEL to restore all fa...

Page 12: ...ction The MotivAider Method Orientation and Operating Basics Getting Started Advanced Settings An Overview How to Change the Interval Type How to Customize the Vibration Signal How to Change What Appears on The Screen During Prompting How to Set Up a Prompting Session How to Create and Manage User Profiles How to Restore All Original Settings How to Prevent Unwanted Access to Advanced Settings How...

Page 13: ... and SEL at the same time until LOCK disappears CONTENTS Introduction The MotivAider Method Orientation and Operating Basics Getting Started Advanced Settings An Overview How to Change the Interval Type How to Customize the Vibration Signal How to Change What Appears on The Screen During Prompting How to Set Up a Prompting Session How to Create and Manage User Profiles How to Restore All Original ...

Page 14: ... the student is in her seat Pausing the countdown when the student leaves her seat and Resuming the countdown when she returns will ensure that observations are being made at the desired frequency Because using Pause Resume consumes more battery power than stopping and starting prompting we recommend using Pause Resume only in situations where it s necessary to suspend the countdown Especially whe...

Page 15: ...en reinstalling the belt clip please make sure that the lock washer is placed between the screw head and the belt clip rather than between the belt clip and the case Note that in order for the lock washer to do its job the screw must be tightened as fully as possible CONTENTS Introduction The MotivAider Method Orientation and Operating Basics Getting Started Advanced Settings An Overview How to Ch...

Page 16: ...ry compartment cover then slide the belt clip all the way back up into place then fully tighten the screw See Installing and Removing the Belt Clip for more detailed instructions The MotivAider will retain all your settings when you remove the battery In fact you can store your MotivAider for weeks or months without a battery and all your settings will be there when you re ready to use the MotivAi...

Page 17: ...ersonnel Except where state law prohibits such exclusion Behavioral Dynamics Inc assumes no responsibility for any special incidental or consequential damages CONTENTS Introduction The MotivAider Method Orientation and Operating Basics Getting Started Advanced Settings An Overview How to Change the Interval Type How to Customize the Vibration Signal How to Change What Appears on The Screen During ...

Page 18: ...l Behavioral Dynamics Inc 202 LaBree Avenue North P O Box 66 Thief River Falls MN 56701 U S A CONTENTS Introduction The MotivAider Method Orientation and Operating Basics Getting Started Advanced Settings An Overview How to Change the Interval Type How to Customize the Vibration Signal How to Change What Appears on The Screen During Prompting How to Set Up a Prompting Session How to Create and Man...

Reviews: