background image

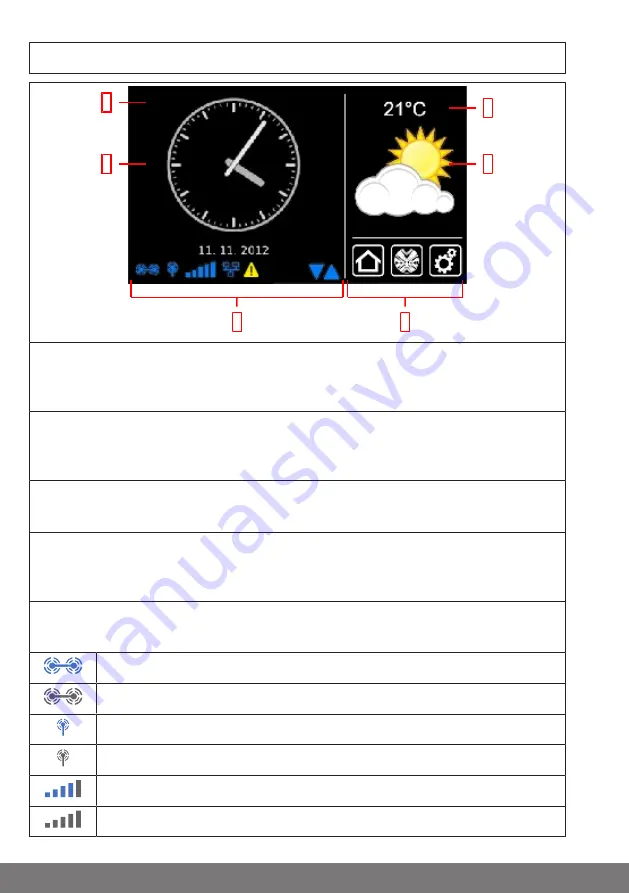
Start / standard screen

1

3

2

4

6

5

1 Main screen area

The time and date, and in some cases the weather forecast, are displayed on the main
screen area.

2 Navigation and status area

The current weather, status information, and the navigation elements for the pro-
grammed receivers are shown in the navigation and status area.

3 Time / date

Display of date and time. The time can be displayed in digital or analogue format.

4 Weather

Display of the current weather at the selected weather location. Displaying the
weather data requires an Internet connection.

5 Device status bar

The statuses of various device-specific functions are displayed on this status bar:

B-Tronic KNX stick is available in the device.

B-Tronic KNX stick is not available in the device.

Centronic RF stick is available in the device.

Centronic RF stick is not available in the device.

WLAN signal strength

No WLAN available

8

Summary of Contents for CentralControl CC51

Page 1: ...roller Important information for Fitters Electricians Users Please forward accordingly These instructions must be kept safe for future reference Becker Antriebe GmbH Friedrich Ebert Stra e 2 4 35764 S...

Page 2: ...Network settings 11 Date time 13 Select weather location 15 Programming receivers 17 Creating rooms 20 Add receivers to rooms 22 Creating groups 24 Program receivers for groups 26 Operation 29 Operat...

Page 3: ...hazardous situation which if not avoided could result in injury ATTENTION ATTENTION indicates measures that must be taken to avoid damage to property Denotes user tips and other useful information War...

Page 4: ...t Clean the control unit with a soft dry lint free cloth and do not use any chemical cleaning agents Caution If the system is controlled by one or more transmitters the system s range of travel must a...

Page 5: ...t radio controlled systems may not be used in areas with a high risk of interference e g hospitals airports The remote control is intended solely for use with equipment and systems in which malfunctio...

Page 6: ...Dimensions All dimensions in mm 156 197 32 Device overview 5 1 2 3 6 4 10 9 8 7 13 12 11 14 15 11 12 13 14 16 17 10 9 8 7 6...

Page 7: ...J45 15 Reset button 16 Cover 17 Feet Online documentation In addition to the present commissioning instructions we make comprehensive docu mentation available to you online Please visit the following...

Page 8: ...date and time The time can be displayed in digital or analogue format 4 Weather Display of the current weather at the selected weather location Displaying the weather data requires an Internet connec...

Page 9: ...a by scrolling up or down 6 Main navigation The main navigation is visible with an identical format on all the screens It consists of the following three navigation panes Clicking this button will alw...

Page 10: ...ooms 20 Add receivers to rooms 22 Creating groups 24 Program receivers for groups 26 Selecting a language 1 Please press the Programs and set tings button 1 2 On the Programs and settings screen you s...

Page 11: ...ck Network settings The full home automation functionality of the B Tronic CentralControl is available even when it is not connected to a network However some additional functions and access options a...

Page 12: ...4 You can change the name of the B Tronic CentralControl here Network Network configuration Ethernet Interface 5 WiFi WiFi access data SSID network name 6 Host name 4 beckernet CentralControl Activate...

Page 13: ...assigned to the CentralControl Select 8 Manual and input the in formation needed for the fields 9 10 11 and 12 After configuration has been finished some of the data can also be seen under System info...

Page 14: ...ternet or whether you want to set it manually The central controller needs an Internet connection if it is to obtain the time and date information automatically Date time Settings 4 automatic NTP Time...

Page 15: ...in the selection list choose the nearest larger city 1 Please press the Programs and set tings button 1 2 On the Programs and settings screen you should now select the Configuration menu item Radio Ca...

Page 16: ...your input by clicking the green tick 8 If your entry results in more than one hit a selection list of possible locations will be displayed Select the location you want To execute Astro functions the...

Page 17: ...menu item 12 Location Programming receivers 1 Please press the Programs and set tings button 1 2 On the Programs and settings screen you should now select the House install ation menu item Radio Camer...

Page 18: ...round the rooms accord ing to their names 5 Tap the name field Receiver name Receiver type Device type Tubular drive ext Switching actuator Add receiver Configure settings Dimming actuator Centronic B...

Page 19: ...able on the door drive being programmed Door must be selected for door control units with defined UP STOP DOWN commands and Door impulse for door control units with impulse sequences UP STOP DOWN STOP...

Page 20: ...r has been successfully programmed and can now be added to groups or rooms Program 13 14 B Tronic KNX RF 14 You confirm your input and close the menu with the green tick You can now test the drive by...

Page 21: ...nfiguration Select an application 2 System information 3 On the House installation screen you should now select the Rooms menu item Rooms Scenarios Groups Setup Receiver Please select a function 3 Tim...

Page 22: ...with the green tick 8 The new room can now be seen in the room selection menu Rooms Add select room Living room 8 Bedroom Add receivers to rooms 1 Please press the Programs and set tings button 1 2 On...

Page 23: ...he list of receiv ers contained in the room is still empty Bedroom Add select receiver or edit room 5 6 6 Select the button in order to add a receiver to the chosen room 7 The list that is now shown d...

Page 24: ...the same type e g roller shutter drives or switching receivers for example can be combined in one group A 1 channel hand held transmitter can also control groups although only one group per hand held...

Page 25: ...onsist of receivers of the same type Please choose the desired receiver type for the group that is to be created Tubular drive ext 6 Add group Adjust settings Switching actuator Dimming actuator 5 Nam...

Page 26: ...ivers also contains groups and scenarios and these can also be assigned to rooms in just the same way as individual receivers Group setup Add select group new group Switch Drives 10 Program receivers...

Page 27: ...Switch Drives 4 5 No receivers have yet been assigned to the chosen group New group in the ex ample For this reason the list of receiv ers contained in the group is still empty New group Add select re...

Page 28: ...8 The chosen receiver B Tronic drive has now been assigned to the group New group and appears in the list of receivers contained in the group New group Add select receiver Drive B Tronic 8 28...

Page 29: ...ceiver 5 Press the button when you want to close the menu Tubular drive receivers With B Tronic receivers you get feedback on the current status and have the option of tapping the desired position on...

Page 30: ...urrent status and have the option of tapping the desired position on the status display in order to initiate a corresponding dimming command 1 2 1 2 1 2 1 2 UP button STOP button DOWN button 1 1 Inter...

Page 31: ...st of receivers of the same type Just like receivers groups can be assigned to rooms 1 Press the button in order to open the My house menu 2 Then press the Groups button 3 Then select the group that y...

Page 32: ...service Linking webcams Weather and the forecast Operation via other devices in the home network or via mobile devices away from home Our richly illustrated Assembly and Operating Instructions offer d...

Page 33: ...nt are working properly before mounting in the desired position 2 Fasten the bracket to the wall using the two enclosed screws Table stand 1 Check that the transmitter receiver and if present WLAN fun...

Page 34: ...868 3 MHz CPU ARM9 454 MHz Memory 128 MB Display 10 9 cm 4 3 inch touchscreen Resolution 480 x 272 pixels Camera 640 x 480 pixels VGA RGB Operating system Linux Dimensions W x H x D 197 x 156 x 34 mm...

Page 35: ...GmbH hereby declares that this radio control system complies with Directive 2014 53 EU The full text of the EU declaration of conformity is available at the following web ad dress www becker antriebe...

Page 36: ......

Reviews: