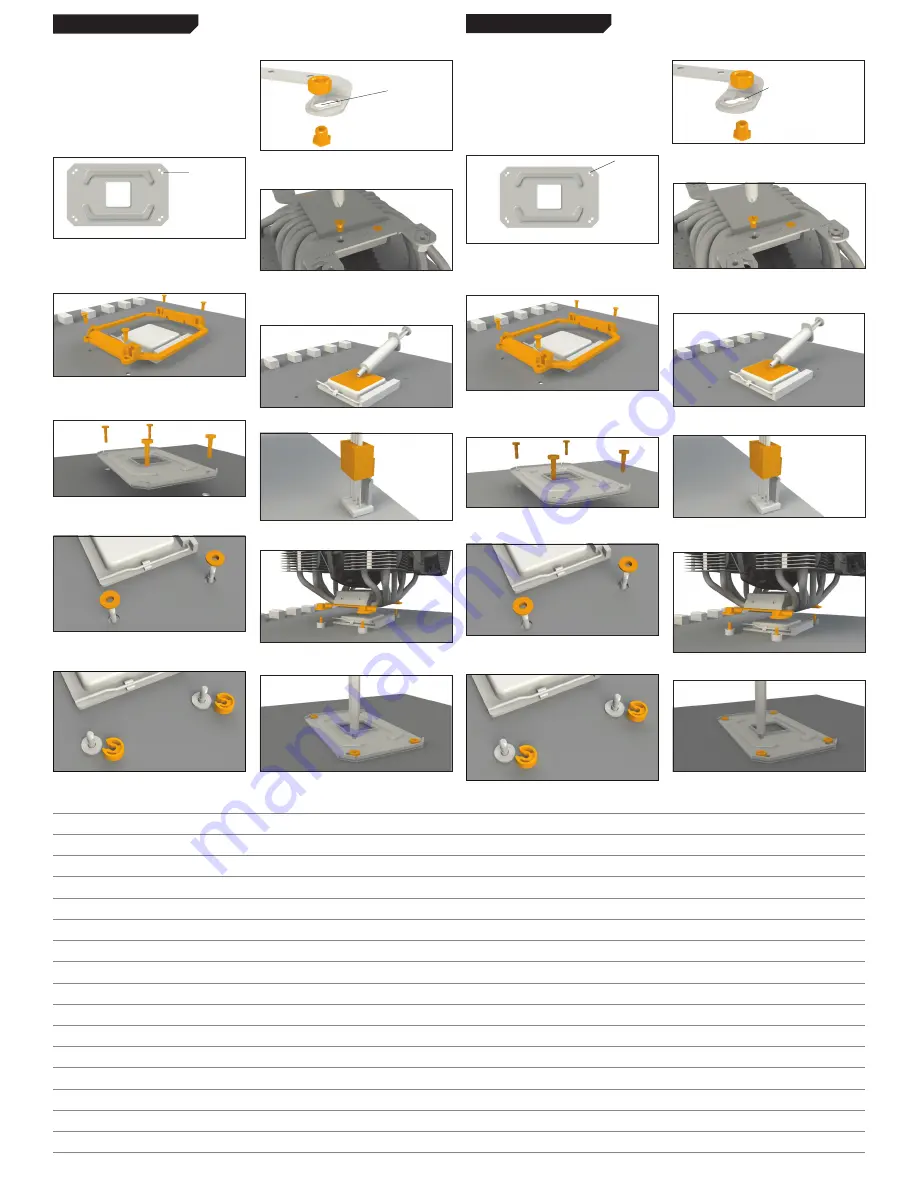
Preparing the mounting brackets
Pass the hexagonal nuts with sleeve (6) from below through
the ends of short AMD mounting brackets (5) and screw
together with the hexagonal nuts (8). Use the hexagonal
wrench (14) for this.
.
Assembly of the mounting brackets
Attach the two short AMD mounting brackets (5) to the underside
of the CPU cooler using the M3x3 screws (11).
Mounting the CPU cooler
First remove the protective foil from the underside of the
cooler. Spread the thermal paste (15) on the surface of the
CPU. The amount supplied is sufficient for one or two
applications.
Connect the fan to the CPU fan connector on the motherboard.
Position the cooler above the CPU, passing the attached AMD
mounting brackets (5) over the projecting AMD M3x15 (10)
and affix by turning the AMD M3x15 (10) from the rear side of
the motherboard.
General
With pre-mounted motherboards we recommend installing
the cooler inside the PC case over the motherboard cutout.
Removing the AMD retention module is performed at your
own risk.
The following parts are needed for this:
1x be quiet! Dark Rock Pro 3 CPU cooler (1), 1x AMD
backplate (3), 2x short AMD mounting brackets (5), 4x
hexagonal nuts with sleeve (6), 4x hexagonal nuts (8), 4x AMD
M3x15 (10), 4x M3x3 screws (11), 4x C-profile spacers (12), 4x
AMD washers (13), 1x hexagonal wrench (14), 1x thermal
paste (15)
Removal of the AMD retention module
Before you are able to install the CPU cooler, you must first
remove the preassembled AMD retention module from the
motherboard. To do this remove the four screws from around
the socket
Mounting the backplate
Position the AMD backplate (3) vertically on the rear side of
the motherboard. Then insert the AMD M3x15 (10) through
the drill holes on the rear side of the backplate.
On the front side of the motherboard, pass the AMD washers
(13) over the projecting AMD M3x15 (10) to cover the
motherboard screw holes.
Now fasten the backplate on the front side of the motherboard
using the C-profile spacers (12) by pressing these onto the
notches in the AMD M3x15 (10) until they click in.
AMD AM2(+) / AM3(+) / FM1 / FM2(+)
AM2(+)
AM3(+)
FM1/FM2(+)
(Bottom view)
Preparing the mounting brackets
Pass the hexagonal nuts with sleeve (6) from below through
the ends of short AMD mounting brackets (5) and screw
together with the hexagonal nuts (8). Use the hexagonal
wrench (14) for this.
.
Installing the mounting brackets
Attach the two short AMD mounting brackets (5) to the
underside of the CPU cooler using the M3x3 screws (11).
Mounting the CPU cooler
First remove the protective foil from the underside of the
cooler. Spread the thermal paste (15) on the surface of the
CPU.
Connect the fans to the CPU fan connector on the
motherboard.
Position the cooler above the CPU, passing the attached AMD
mounting brackets (5) over the projecting AMD M3x15
screws (10)
and affix by turning the AMD M3x15 screws (10) from the rear
side of the motherboard.
AM4
General
With preassembled motherboards we recommend installing
the cooler inside the PC case over the motherboard cutout.
Removing the AMD retention module is performed at your
own risk.
The following parts are needed for this:
1x be quiet! Dark Rock Pro 3 CPU cooler (1), 1x AMD
backplate (3), 2x short AMD mounting brackets (5), 4x
hexagonal nuts with sleeve (6), 4x Hexagonal nuts (8), 4x AMD
M3x15 screws (10), 4x M3x3 screws (11), 4x C-profile spacers
(12), 4x AMD washers (13), 1x hexagonal wrench (14), 1x
thermal paste (15)
Removal of the AMD AM4 retention module
Before you are able to install the CPU cooler, you must first
remove the preassembled AMD AM4 retention module from
the motherboard. To do this remove the four screws from
around the socket.
Mounting the backplate
Position the AMD backplate (3) vertically on the rear side of
the motherboard. Then insert the AMD M3x15 screws (10)
through the drill holes on the rear side of the backplate.
On the front side of the motherboard, pass the AMD washers
(13) over the projecting AMD M3x15 screws (10) to cover the
motherboard screw holes.
Now fasten the backplate using the C-profile spacers (12) by
pressing these onto the notches in the AMD M3x15 screws
(10) until they click in.
AMD AM4
AM4
(Bottom view)
Notes
bequiet.com
AM2(+)
AM3(+)
FM1/FM2(+)


