19
STEP 8:
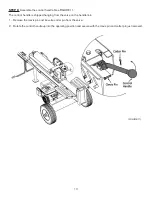
Assemble the control handle. See FIGURE 11.
The control handle is shipped hanging from the valve on the handle link.
1. Remove the clevis pin and bow-tie cotter pin from the valve.
2. Rotate the control handle up into the operating position and secure with the clevis pin and cotter pin just removed.
Page 16
STEP 8:
Assemble the control handle. See FIGURE 11.
The control handle is shipped hanging from the valve on the handle link.
1.
Remove the clevis pin and bow-tie cotter pin from the valve.
2. Rotate the control handle up into the operating position and secure with the clevis pin and cotter pin just removed.
(FIGURE11)
Page 19


