background image

BD FACSPresto Near-Patient CD4 Counter Instructions For Use

14

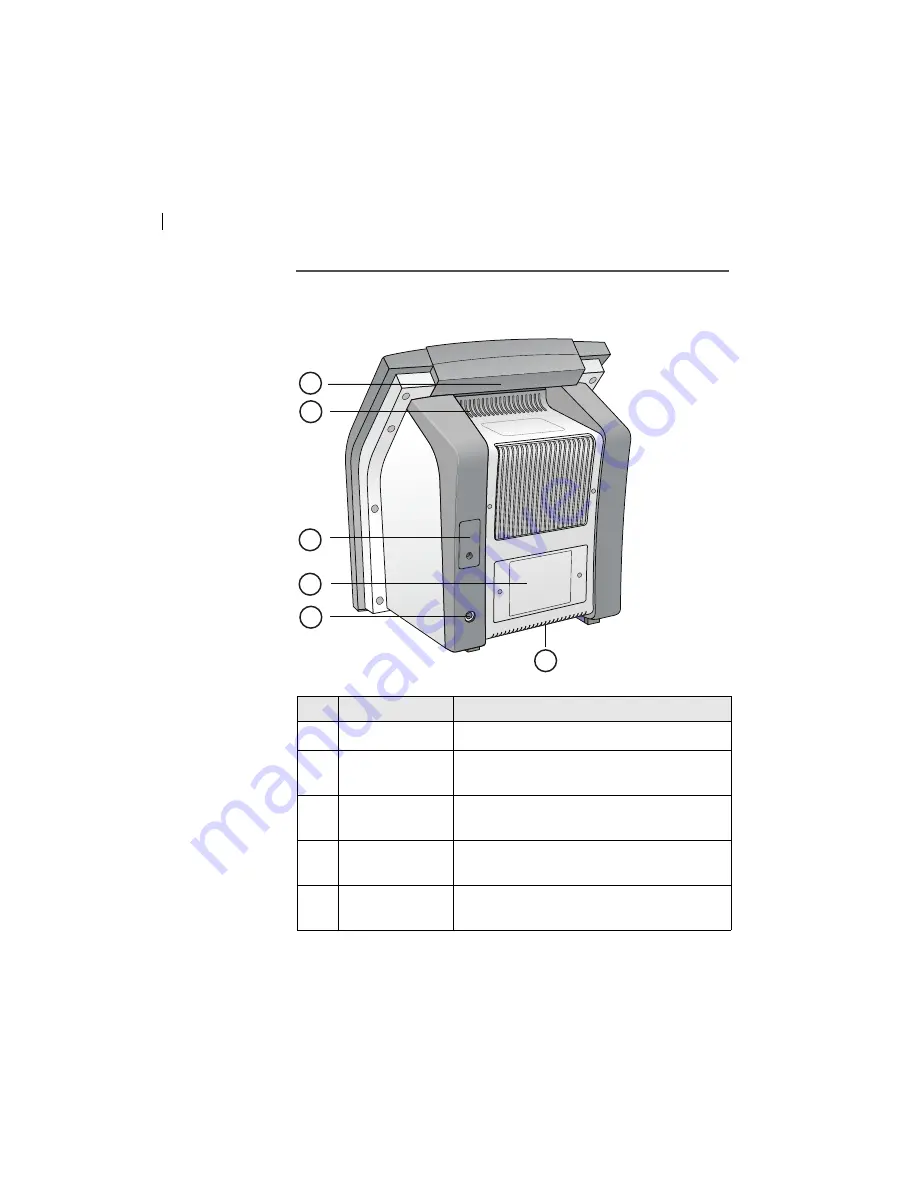
Instrument rear 
view

Power, service, and identification components are located on the 
rear of the instrument.

No.

Component

Description

1

Lift handle

Handle used to move the instrument.

2

Air vent

Enables air flow into and out of the 
instrument.

3

Service port

Used by BD personnel only to service the 
instrument.

4

Asset tag plate

Removable plate for instrument 
identification.

5

Power port

Port for connecting the adapter cord to the 
instrument.

1
2

3

4

5

2

Summary of Contents for BD FACSPresto

Page 1: ...ciences European Customer Support Tel 32 2 400 98 95 Fax 32 2 401 70 94 help biosciences europe bd com Becton Dickinson Pty Ltd 4 Research Park Drive Macquarie University Research Park North Ryde NSW...

Page 2: ...ssly approved by the party responsible for compliance could void the user s authority to operate the equipment NOTICE This equipment has been tested and found to comply with the limits for a Class A d...

Page 3: ...r 3 Instrument setup 23 Instrument setup startup and shutdown 24 Instrument settings 29 Chapter 4 Instrument use 33 Setting the on board timer 34 Watching the instructional videos 36 Upgrading the sof...

Page 4: ...rview 58 Preparing a capillary blood sample 58 Preparing a venipuncture blood sample 61 Running samples 64 Inserting the cartridge 65 Managing test results 70 Chapter 7 Instrument reference 75 Trouble...

Page 5: ...1 Introduction This chapter covers the following topics Product documentation page 6 Technical assistance page 7 Safety symbols used in this guide page 8...

Page 6: ...ions on how to set up the system run process controls and samples and manage results and reports BD FACSPresto Near Patient CD4 Counter Safety and Limitations Guide This guide provides descriptions of...

Page 7: ...t your local BD Biosciences technical support representative or supplier Visit our website bdbiosciences com for up to date contact information When contacting BD Biosciences have the following inform...

Page 8: ...r Safety and Limitations Guide for safety information and symbol definitions for the system Symbola a Although these symbols appear in color on the instrument they might be printed in black and white...

Page 9: ...2 System overview This chapter covers the following topics About the system page 10 System components page 12 Software overview page 19...

Page 10: ...an whole blood System overview The BD FACSPresto system consists of the following BD FACSPresto instrument package containing Portable instrument Power supply Adapter cords Instrument cover Work stati...

Page 11: ...through a microscope lens and emission filter or a spectrometry system onto a digital camera chip Reagents Each test uses one cartridge The cartridge contains dried reagents Human whole blood from ei...

Page 12: ...ponents Introduction This topic describes the BD FACSPresto system components Before operating the system you should familiarize yourself with the names locations and functions of the various system c...

Page 13: ...y opens when you need to insert or remove the cartridge Do not manually open the cartridge door 4 Standby LEDs Lights that Are on if the instrument is on Are off if the instrument is off Blink if the...

Page 14: ...e instrument No Component Description 1 Lift handle Handle used to move the instrument 2 Air vent Enables air flow into and out of the instrument 3 Service port Used by BD personnel only to service th...

Page 15: ...he reagents that are needed to test one sample or specimen Use one cartridge per specimen Use only BD FACSPresto cartridges with the instrument No Component Description 1 Cap open Enables blood additi...

Page 16: ...rocess control in the cartridge before closing the cap 4 Ridges Place to hold the cartridge 5 Add blood Indicates the step to put blood into the cartridge 6 Barcode Scanned by the instrument to identi...

Page 17: ...ates the space to write the patient ID or process control information before putting blood or process control into the cartridge Do not write on any other part of the cartridge 12 Channel protector Pr...

Page 18: ...ion About the system page 10 Setting the on board timer page 34 No Component Description 1 Tube or pen holders Hold tubes or pens 2 Handle Handle used to hold and carry the work station 3 Cartridge BD...

Page 19: ...damage the screen Welcome screen and navigation tabs After you turn the instrument on the welcome screen opens Press a navigation tab to adjust settings perform tasks and get help on using the instru...

Page 20: ...remaining battery power 8 Time and date Shows the time and date as specified in the Settings tab No Tab name or Icon Description Icon Description The fill is completely green when the battery is full...

Page 21: ...m overview 21 Keyboard A keyboard opens when your input is needed An example of the keyboard used for entering the patient ID is shown in the following figure No Button 1 Patient ID 2 Backspace 3 Caps...

Page 22: ...ng table describes the basic buttons in the software More information Settings tab page 30 Button Description Increases the setting in a field for example setting the date Decreases the setting in a f...

Page 23: ...3 Instrument setup This chapter covers the following topics Instrument setup startup and shutdown page 24 Instrument settings page 29...

Page 24: ...rvice 3 Place the instrument on a level surface a minimum of 1 27 cm 0 5 in away from the wall 4 Remove the tape from the cartridge door 5 Plug the power supply into the instrument 6 Plug the adapter...

Page 25: ...to the instrument using a car battery charge adapter 1 Plug the car battery charge adapter directly into the car s cigarette lighter receptacle Do not plug any adapters or splitters into the cigarette...

Page 26: ...t Do not use the instrument in a car with a running engine Note You can also use the car charge battery adapter to charge the solar generator Power connection using a solar charge kit To connect power...

Page 27: ...3 Instrument setup 27 The solar panel needs 11 22 hours to fully charge the solar generator depending on the sun 2 Plug the solar generator into the instrument No Component 1 Solar panel 2 Solar gener...

Page 28: ...a solar generator The solar generator can be used without the solar panel as another power supply To connect power to the instrument using the solar generator 1 Plug solar generator into a wall elect...

Page 29: ...ont of the instrument A confirmation screen opens 2 Press Accept More information Power requirements page 89 Instrument front view page 12 Car battery charge adapter instructions for use Solar charge...

Page 30: ...t CD4 Counter Instructions For Use 30 Settings tab The following figure shows the screen with the Settings tab selected No Button 1 Date 2 Time 3 Display brightness 4 Volume 5 Hb Units 6 Lab Name 7 Op...

Page 31: ...per deciliter g dL or grams per liter g L Optional Lab Press Backspace to delete the default setting Enter a lab name from 0 15 characters Optional Operator 1 Operator 2 or Operator 3 Press Backspace...

Page 32: ...This page intentionally left blank...

Page 33: ...4 Instrument use This chapter covers the following topics Setting the on board timer page 34 Watching the instructional videos page 36 Upgrading the software page 38...

Page 34: ...artridge into the instrument Incubate each cartridge for at least 18 minutes but no longer than 2 hours About the on board timer Use the on board timer while the cartridge is in the BD FACSPresto work...

Page 35: ...he BD FACSPresto work station The timer starts at 18 minutes and shows the minutes and seconds remaining until incubation is complete It turns green when complete If another screen is open when the ti...

Page 36: ...tasks Help tab The following figure shows the Help tab s video selection screen No Component Description 1 Add Blood Video on collecting samples 2 Incubate Video on setting the on board timer for a ca...

Page 37: ...control information 8 Software version Software version installed on the instrument 9 Date Date of software version 10 Delete All Button for deleting all test results 11 Copyright information Opens th...

Page 38: ...o 4 Press Back to return to the video selection screen More information Deleting test results page 72 Upgrading the software Introduction This topic describes how to upgrade the instrument software If...

Page 39: ...ware on the instrument press Back The Welcome screen opens and the current software version starts 4 To upgrade the software to the software version on the USB flash drive press Accept No Component 1...

Page 40: ...he USB flash drive 6 Press Accept The instrument turns off When you turn on the instrument the upgraded software version starts More information Instrument startup page 28 Instrument shutdown page 29...

Page 41: ...This chapter covers the following topics Quality and process control overview page 42 Running instrument QC page 44 Entering process control information page 45 Preparing process controls page 50 Run...

Page 42: ...runs and the results print every time the instrument turns on About process controls Process controls are liquid control materials that are processed like patient samples to monitor the performance of...

Page 43: ...he screen with the QC tab selected From the QC tab you can run instrument QC and CD4 and Hb process controls More information To run QC manually see Running instrument QC page 44 BD FACSPresto Cartrid...

Page 44: ...instrument QC Introduction This topic describes how to manually run instrument QC Procedure To run instrument QC 1 Press the QC tab 2 Press Instrument QC The Instrument QC Operator screen opens No Bu...

Page 45: ...automatically print 4 Press Accept Entering process control information Introduction This topic describes how to enter process control information Enter the following information for each new lot of p...

Page 46: ...s the screen with the QC button in the Settings tab selected From this screen you can define the process control settings Defining CD4 process control settings To define the CD4 process control settin...

Page 47: ...laces 5 Press the Upper Limit CD4 Count field on the right and enter a value 6 Press the Lower Limit CD4 Percentage field on the left and enter a value according to the process control documentation w...

Page 48: ...Up or Down to set the year month and day 11 Press Accept The Expiration Date screen closes 12 Press Accept on the CD4PC Low Settings screen to save all the entered data for the low count process cont...

Page 49: ...h up to three digits including one decimal place 3 Press the Upper Limit HbPC Concentration field and enter a value 4 Press the Lot Number field and enter the lot number for the process control 1 10 c...

Page 50: ...rol Settings screen when you are finished entering data for the process controls Next step Preparing process controls page 50 More information Settings tab page 30 Preparing process controls Introduct...

Page 51: ...ke sure that process control appears in the part of the channel not covered by the channel protector next to the containment zone 3 Close the cartridge cap securely Make sure both latches on the cap s...

Page 52: ...e fill indicator is full Some process controls might be difficult to see in the cartridge Check the fill indicator carefully 6 Place the cartridge barcode side up on the work station Next step Running...

Page 53: ...bes how to run process controls Process Control Results screen The following figure shows the screen with process control results Procedure To run process controls 1 Press the QC tab 2 Press CD4PC No...

Page 54: ...r screen opens 5 Insert the cartridge See Inserting the cartridge page 65 The process control is processed and a progress screen opens When the process is complete the Process Control Results screen o...

Page 55: ...Process Control Selection screen opens 8 Press CD4PC N 9 Repeat steps 3 to 7 for the CD4 normal count process control 10 Press HbPC in the QC tab The Hb ID Confirmation screen opens 11 Repeat steps 3...

Page 56: ...BD FACSPresto Near Patient CD4 Counter Instructions For Use 56 Running samples page 64 Troubleshooting page 76...

Page 57: ...vers the following topics Sample processing overview page 58 Preparing a capillary blood sample page 58 Preparing a venipuncture blood sample page 61 Running samples page 64 Inserting the cartridge pa...

Page 58: ...s the following stages Preparing a capillary blood sample Introduction This topic describes how to collect a capillary blood specimen using a finger stick and how to add the specimen into the cartridg...

Page 59: ...ers Ask the patient to extend his or her arm towards the floor and shake and squeeze his or her hand If the patient s hand is cold use a warming device or run the hand under warm water 2 Firmly squeez...

Page 60: ...cartridge by its ridges only Squeeze and hold the finger to maintain blood flow until blood reaches the top of the inlet port Make sure the cartridge is level with the barcode side up at all times Ma...

Page 61: ...w to add a previously collected venipuncture blood specimen into the cartridge Required materials Pipet Cartridge BD Vacutainer EDTA tube containing room temperature blood Caution Biological If necess...

Page 62: ...e pipet per specimen 3 Gently squeeze the bulb on the pipet to form a drop of blood on the tip of the pipet 4 Carefully dispense the specimen into the inlet port Hold the cartridge by its ridges only...

Page 63: ...FACSPresto work station page 17 BD FACSPresto cartridge page 15 Caution Biological If necessary use a cloth dampened with bleach diluted to 0 5 sodium hypochlorite concentration to clean excess blood...

Page 64: ...run if the instrument has a low battery You cannot turn off the instrument during a run Procedure To run samples 1 Make sure the cap on the cartridge is closed 2 Press the Run Test tab 3 Press Patient...

Page 65: ...cribes how to insert the cartridge into the instrument Procedure To insert the cartridge 1 Select your Operator ID and press Accept The cartridge door on the instrument opens Note If possible complete...

Page 66: ...cept for the closed cap 3 Hold the cap with the channel facing upwards Insert the prepared cartridge into the cartridge door as shown in the following figure The cartridge clicks in place The cartridg...

Page 67: ...Chapter 6 Sample processing 67 The sample is processed and a progress screen opens Typically a sample takes 4 minutes to process...

Page 68: ...complete the instrument beeps 3 times the results appear on the screen and automatically print No Description 1 Product and software version 2 Results type Patient results are shown in this example Ot...

Page 69: ...rtridge goes back into the instrument If this happens press Open Door and remove the ejected cartridge 6 Press Accept 7 Dispose of the used cartridge using proper precautions and in accordance with lo...

Page 70: ...de Managing test results Introduction This topic describes how to search filter print delete and export test results Press the Results tab to manage the test results Results tab The following figure s...

Page 71: ...searching for a patient ID that begins with 123 enter 123 If you are searching for a patient ID that ends with 123 enter 123 If you are searching for a patient ID that contains 123 enter 123 3 Press A...

Page 72: ...USB flash drive You should delete all test results from the instrument before sending the instrument to BD Biosciences for service To delete a test result 1 Select a test result 2 Press Delete A confi...

Page 73: ...e into the USB port on the front of the instrument 3 Press USB The USB button is not active unless a USB flash drive is properly inserted into the USB port 4 Optional Enter a new file name for the res...

Page 74: ...This page intentionally left blank...

Page 75: ...7 Instrument reference This chapter covers the following topics Troubleshooting page 76 Maintenance transportation and disposal page 84 Instrument specifications page 87 Power requirements page 89...

Page 76: ...ng Introduction This topic describes how to troubleshoot problems with the instrument Error screens alert you to issues with the hardware software and cartridge If additional assistance is required co...

Page 77: ...t 2 If there is a cartridge stuck in the cartridge door do not attempt to remove it If possible make sure the cap is closed 3 Press the power button until the instrument turns off 4 Press the power bu...

Page 78: ...mple or process control run has stopped 1 Wait 2 minutes 2 If the progress bar does not move press the power button until the instrument turns off 3 Press the power button to turn on the instrument A...

Page 79: ...the barcode label or channel 3 Re insert the cartridge into the instrument 4 If the error persists prepare a new cartridge There is not enough blood or process control in the cartridge 1 Make sure th...

Page 80: ...102 1 Re run instrument QC 2 Insert the cartridge into the instrument again If you get the same error screens prepare a new cartridge For other error codes insert the cartridge into the instrument aga...

Page 81: ...ent 3 If the error persists contact BD Biosciences The instrument temperature is outside its operational range 1 Make sure the air vents are unobstructed 2 Press the power button until the instrument...

Page 82: ...Biosciences The instrument has low battery power and will shut down in the number of seconds specified on the screen 1 Plug the instrument into a wall electrical outlet or other electric source 2 Pre...

Page 83: ...he USB port The USB flash drive is not inserted correctly Remove and insert the USB flash drive into the USB port again The USB flash drive is full Insert the USB flash drive into a PC and remove some...

Page 84: ...ent To maintain the instrument Turn off the instrument when it is not in use Cover the instrument with the included instrument cover when it is not in use There are no user serviceable parts Contact B...

Page 85: ...latch The printer door opens 2 Remove the old paper roll 3 Detach the end of the paper from the new paper roll No Component 1 Printer door latch 2 Button to eject paper from printer 3 Green light mean...

Page 86: ...paper is inserted into the printer correctly Transporting the instrument To transport the instrument pack it in its original shipping box You can also use the carrying case which is an optional acces...

Page 87: ...tion Instrument shutdown page 29 Technical assistance page 7 Troubleshooting page 76 Instrument specifications Introduction This topic describes the instrument specifications The instrument complies w...

Page 88: ...Cartridge IFU Operating and Storage Environment Temperature at 2 500 meters above sea level Operating 10 C 40 C 50 F 104 F Storage 0 C 50 C 32 F 122 F Humidity 10 95 non condensing Vibration Do not op...

Page 89: ...ation worldwide Requirements The instrument uses battery or electrical power The power supply connects the instrument and adapter cord More information Instrument setup startup and shutdown page 24 Re...

Page 90: ...This page intentionally left blank...

Page 91: ...Microtainer contact activated lancet 10 blood preparing a capillary sample 58 preparing a venipuncture sample 61 C cap 15 16 capillary blood sample preparation 58 car battery charge adapter 25 carryi...

Page 92: ...inlet port 16 instructional videos 36 instructions 6 instrument air vent 14 asset tag plate 14 carrying case 86 cartridge door 13 cleaning 84 cover 84 disposal 87 heat dissipation 88 lab name 29 lift...

Page 93: ...rt 14 power requirements instrument 89 power instrument 87 preparing a capillary blood sample 58 preparing a venipuncture sample 61 preparing process controls 50 preparing samples 58 printer 13 paper...

Page 94: ...deo 37 shut down instrument 29 software 11 overview 19 upgrade 38 version 37 sound setting 29 standby LEDs 13 start up the instrument 28 symbols 8 system components 12 T tabs 19 Help 20 On board Timer...

Page 95: ...Index 95 volume setting 29 W weight instrument 87 width instrument 87 work station 17 84...

Page 96: ...THIS PAGE INTENTIONALLY LEFT BLANK...

Reviews: