background image

Using Power Adapter 

Do not use any other power supply adapter other than the one supplied with this unit. Connect one side to 

the power supply socket on the back-panel and the other side to an outlet. Note: the input voltage should be 

compatible with the outlet power.

Headphone Jack

• Turn off keyboard before connecting external speakers or audio devices to keyboard. Connect these 

devices via the “PHONES/OUTPUT” port on the back of the keyboard.

• Insert headphones (not included) into the “PHONES/OUTPUT” jack on the back of the instrument. The 

speaker will automatically turn off when headphones are in use. WARNING: Hearing loss can occur if 

headphones are used at too high of a volume. 

Mic Input and Audio Input 

• You can connect a microphone (not included) via the “MIC” port to use with the keyboard.
• You can play audio through the computer speakers. To do so, first turn off the keyboard. Plug in your device 

to the keyboard via the “AUDIO INPUT” jack. Then, turn on the keyboard.

Playing Music from an External Device

• Insert a USB flash drive into the “UDISK” port behind the keyboard. The keyboard only supports USB drives 

up to 32GB. 

• Press            to adjust the volume.
• Press     to go to the previous track, press     to go to the next track, press     to play/pause a track, press    

to stop the audio. Press      /      /      to cycle through continuous, random, or single playback.

1

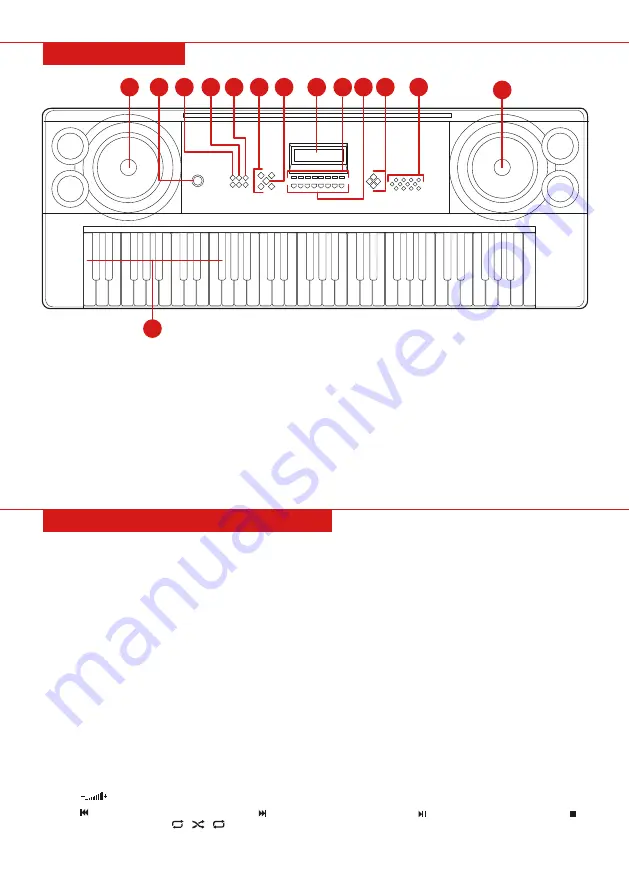
FRONT PANEL

1

2

3

4 5

6 7

9

8

10 11

1

12

13

PERFORMANCE PREPARATION

Pg. 4

1. Speaker

2. Power Switch

3. Master Volume

4. Accompaniment 

Volume

5. Tempo

6. Clockwise:

• Single

• Fingered

• Fill-In

• Synch

7. Start/Stop

8. LED Display

9. • Record

• Programming

• Play

• Sustain

• Vibrato

• One-Key

• Follow

• Ensemble

10. • Volume Down

• Volume Up

• Previous

• Next

• Play/Pause

• Stop

• Continous/Random/ 


Single/Playback

• Key Lighting

11. Clockwise from top

• Timbre

• Demo Song

• Rhythm

• Keyboard   


Percussion

12. Numbers

13. Chord Keyboard (for 

use with single-finger 

chords)

Summary of Contents for SKY3160

Page 1: ...SKY2954 SKY3160 Ver 2 INSTRUCTION MANUAL 61 Key Electronic Teaching Keyboard ...

Page 2: ...HARDWARE APPROXIMATELY 15 MIN ASSEMBLY 1 PERSON ASSEMBLY A B C E PLATFORM 1 PC TOOLS REQUIRED WRENCH F KEYBOARD 1 PC G MUSIC STAND 1 PC 2 4 PCS 3 8 PCS 5 x 35mm 5 x 25mm 5 x 35mm 4 2 PCS H STOOL 1 PC I HEADPHONES 1 PC COMES WITH SKY3160 ONLY COMES WITH SKY3160 ONLY ...

Page 3: ...NEL AUDIO INPUT PHONES OUTPUT 9V MIC UDISK DC 9V Pg 3 1 PRODUCT ASSEMBLY Please retain these instructions for future reference D Assemble the stand and attach the keyboard and music stand A B C 1 2 3 4 G F E D ...

Page 4: ...the computer speakers To do so first turn off the keyboard Plug in your device to the keyboard via the AUDIO INPUT jack Then turn on the keyboard Playing Music from an External Device Insert a USB flash drive into the UDISK port behind the keyboard The keyboard only supports USB drives up to 32GB Press to adjust the volume Press to go to the previous track press to go to the next track press to pl...

Page 5: ... demo songs in order Press the DEMO SONG button again to stop playing the demo song Press the number buttons or buttons during demo mode to select a demo song You can change the timbre of the demo song by selecting the TIMBRE button while the demo song is playing and selecting the timbre in the same way as normal Press START STOP or press DEMO SONG to stop playing the demo song BASIC PERFORMING ME...

Page 6: ...play a single chord using the chord keyboard first 19 keys from the left Press SINGLE again to disable the function Single Finger Chord Fingering AUTO BASS CHORD Fingered Chord While the rhythm is active press FINGERED and FIN will show on the display You can now play fingered chords using the chord keyboard Press FINGERED to disable the function Pg 6 ...

Page 7: ...ythm Press PLAY again to stop the playback and enter programming mode again Press START STOP or press PROG again to disable the programming function all recorded rhythms will be removed RECORDING AND RHYTHM PROGRAMMING One Key Press ONE KEY to enable the one key teaching function You can select the song to be learned by pressing the number buttons or the buttons The keyboard will light up accordin...

Page 8: ...ed in its original product packaging and all accessories from its original shipment are included All returned items will receive a full refund back to the original payment method All returned items will not be charged a re stocking fee All returned items require an RA Return Authorization number which can only be provided by a Best Choice Products Customer Service Representative when the return re...

Reviews: