background image

27

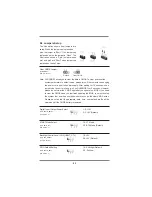
       Though this motherboard provides 4-Pin CPU fan (Quiet Fan) support, the 3-Pin  
       CPU fan still can work successfully even without the fan speed control function.  
       If you plan to connect the 3-Pin CPU fan to the CPU fan connector on this  
       motherboard, please connect it to Pin 1-3.  

3-Pin Fan Installation

Pin 1-3 Connected


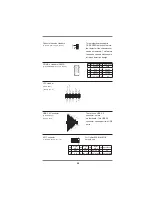
ATX Power Input Connector 

Please connect a DC 

(Input 12V) 

12V power supply to this  

(4-pin  ATX12V1)

connector.

(see p.9  No. 17)

1-2: GND
3-4: DC Input

CPU Fan Connector 

Please connect the CPU fan 

(4-pin CPU_FAN1)

cable to the connector and 

(see p.9  No. 13)

match the black wire to the  
ground pin.

4

2

3

1

Printer Port Header 

(25-pin  LPT1)
(see p.9  No. 7)           

LVDS Connector 


(40-pin  LVDS1)
(see p.9  No. 24)

1

AFD#

ERROR#

PINIT#

GND

SLIN#

STB#

SPD0

SPD1

SPD2

SPD3

SPD4

SPD5

SPD6

SPD7

ACK#

BUSY

PE

SLCT

PIN

Signal Name

PIN

Signal Name

2

VDD_+5V

1

VDD_+3.3V

4

VDD_+5V

3

VDD_+3.3V

6

DDC_DATA

5

DDC_CLK

8

GND

7

GND

10

9

12

LVDS_A0-

11

LVDS_A1-

14

GND

13

GND

16

15

18

LVDS_A2-

17

LVDS_A3-

20

GND

19

GND

22

21

24

LVDS_B0-

23

LVDS_B1-

26

GND

25

GND

28

27

30

LVDS_B2-

29

LVDS_B3-

32

GND

31

GND

34

LVD

33

LVD

36

LVDS_A_CLK-

35

LVDS_B_CLK-

38

GND

37

GND

40

VDD_+12V

39

VDD_+12V

1

39

40

2

GND

+12V

CPU_FAN_SPEED

FAN_SPEED_CONTROL

Summary of Contents for MX110H

Page 1: ...MX110H Intel H110 Mini ITX Motherboard supports 14nm Intel Core i7 i5 i3 6th generation Desktop Processors Skylake Platform User s Manual Ver 1 0...

Page 2: ...power company If the power supply is broken do not try to fix it by yourself Contact a qualified service technician or your retailer Operation safety Before installing the motherboard and adding devi...

Page 3: ...mponents It includes description of the jumpers and connectors on the motherboard Section 3 BIOS setup This chapter tells how to change system settings through the BIOS Setup menus Detailed descriptio...

Page 4: ...O DIMM 20 2 5 Expansion Slot 22 2 6 Jumpers Setup 23 2 7 Onboard Headers and Connectors 25 3 BIOS SETUP UTILITY 30 3 1 Introduction 30 3 1 1 BIOS Menu Bar 30 3 1 2 Navigation Keys 31 3 2 Main Screen 3...

Page 5: ...fications and the BIOS software might be updated the content of this manual will be subject to change without no tice In case any modifications of this manual occur the updated version will be availab...

Page 6: ...CPU Dependent 2 x DisplayPort 18 24 bits Dual Channel LVDS Through Chrontel CH7511B BOM option to support eDP 2 GigaLan support Intel i219 V PHY LAN Controller Intel i211 AT PCIe LAN Controller Realt...

Page 7: ...Type CMOS Battery FAN 1 x 4 Pin CPU Fan Header 1 x 4 Pin Chassis Fan Header Power In 1 x Standard 24 pin ATX Connector 1 x 4 pin ATX 12 Connector Front Panel 1 x Front Panel Header 2 54mm Pitch LPC He...

Page 8: ...FCC CE UL O p e r a t i o n Environment S t o r a g e Environment RoHS Compliant Temperature 0 C to 60 C Note In environment of 45C or above it requires active system fan cooling Temperature 20 C to 6...

Page 9: ...2 1 USB2_34 1 BLT_PWR1 BLT_PWM1 1 CI2 1 CI1 1 1 JGPIO1 11 8 10 16 14 20 19 22 24 26 COM2 PS2 Keyboard PS2 Mouse COM1 DISPLAY1 DISPLAY2 Top RJ 45 USB 3 0 T USB1 B USB2 Top RJ 45 USB 2 0 T USB1 B USB2 T...

Page 10: ...ctor 12 Clear CMOS Header 13 4 Pin CPU FAN Connector 12V 14 4 Pin Chassis FAN Connector 12V 15 System Panel Header 16 3W Audio AMP Output Wafer 17 4 pin ATX Power Input Connector 18 SPI Connector 19 F...

Page 11: ...lue 7 Front Speaker Lime 8 Microphone Pink 9 USB 2 0 Ports USB_12 10 USB 3 0 Ports USB3_12 11 DisplayPort DP2 12 COM Port COM2 13 PS 2 Keyboard Port ACT LINK LED SPEED LED LAN Port 13 8 9 11 12 7 6 1...

Page 12: ...tions before you install motherboard components or change any motherboard settings 1 Unplug the power cord from the wall socket before touching any component 2 To avoid damaging the motherboard compon...

Page 13: ...he motherboard make sure that the PnP cap is on the socket and the socket pins are not bent Contact your retailer immediately if the PnP cap is missing or if you see any damage to the PnP cap socket p...

Page 14: ...your thumb A then move it to the left B until it is released from the retention tab To prevent damage to the socket pins do not remove the PnP cap unless you are installing a CPU Before installing the...

Page 15: ...e socket alignment key into the CPU notch 5 Pull back the load lever then push the load lever A until it snaps into the retention tab The CPU fits in only one correct orientation DO NOT force the CPU...

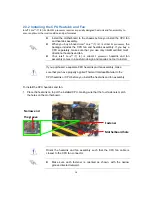
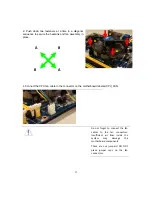
Page 16: ...ntel Core i7 i5 i3 LGA1151 processor heatsink and fan assembly comes in a push pin design and requires no tool to install If you purchased a separate CPU heatsink and fan assembly make sure that you h...

Page 17: ...ce 3 Connect the CPU fan cable to the connector on the motherboard labeled CPU_FAN Do not forget to connect the fan cables to the fan connectors Insufficient air flow inside the system may damage the...

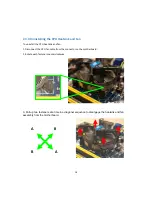
Page 18: ...PU heatsink and fan 1 Disconnect the CPU fan cable from the connector on the motherboard 2 Rotate each fastener counterclockwise 3 Pull up two fasteners at a time in a diagonal sequence to disengage t...

Page 19: ...19 4 Carefully remove the heatsink and fan assembly from the motherboard 5 Rotate each fastener clockwise to ensure correct orientation when reinstalling...

Page 20: ...R2 or DDR3 memory module into a DDR4 slot otherwise this motherboard and SO DIMM may be damaged 2 Please make sure to disconnect the power supply before adding or removing SO DIMMs or the system compo...

Page 21: ...21 1 2 3...

Page 22: ...card Step 1 Before installing the expansion card please make sure that the power Step 2 Step 3 Step 4 Step 5 Step 6 supply is switched off or the power cord is unplugged Please read the documentation...

Page 23: ...ap to short pin2 and pin3 on CLRCMOS1 for 5 seconds However please do not clear the CMOS right after you update the BIOS If you need to clear the CMOS when you just finish updating the BIOS you must b...

Page 24: ...COM Port1 3 4 RI Default 6 pin PWR_COM2 for COM Port2 5 6 5V see p 9 No 5 3 pin PWR_COM3 for COM Port3 1 2 5V Default 3 pin PWR_COM4 for COM Port4 2 3 12V see p 9 No 5 mSATA Select 1 2 Mini PCIE SATA...

Page 25: ...system front panel see p 9 No 15 functions Connect the power switch reset switch and system status indicator on the chassis to this header according to the pin assignments below Note the positive and...

Page 26: ...udio supports Jack Sensing but the panel wire on the chassis must support HDA to function correctly Please follow the instruction in our manual and chassis manual to install your system 2 If you use A...

Page 27: ...nector and see p 9 No 13 match the black wire to the ground pin 4 2 3 1 Printer Port Header 25 pin LPT1 see p 9 No 7 LVDS Connector 40 pin LVDS1 see p 9 No 24 1 AFD ERROR PINIT GND SLIN STB SPD0 SPD1...

Page 28: ...D 3VSB 48MHz 5V USB 3 0 Connector There is one USB 3 0 9 pin USB3_34 connector on this see p 9 No 6 motherboard This USB 3 0 connector can support two USB ports 1 ID IntA_P_D IntA_P_D GND IntA_P_SSTX...

Page 29: ...4 CON_LBKLT_CTL 5 5V_BL 1 PIN Signal Name PIN Signal Name PIN Signal Name PIN Signal Name PIN Signal Name PIN Signal Name 2 SIO_GP20 4 SIO_GP21 6 SIO_GP22 8 SIO_GP23 10 SMB_DATA 12 GND 1 SIO_GP24 3 SI...

Page 30: ...system off and then back on Because the BIOS software is often being updated the following BIOS setup screens and descriptions are for reference purpose only and they may not exactly match what you s...

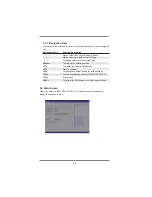
Page 31: ...To change option for the selected items Enter To bring up the selected screen F1 To display the General Help Screen F7 Discard changes F9 To load optimal default values for all the settings F10 To sa...

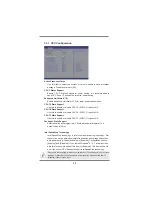
Page 32: ...use the system to malfunction 3 3 Advanced Screen In this section you may set the configurations for the following items CPU Configuration Chipset Configuration Storage Configuration Super IO Configur...

Page 33: ...te Support Use this to enable or disable CPU C3 ACPI C2 report to OS CPU C6 State Support Use this to enable or disable CPU C6 ACPI C3 report to OS CPU C7 State Support Use this to enable or disable C...

Page 34: ...with No Execute NX Memory Protection can prevent data pages from being used by malicious software to execute codes This option will be hidden if the current CPU does not support No Excute Memory Prot...

Page 35: ...value of this feature is Disabled PCIE1 Link Speed Select the link speed for PCIE1 Share Memory Configure the size of memory that is allocated to the integrated graphics processor when the system boo...

Page 36: ...Panel Deep Sleep Mobile platforms support Deep S5 in DC only and desktop platforms sup port Deep S5 in AC only The default value is Disabled Active LVDS Use this to enable or disable the LVDS The def...

Page 37: ...ult value is AHCI Mode AHCI Advanced Host Controller Interface supports NCQ and other new features that will improve SATA disk perfor mance SATA Aggressive Link Power Management Use this item to confi...

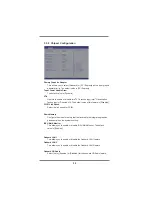
Page 38: ...Use this to set parameters of COM2 COM3 Configuration Use this to set parameters of COM3 COM4 Configuration Use this to set parameters of COM4 LPT1 Port Configuration Use this set parameters of the on...

Page 39: ...n Use this item to enable or disable PS 2 keyboard to turn on the system from the power soft off mode PCIE Devices Power On Use this item to enable or disable PCIE devices to turn on the system from t...

Page 40: ...o and UEFI Setup Only The default value is Auto Please refer to below descriptions for the details of these four options Enabled Enables support for legacy USB Auto Enables legacy support if USB devic...

Page 41: ...41 3 3 7 Trusted Computing Optional Security Device Support Enable or disable BIOS support for security device...

Page 42: ...default is value Disabled Clear Status This option appears only when the case open has been detected Use this option to keep or clear the record of previous chassis intrusion status Over Temperature...

Page 43: ...nt Only the ad ministrator has authority to change the settings in the BIOS Setup Utility Leave it blank and press enter to remove the password User Password Set or change the password for the user ac...

Page 44: ...tup Num Lock If this item is set to On it will automatically activate the Numeric Lock function after boot up Boot Beep Select whether the Boot Beep should be turned on or off when the system boots up...

Page 45: ...ule CSM Enable to launch the Compatibility Support Module Please do not disable unless you re running a WHCK test If you are using Windows 8 64 bit and all of your devices support UEFI you may also di...

Page 46: ...en you select this option it will pop out the following message Discard changes and exit setup Select OK to exit the BIOS SETUP UTILITY without saving any changes Discard Changes When you select this...

Page 47: ...Appendix GPIO Programming...

Page 48: ......

Page 49: ..._WRITE_BYTE 0x2E 0x30 IO_WRITE_BYTE 0x2F Temp Programmed GPIO20 as an output port IO_WRITE_BYTE 0x2E 0xE8 UCHAR Temp IO_READ_BYTE 0x2F 0xFE IO_WRITE_BYTE 0x2E 0xE8 IO_WRITE_BYTE 0x2F Temp Set GPIO20 t...

Page 50: ...0x2E 0x30 IO_WRITE_BYTE 0x2F Temp Programmed GPIO21 as an output port IO_WRITE_BYTE 0x2E 0xE8 UCHAR Temp IO_READ_BYTE 0x2F 0xFD IO_WRITE_BYTE 0x2E 0xE8 IO_WRITE_BYTE 0x2F Temp Set GPIO21 to low state...

Page 51: ...0x2E 0x30 IO_WRITE_BYTE 0x2F Temp Programmed GPIO22 as an output port IO_WRITE_BYTE 0x2E 0xE8 UCHAR Temp IO_READ_BYTE 0x2F 0xFB IO_WRITE_BYTE 0x2E 0xE8 IO_WRITE_BYTE 0x2F Temp Set GPIO22 to low state...

Page 52: ...0x2E 0x30 IO_WRITE_BYTE 0x2F Temp Programmed GPIO23 as an output port IO_WRITE_BYTE 0x2E 0xE8 UCHAR Temp IO_READ_BYTE 0x2F 0xF7 IO_WRITE_BYTE 0x2E 0xE8 IO_WRITE_BYTE 0x2F Temp Set GPIO23 to low state...

Page 53: ...0x2E 0x30 IO_WRITE_BYTE 0x2F Temp Programmed GPIO24 as an output port IO_WRITE_BYTE 0x2E 0xE8 UCHAR Temp IO_READ_BYTE 0x2F 0xEF IO_WRITE_BYTE 0x2E 0xE8 IO_WRITE_BYTE 0x2F Temp Set GPIO24 to low state...

Page 54: ...0x2E 0x30 IO_WRITE_BYTE 0x2F Temp Programmed GPIO25 as an output port IO_WRITE_BYTE 0x2E 0xE8 UCHAR Temp IO_READ_BYTE 0x2F 0xDF IO_WRITE_BYTE 0x2E 0xE8 IO_WRITE_BYTE 0x2F Temp Set GPIO25 to low state...

Page 55: ...0x2E 0x30 IO_WRITE_BYTE 0x2F Temp Programmed GPIO26 as an output port IO_WRITE_BYTE 0x2E 0xE8 UCHAR Temp IO_READ_BYTE 0x2F 0xBF IO_WRITE_BYTE 0x2E 0xE8 IO_WRITE_BYTE 0x2F Temp Set GPIO26 to low state...

Page 56: ...0x2E 0x30 IO_WRITE_BYTE 0x2F Temp Programmed GPIO27 as an output port IO_WRITE_BYTE 0x2E 0xE8 UCHAR Temp IO_READ_BYTE 0x2F 0x7F IO_WRITE_BYTE 0x2E 0xE8 IO_WRITE_BYTE 0x2F Temp Set GPIO27 to low state...

Reviews: