


13
2.3
Processor
The board supports 6th generation Intel Core processors. Other processors may be
supported in the future. This board supports processors with a maximum wattage of
65 W Thermal Design Power (TDP).
NOTE
This board has specific requirements for providing power to the processor.
Additional
power required will depend on configurations chosen by the integrator.
The motherboard comes with a surface mount LGA1151 socket designed for the Intel® Core™
i7/ i5/ i3 processor in the 1151-land package.
z
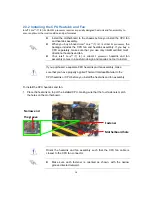
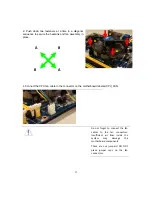
Your boxed Intel® Core™ i7/ i5/ i3 LGA1151 processor package
should come with installation instructions for the CPU, fan and
heatsink assembly. If the instructions in this section do not match the
CPU documentation, follow the latter.
z
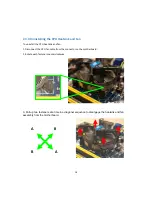
Upon purchase of the motherboard, make sure that the PnP cap is on
the socket and the socket pins are not bent. Contact your retailer
immediately if the PnP cap is missing, or if you see any damage to
the PnP cap/socket pins/motherboard components. BCM will shoulder
the cost of repair only if the damage is shipment/transit-related.
z
Keep the cap after installing the motherboard. BCM will process
Return Merchandise Authorization (RMA) requests only if the
motherboard comes with the cap on the LGA1151 socket.
z
The product warranty does not cover damage to the socket pins
resulting from incorrect CPU installation/removal, or
misplacement/loss/incorrect removal of the PnP cap.
z
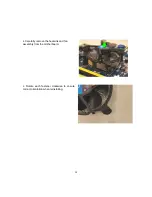
Install the CPU fan and heatsink assembly before you install
motherboard to the chassis.
If you purchased a separate CPU heatsink and fan assembly, make sure
that you have properly applied Thermal Interface Material to the CPU
heatsink or CPU before you install the heatsink and fan assembly.


