background image

SSS3416TC 
Owner’s Manual 

15


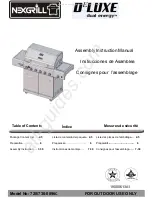
FIG. A                                                    FIG. B                                              FIG. C 


Burner installation and adjustment


Lighting Infrared Burner 

1.  Open lid while lighting burner. 
2.  Make sure the control knob is locked in the OFF position. 
3. Open 

cylinder 

valve. 

4.  Push and turn control knob to HIGH setting. After lighting, please observe the ceramic plate on the surface of burner; it 

should feel warm after 5-10 seconds and the color of the ceramic plate should turn red in 2-3 minutes. 

5.  If burner does not light on the first try, turn the control knob to its OFF position and wait 5 minutes for gas to clear before 

trying again. If burner flame goes out during operation, immediately turn the gas OFF and open lid to let the gas clear for 
about 5 minutes. Attempt to re-light. 

6.  Clean your grill after each use, DO NOT use abrasive or flammable cleansers, as it will damage the parts of this product and 

may start a fire. Clean with warm soapy water. 

Observing the Heat and Color of the Infrared Ceramic Burner when lit 

      Flame of infrared burner might be visible in shaded area. 

      After burner is lit, it should feel warm in 5-10 seconds and color of the ceramic plate turns red in approximately 2-3 minutes. 

WARNING: 

Adjusting the air-shutter while the grill is on operation. If it still hot, please wear protective gear and be careful. Failure to follow 
this instruction could cause personal injury. 

Flare-ups 


“Flare-ups” sometimes occur when food drippings fall onto the hot heat distribution plate or burners and ignite. Some flaring is 
normal and desirable as it helps impart the unique flavors associated with grilled foods. Controlling the intensity of the flare-ups is 
necessary, however, in order to avoid burned or unevenly cooked foods and to prevent the possibility of accidental fire. 

WARNING: 

Always monitor the grill closely when cooking and turn the flame level down to LOW or OFF if flare-ups intensify. 
Shutting Off Burners


1.  Always turn the valve knob(s) clockwise to the ‘’HIGH’’ position, and then press and turn it to ‘’OFF’’. Never force the knob 

without pressing it. This could damage the valve. 

2.  Promptly turn the gas supply to the “OFF” position at the propane cylinder. 
3.  Close the lid of the grill. 

Excess flow safety valve reset procedure


● 

The new regulators are equipped with a safety device that restricts the gas flow in the event of a gas leek. However, 
unsafe practices of grill operation could activate the safety device without having a gas leak. 

● 

A sudden shut off of the gas flow typically occurs if you open the LP tank valve rapidly, or if one or more of the burner 
control knobs is in an open position when opening the LP tank valve. 

Normal: Soft blue flames with yellow 
tips between I in 
ch - 2 inches high. 

Out of adjustment: Noisy hard blue   
flames – too much air. 

Poor combustion: Wavy, yellow 
flames- too little air. 

1.  Release the screw on venturi tube. 
2.  Adjust the flame by turning the collar 

on head of venturi tube from back side 
of the grill and do not take apart the 
venturi tube. 

3.  Tighten the screw and make certain it 

is secured. 

1.  Overlap 14 mm between 

venturi tube and nozzle 
when assembling. 

2.  Keep the center line of venturi

tube and nozzle on one line.

End edge should face towards upside. 

Summary of Contents for SSS3416TC

Page 1: ...XIC fumes can accumulate and cause asphyxiation DO NOT use in or on boats or recreational vehicles MODEL SSS3416TC SAVE THESE INSTRUCTIONS FOR FUTURE REFERENCE IF YOU ARE ASSEMBLING THIS UNIT FOR SOME...

Page 2: ...p 3 Clean up grease build up to avoid grease fire and cover your grill to prevent rust Always read and understand the WARNINGS and INSTRUCTIONS that are contained in this manual before attempting to u...

Page 3: ...Contents 5 Hardware Contents 6 Assembly Instructions 7 Operating Your Grill 12 Connecting disconnecting Gas Cylinder 13 Checking for Leaks 13 Lighting Your Grill 14 Excess flow safety valve reset proc...

Page 4: ...t attempt to attach this grill to the self contained propane system of a camper trailer motor home or house 11 Do not use charcoal or lighter fluid 12 Do not use gasoline kerosene or alcohol for light...

Page 5: ...ing a fire Always confirm that the installation of this grill conforms with the requirements of all local codes or in the absence of applicable local codes with either the National Fuel Gas Code ANSI...

Page 6: ...sket 1 PC D Grease cup 1 PC P Tank clip 1 PC E Grease cup support 1 PC Q Cart Base 1 PC F Warming left rack 1 PC R Cart right door 1 PC G Warming right rack 1 PC S Cart right side panel 1 PC H Cooking...

Page 7: ...SSS3416TC Owner s Manual 6 Hardware listed above is not scaled to exact size A screwdriver is required on assembly and is included for your convenience...

Page 8: ...b Align the holes upon the left side of cart base Q with the holes on the cart left side panel K and tighten the pre installed bolts by hand c Repeat the procedure with the cart right side panel S on...

Page 9: ...ket O on the storage basket support T f Go back and tighten all the bolts using screwdriver the provided Step 4 Front beam assembly a Align the holes on cart left side panel K with the holes on front...

Page 10: ...th cart assembly Note Unpacked the hose assembly prior to install the body assembly and pull out the hose to the cart side panel when go ahead to this step a Put the body assembly A onto the cart asse...

Page 11: ...er provided Step11 Install the heating plate cooking grid and warming rack a Place the heating plates J upon each burners as shown in the diagram b Put the left cooking grid I and right cooking grid H...

Page 12: ...gulator by screwing regulator collar onto the tank valve c Conduct the leaking test on page 13 Step13 Install the tank clip a Inset the tank clip P into the holes on the tank holder Step12 Install the...

Page 13: ...e compatible with the connection for outdoor cooking appliances The cylinder must include a collar to protect the cylinder valve The gas cylinder should not be dropped or handled roughly If the applia...

Page 14: ...k valve in OFF position 8 Always disconnecting the gas supply regulators as follows Loosen the connection collar by turning it anti clockwise with one hand while holding the regulator with the other h...

Page 15: ...re Using the Lighting Stick to Light the Main Burners 1 Insert a match into the end of lighting stick locked in the drawer Light the match 2 Once lit put the lighting stick through the cooking grid an...

Page 16: ...ring is normal and desirable as it helps impart the unique flavors associated with grilled foods Controlling the intensity of the flare ups is necessary however in order to avoid burned or unevenly co...

Page 17: ...lator to the LP tank 10 Slowly turn the LP tank valve turn at a time and have the valve all the way open 11 With the lid open For grill with ignition button turn on only ONE burner control knob to the...

Page 18: ...ely dry Interior of grill bottom Remove residue using brush scraper and or cleaning pad Wash with a dishwashing detergent and hot water solution Rinse with water and let dry Cooking Grates The porcela...

Page 19: ...ntil solid stop Tighten by hand ONLY do not use tools Clear burner tubes Check for bent or kinked hose Reengage burner and valve Clean venturi Clean burner ports New burner may have residual manufactu...

Page 20: ...inless steel not painted Baked on grease buildup has turned to carbon and is flaking off Clean thoroughly Air flow is not correct Correct Flame blue with yellow tips 1 2 in high Too little air wavy ye...

Page 21: ...enance hostile environment accidents alterations abuse or neglect This warranty does not cover damage caused by heat abrasive and chemical cleaners resulting in chipped porcelain enamel parts or any d...

Reviews: