background image

SECTION

6

Blood Glucose Test

14

Test Results:

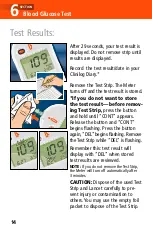
After 29 seconds, your test result is
displayed. Do not remove strip until
results are displayed.

Record  the test result/date in your
Clinilog Diary.*

Remove the Test Strip. The Meter 
turns off and the test result is stored.

*If you do not want to store 
the test result—before remov-
ing Test Strip,

press the button

and hold until “CONT” appears.
Release the button and “CONT”
begins flashing. Press the button 
again, “DEL” begins flashing. Remove 
the Test Strip while “DEL” is flashing.
Remember this: test result will
display with “DEL” when stored 
test results are reviewed.

NOTE:

If you do not remove the Test Strip,

the Meter will turn off automatically after 
3 minutes.

CAUTION:

Dispose of the used Test

Strip and Lancet carefully to pre-
vent injury or contamination to
others. You may use the empty foil
packet to dispose of the Test Strip.

Summary of Contents for Ascensia Elite XL

Page 1: ...THE NEW FACE of Glucometer Diabetes Care System USER GUIDE For Use With Ascensia ELITE XL Blood Glucose Meter Need Help with Reimbursement Call Our Bayer Care Help Line 1 877 787 1912...

Page 2: ...2 The Meter ii Test end Meter end Test Strip Icon Button Display Test slot...

Page 3: ...se to check if the Meter is working properly before running a blood glucose test Ascensia ELITE Code Strip use to set the Meter calibrate to match the box of Test Strips MICROLET Adjustable Lancing De...

Page 4: ...computer and analyzed with WinGlucofacts XL software Agrees with laboratory serum plasma glucose results values 10 15 higher than whole blood glucose results Capillary action at the end of the Test St...

Page 5: ...can help you manage your diabetes to keep your blood sugar levels within your target range Do I need to read this book This instruction guide is provided as a reference as you operate the system It is...

Page 6: ...tially serious medical condition If your glucose is below 50 mg dL or above 250 mg dL contact your healthcare professional immediately CAUTION Before using any product to test your blood glucose sugar...

Page 7: ...Control Test 8 Testing 6 Blood Glucose Test 11 7 Important to Remember 15 Test Result Management 8 Stored Test Results 17 9 Data Management 18 Taking Care 10 Meter and Test Strip Care 19 11 Meter and...

Page 8: ...red in the memory are not erased when batteries are changed but time must be reset NOTE Two 3 volt CR2032 lithium batteries are furnished with the Meter WARNING Keep batteries away from children Lithi...

Page 9: ...button to change item as it flashes you have five seconds to make a change Display 1 Press button to switch Beeper on to beeper off if you wish to turn off the sound Display 2 Press button to set Min...

Page 10: ...r a beep A full display shows followed by another beep and then the Check Strip result 3 The Check Strip result must be within the range listed on the Check Strip package insert If not see the problem...

Page 11: ...the packet found in the new carton of Test Strips and remove the Code Strip save the packet 2 Insert the Code Strip into the test slot as shown A beep sounds and a full display appears briefly Another...

Page 12: ...est Strip insert the strip into the Meter until it stops 3 A beep sounds A full display fol lowed by the Code Number F and previous test result appears The Code Number and previous test result flash a...

Page 13: ...st Strip The timer begins to count down from 29 seconds The test result appears with CONT in the display if marked when the countdown is com plete Compare result to range on end flap of Test Strip car...

Page 14: ...e and will be stored in the memory and displayed with CONT or DEL Mark the Result Hold the button until CONT appears at the top of the display Release the but ton and CONT begins flashing Remove the T...

Page 15: ...on can help you manage your diabetes to keep your blood sugar levels within your target range Prepare for the Test You will need a Microlet Lancing Device and Lancet to stick your fin ger then cotton...

Page 16: ...pen a foil packet and remove the Test Strip 2 With the Meter off hold the round end and insert the Test Strip fully into the Meter You will hear a beep 2 After a full display the Code Number F and pre...

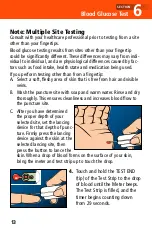
Page 17: ...f skin that is free from hair and visible veins B Wash the puncture site with soap and warm water Rinse and dry thoroughly This ensures cleanliness and increases blood flow to the puncture site C Afte...

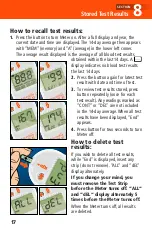
Page 18: ...trip press the button and hold until CONT appears Release the button and CONT begins flashing Press the button again DEL begins flashing Remove the Test Strip while DEL is flashing Remember this test...

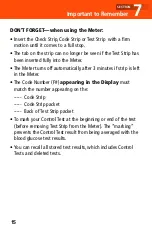
Page 19: ...utomatically after 3 minutes if strip is left in the Meter The Code Number F appearing in the Display must match the number appearing on the Code Strip Code Strip packet Back of Test Strip packet To m...

Page 20: ...help if you ever need assistance DON T FORGET when using a Test Strip Always check the expiration date on the Test Strip foil packet or carton If date is passed replace with unexpired Test Strips Use...

Page 21: ...of test 3 To review test results stored press button repeatedly once for each test result Any readings marked as CONT or DEL are not included in the 14 day average When all test results have been disp...

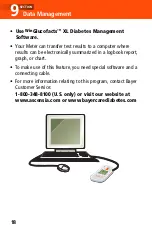
Page 22: ...where results can be electronically summarized in a logbook report graph or chart To make use of this feature you need special software and a connecting cable For more information relating to this pro...

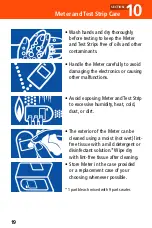
Page 23: ...s or causing other malfunctions Avoid exposing Meter and Test Strip to excessive humidity heat cold dust or dirt The exterior of the Meter can be cleaned using a moist not wet lint free tissue with a...

Page 24: ...ecommendations for prevention of blood borne transmissible diseases in healthcare settings as recommended for potentially infectious human blood specimens in National Committee for Clinical Laboratory...

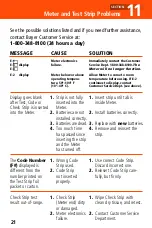
Page 25: ...ed into the Meter 1 Strip is not fully inserted into the Meter 2 Batteries are not installed correctly 3 Batteries are dead 4 Too much time has passed since inserting the strip and the Meter has turne...

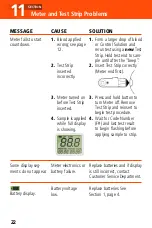
Page 26: ...Replace batteries and if display is still incorrect contact Customer Service Department Battery display Battery voltage low Replace batteries See Section 1 page 4 1 Form a larger drop of blood or Cont...

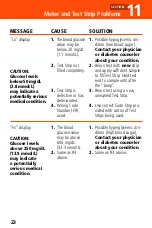
Page 27: ...cian or diabetes counselor about your condition 2 Rerun test with new strip and apply sufficient sample to fill Test Strip Hold test end to sample until after the beep 3 Rerun test using a new unexpir...

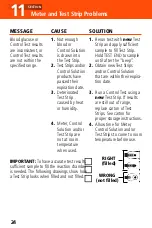
Page 28: ...Rerun test with new Test Strip and apply sufficient sample to fill Test Strip Hold TEST END to sample until after the beep 2 Obtain new Test Strips and or Control Solution that are within their expir...

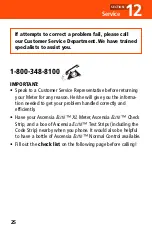
Page 29: ...iently Have your Ascensia ELITE XL Meter Ascensia ELITE Check Strip and a box of Ascensia ELITE Test Strips including the Code Strip nearby when you phone It would also be helpful to have a bottle of...

Page 30: ...Range listed on the end flap of the Test Strip carton is _______ to _______ 5 The Code Number being displayed on the Meter is F _________ The Code Number on the Code Strip and on the Test Strip foil...

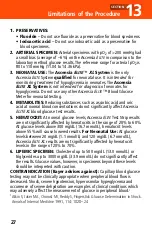
Page 31: ...results 5 HEMATOCRIT At normal glucose levels Ascensia ELITE Test Strip results are not significantly affected by hematocrits in the range of 20 to 60 At glucose levels above 300 mg dL 16 7 mmol L he...

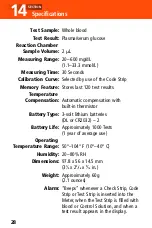
Page 32: ...on Automatic compensation with built in thermistor Battery Type 3 volt lithium batteries DL or CR2032 2 Battery Life Approximately 1000 Tests 1 year of average use Operating Temperature Range 50 104 F...

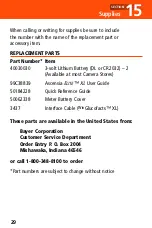
Page 33: ...DL or CR2032 2 Available at most Camera Stores 99C38839 Ascensia ELITE XL User Guide 50184228 Quick Reference Guide 50062338 Meter Battery Cover 3437 Interface Cable WinGlucofacts XL These parts are...

Page 34: ...E Test Strips 50 s 3942A Ascensia ELITE Test Strips 100 s 3940A Ascensia ELITE Low and High Controls 3972A Ascensia ELITE Normal Control 3416 MICROLETVaculance Lancing Device 6540B MICROLET Adjustable...

Page 35: ...function or are damaged due to abuse accidents alteration mis use neglect maintenance by other than Bayer or failure to operate the instrument in accordance with instructions Further Bayer assumes no...

Page 36: ...sion may not apply to you This warranty gives you specific legal rights and you may also have other rights which vary from state to state For warranty service Purchaser must contact the Customer Servi...

Reviews: